You have the threads, the hoops, and the desire to create something beautiful for your walls. But perhaps you feel that your finished pieces are missing a certain something—a touch of polish, a sense of intention that transforms them from simple projects into true works of art.
The secret isn’t in mastering dozens of complex stitches. Instead, it lies in learning to think like a designer, making small, deliberate choices about texture, color, and composition. It’s about understanding that the direction of a single stitch can mimic the texture of fur, or that using one fewer strand of thread can create a delicate, painterly effect.
These ideas are your invitation to move beyond just following a pattern. Use them as a starting point to explore new techniques, build your confidence, and stitch pieces that don’t just decorate your bedroom, but fill it with your unique creative voice. Your walls are waiting.
1. Thread Paint a Statement Botanical
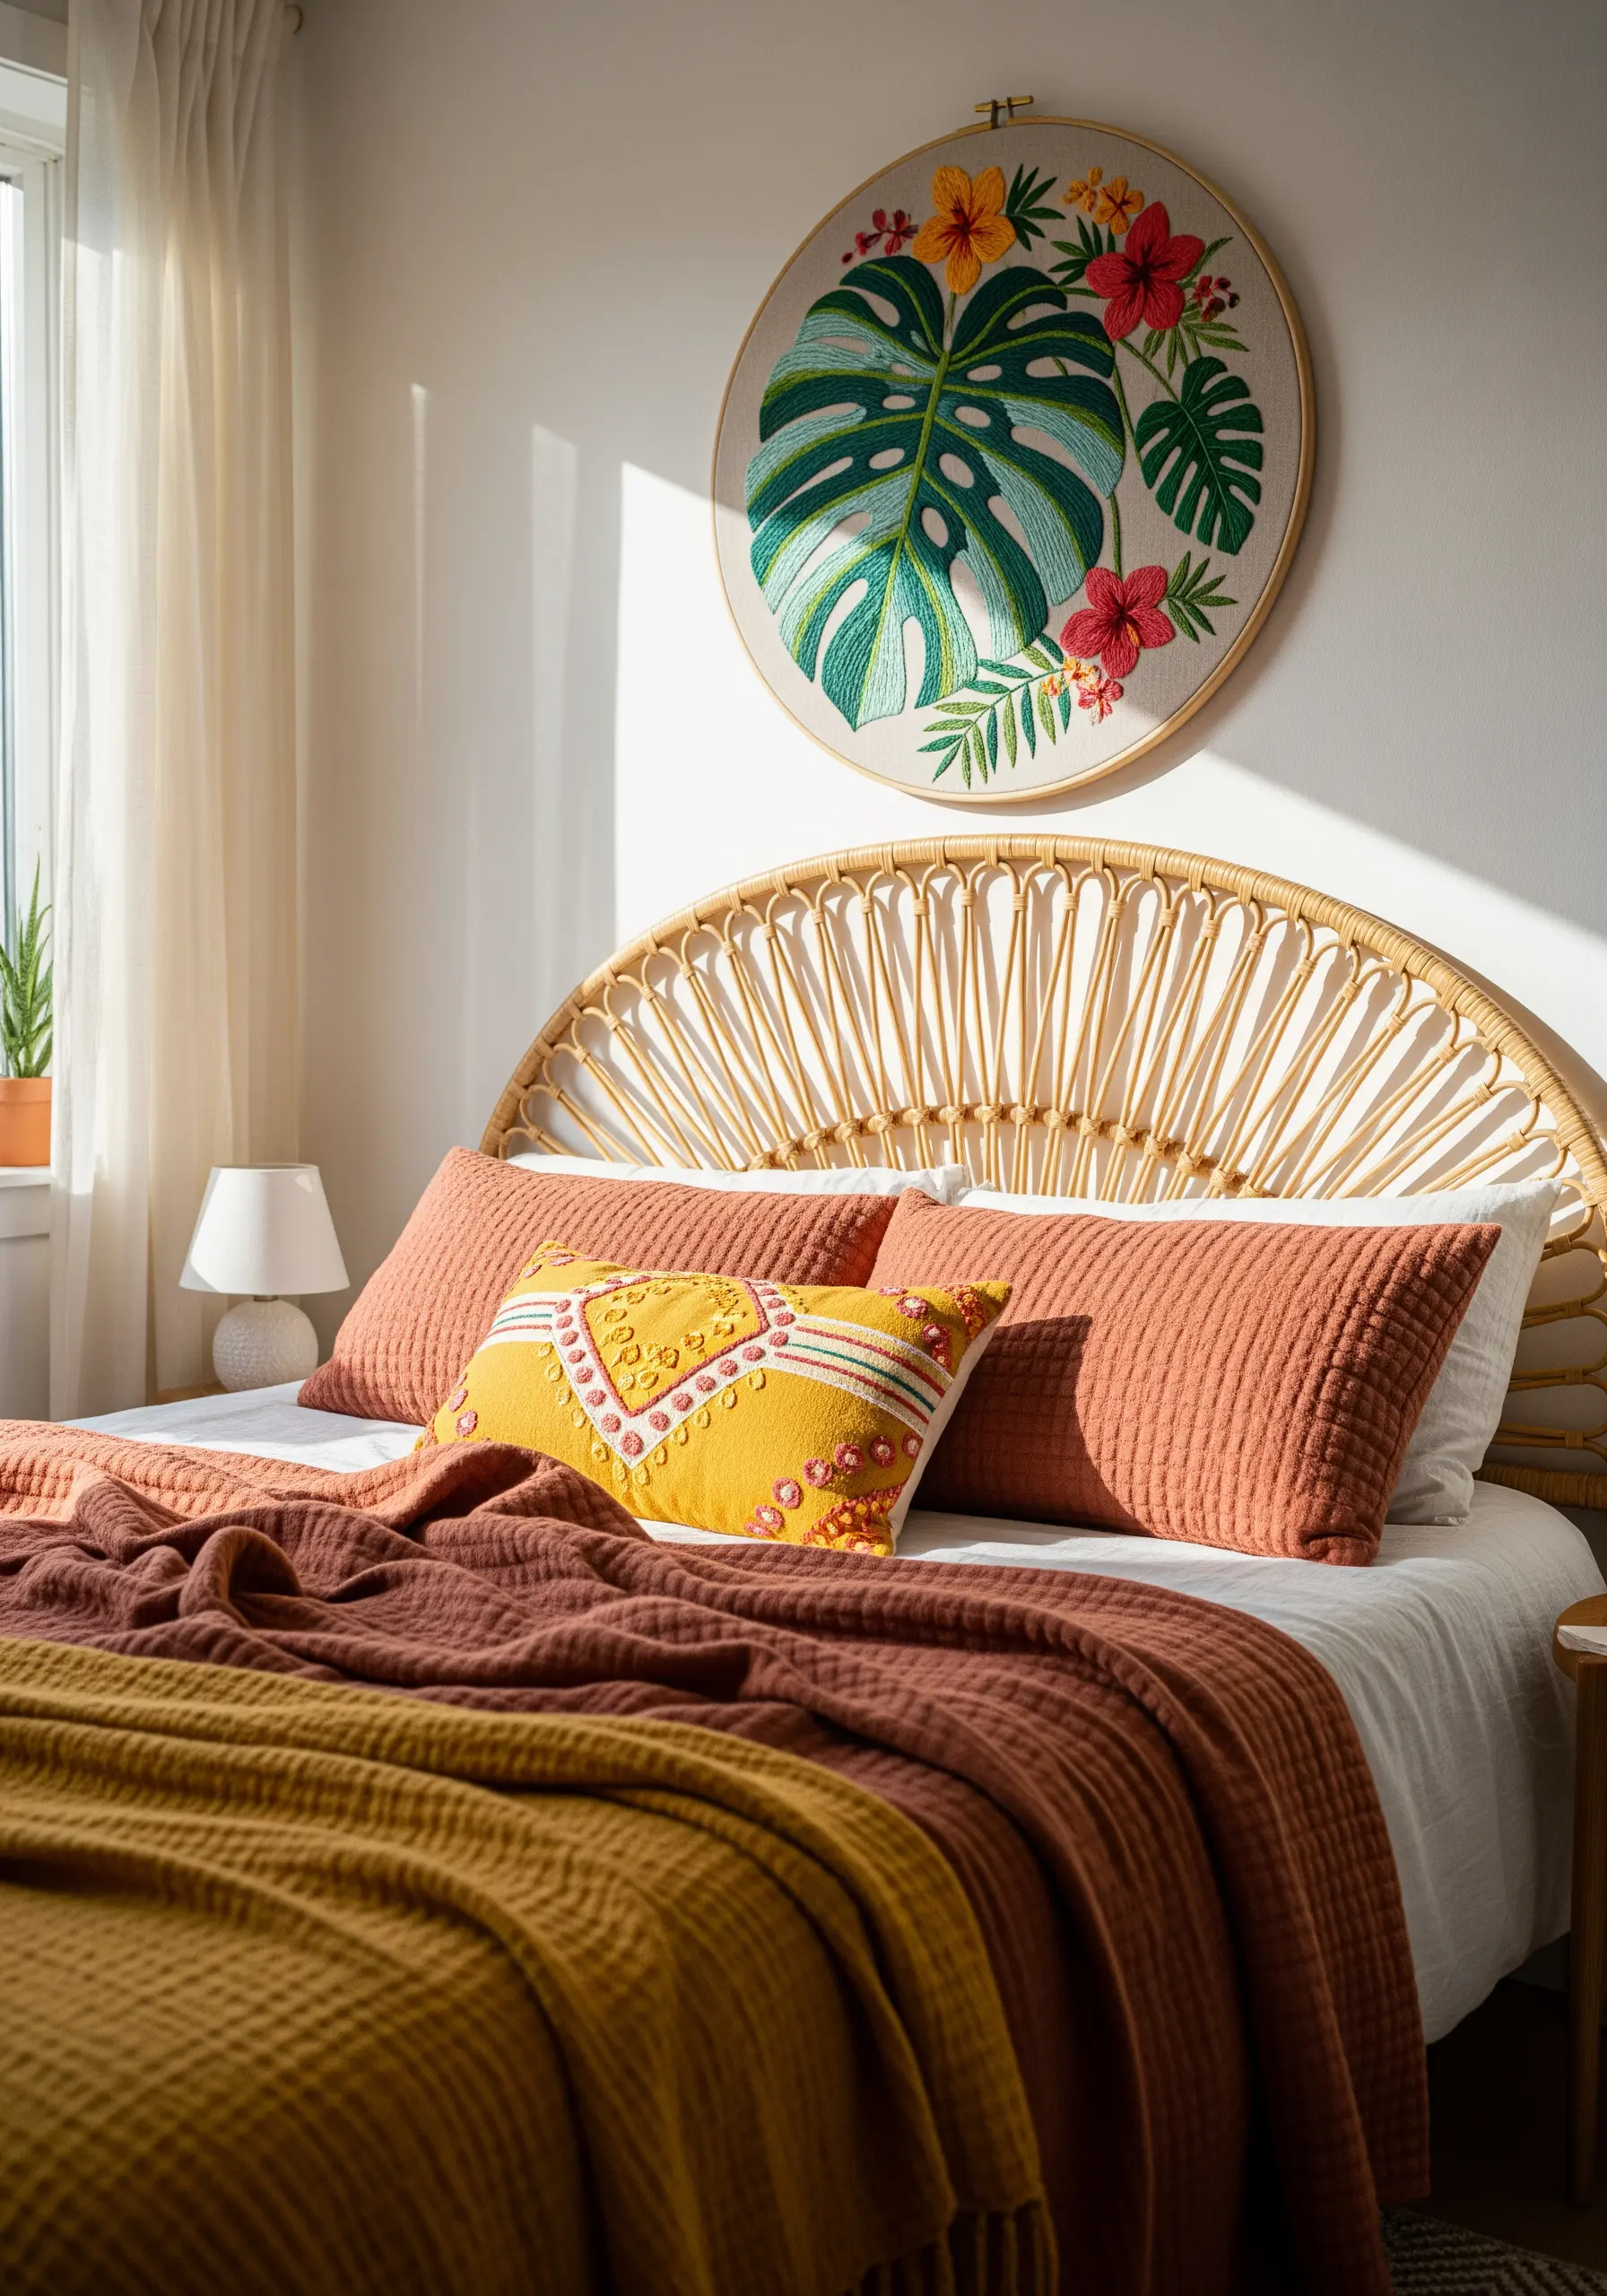
To achieve the rich, blended look of this monstera leaf, use a long-and-short stitch, also known as thread painting.
Work with three to four shades of green, starting with the darkest tone and gradually introducing lighter ones to mimic how light hits the leaf’s surface.
Vary the direction of your stitches to follow the natural curve of the leaf and its veins, which adds realism and movement.
For the hibiscus flowers, use a smooth satin stitch for the petals and dense French knots for the center, creating a beautiful textural contrast against the foliage.
Choosing a large hoop (12 inches or more) transforms your work from a simple craft into a significant piece of botanical stitch art.
2. Master Minimalist Lines with Precision
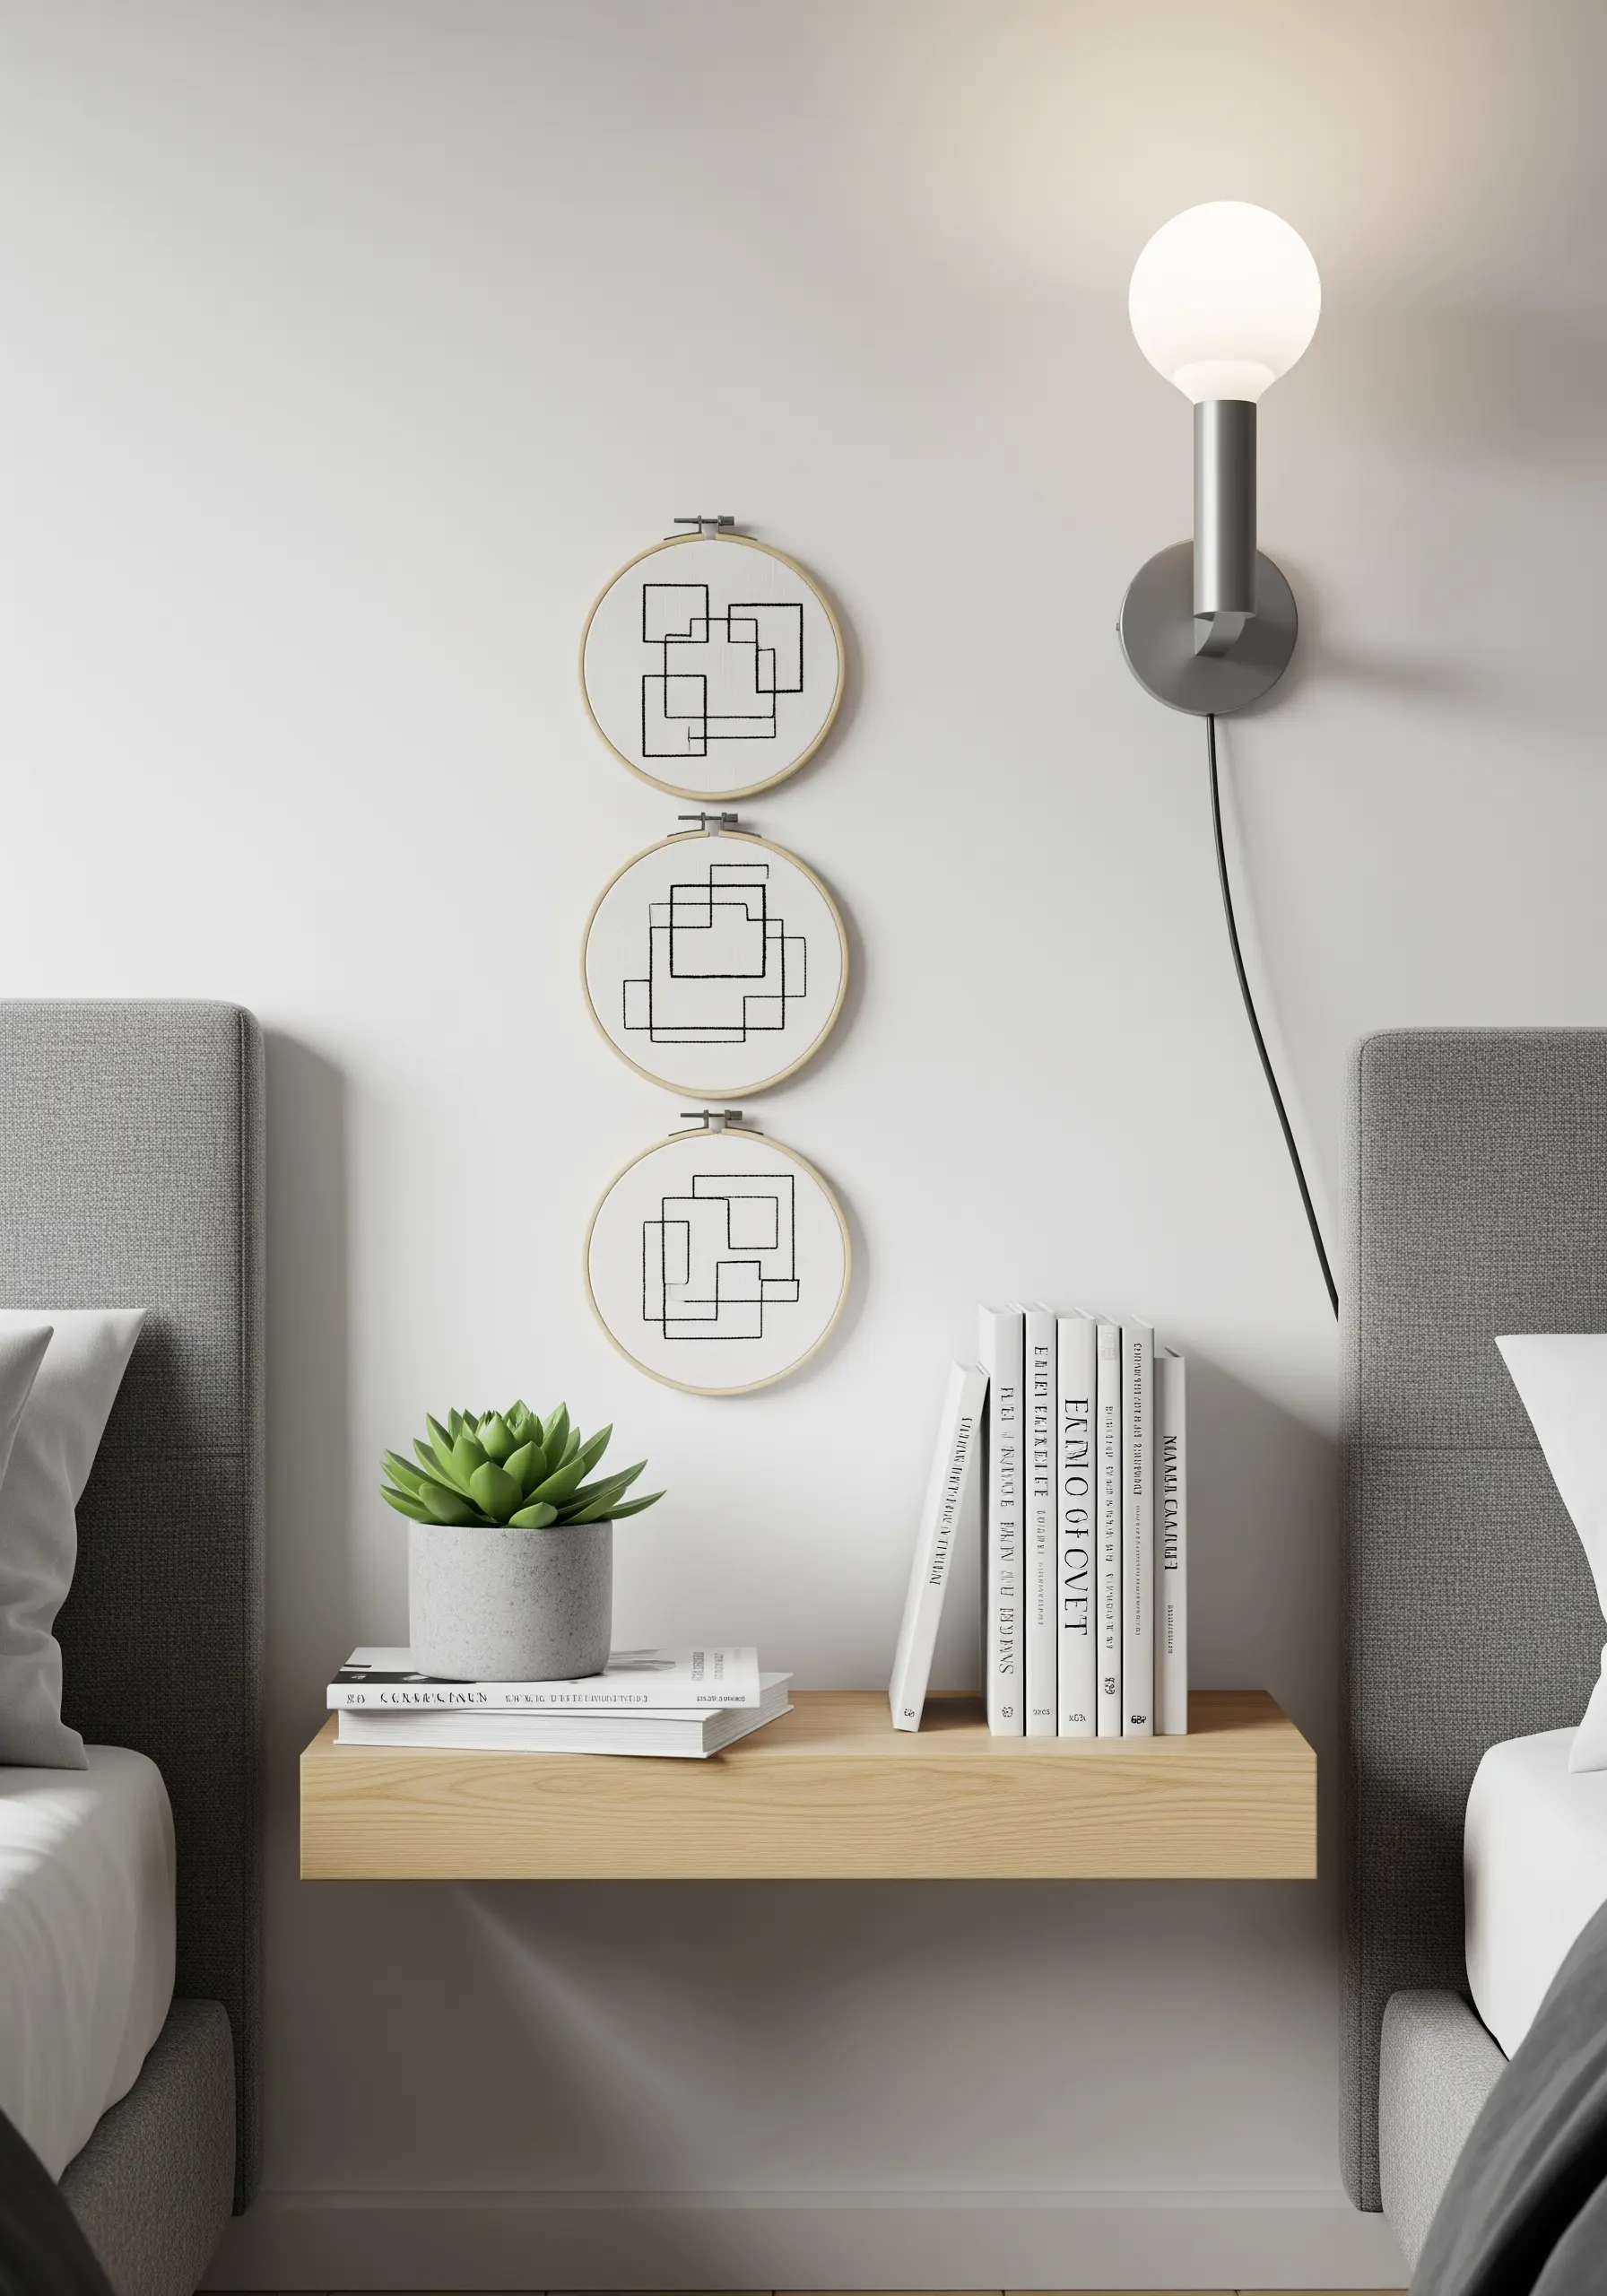
This design’s power lies in its clean, flawless lines, best achieved with a crisp backstitch or split stitch.
To ensure your geometric shapes are perfectly sharp, draw your pattern onto the fabric first using a ruler and a water-soluble pen.
Use only one or two strands of black floss for a delicate, architectural look that emphasizes the composition.
Remember that the negative space is just as important as the stitched lines; it’s this balance that gives minimal embroidery wall pieces their sophisticated feel.
3. Curate a Woodland Creature Hoop Collection
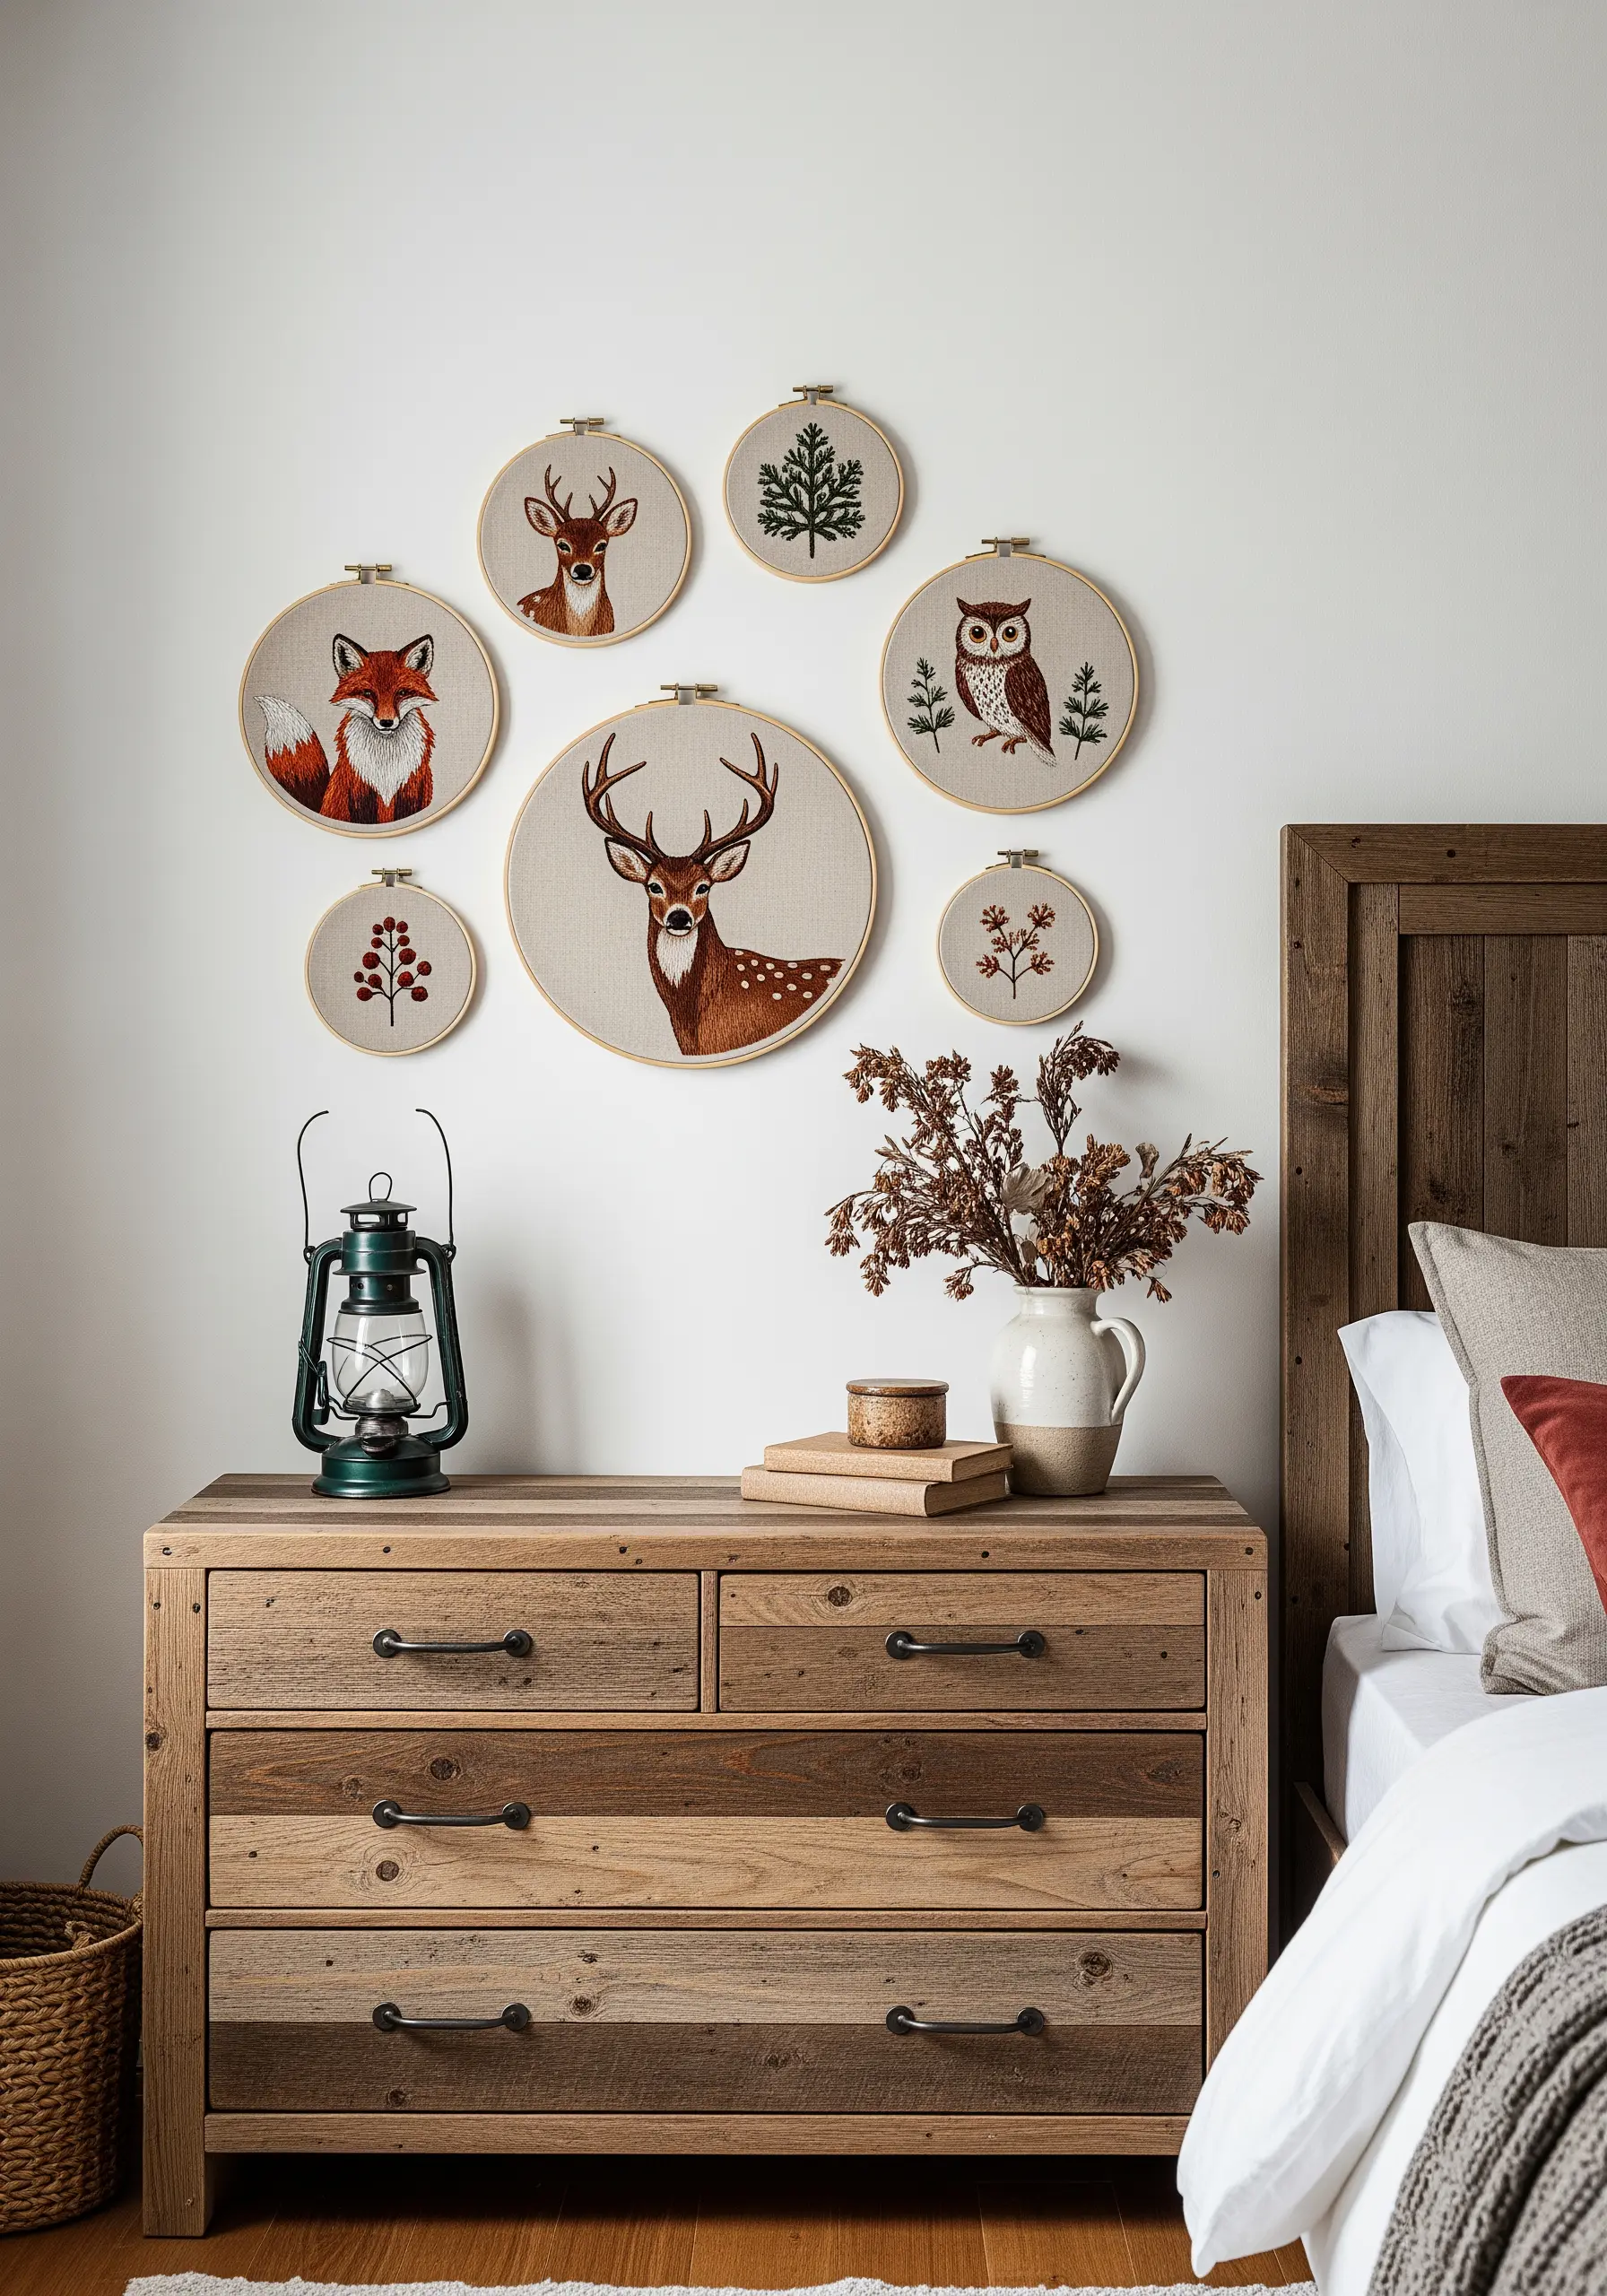
To create a cohesive gallery wall, use the same neutral linen or cotton fabric for each animal portrait.
Varying the hoop sizes adds rhythm and visual interest to the arrangement, preventing it from looking too uniform.
For realistic fur, use single-strand thread painting—short, directional stitches that mimic the texture and growth pattern of fur.
Blend several complementary shades of brown, rust, and grey to give each of these adorable forest animal embroidery ideas lifelike depth and dimension.
4. Craft a Dreamy Celestial Mobile
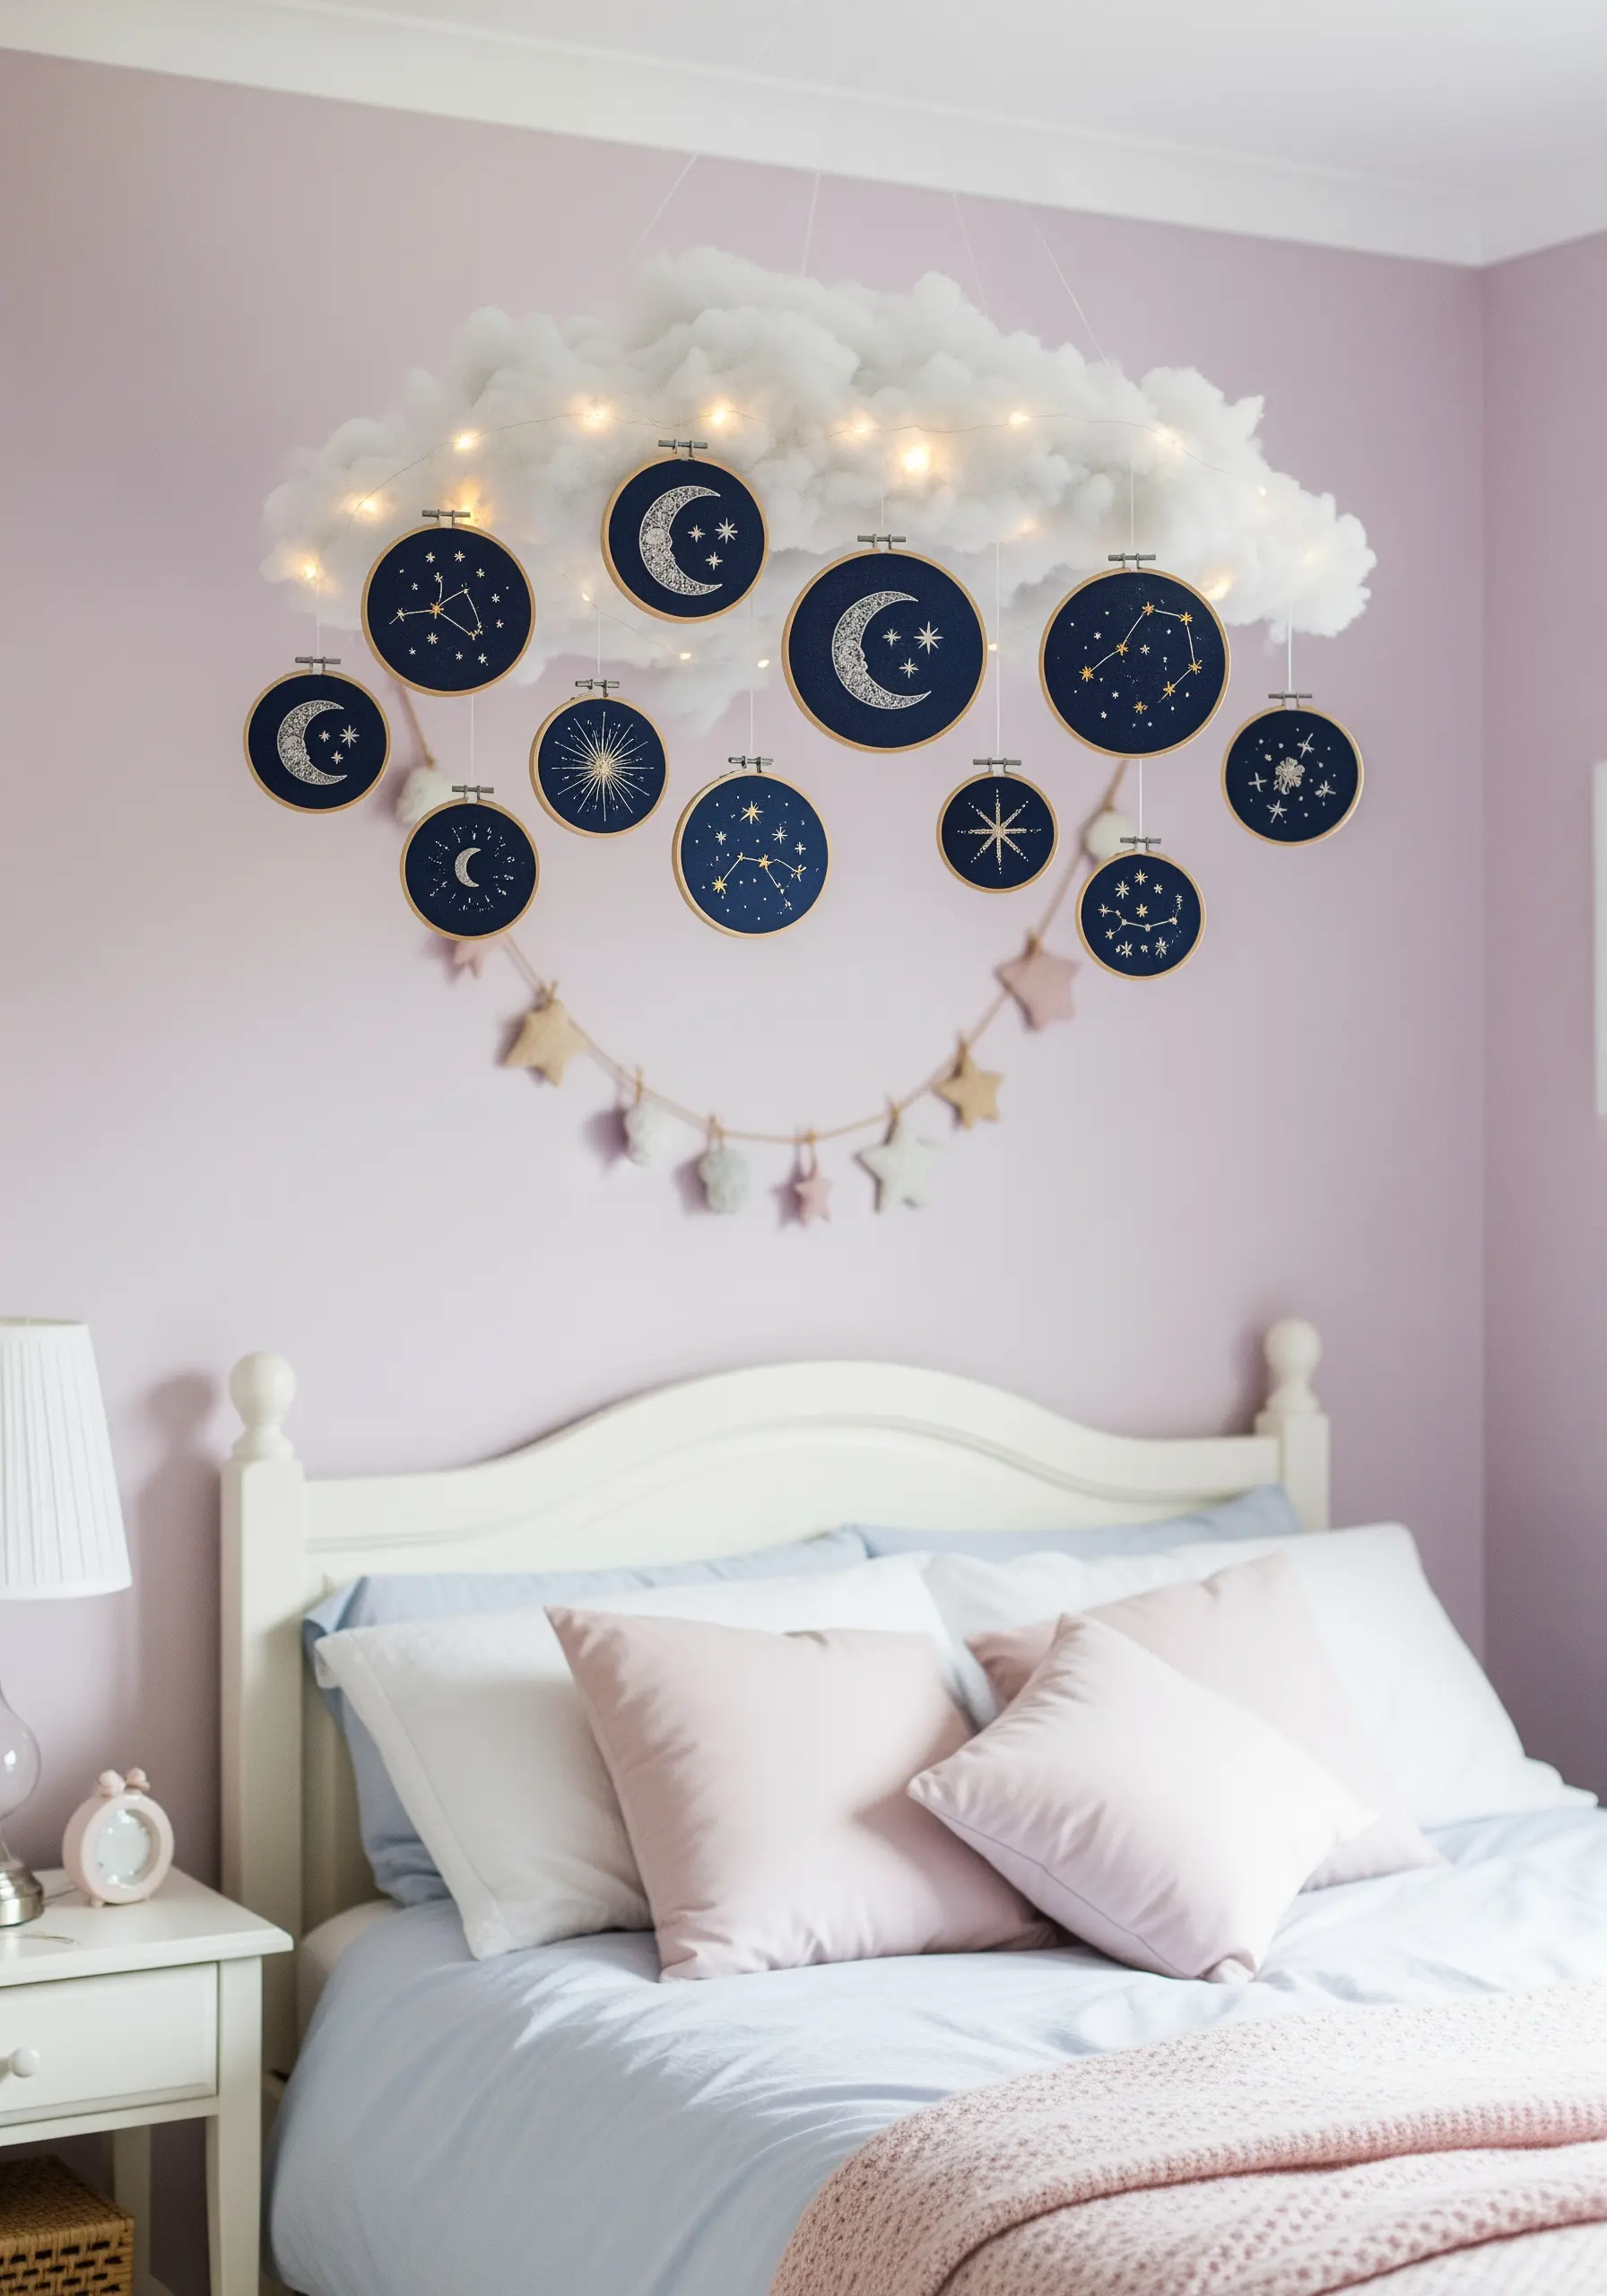
Transform your embroidery into a multi-dimensional installation by combining it with other materials.
Stitch your constellations on dark navy fabric using metallic silver or gold thread to make them shimmer; simple straight stitches and French knots are all you need.
To construct the cloud, wrap polyester batting around a sturdy wire frame, securing it with hot glue or thread.
Suspend the hoops from the cloud with an invisible fishing line to create the illusion that they are floating, turning your moon and stars embroidery ideas into a magical mobile.
5. Embrace Bold Texture with Punch Needle
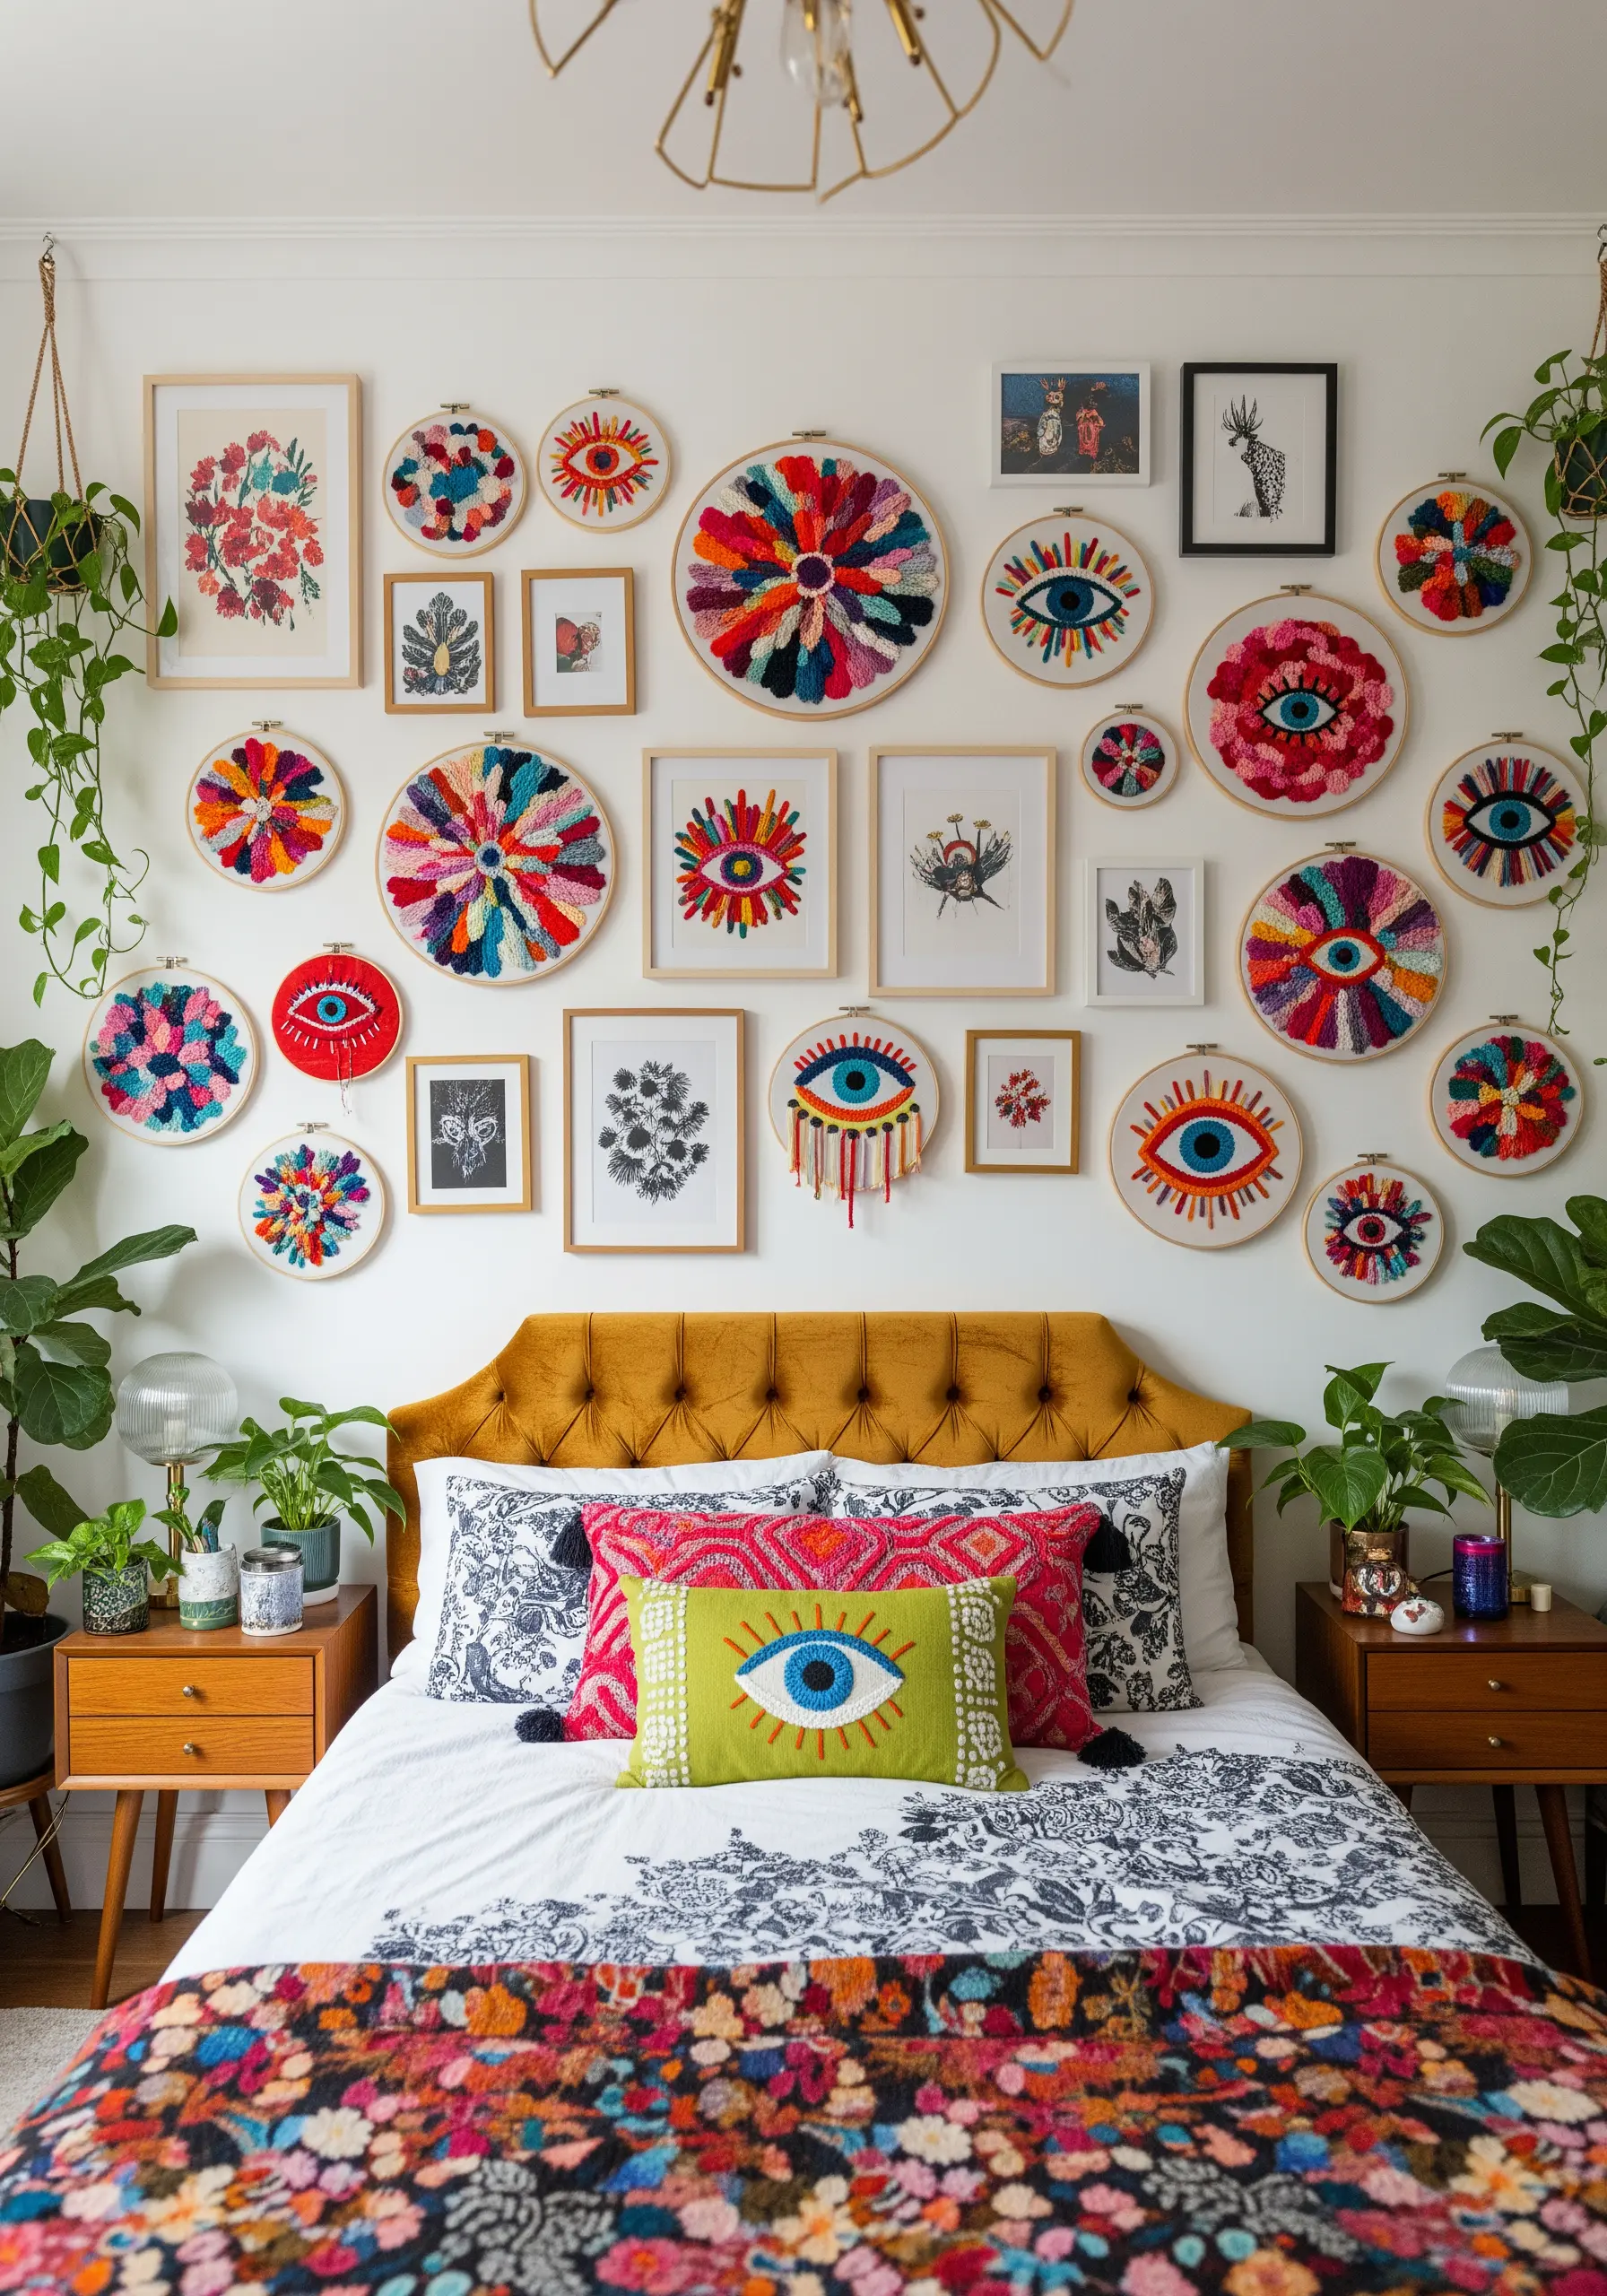
This vibrant, maximalist wall celebrates bold texture and color, which you can achieve efficiently with punch needle embroidery.
The technique creates plush, looped textures that fill large areas much faster than traditional stitching, giving you that satisfying, rug-like finish.
Combine different yarn weights and unapologetically bright colors to enhance the eclectic feel.
For fine details like the iris of an eye, switch back to traditional satin stitch to create a focal point amidst the texture of these abstract embroidery patterns.
6. Stitch Delicate Lettering and Botanicals
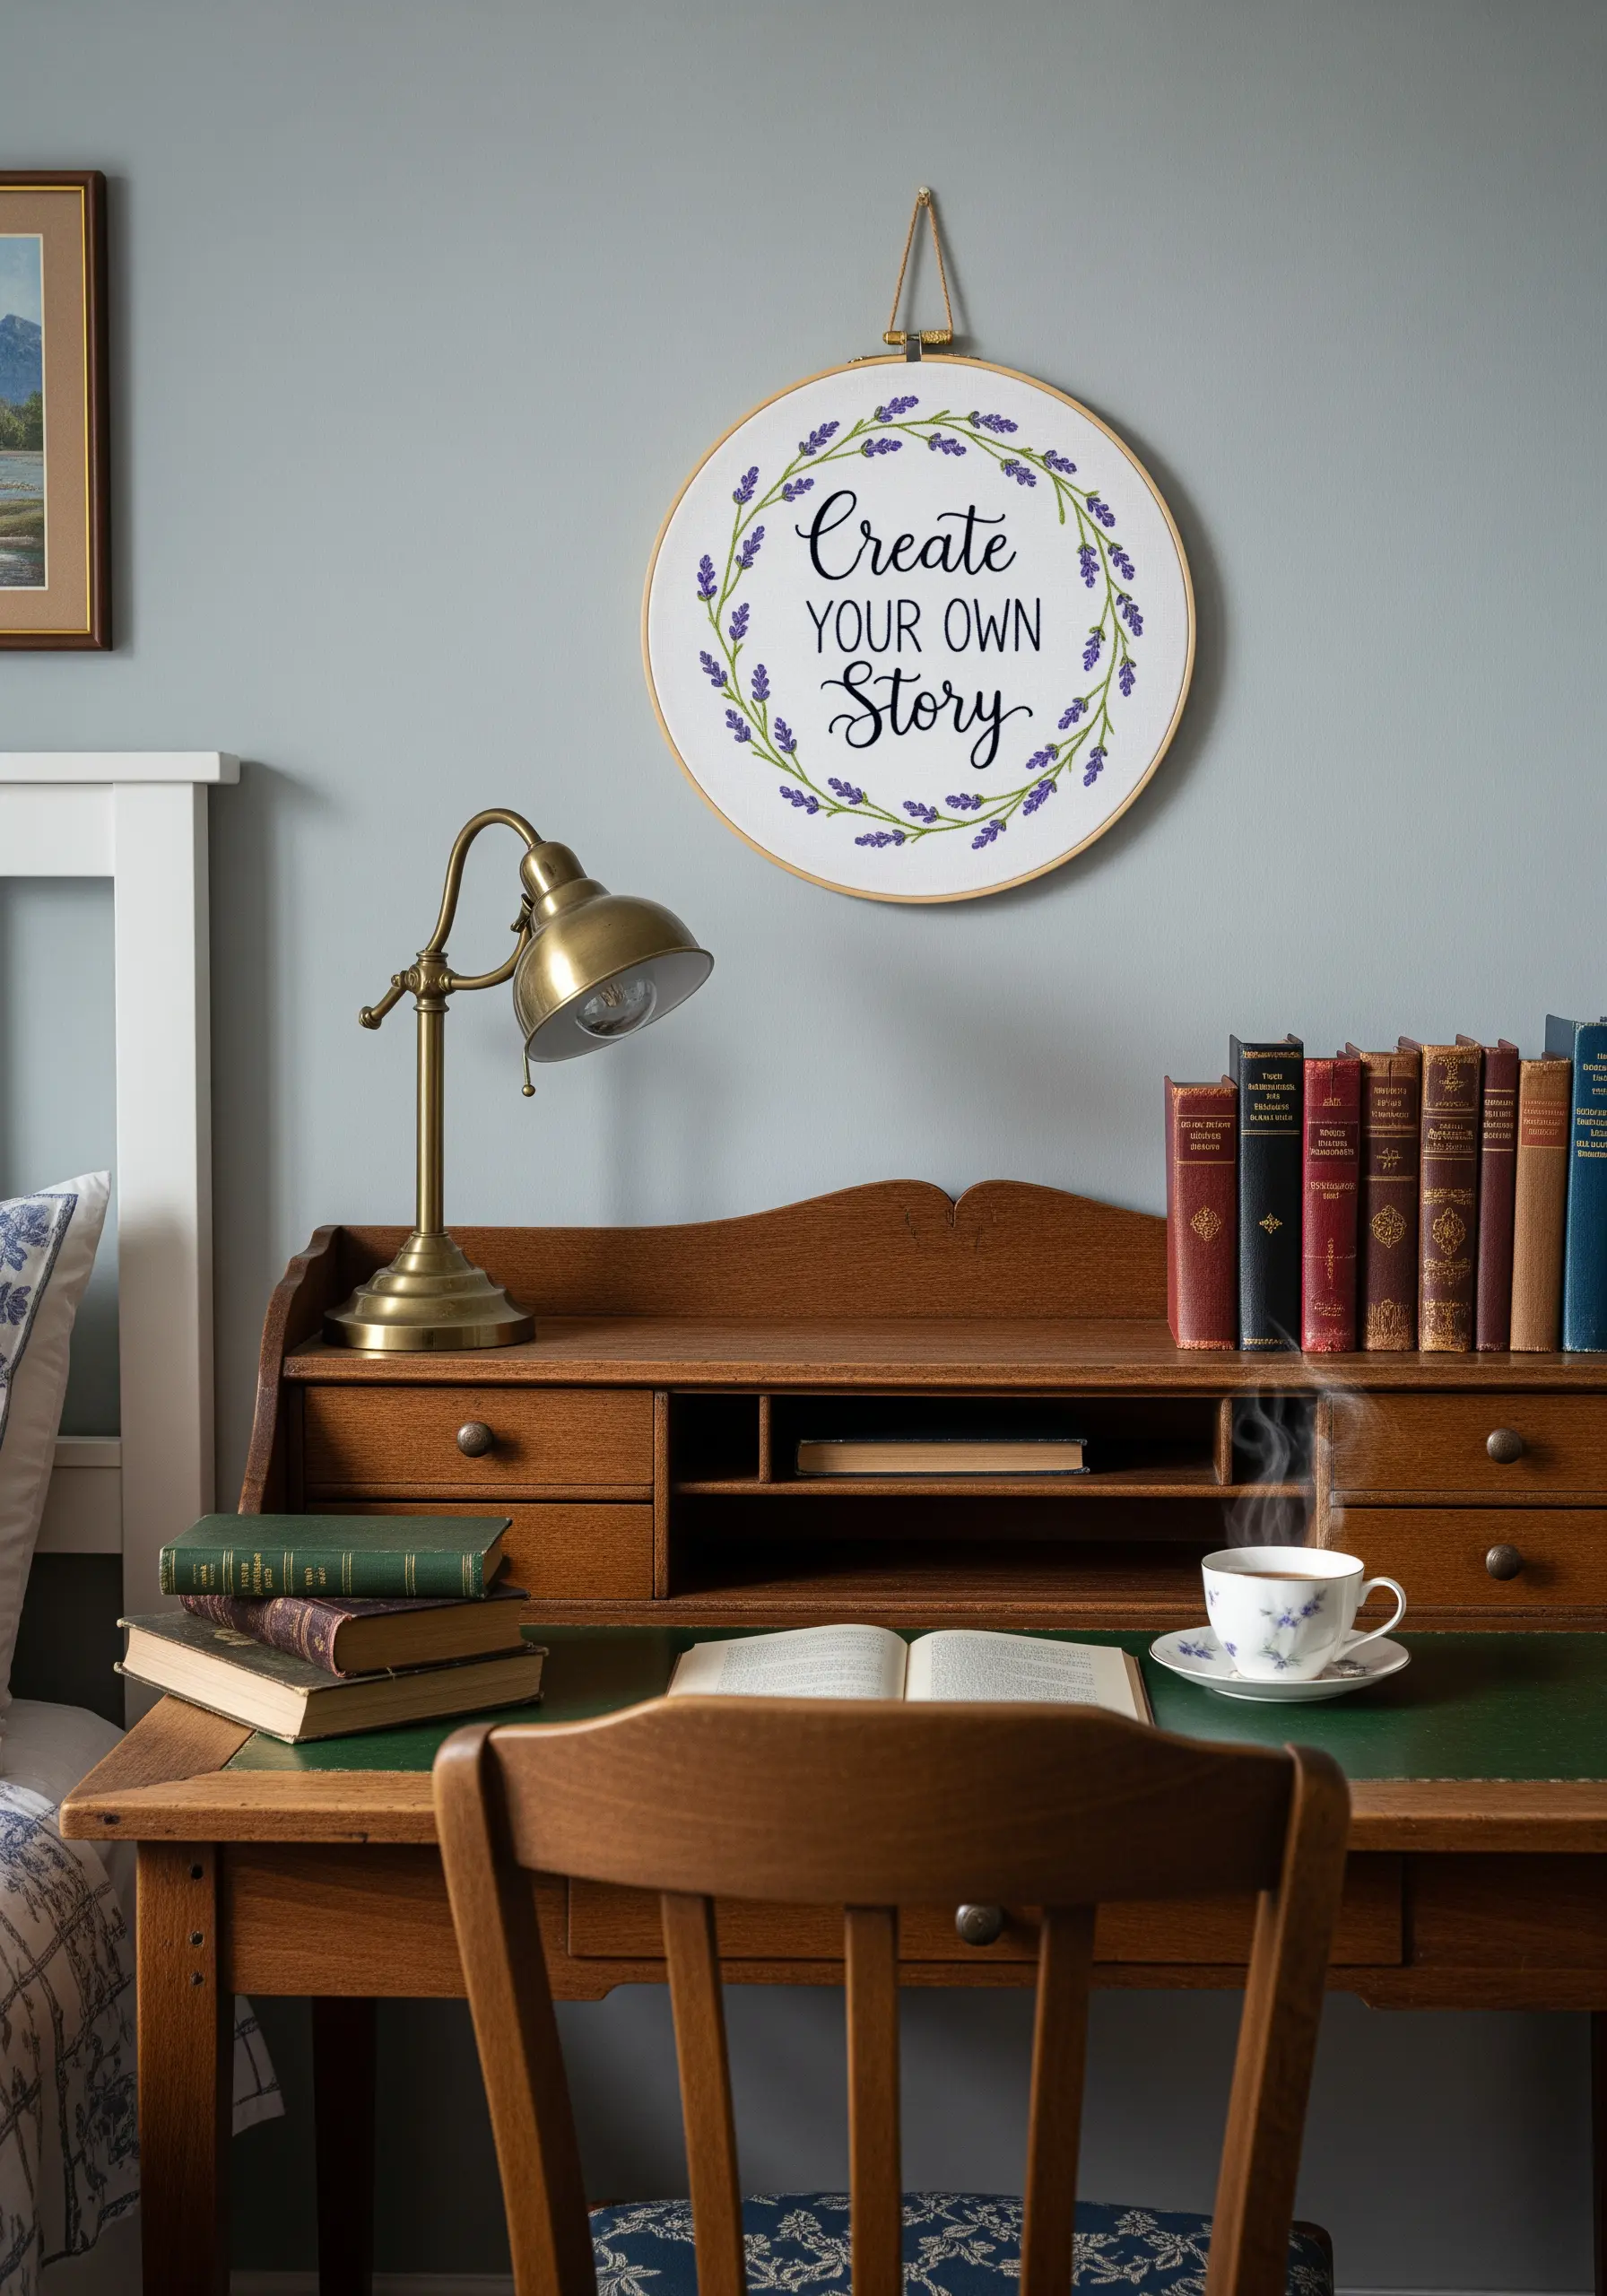
For clean, elegant lettering, a whipped backstitch is your best friend; it covers the individual stitches of a backstitch to create one smooth, uninterrupted line.
Lightly trace your quote onto the fabric with a fine-tipped, heat-erasable pen for a perfect guide.
For the lavender, use detached chain stitches (lazy daisies) for the tiny blossoms and simple straight stitches for the stems, using two or three shades of purple to give the wreath depth.
This is one of those minimal typography quotes that look trending on hoops and adds a personal touch.
7. Preserve Nature on Sheer Fabric
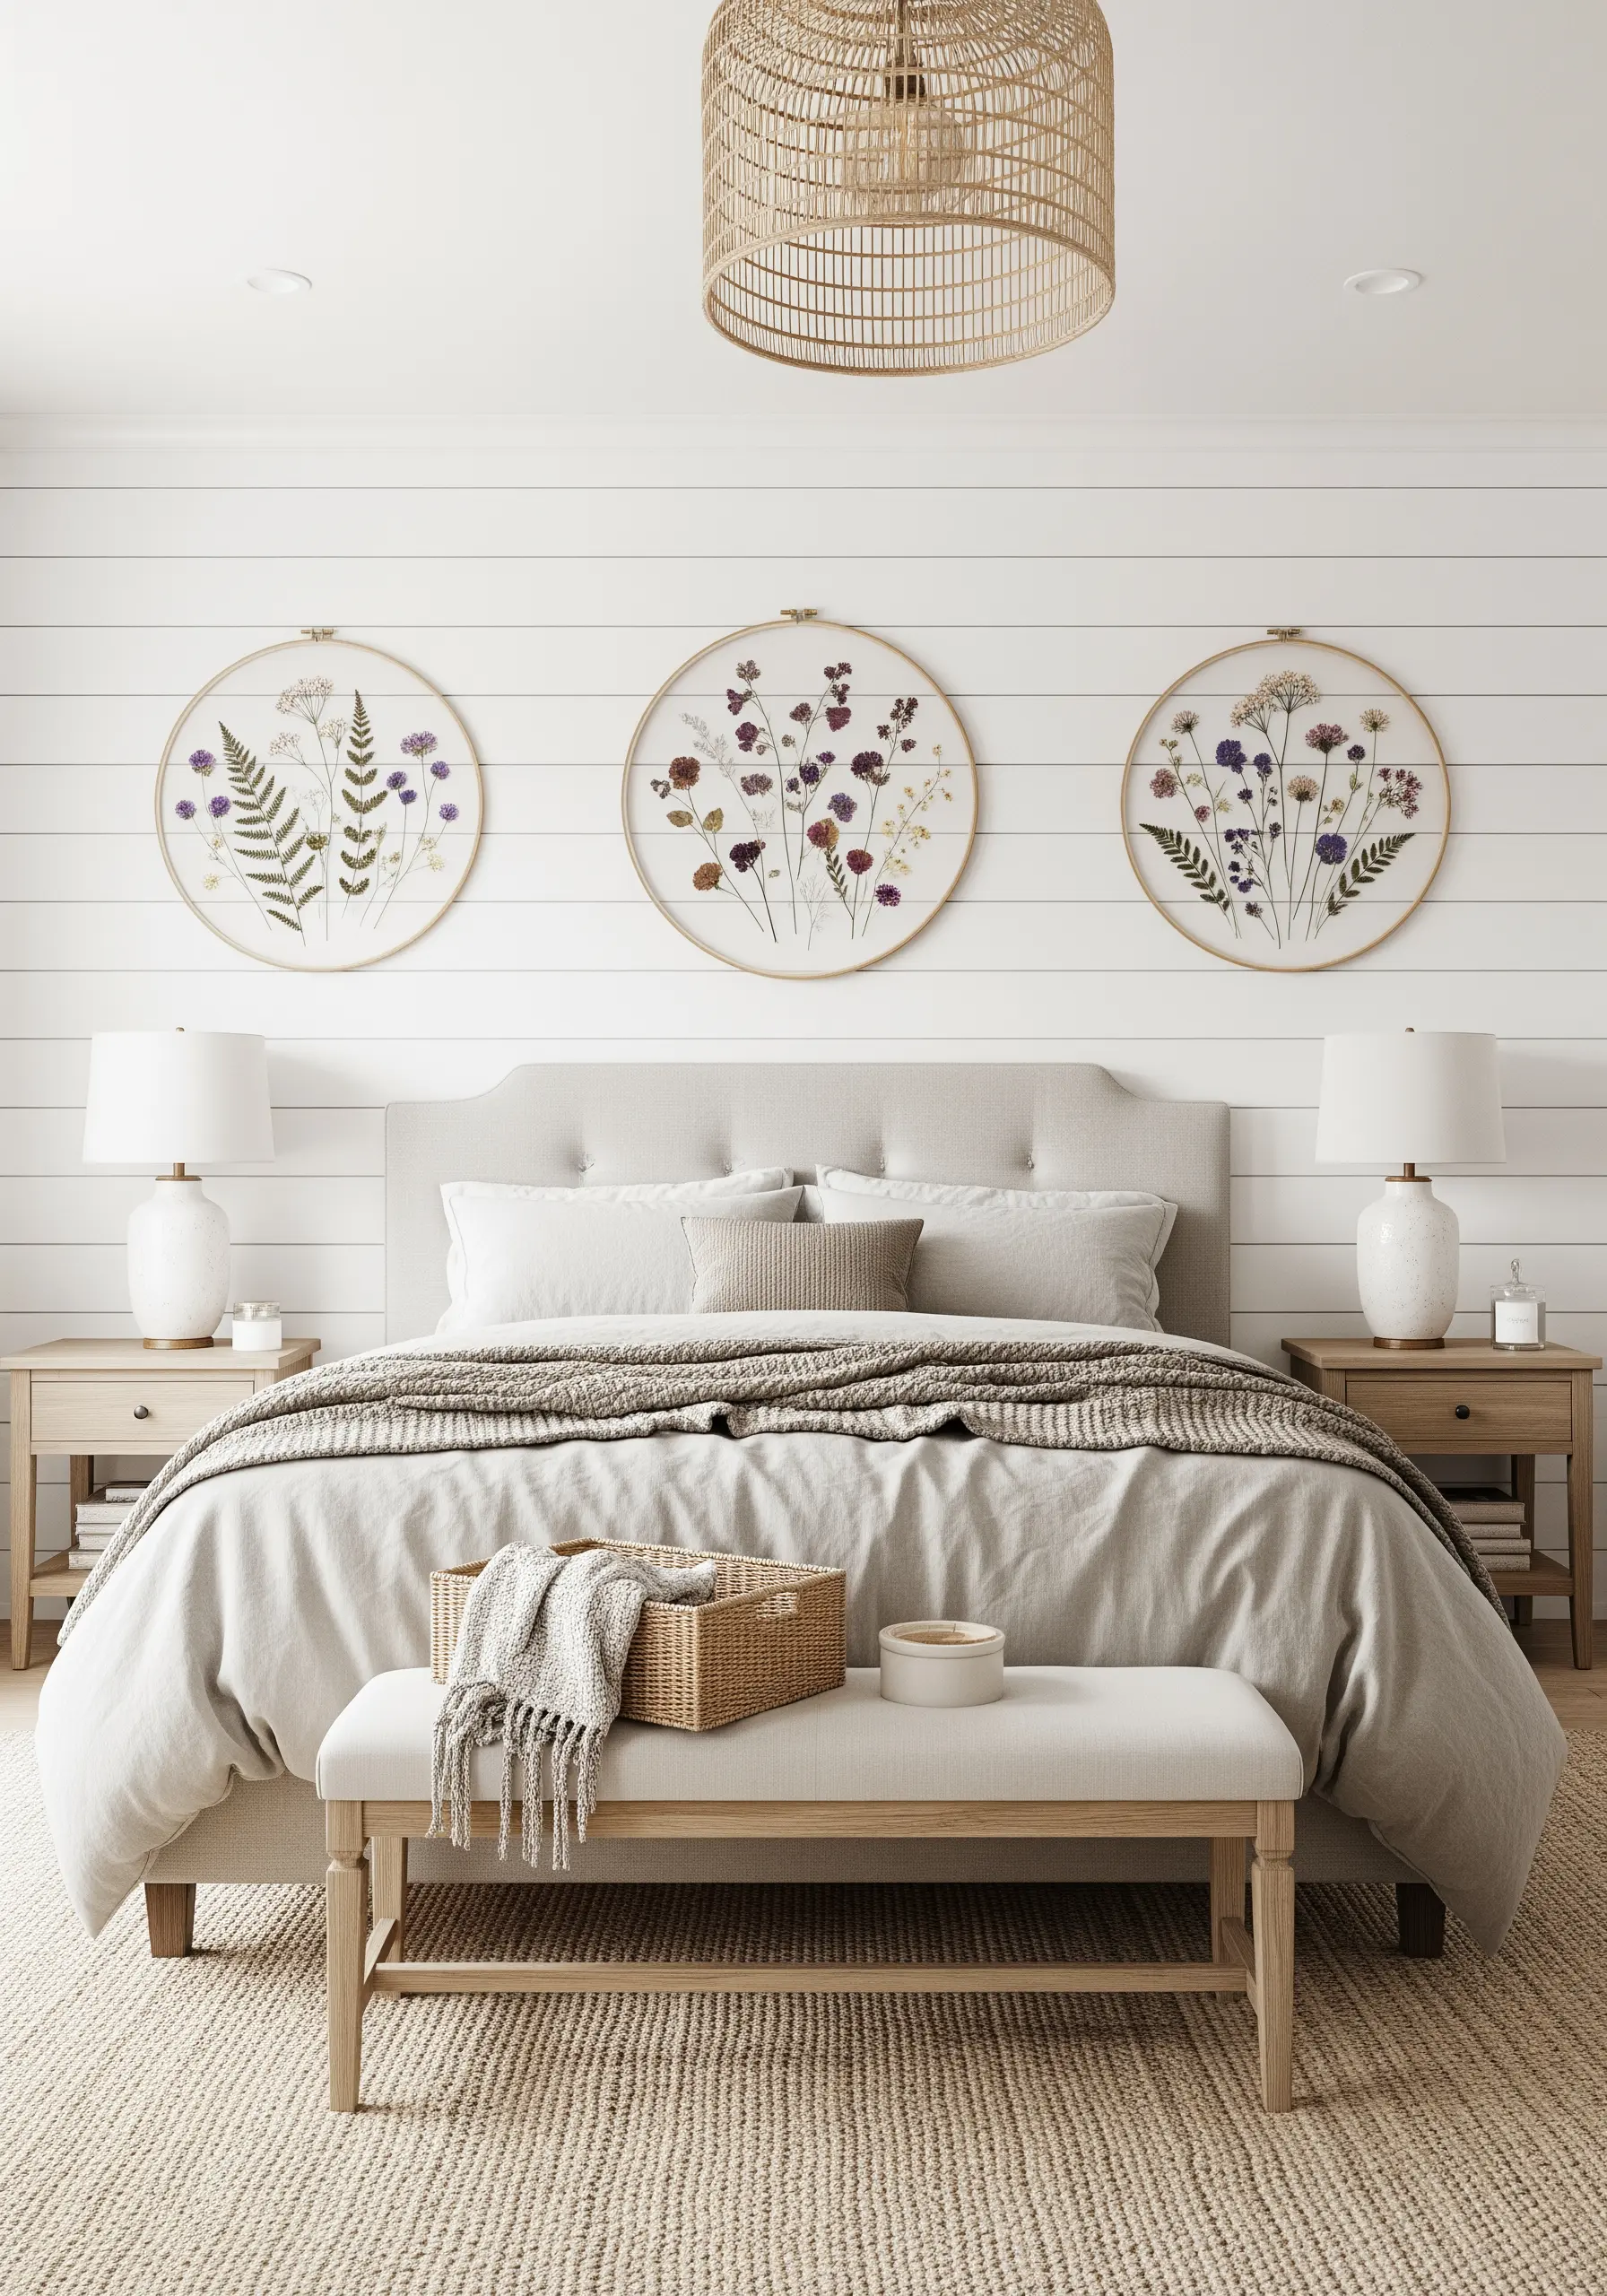
This ethereal style captures real botanicals by sandwiching them between two layers of tulle or organza stretched in a hoop.
Carefully arrange your pressed flowers, then secure them with tiny, almost invisible couching stitches.
Use a single strand of thread that perfectly matches the color of the petal or stem you are securing.
This technique allows the flower’s natural form and color to be the star, turning your embroidery into a delicate piece of preserved nature.
Discover more ways to combine pressed flowers with embroidery for stunning wall art that feels both modern and timeless.
8. Paint a Luminous Landscape with Thread
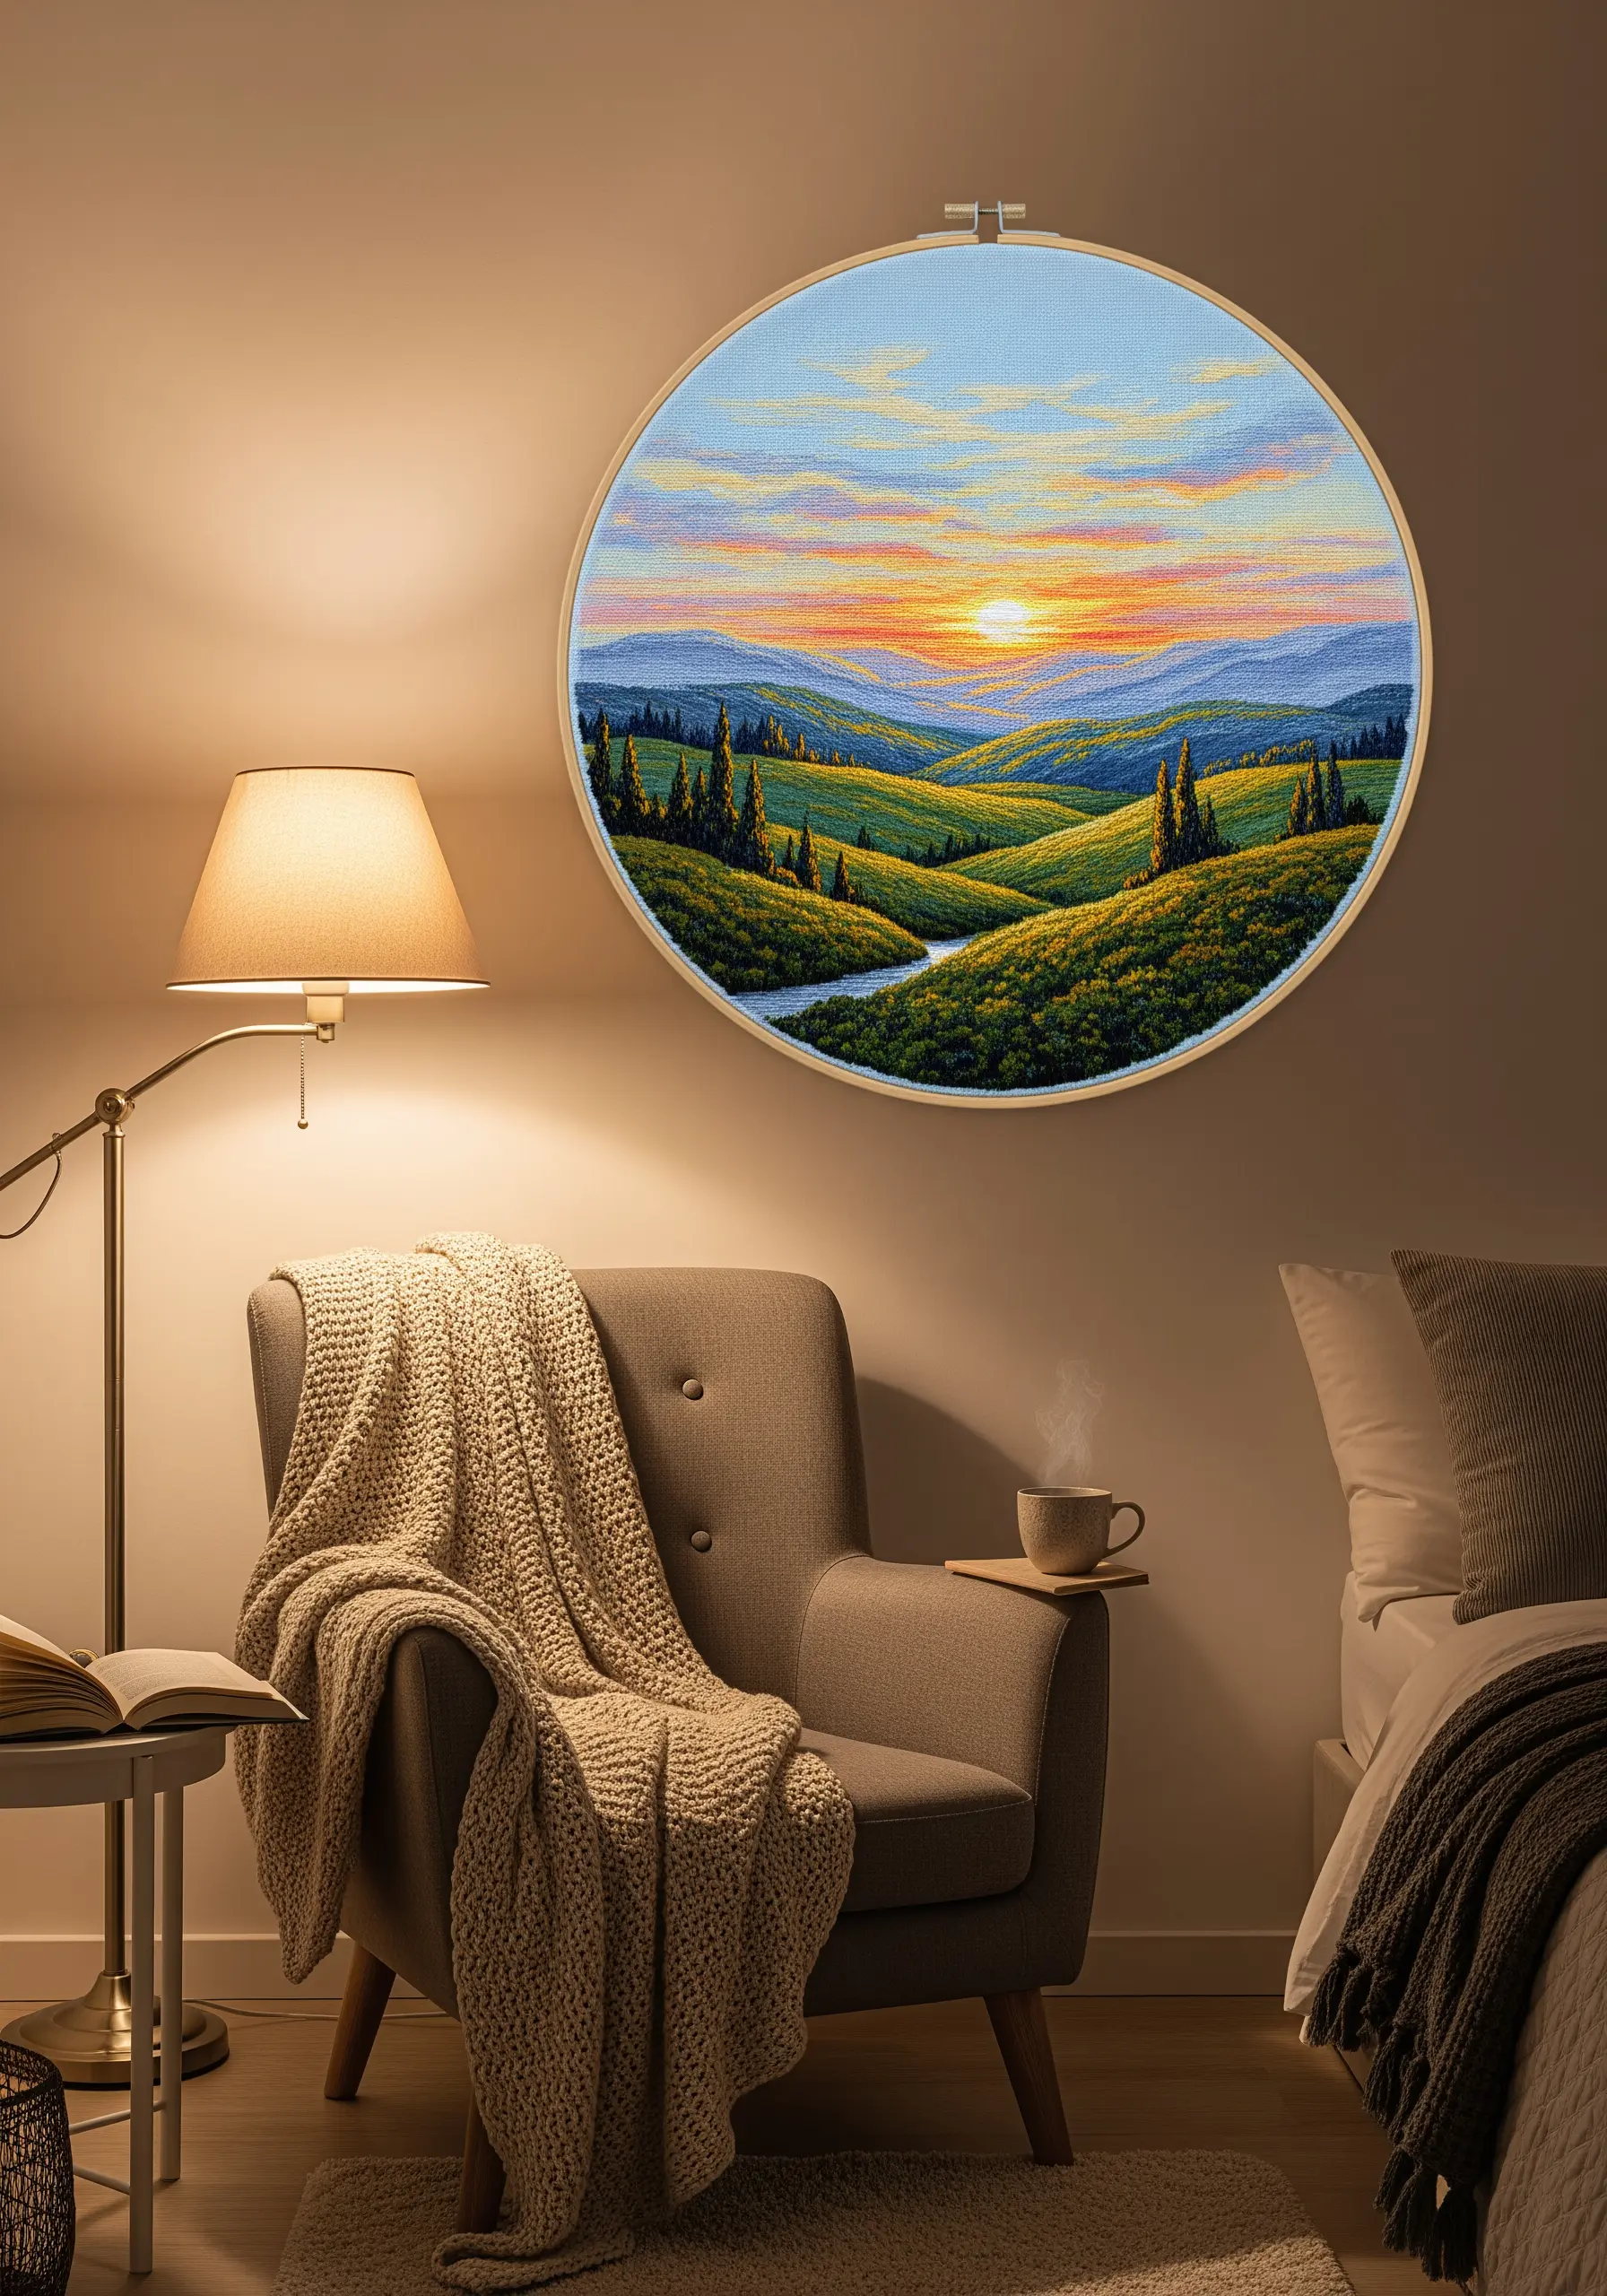
Recreate the soft glow of a sunset by using thread like paint.
The long-and-short stitch is essential here, allowing you to seamlessly blend multiple shades of floss to create smooth color gradients in the sky and hills.
Work with only one or two strands of thread at a time for the most painterly effect.
To create atmospheric perspective, use warmer, saturated colors for the foreground and cooler, muted tones for the distant mountains. This is one of those mountain landscape thread painting techniques that rewards patience with breathtaking results.
9. Design a Serene Coastal Gallery
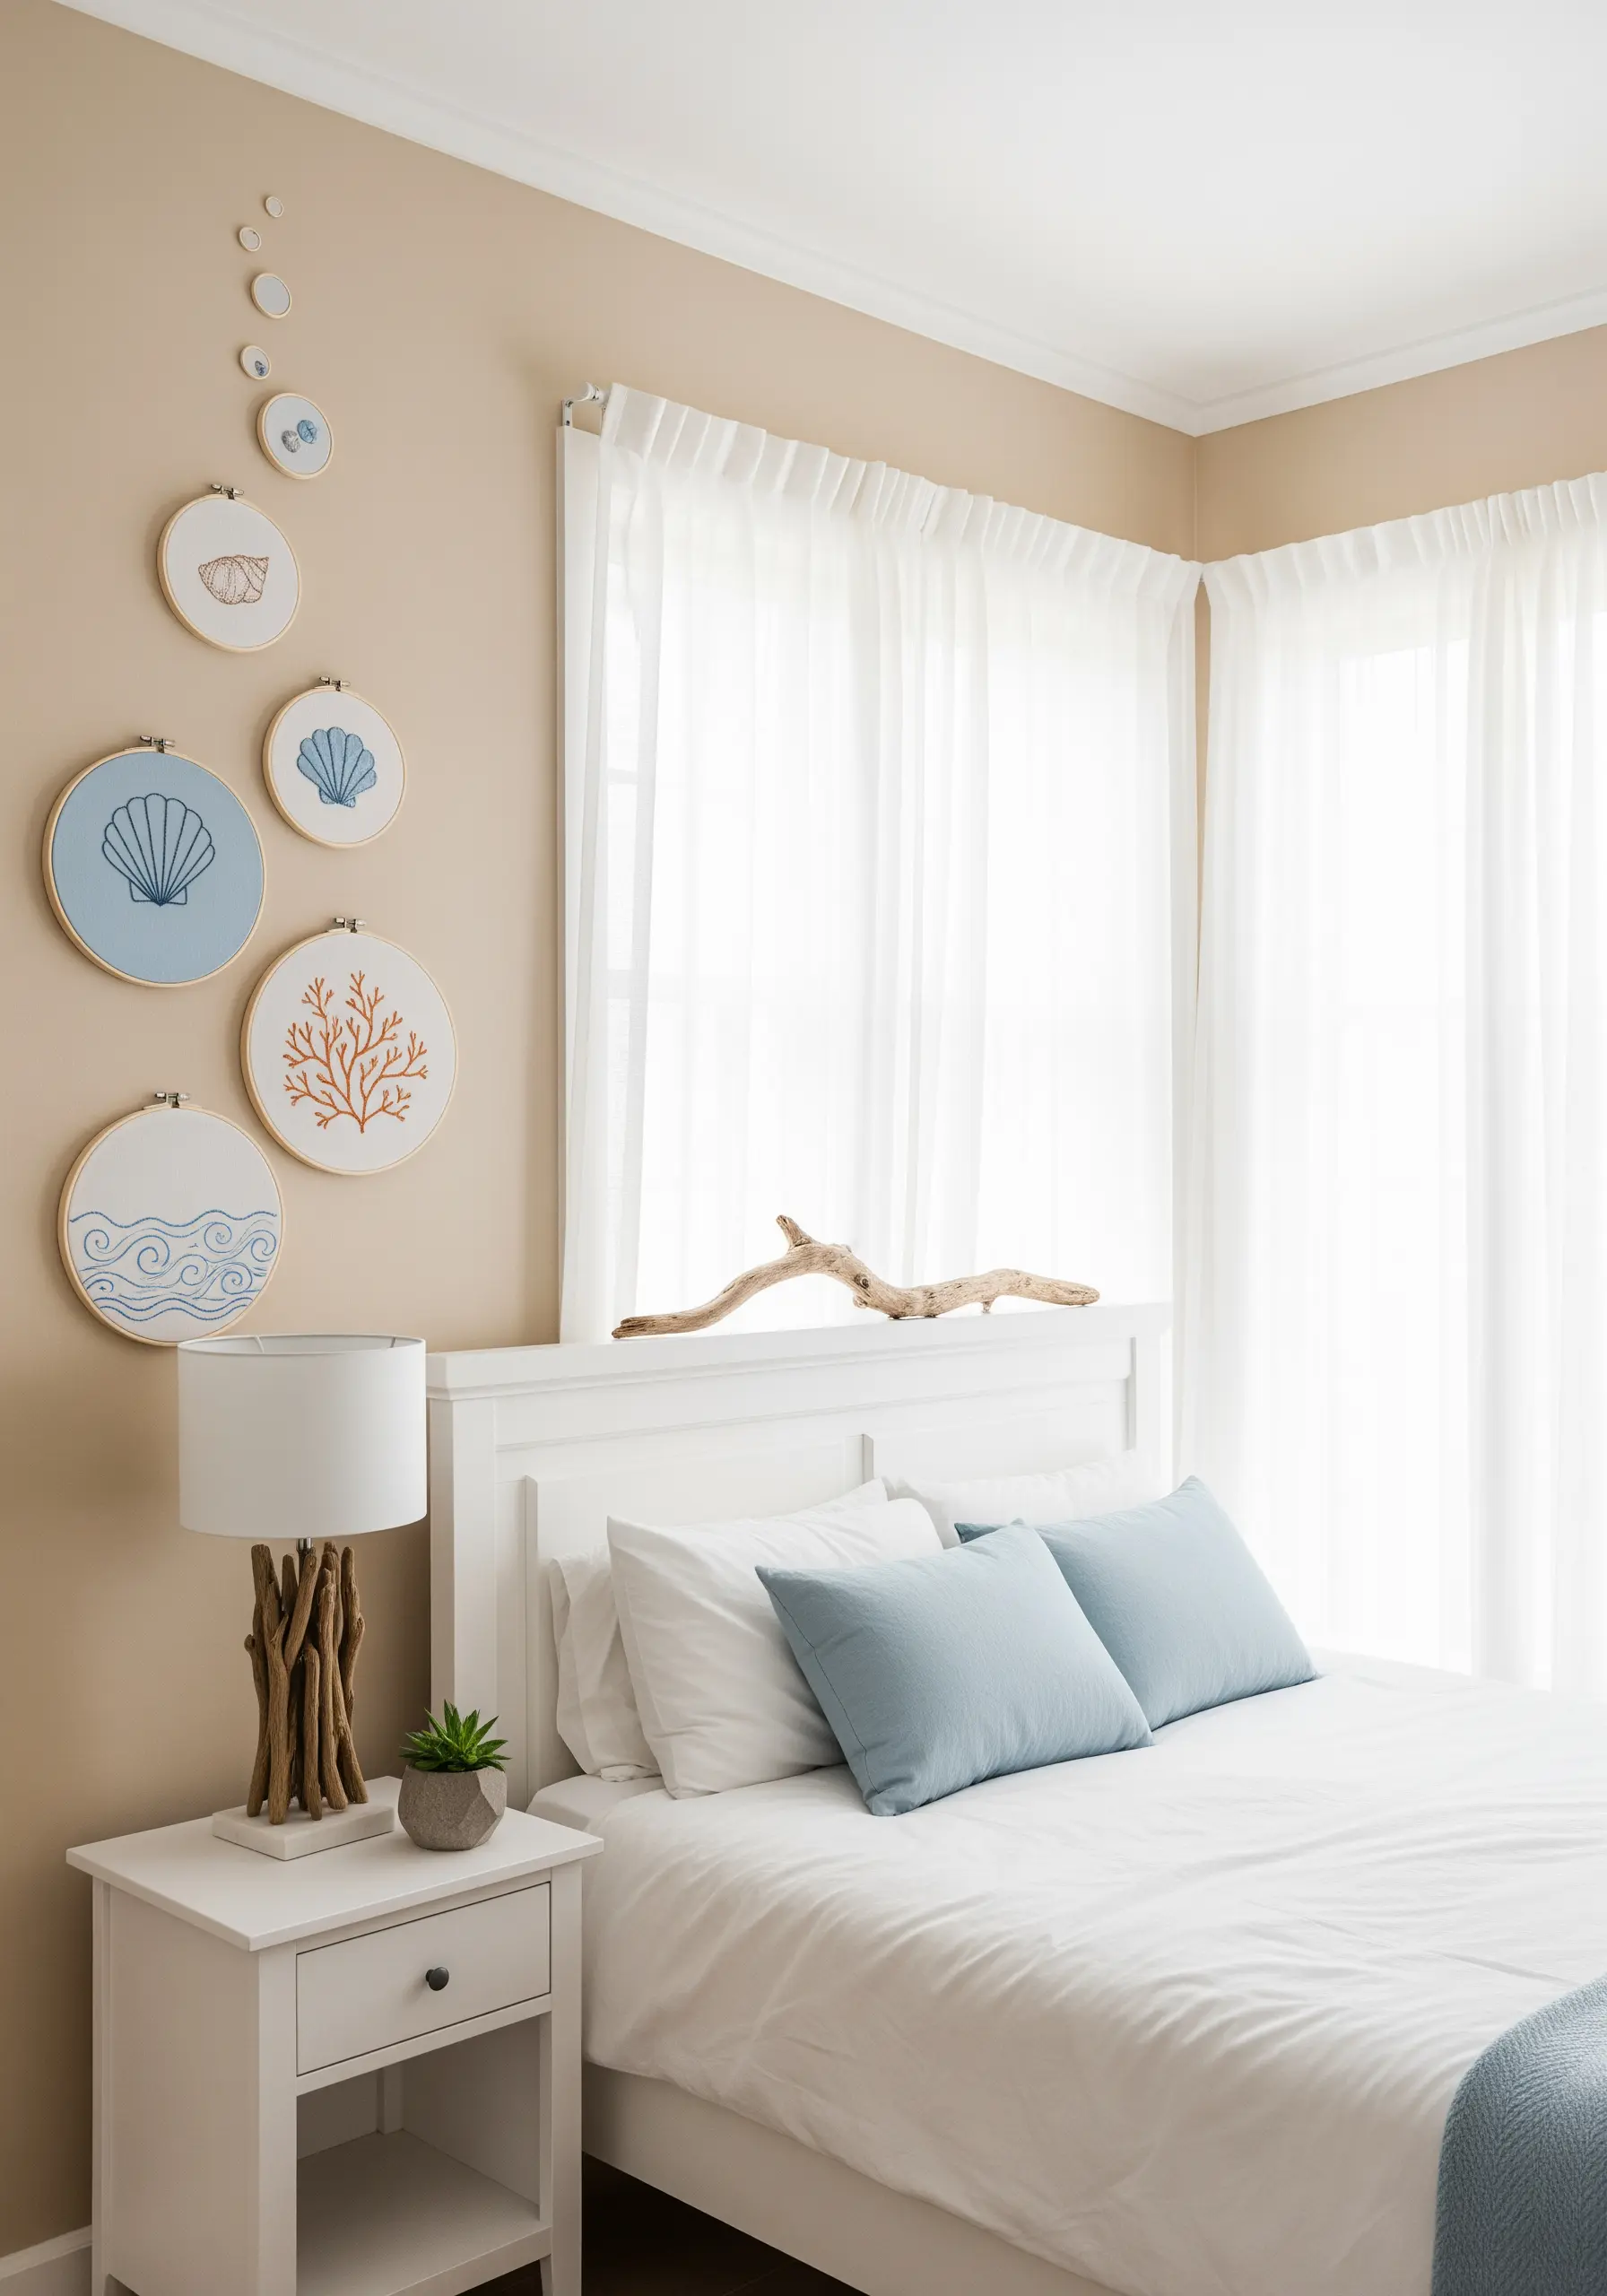
Evoke the calm of the seaside by curating a collection of simple, thematic motifs.
Maintain a cohesive look by sticking to a limited color palette—think soft blues, sandy beiges, and a single accent color like coral or terracotta.
Vary your stitch textures: a smooth satin stitch for a solid shell, a looped chain stitch for textured coral, and a clean backstitch for wave outlines.
Arranging the hoops in an organic, cascading line enhances the feeling of flow in your coastal-inspired embroidery wall decorations.
10. Stitch a Functional Rainbow Organizer
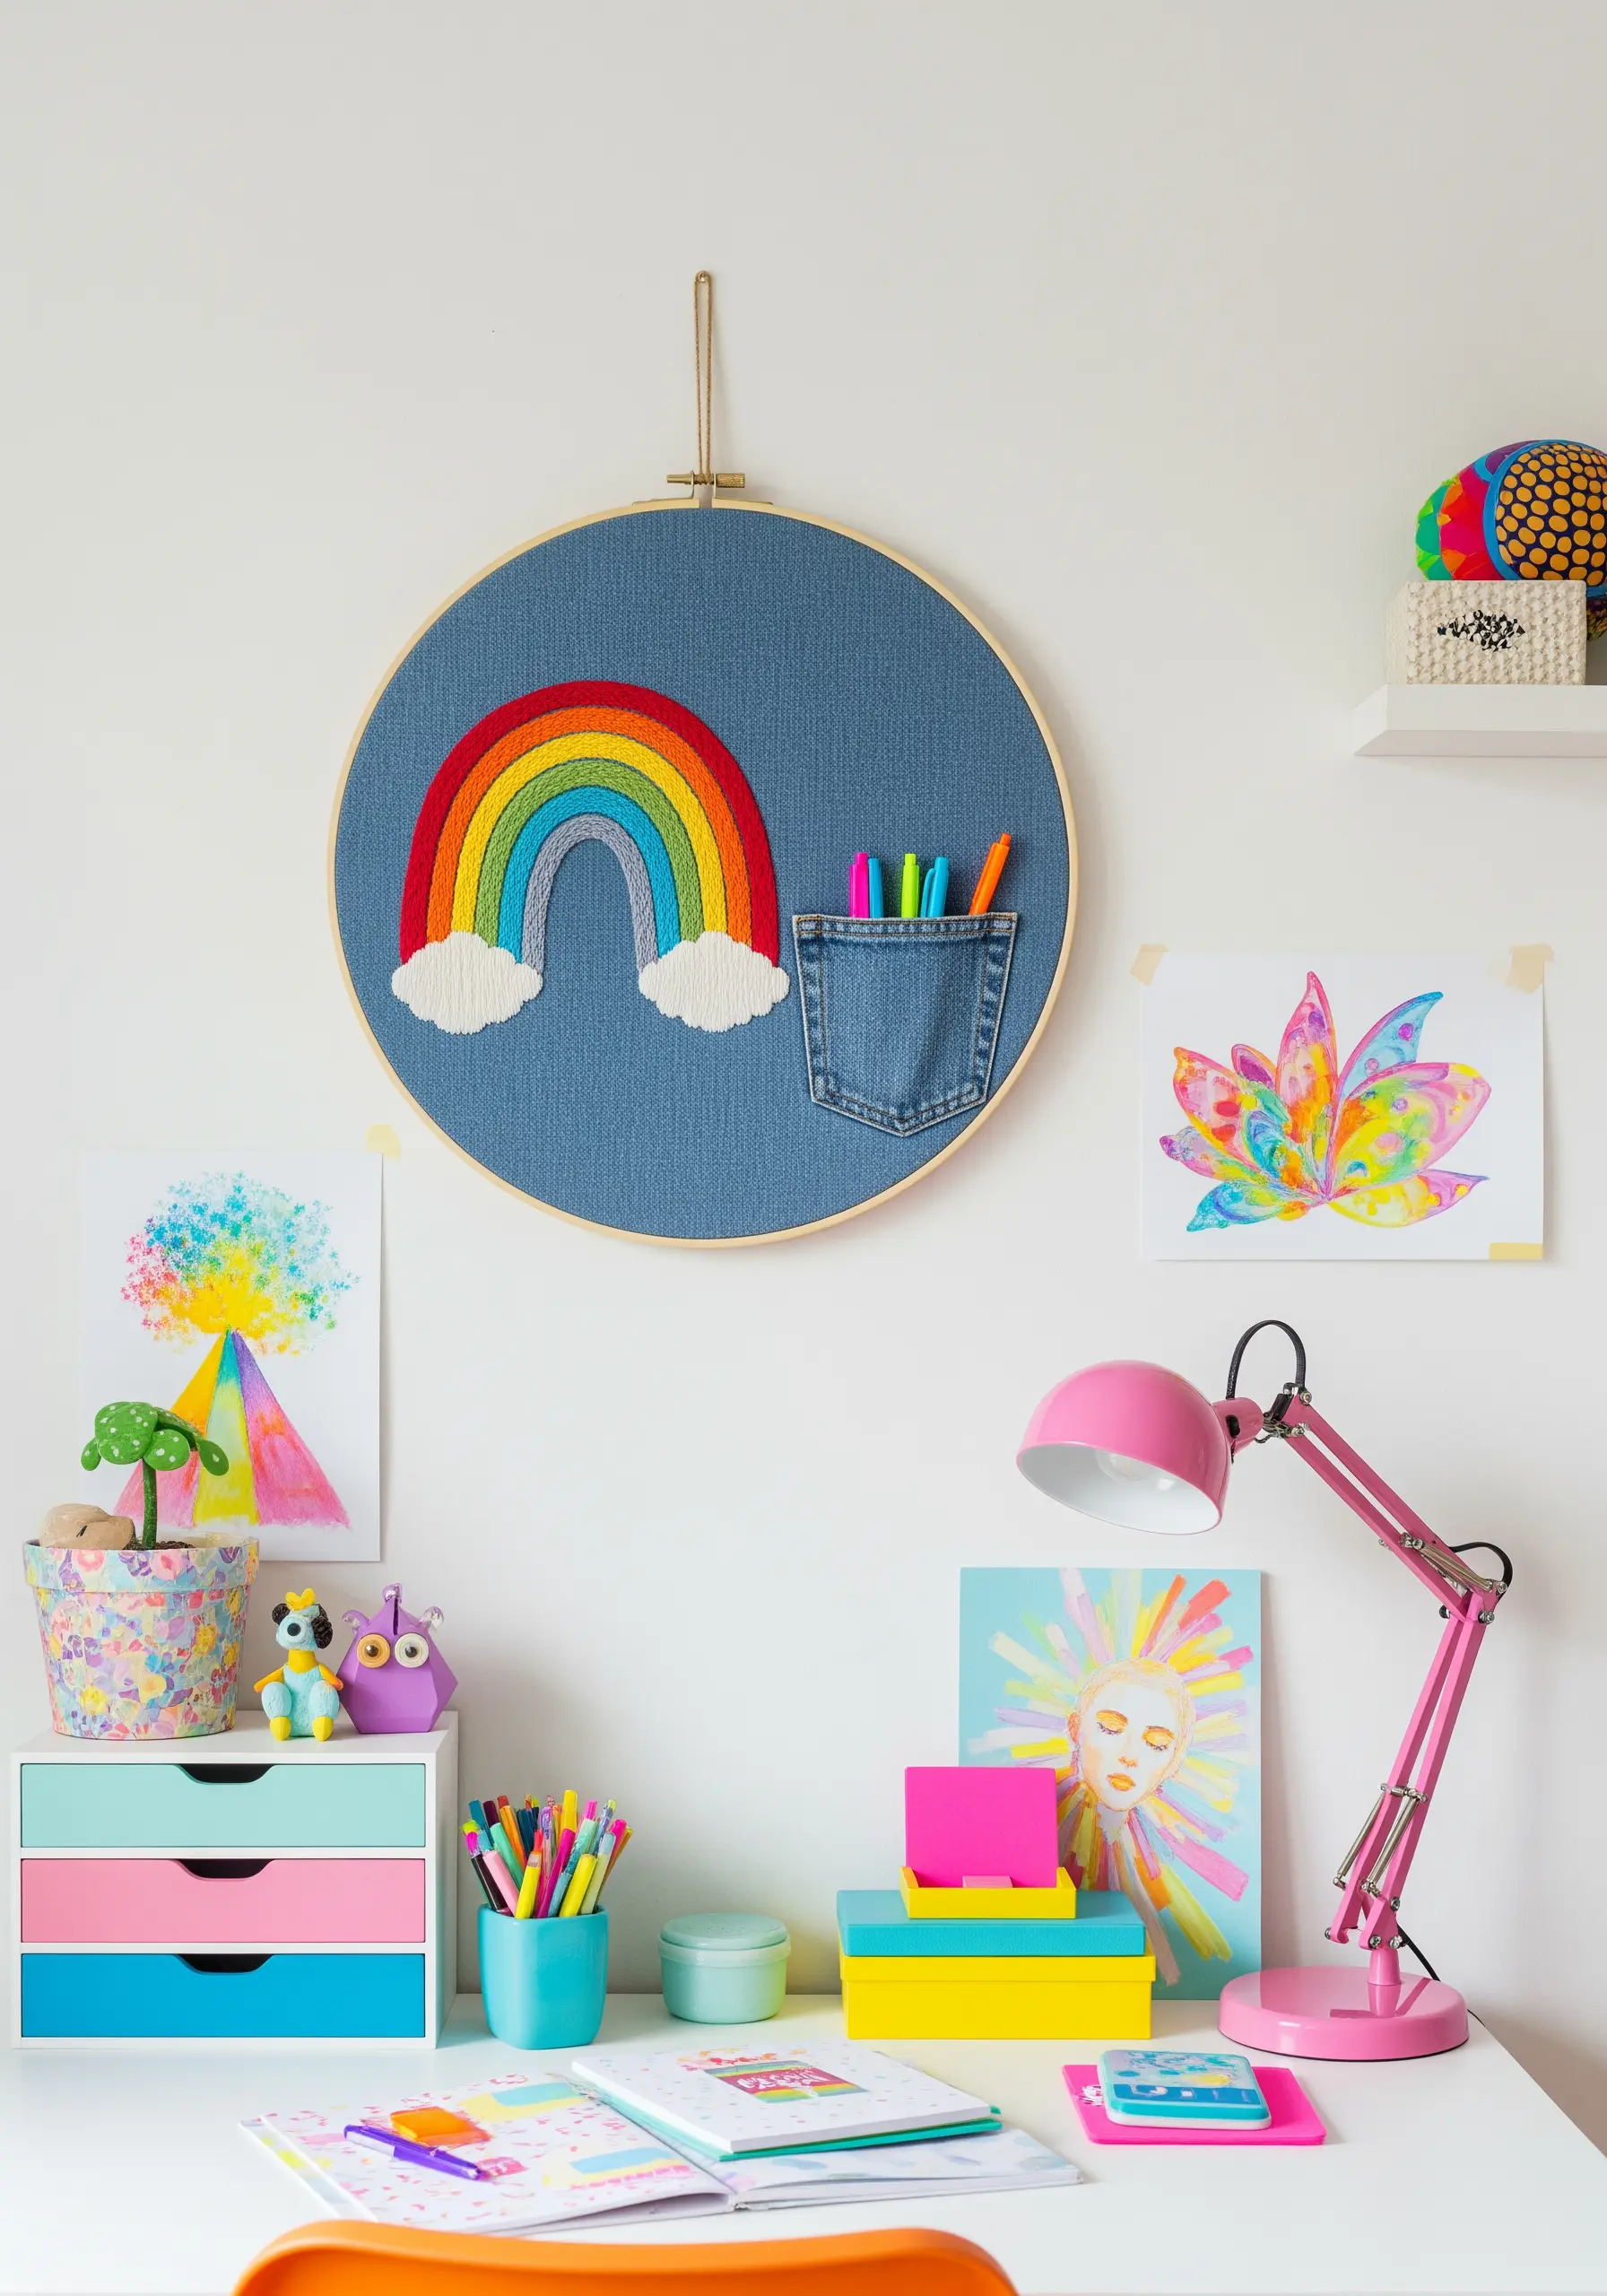
Merge artistry and utility by creating an embroidery hoop that doubles as storage.
Choose a sturdy fabric like denim or canvas as your base.
To make the functional pocket, simply cut one from an old pair of jeans and stitch it securely onto your base fabric before placing it all in the hoop.
For the rainbow, use a plush satin stitch or chain stitch with bright, cheerful threads to create a piece that is both practical and one of those playful hoop art ideas.
11. Create a Moody Anatomical Statement Piece
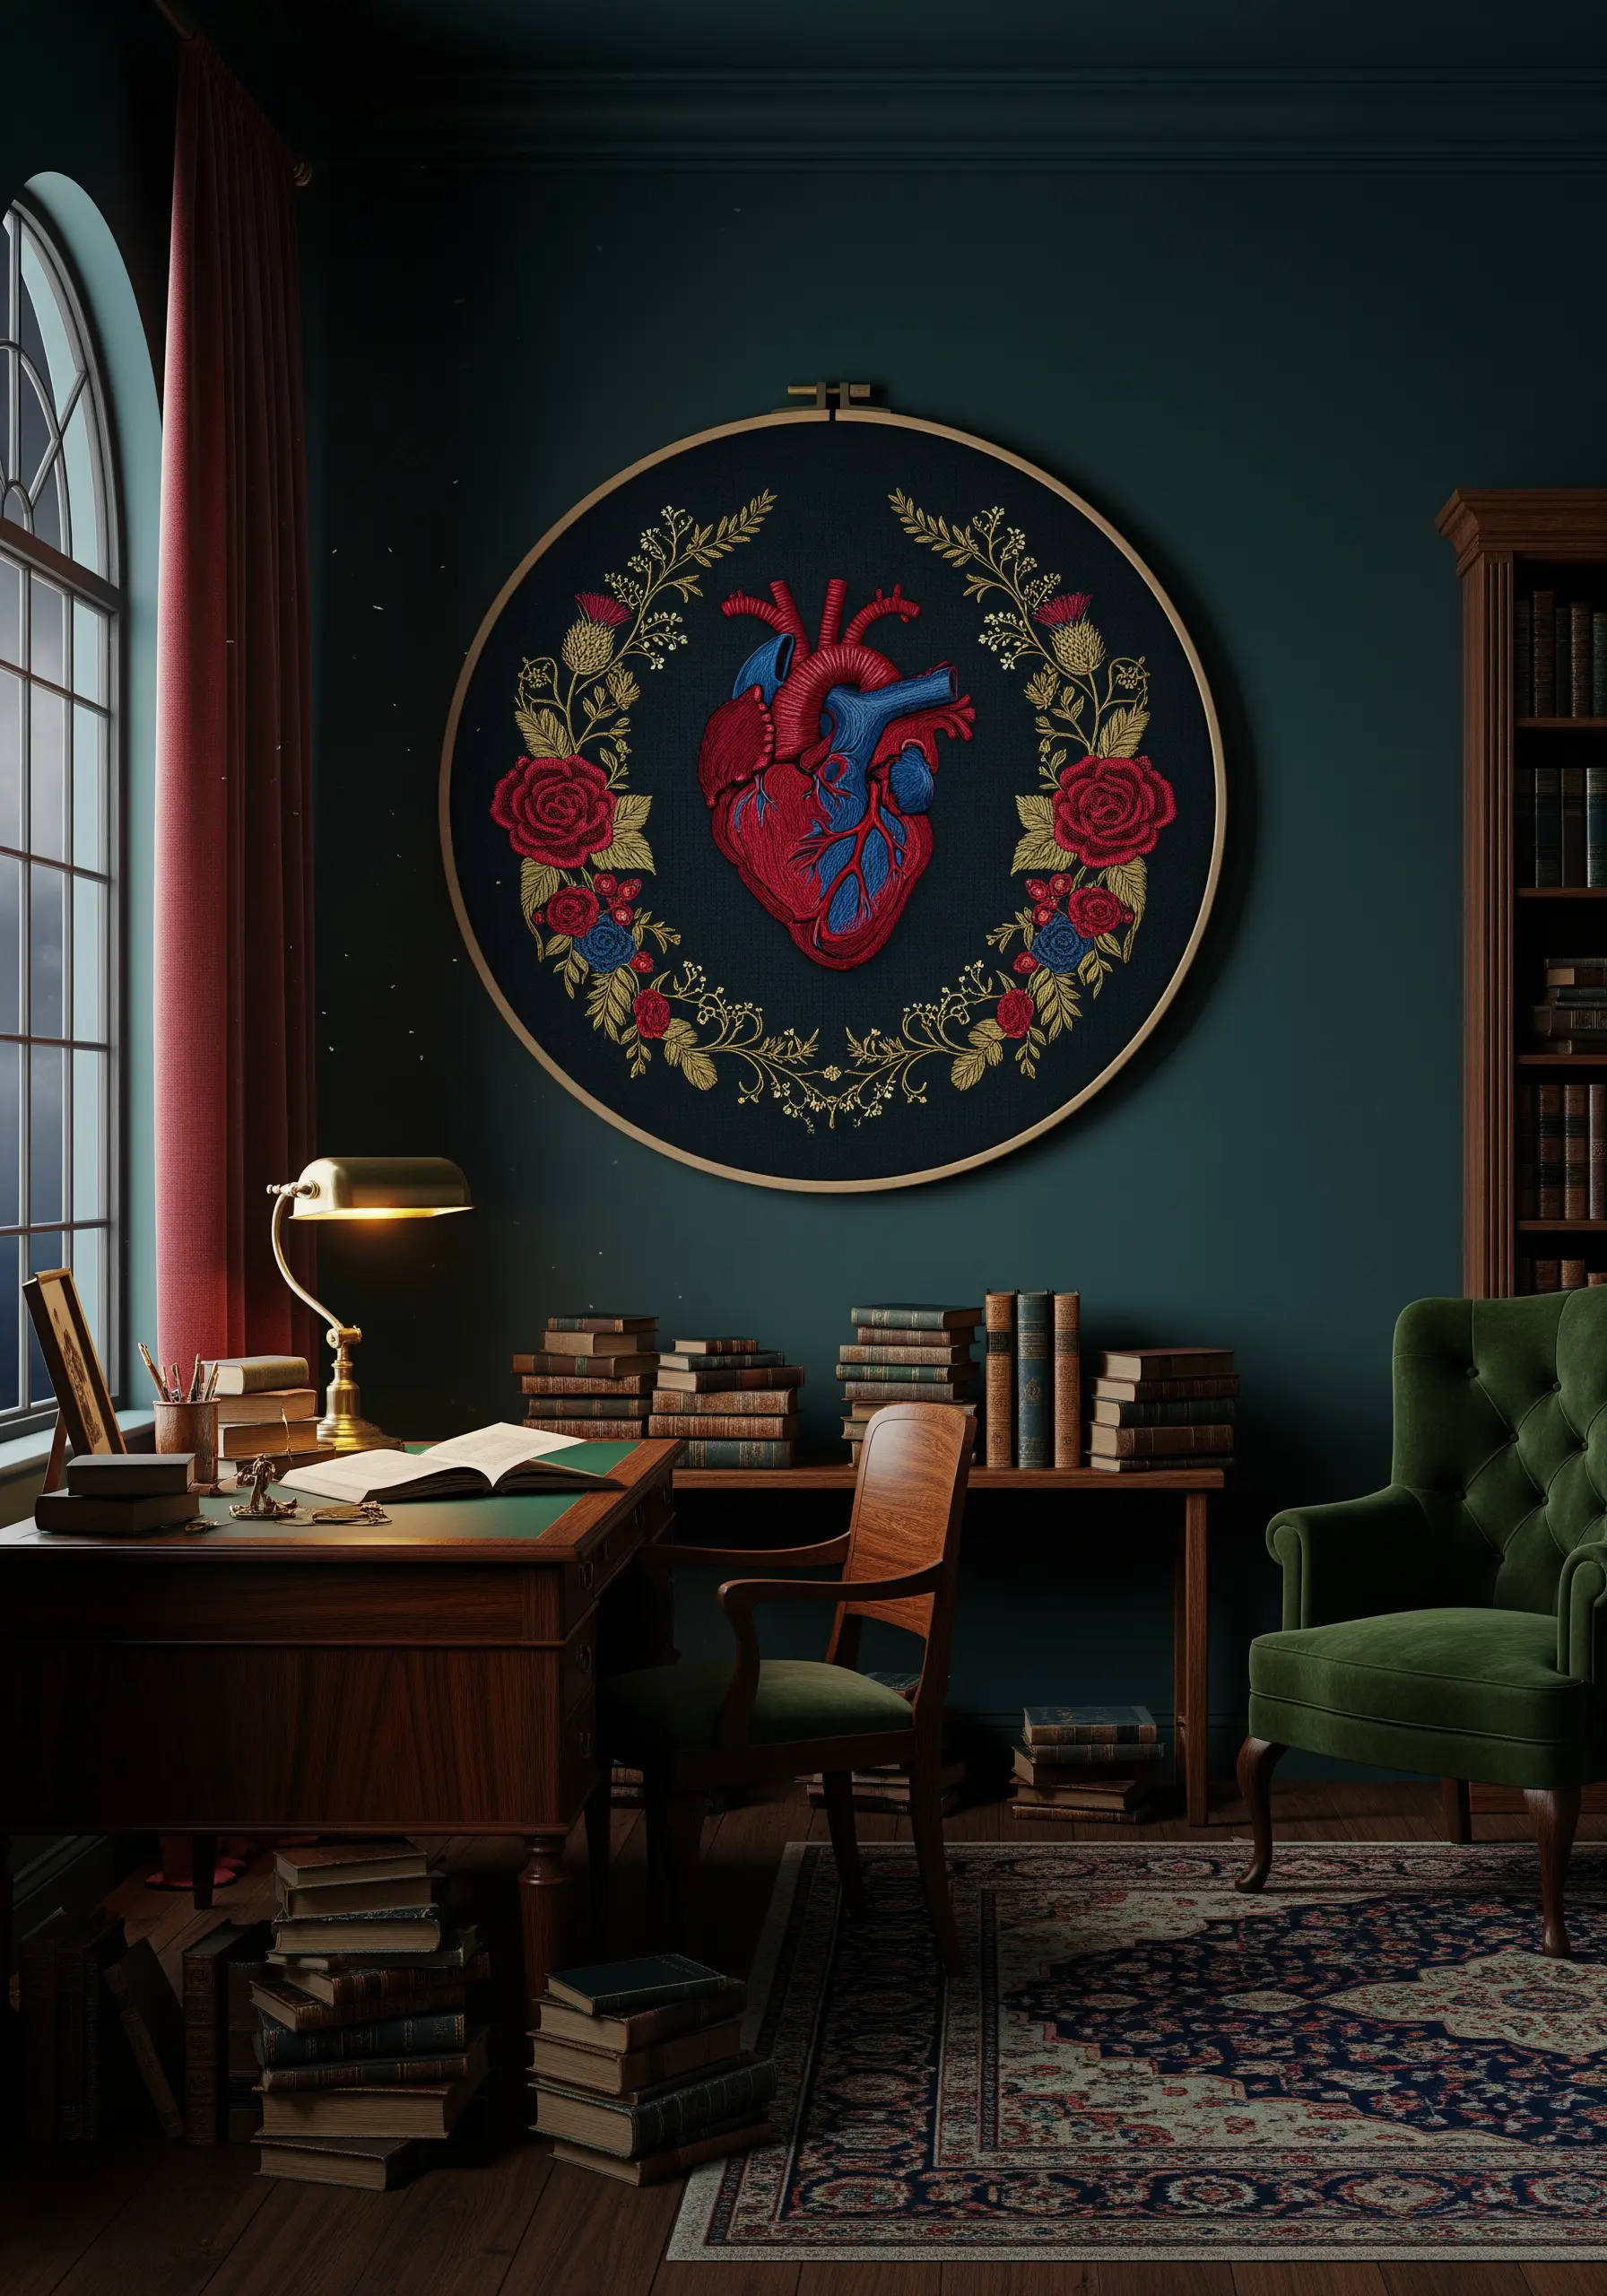
For a design with this level of drama, begin with a dark fabric base, such as deep emerald green, navy, or black linen.
Select a palette of rich jewel tones—ruby red, sapphire blue, and antique gold—to make the anatomical and floral elements pop.
Outline the heart’s chambers with a single strand of a lighter color before filling with satin stitch to create sharp, defined edges.
The strategic use of metallic gold thread adds a touch of gothic luxury, resulting in one of those dramatic dark thread embroidery designs.
12. Design an “Out-of-the-Hoop” Mural
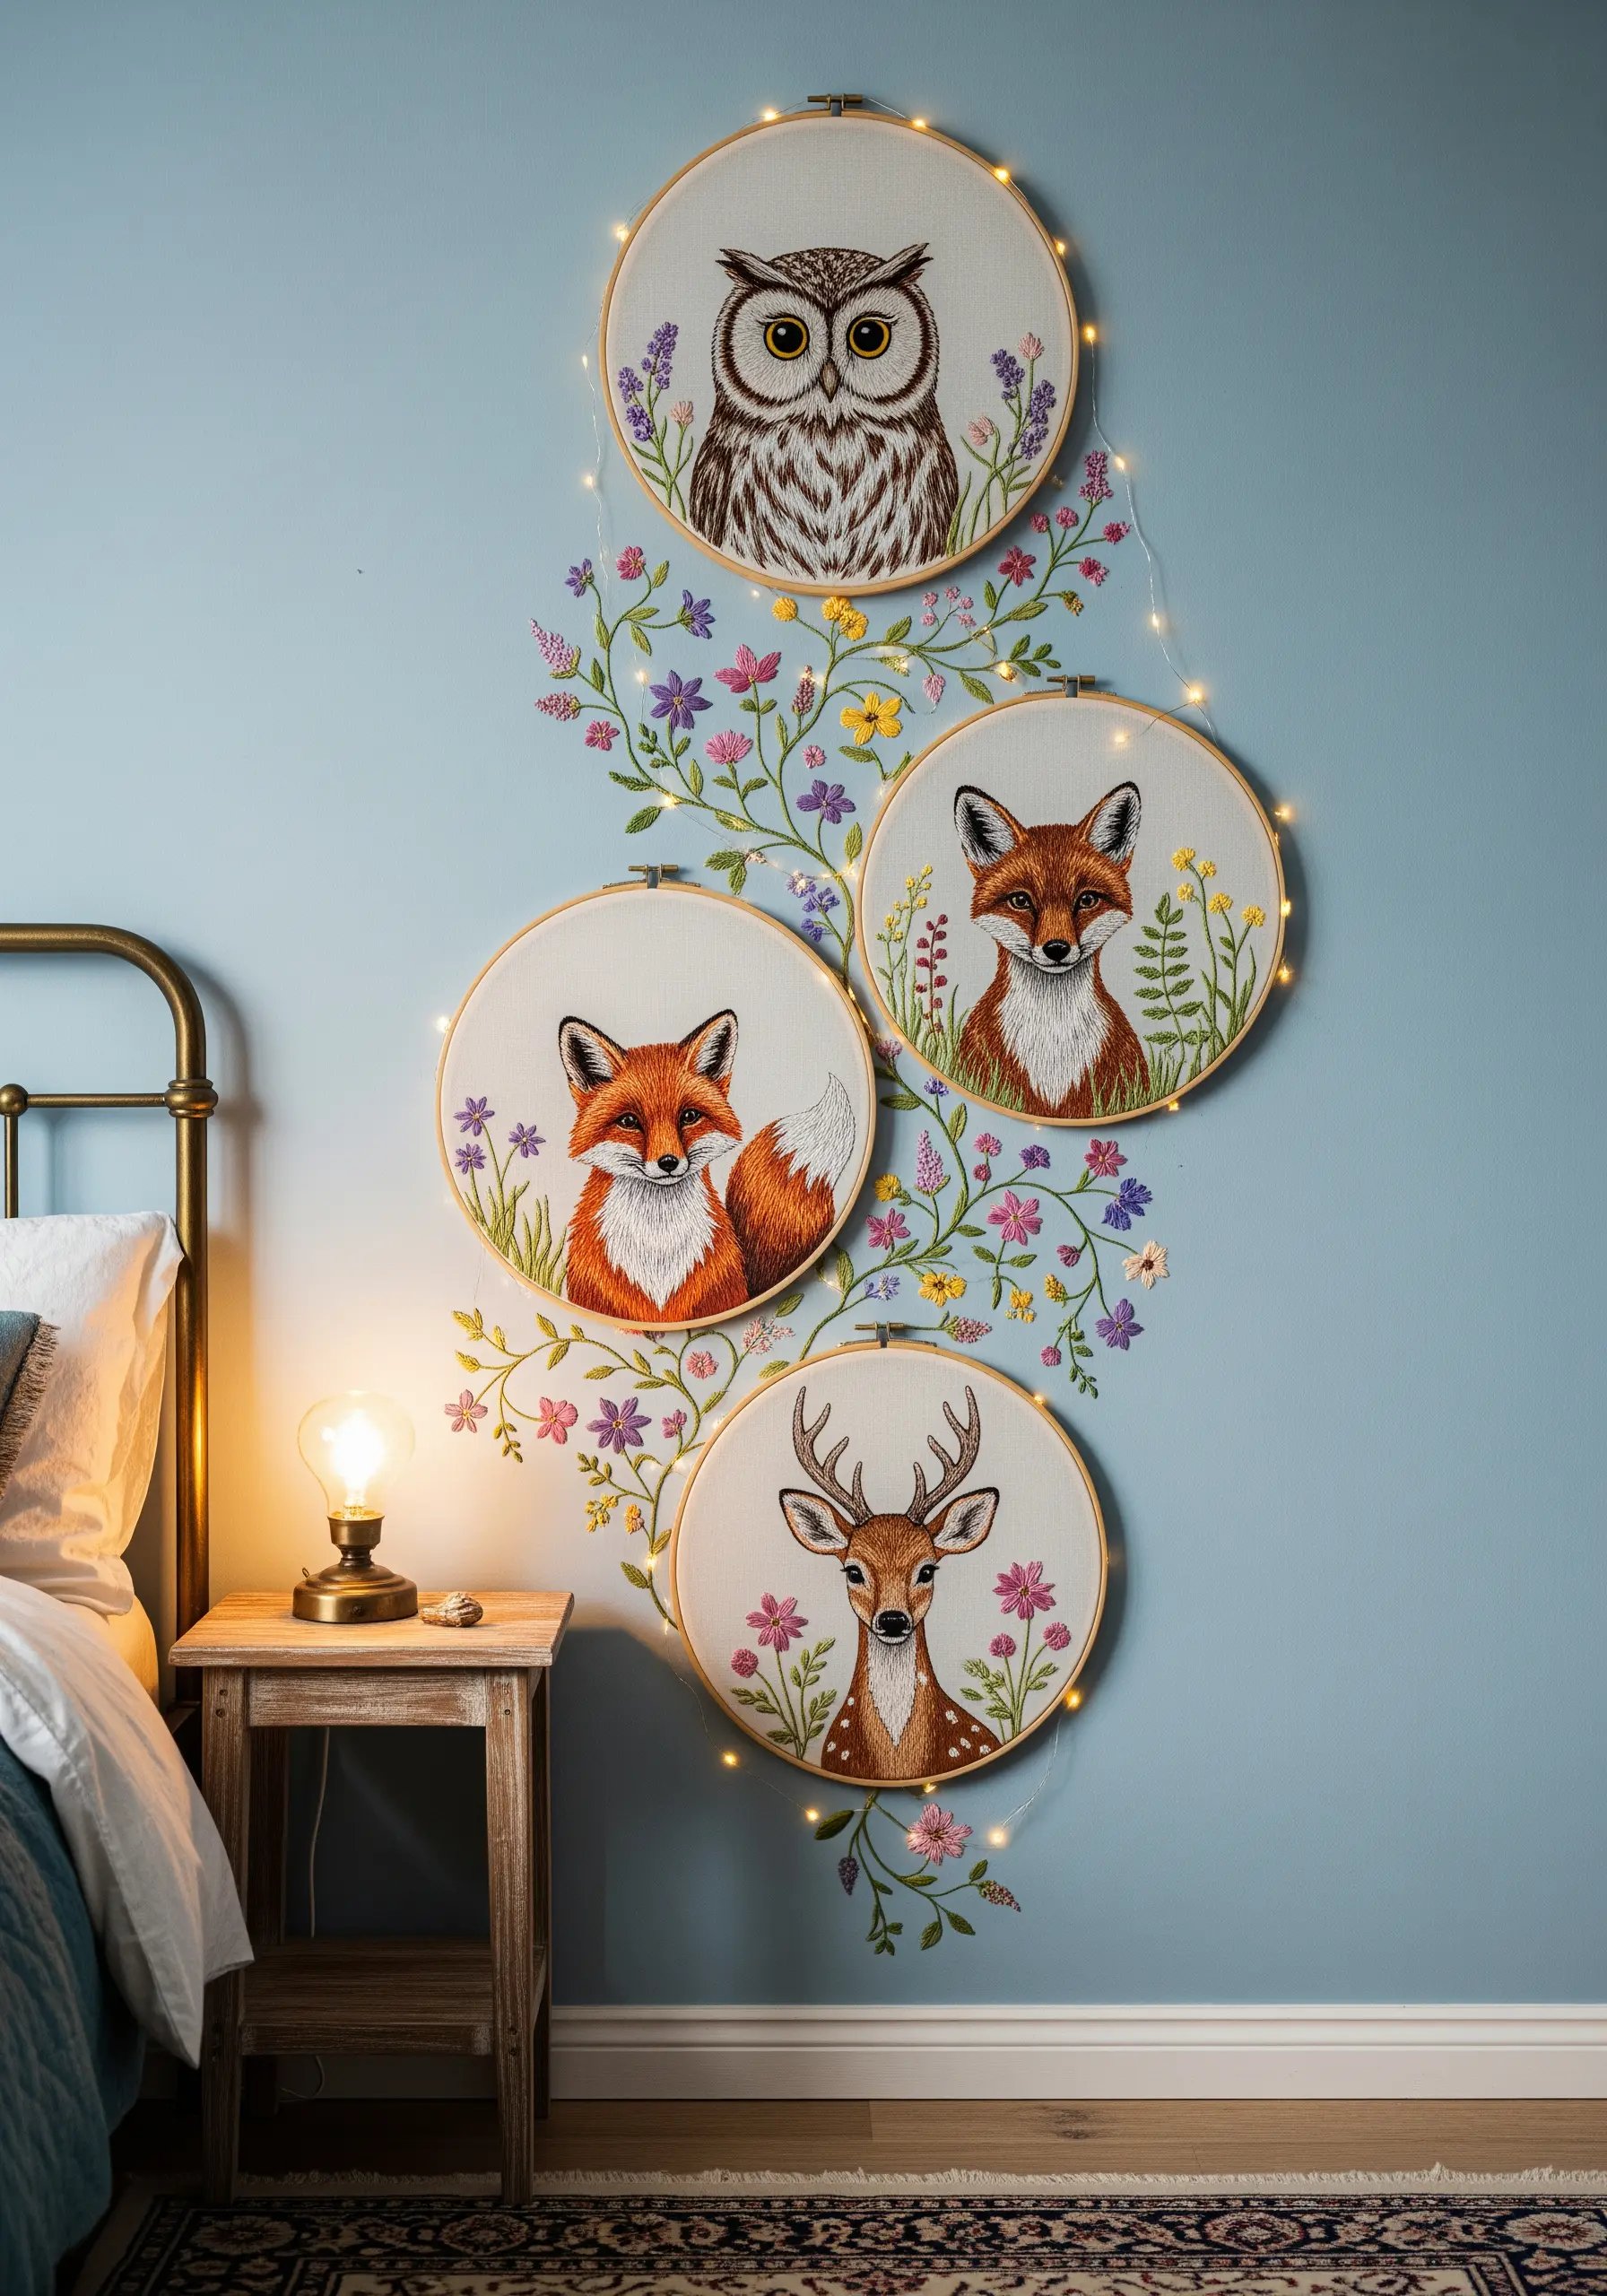
Let your embroidery break free from its circular confines to create a flowing wall mural.
First, complete the main animal portraits within their individual hoops.
Then, create separate, tiny floral and vine motifs on a scrap piece of fabric backed with an iron-on adhesive like Stitch Witchery.
Cut them out and arrange them on the wall between your hoops, ironing them in place to create a single, interconnected piece.
This is one of the most clever hooped wall collage layouts you can try.
13. Achieve Classic Elegance with a Timeless Bouquet
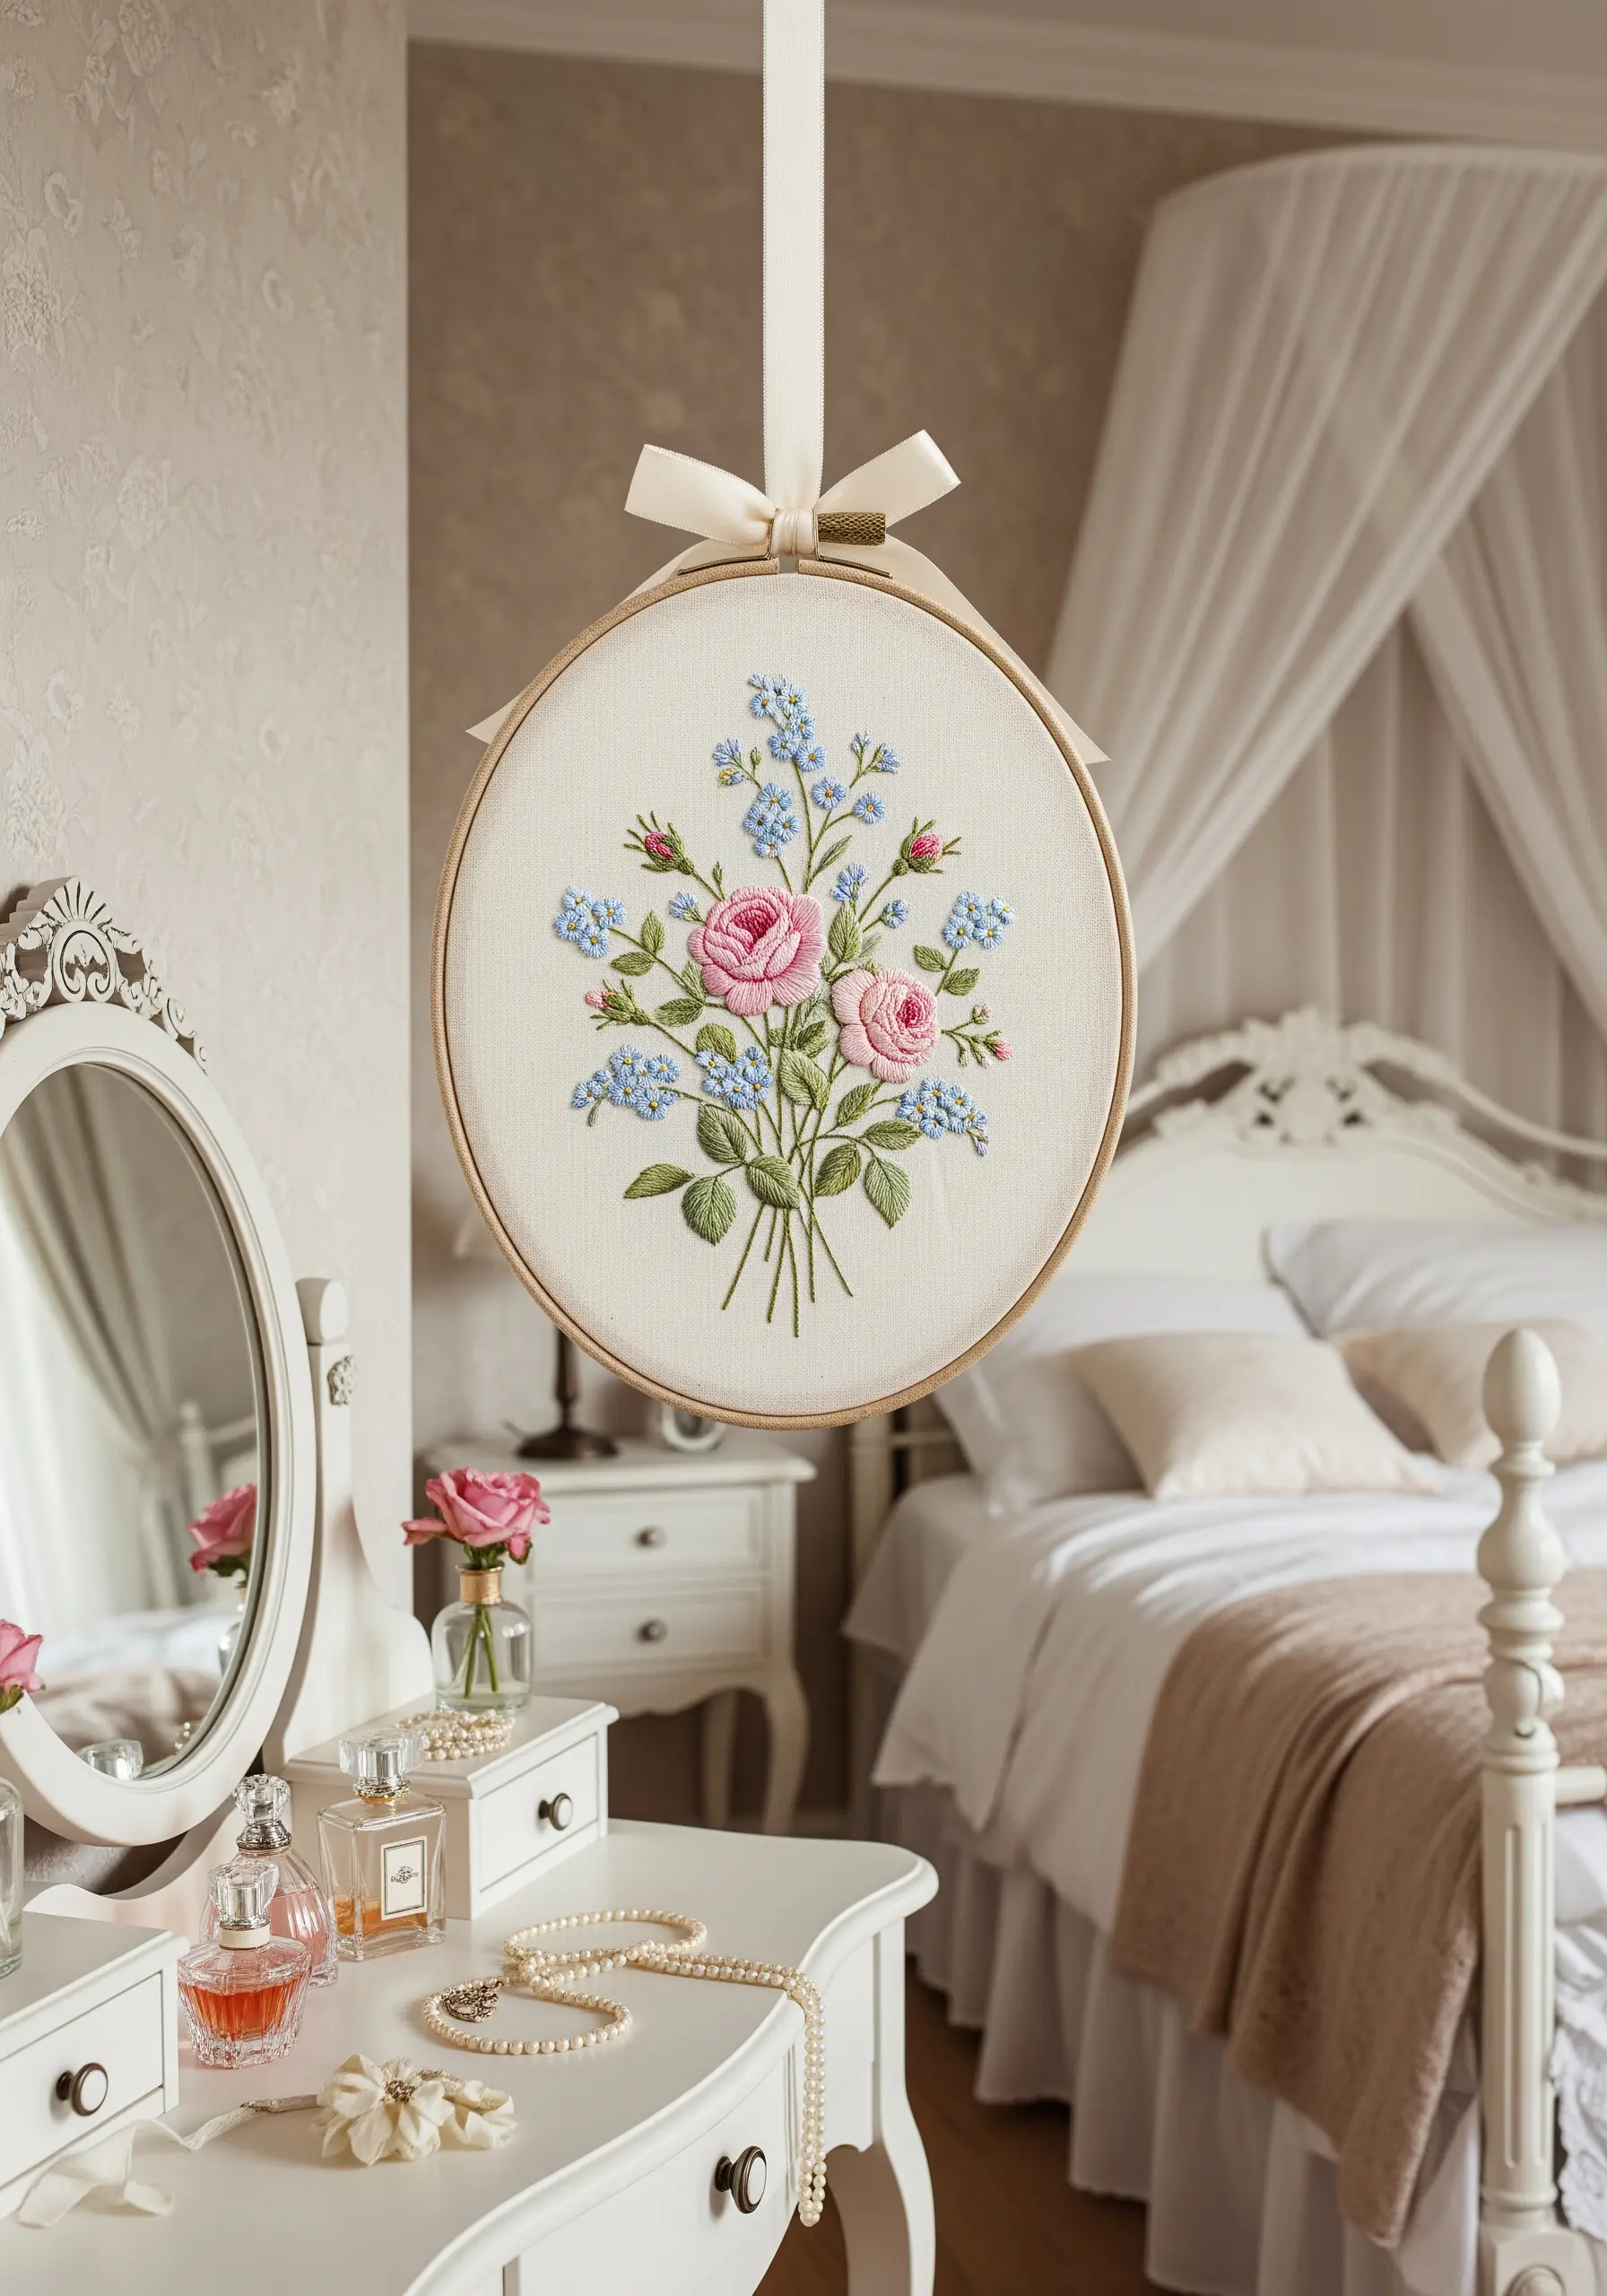
You can create a stunning, classic floral arrangement using just a few foundational stitches.
Use the woven wheel stitch to create the lush, dimensional pink roses; the interwoven threads perfectly mimic layered petals.
For the delicate blue forget-me-nots, a simple lazy daisy stitch for each petal is all you need.
This piece demonstrates how a soft linen background and a harmonious color palette can create gentle floral embroidery ideas for serenity-filled bedroom walls.
14. Capture Lifelike Detail in a Pet Portrait
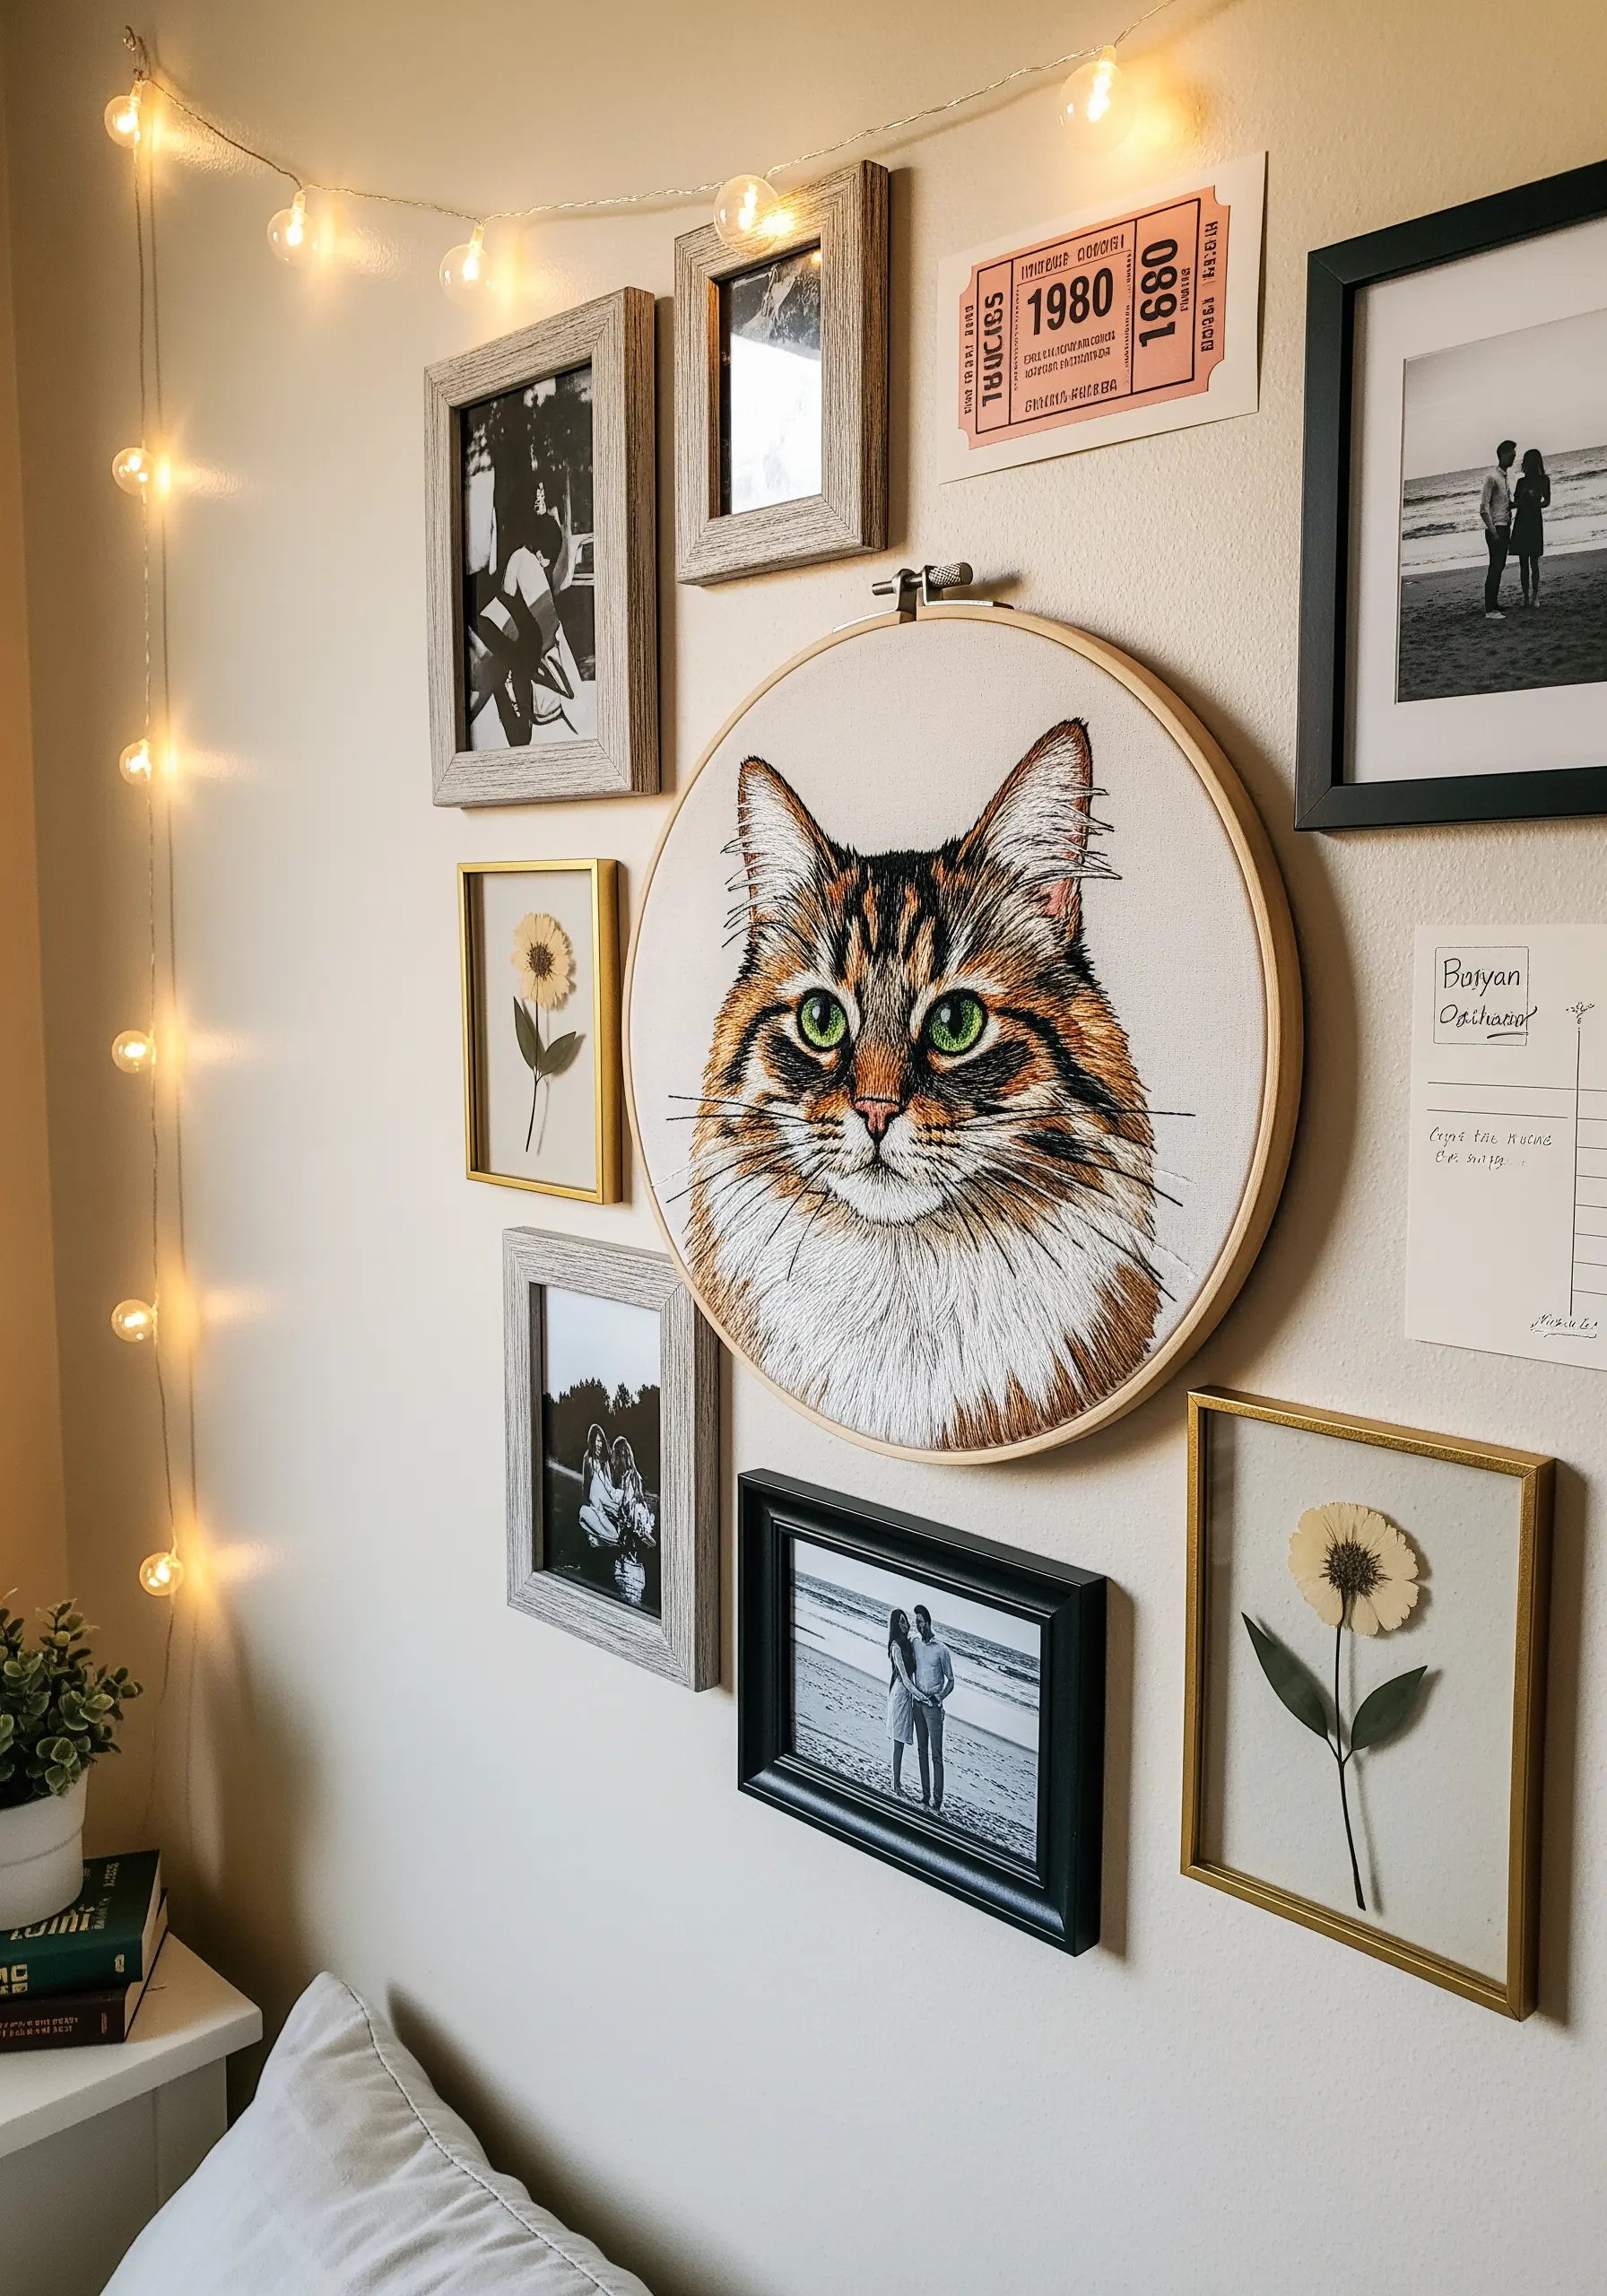
The key to a realistic pet portrait is the meticulous layering of single strands of floss.
Always stitch in the natural direction of fur growth, using a blend of short and long stitches to avoid harsh lines and create soft transitions.
Use a photograph as a reference and don’t hesitate to use dozens of thread colors—the subtle tonal shifts are what create true-to-life depth.
For the eyes, a single, tiny white stitch creates a reflective glint that brings your portrait to life. You can find more inspiration in cat & kitten embroidery designs that capture emotion.
15. Embrace Zen with a Stitched Ensō Circle
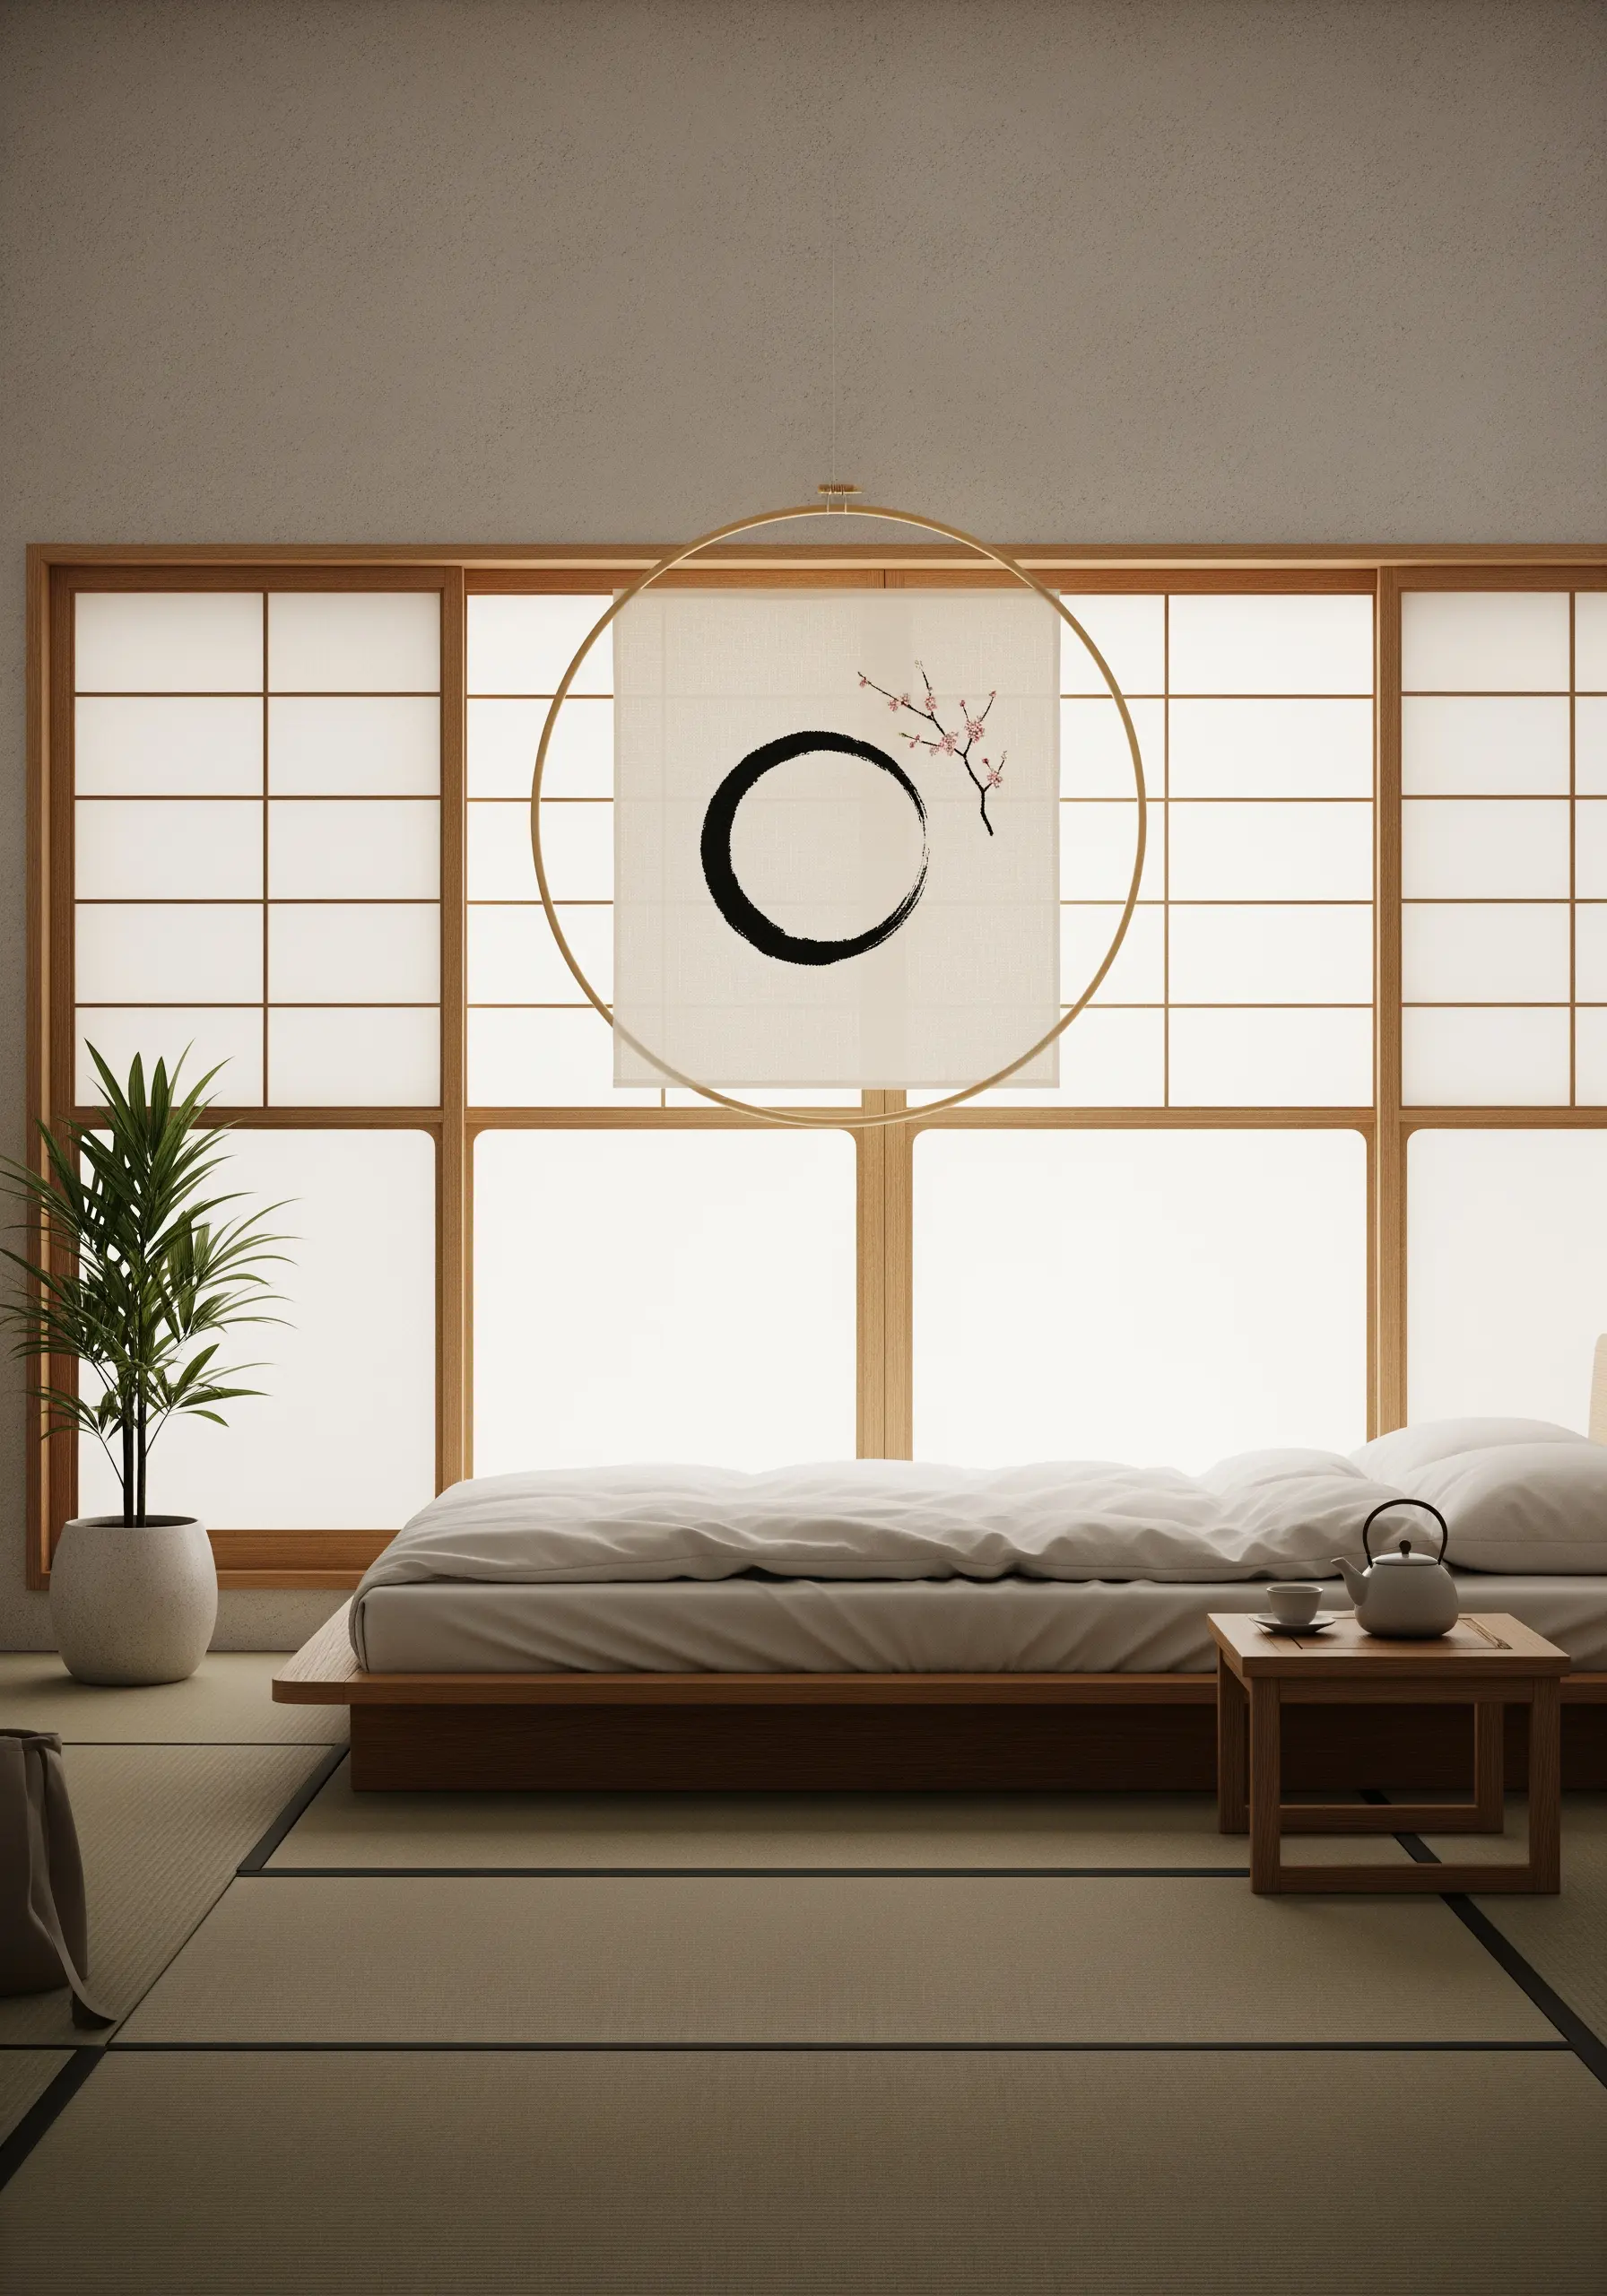
This meditative piece celebrates the Japanese principle of wabi-sabi—finding beauty in imperfection.
To achieve the textured, brushstroke effect of the Ensō circle, use a thick black yarn and couch it onto the fabric with a thinner black thread.
Alternatively, use a wide satin stitch and intentionally allow for slight unevenness to mimic an ink brush.
A single, delicately stitched branch of cherry blossoms adds balance and a touch of nature to these minimal embroidery wall designs made for meditation rooms.
16. Create a Geometric Tilework Sampler
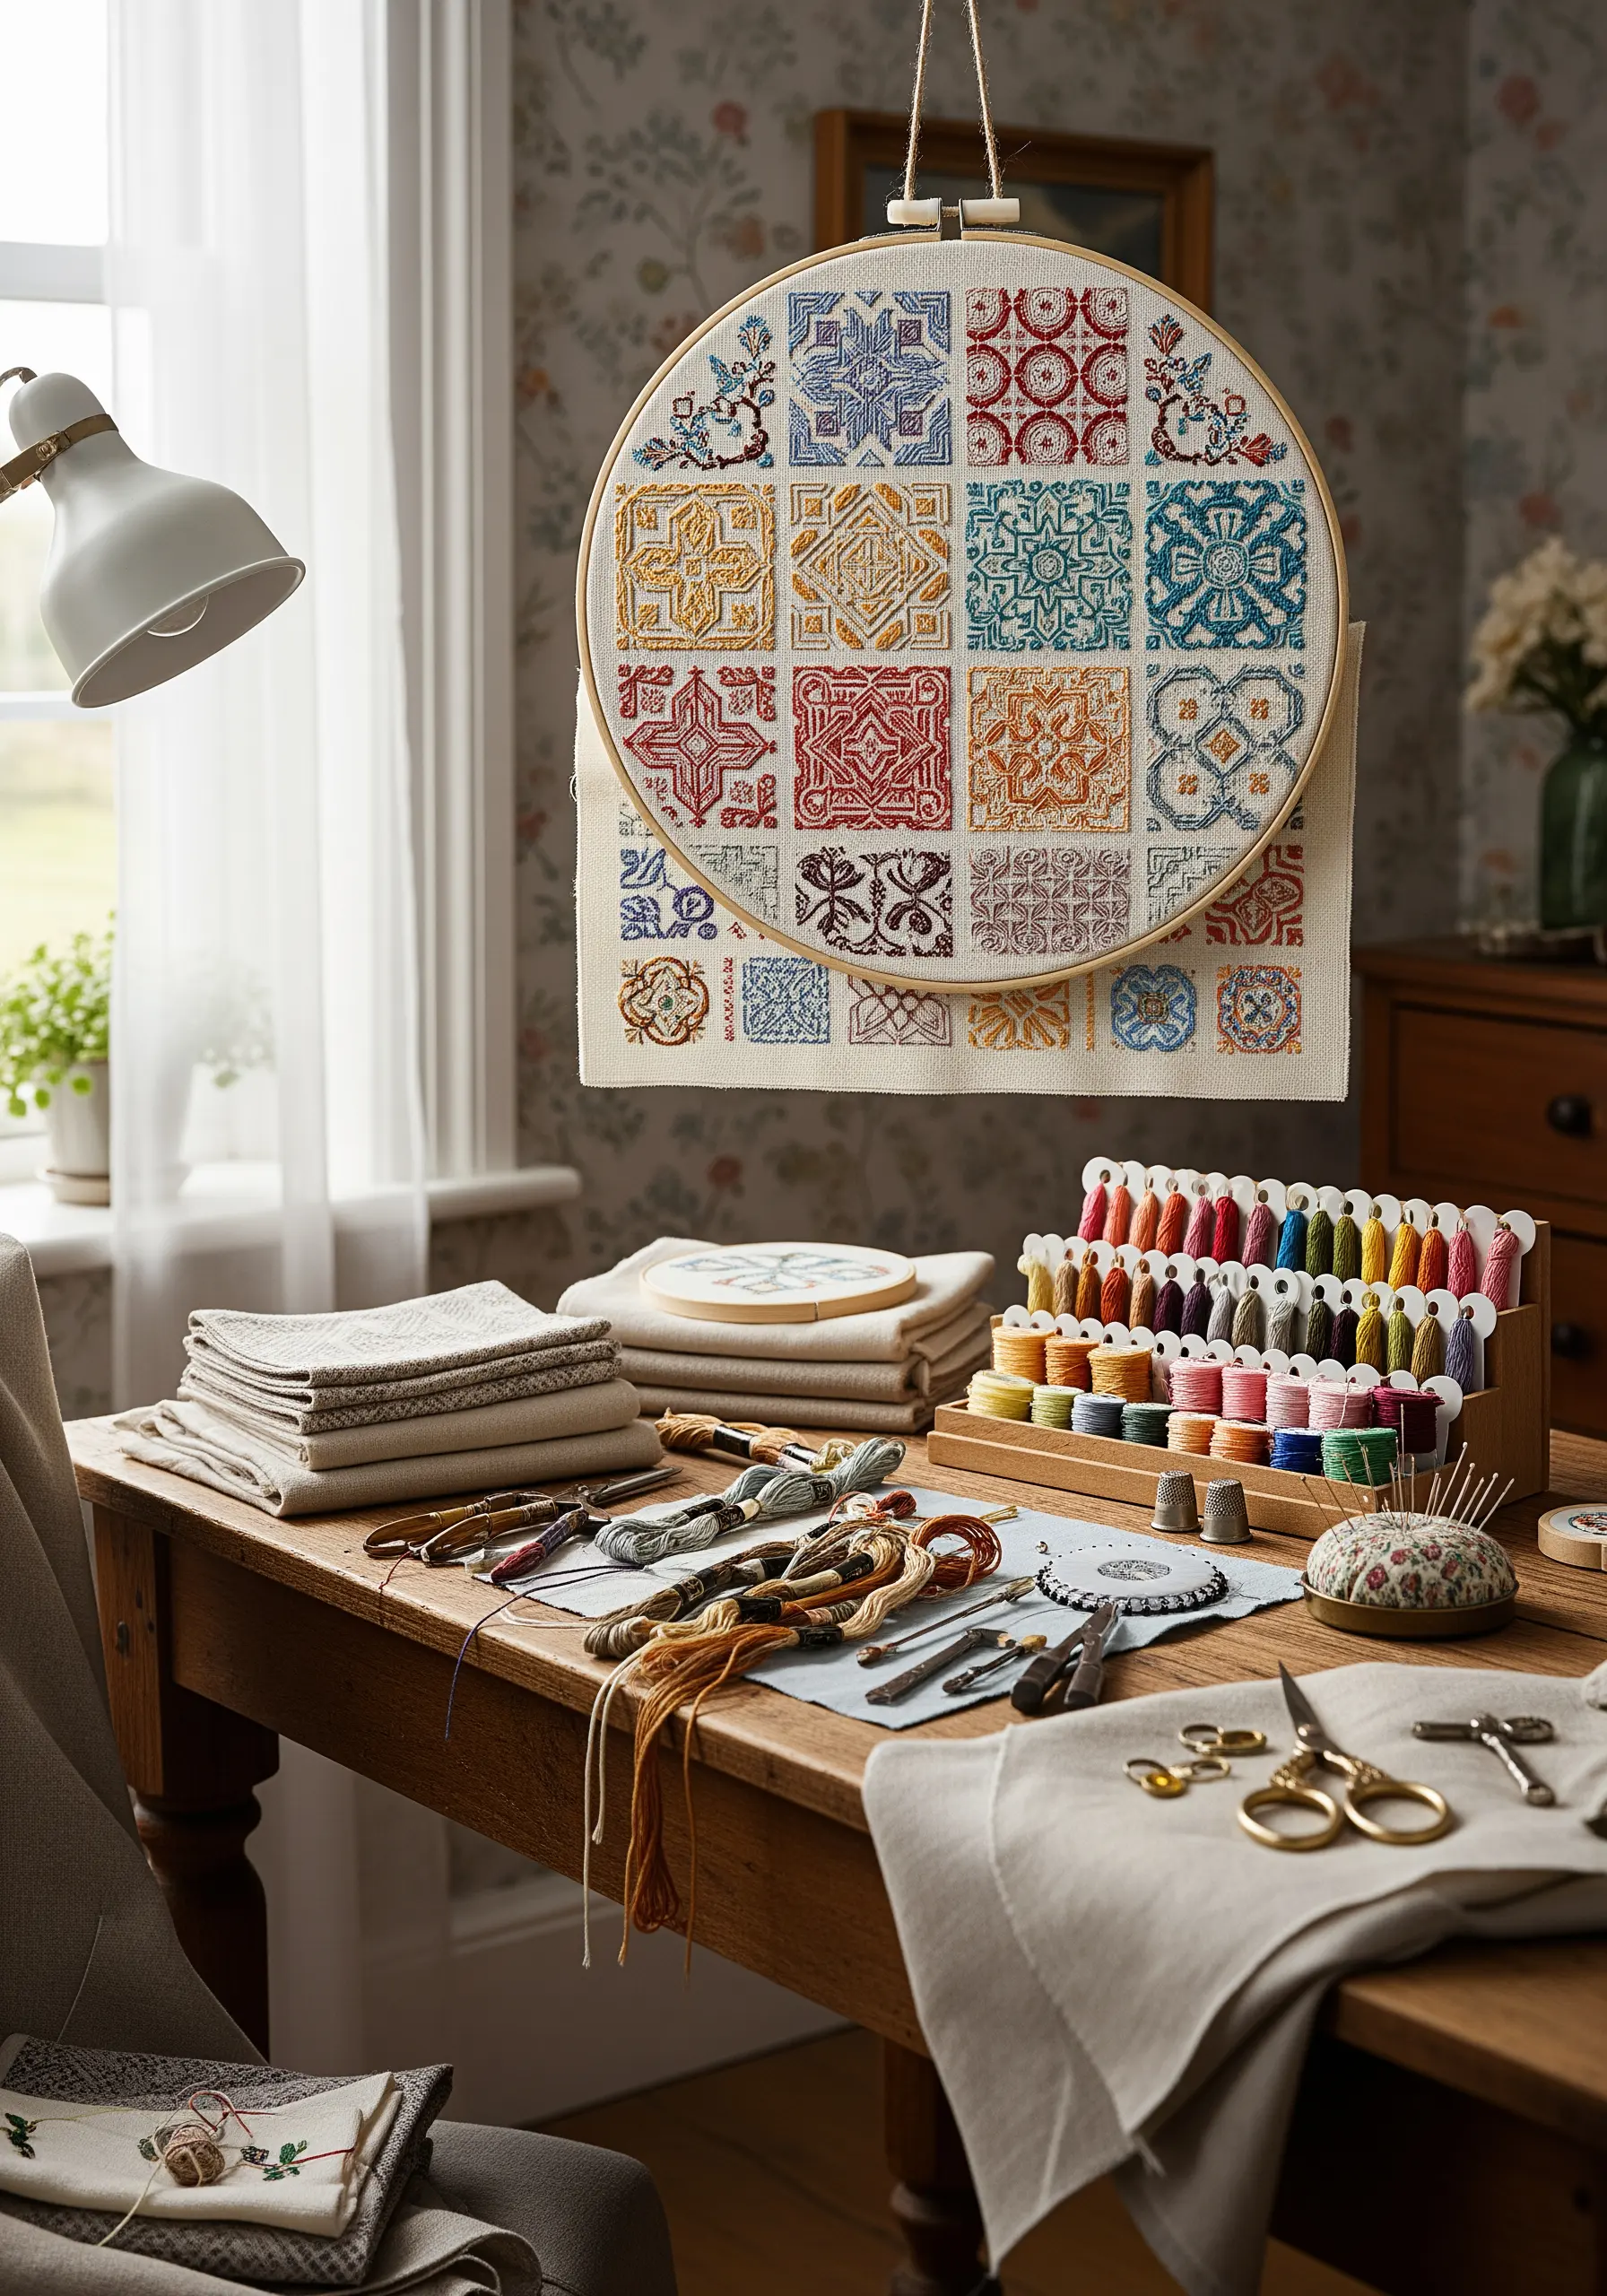
A sampler is a perfect project for practicing new stitches while creating a beautiful piece of art.
Use a removable marker to draw a grid on your fabric, then fill each square with a different pattern inspired by Portuguese tiles or quilt blocks.
Experiment with blackwork, cross-stitch, satin stitch, and woven stitches to explore how different techniques create unique textures.
This approach allows you to build skills in a low-pressure way and results in one of those stunning geometric abstract thread patterns.
17. Stitch Translucent Insect Suncatchers
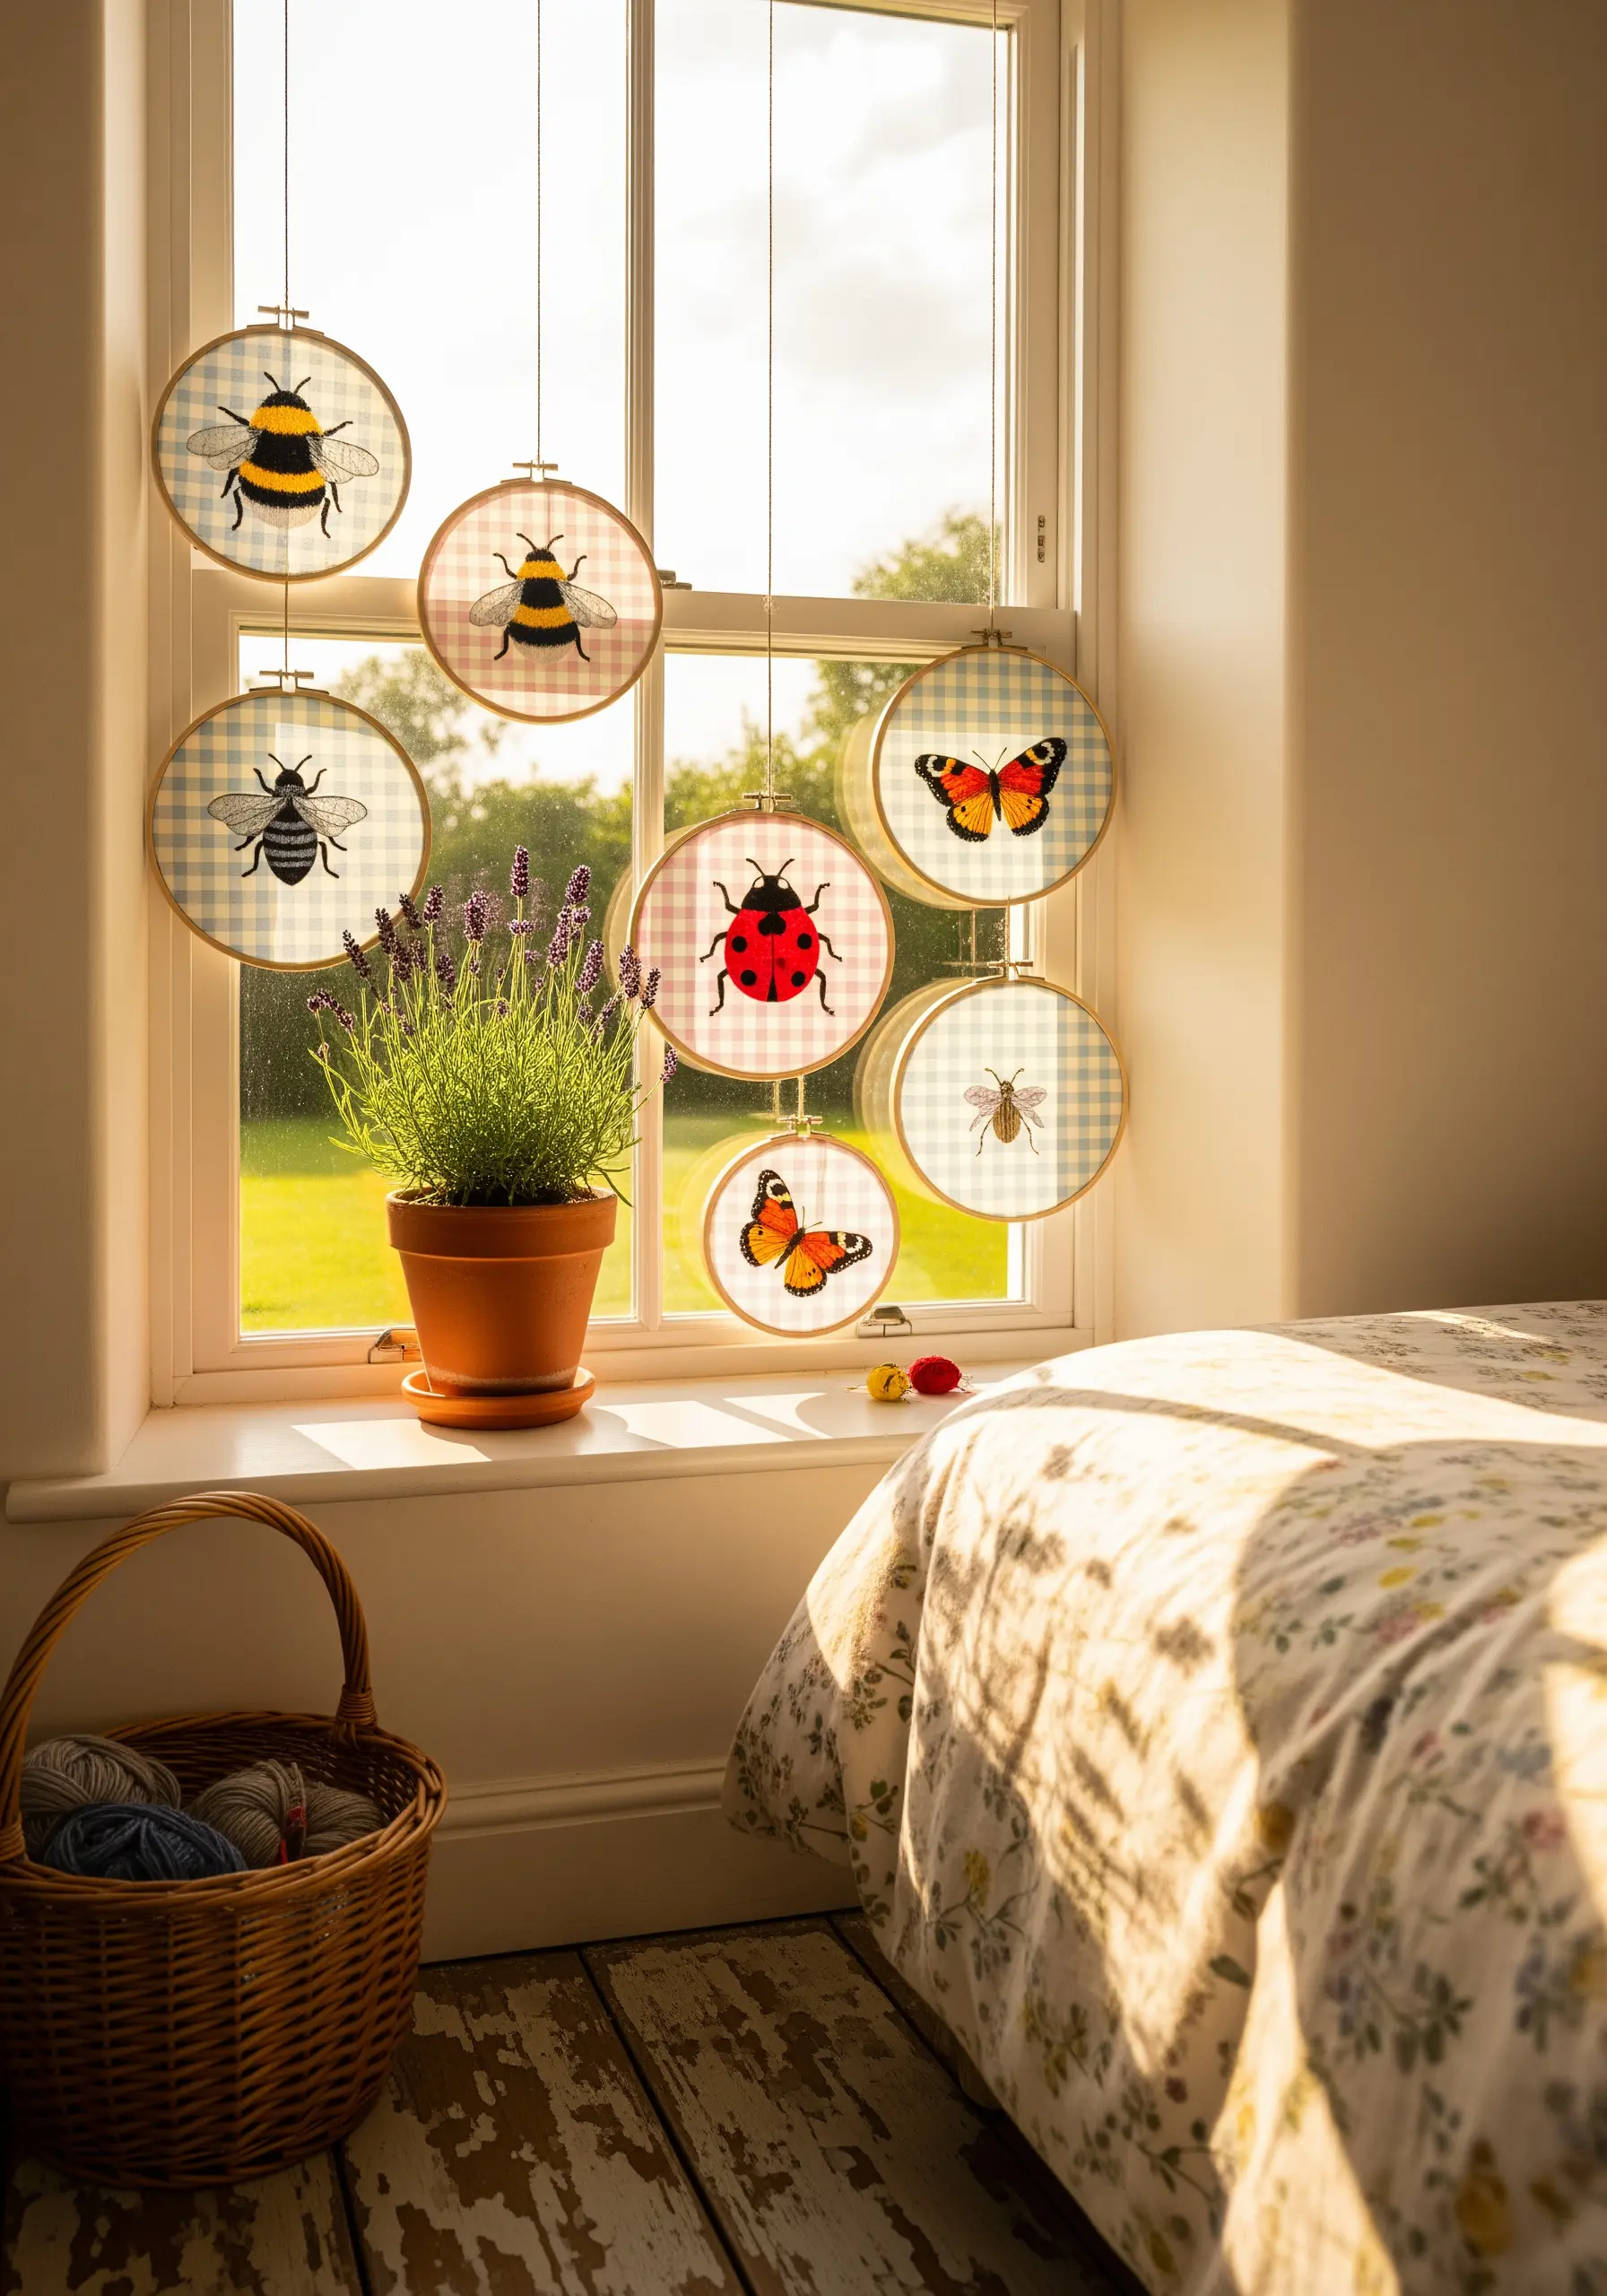
Turn your embroidery into dynamic art by stitching on semi-sheer fabric like gingham, organza, or voile.
When you hang these hoops in a window, the sunlight will filter through the fabric, making your stitched insects appear to glow.
Use bold satin stitches for the bodies and crisp backstitches for the delicate wings and legs.
This simple adjustment in fabric choice transforms your bird & butterfly embroidery patterns into beautiful, light-catching suncatchers.
18. Make a Statement with High-Contrast Line Art
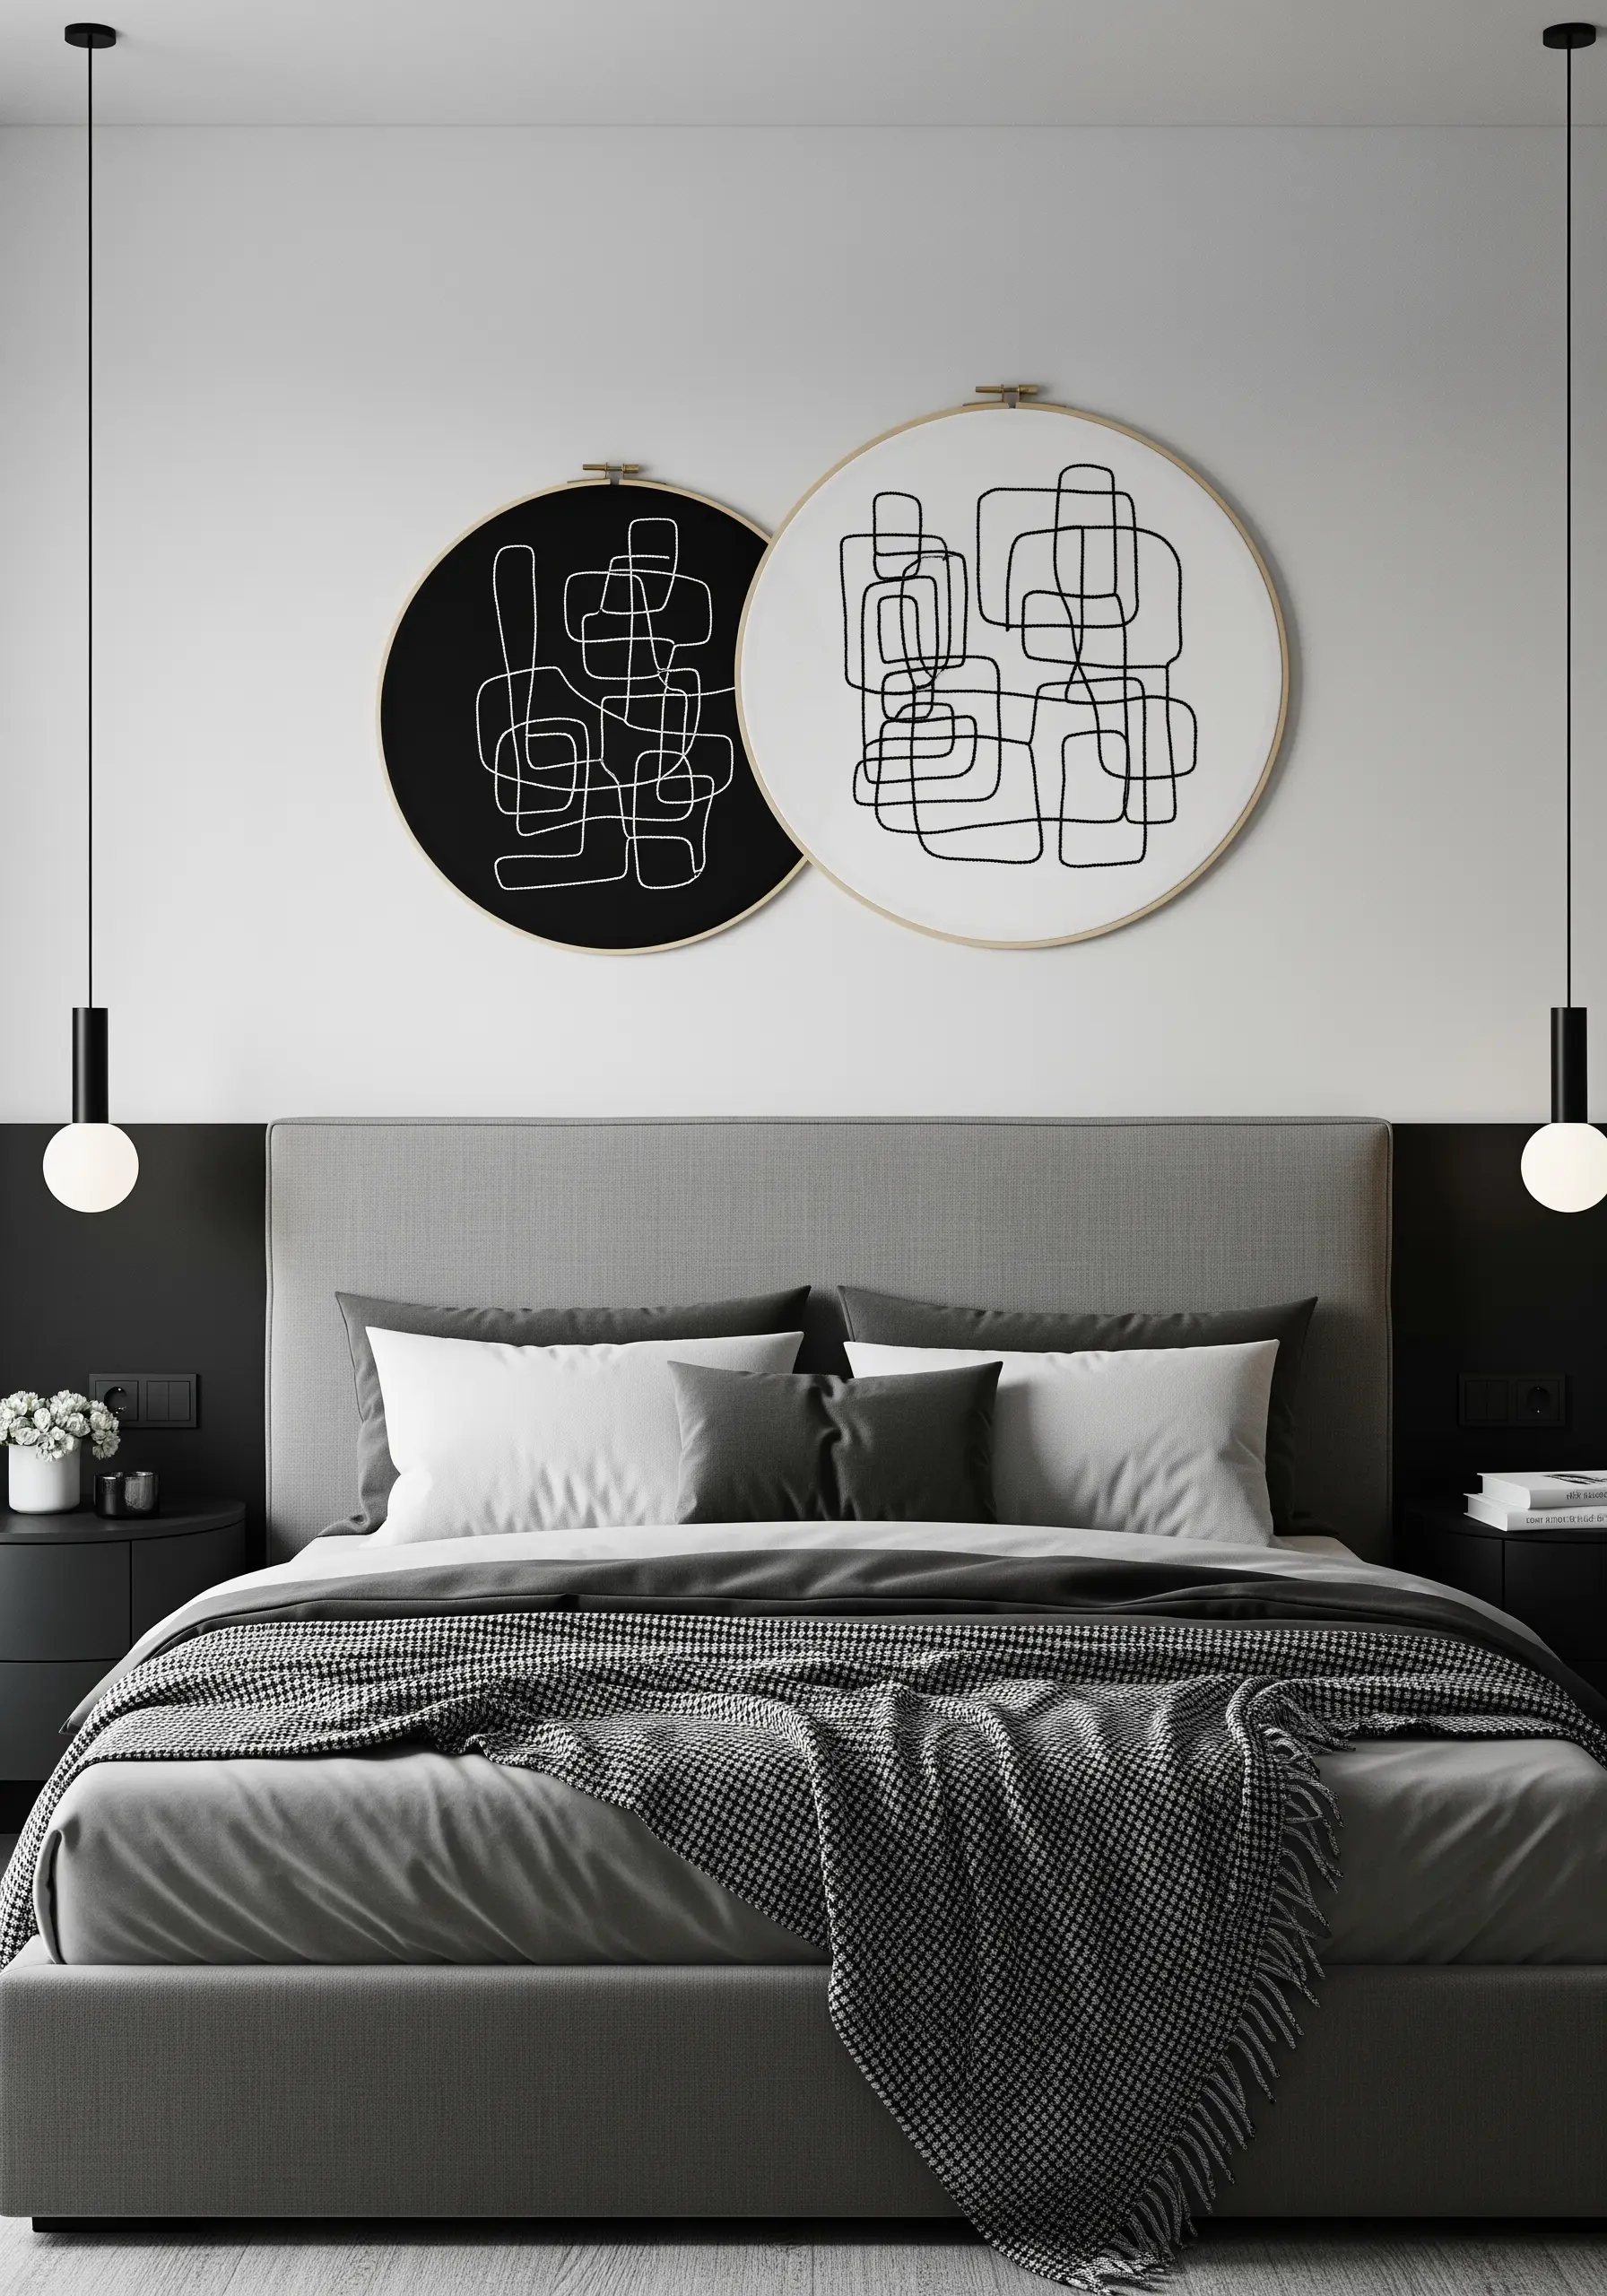
The striking impact of this design comes from its bold simplicity and high contrast.
Use a full six strands of embroidery floss or even a thicker perle cotton to create a substantial, graphic line.
To maintain a smooth, continuous curve, use a stem stitch, outline stitch, or couching stitch rather than a standard backstitch.
The interplay between the black thread and the white space creates powerful, modern abstract line art embroidery styles.
19. Chart Your Travels with an Interactive Map
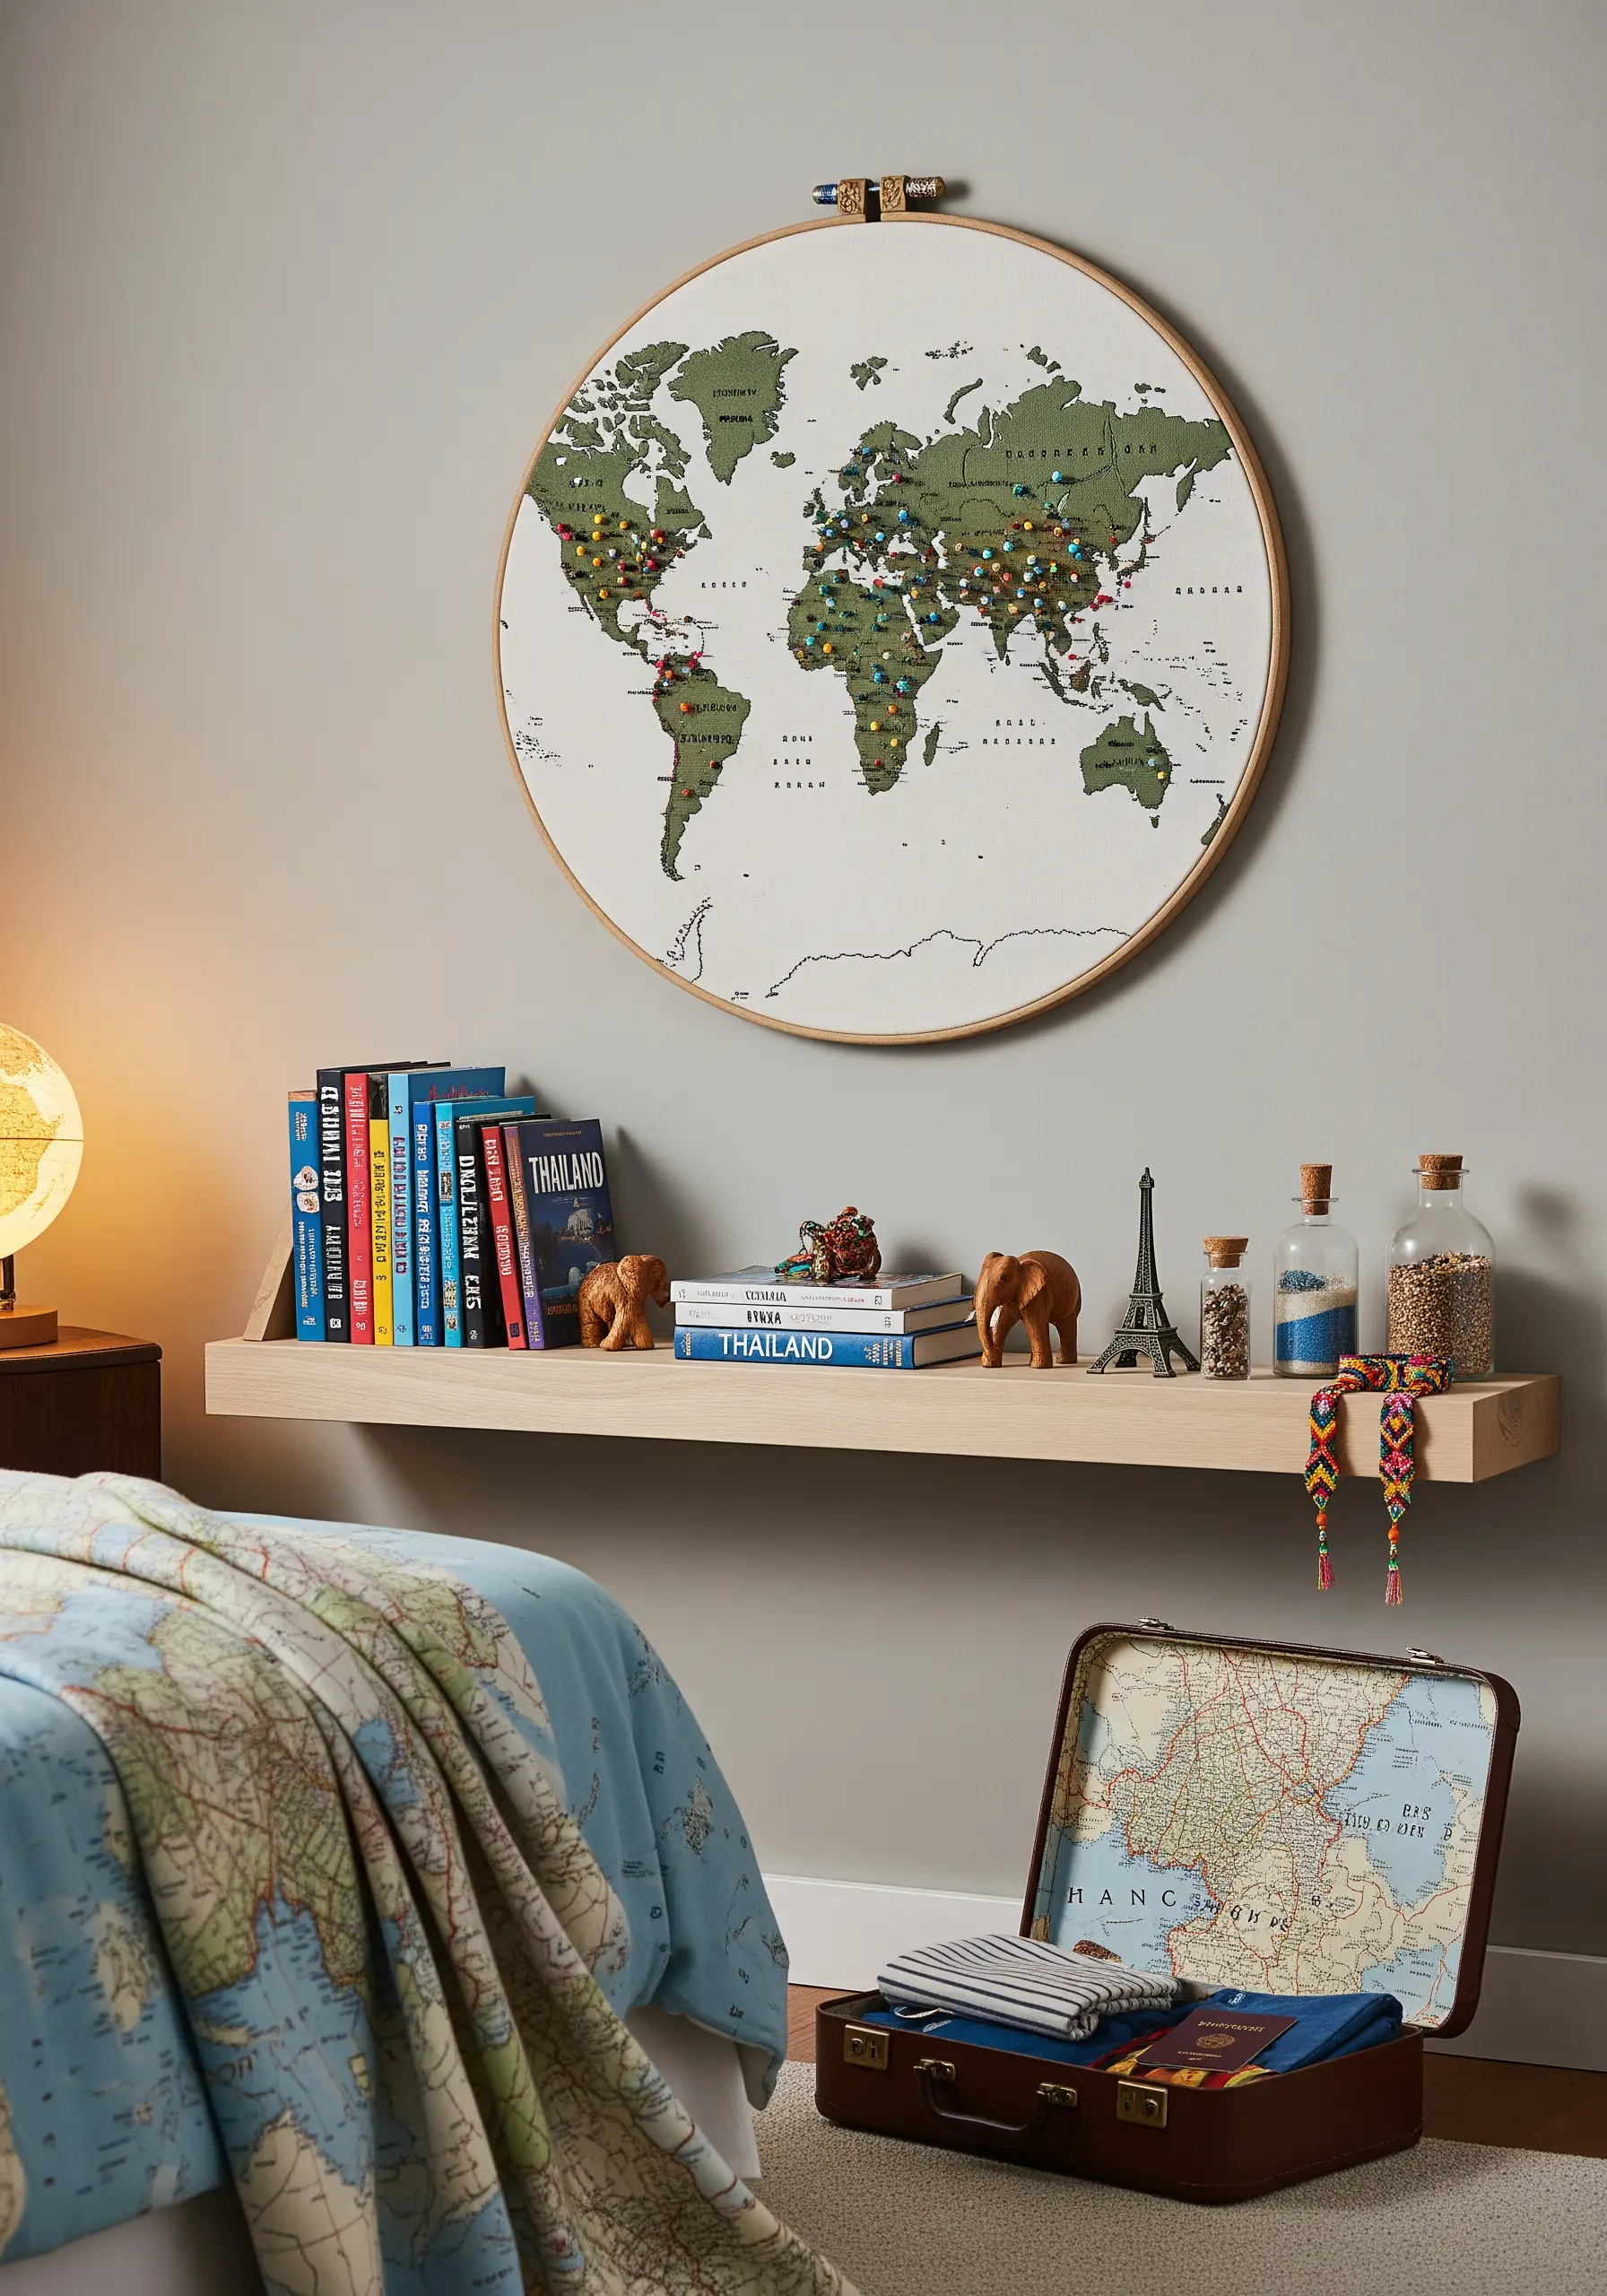
Create a living piece of art that documents your journeys.
Start by embroidering the world map continents using a simple backstitch or stem stitch.
The magic is in the personalization: use colorful French knots, seed beads, or even tiny map pins to mark the places you’ve visited or dream of exploring.
This project evolves with you, becoming a beautiful and meaningful record of your adventures and one of the most personal minimal travel-themed embroidery ideas.
20. Evoke Autumn Warmth with Felt Appliqué
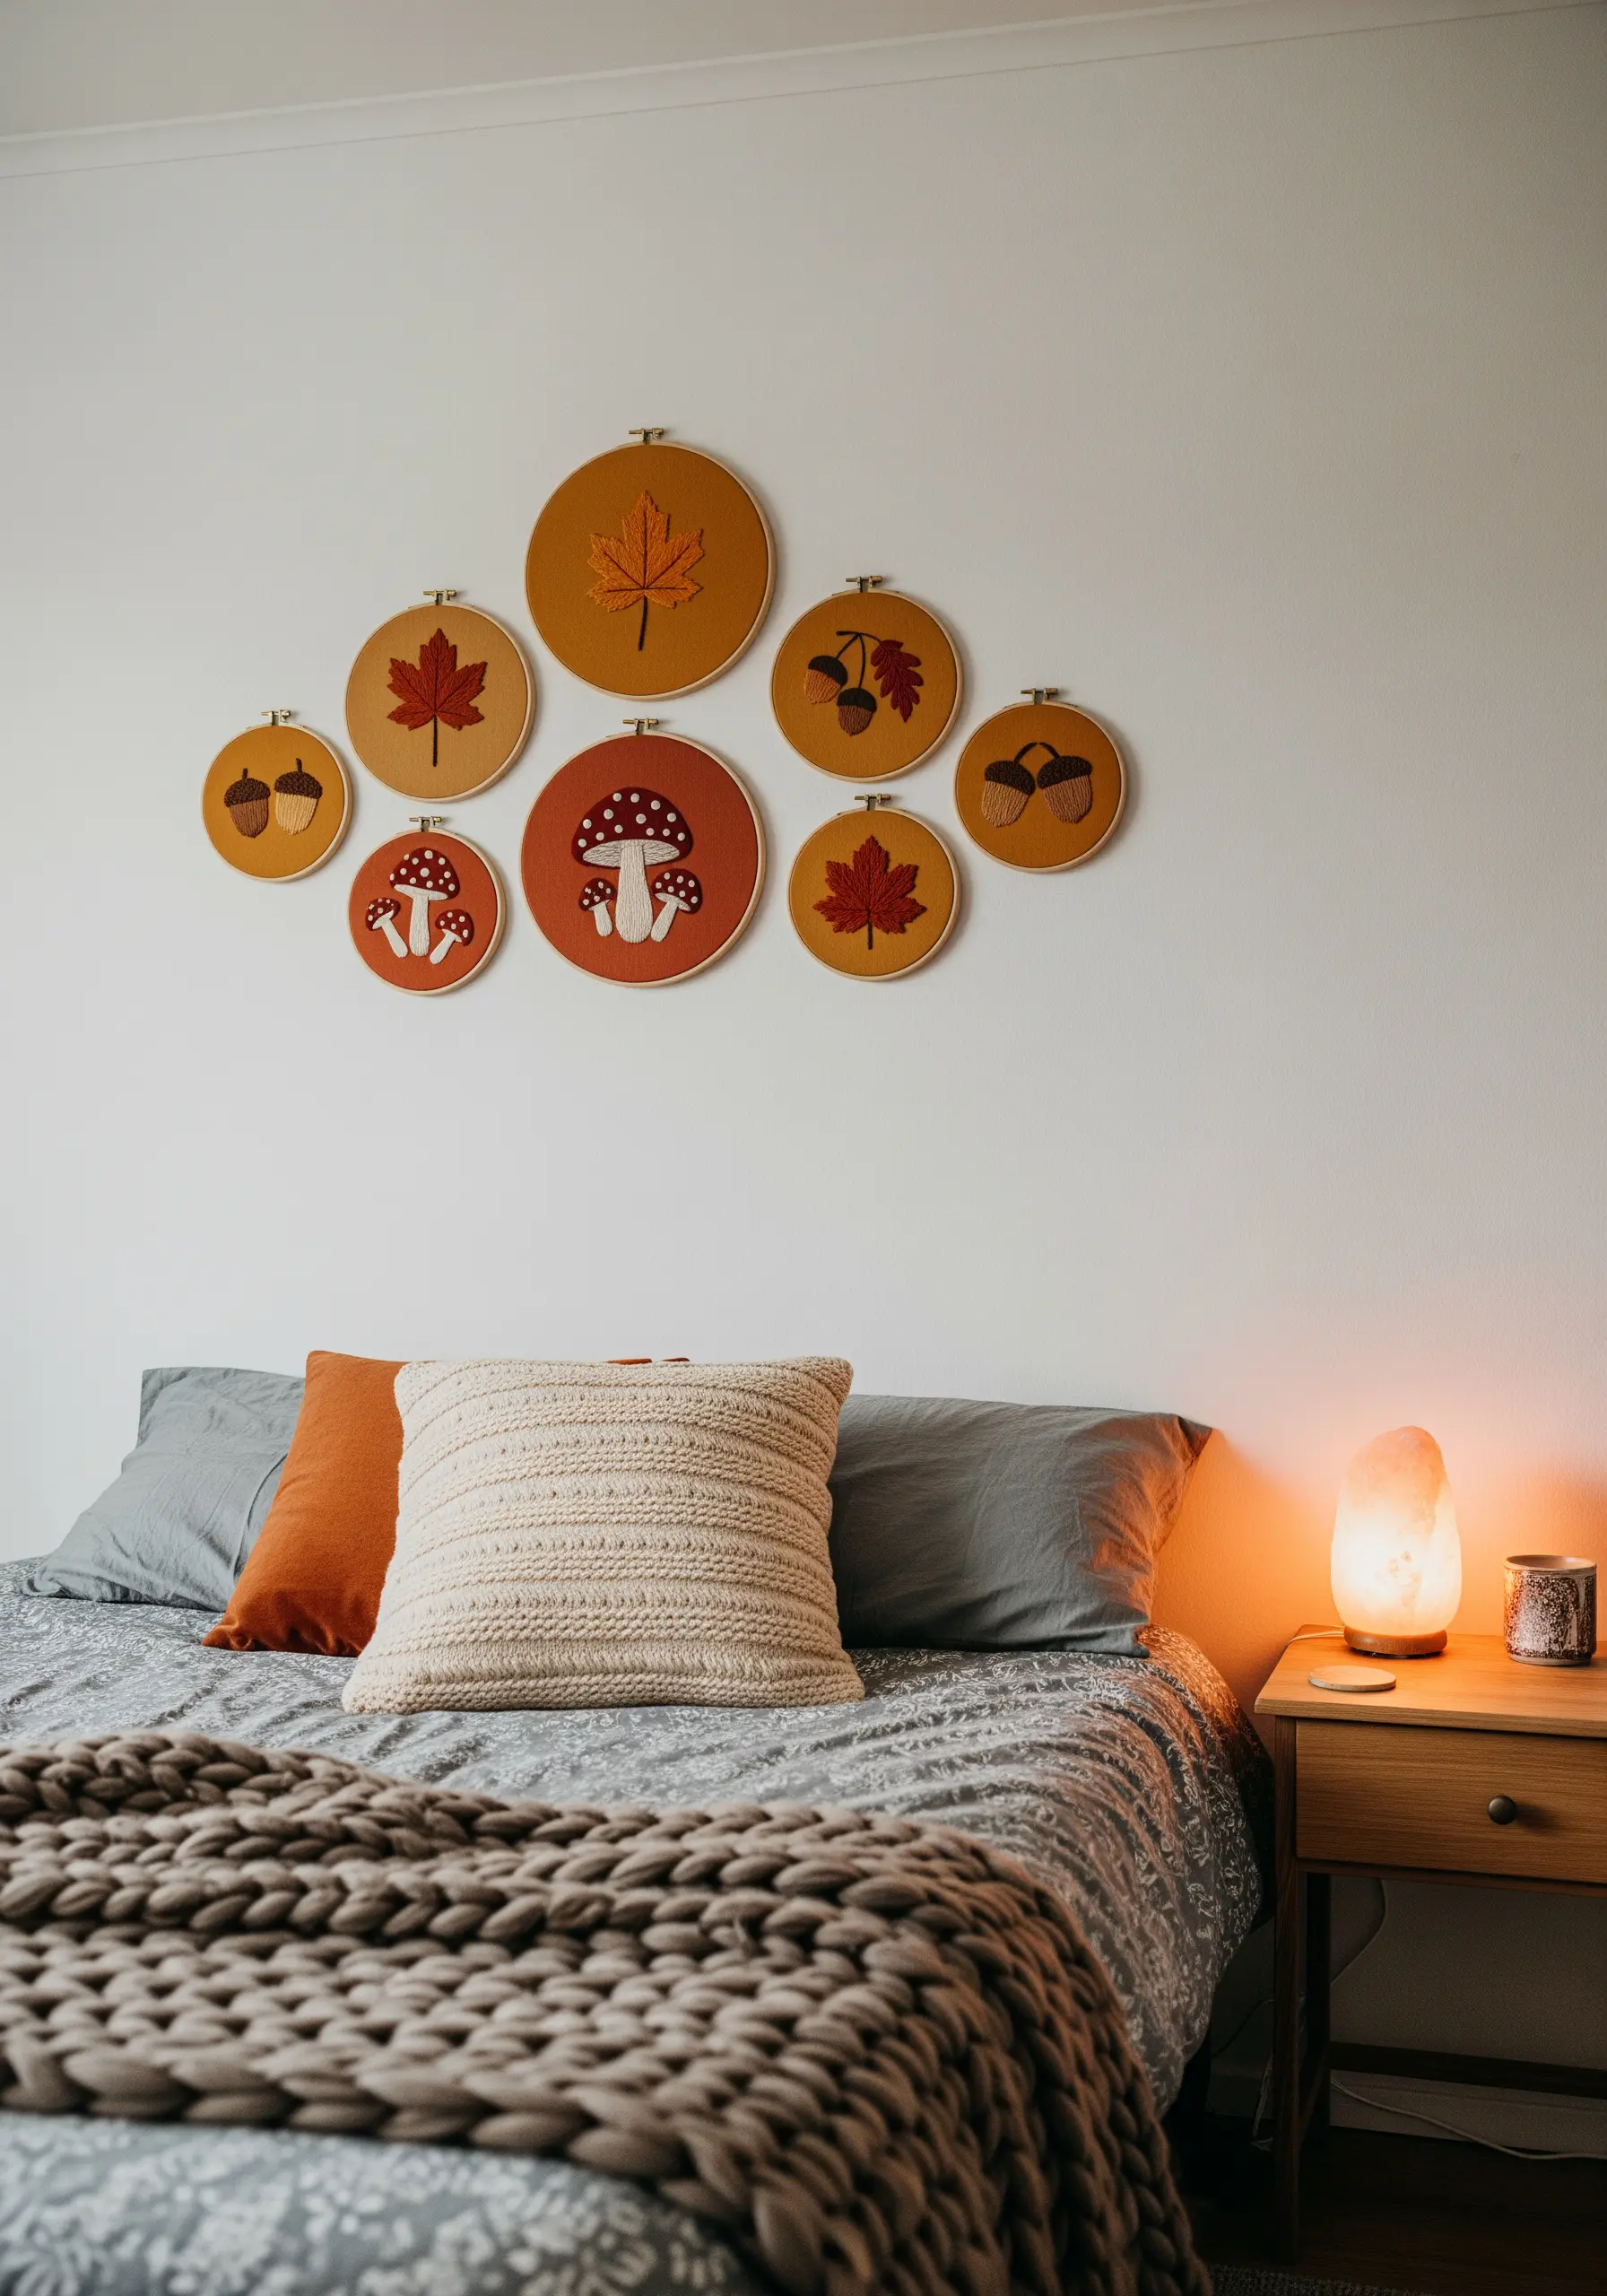
To create bold, graphic shapes with a cozy texture, combine embroidery with felt appliqué.
Cut your leaf, acorn, and mushroom shapes from colored felt and attach them to your base fabric using a decorative blanket stitch or a simple running stitch around the edges.
This technique is much faster than filling large areas with satin stitch and adds instant dimension.
It’s an ideal method for creating seasonal framed embroidery pieces with a charming, handmade feel.
21. Create Depth with Monochromatic Layering
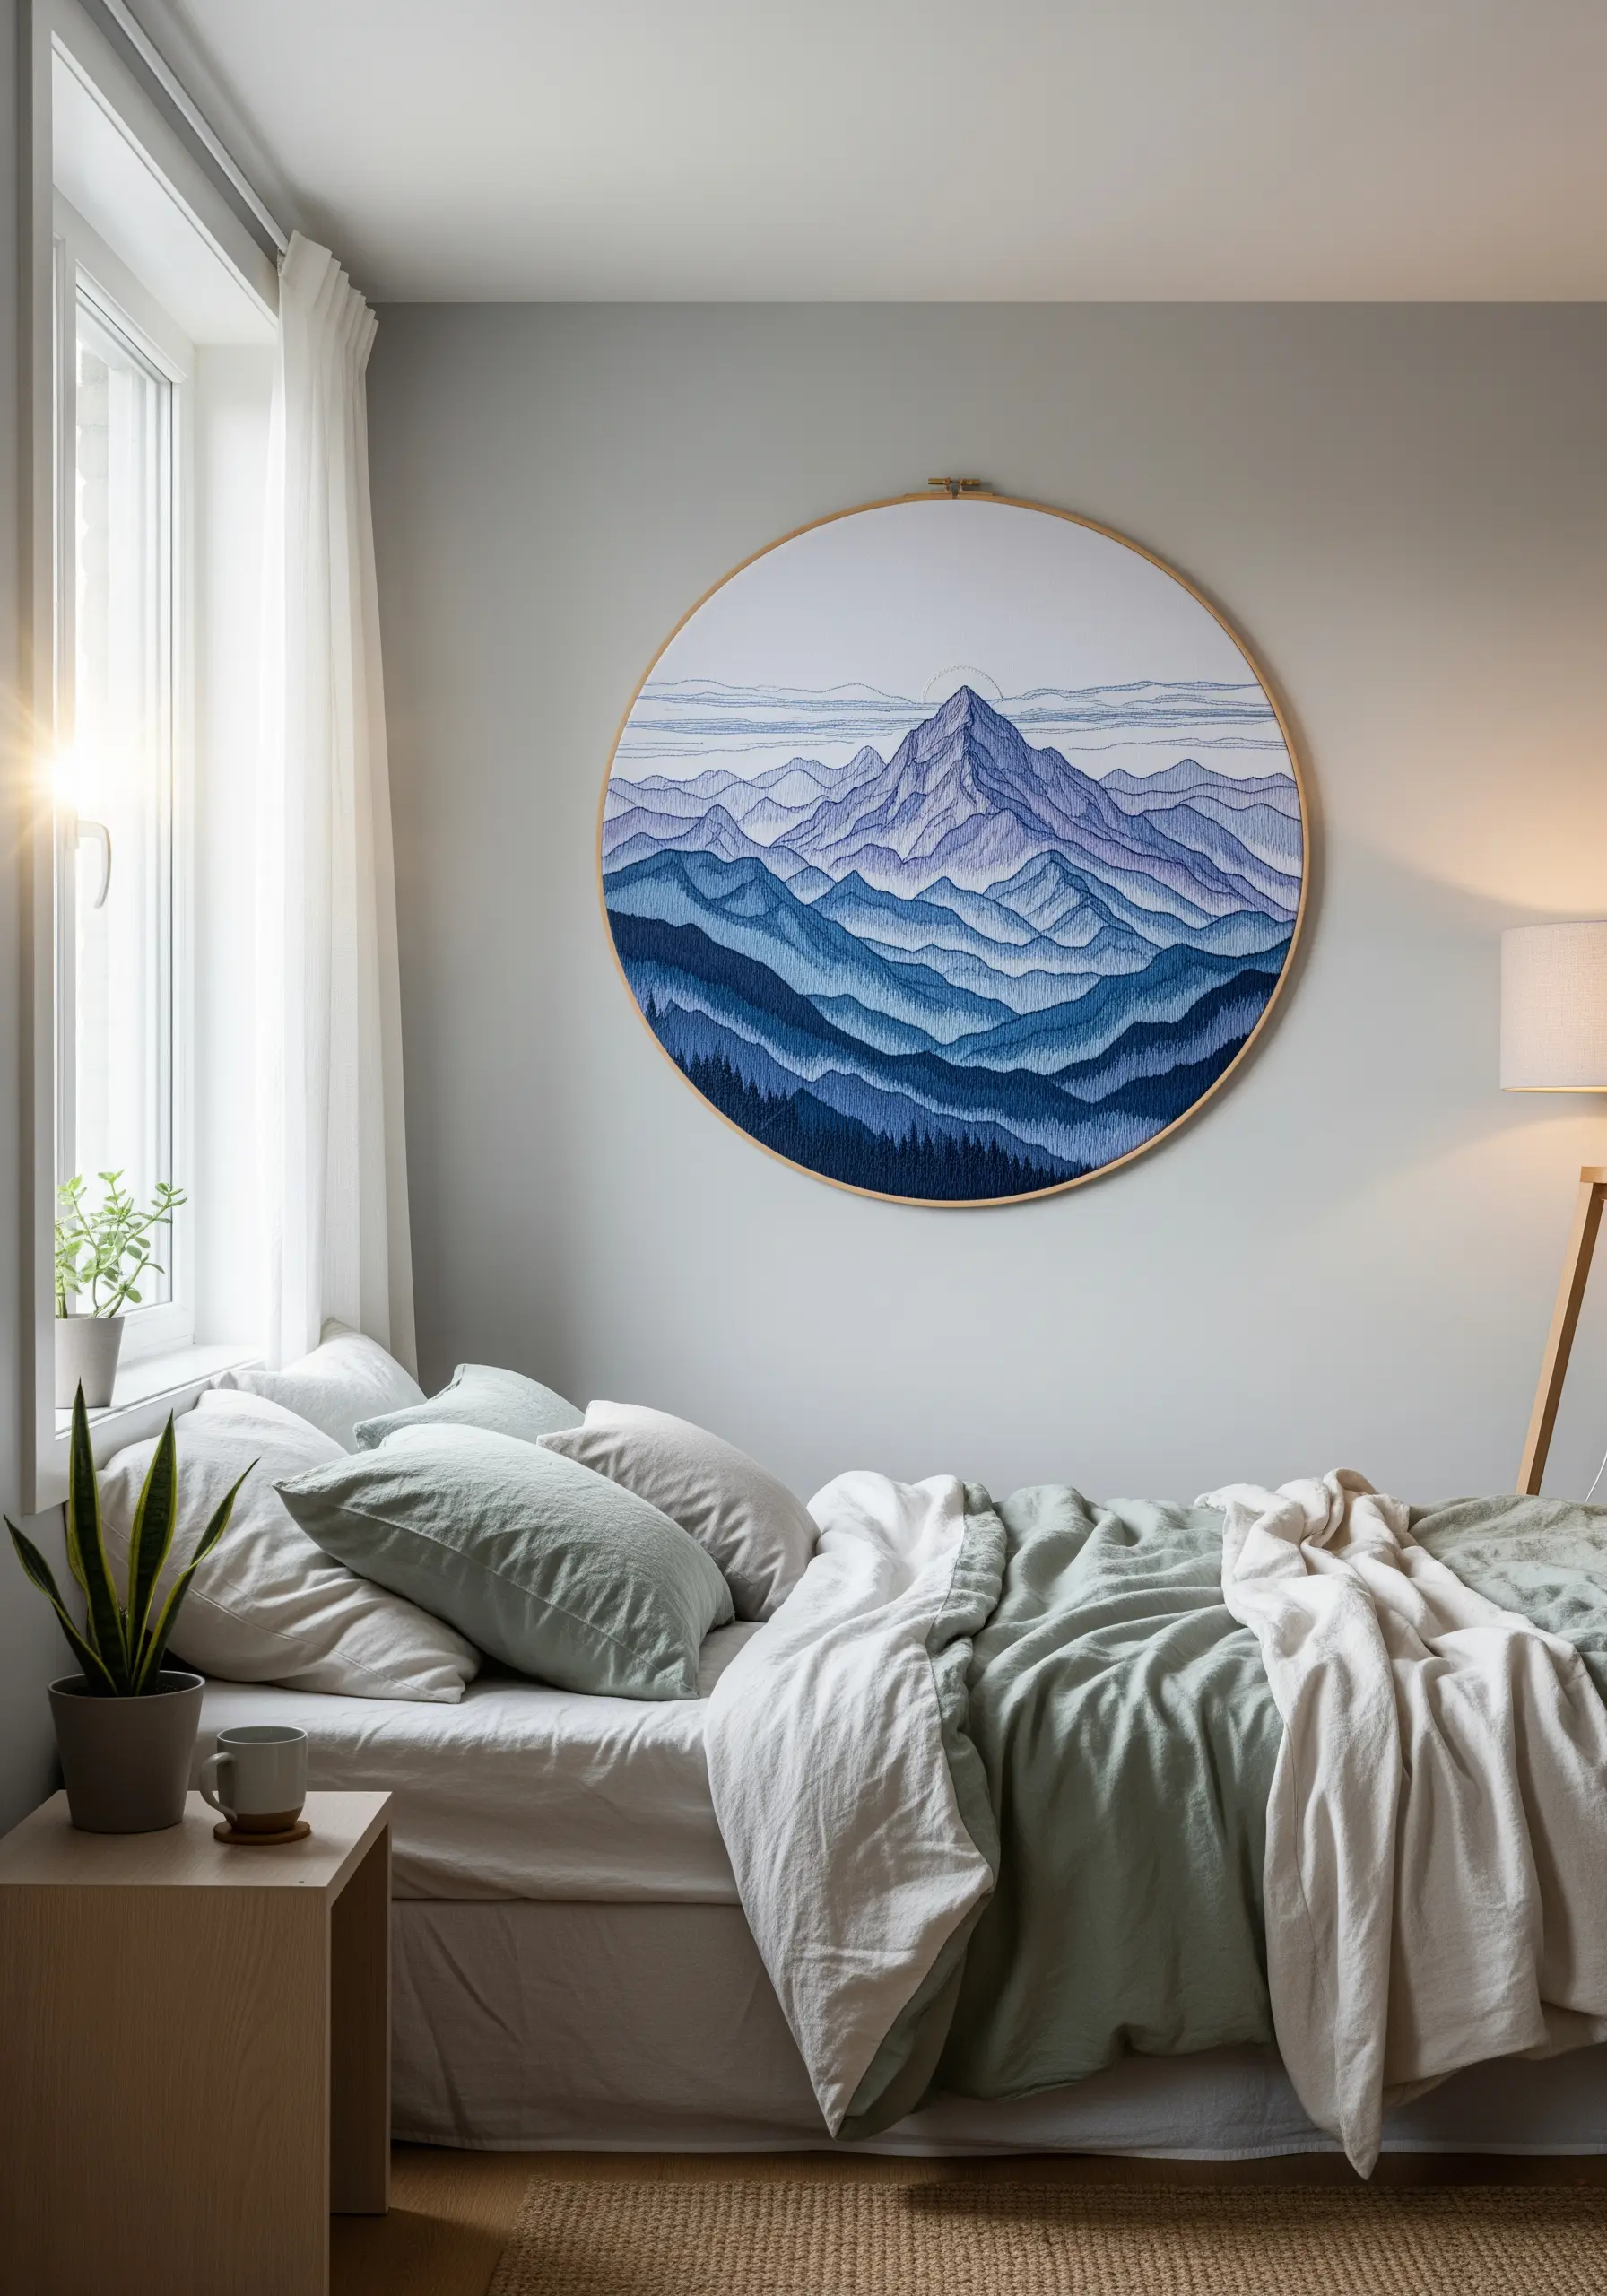
This serene mountainscape proves you don’t need a full spectrum of colors to create a piece with incredible depth.
Select several shades from a single color family, like blues or grays, ranging from light to dark.
Use simple backstitches or running stitches to outline each mountain ridge, placing the darkest shades in the foreground and the lightest in the background.
This creates an illusion of atmospheric perspective, perfect for relaxing nature scene embroidery hoops.
22. Add Texture to a Retro Floral Print
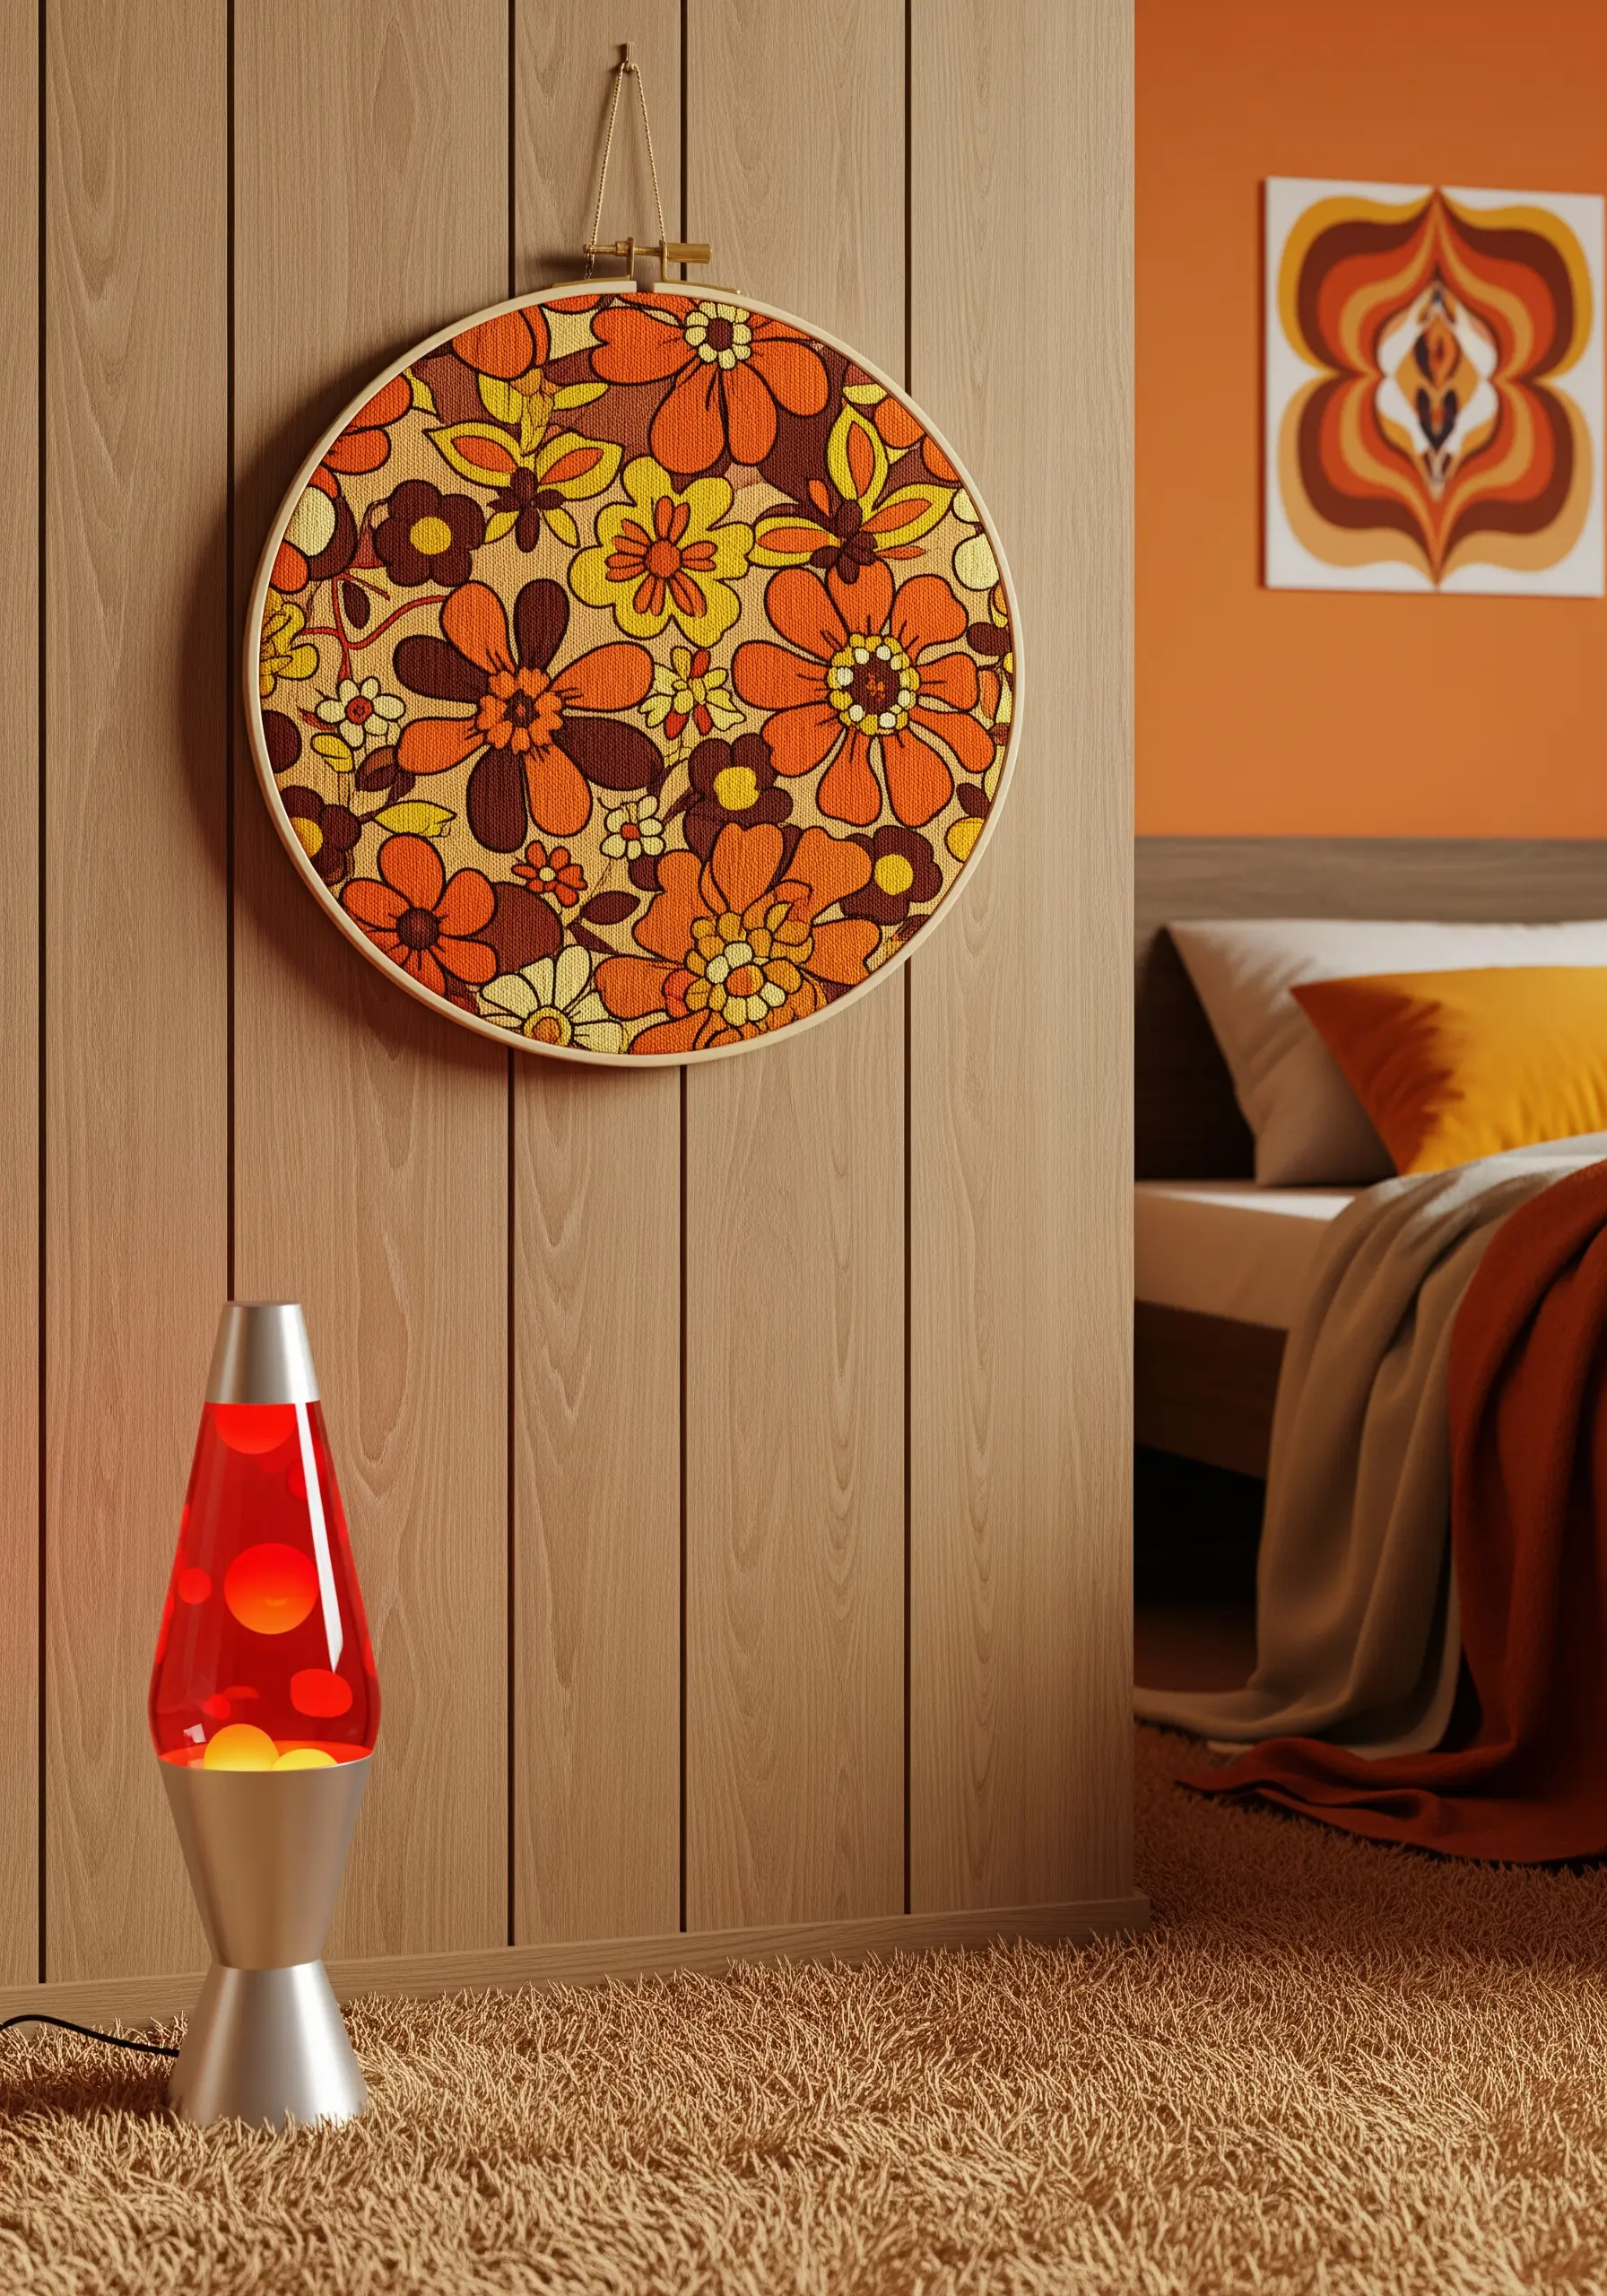
Instead of starting with a blank canvas, use a bold, patterned fabric as your guide.
Choose a retro floral print and use embroidery to elevate it, adding texture and a handmade touch.
Trace the outlines of the existing flowers and leaves with a chunky chain stitch or a thick stem stitch using a contrasting thread color like off-white or dark brown.
This simple technique transforms printed fabric into a unique, dimensional piece of art, perfectly capturing the vibe of retro 70s-style pillow embroidery designs.
23. Stitch Soft Lettering with Gradient Threads
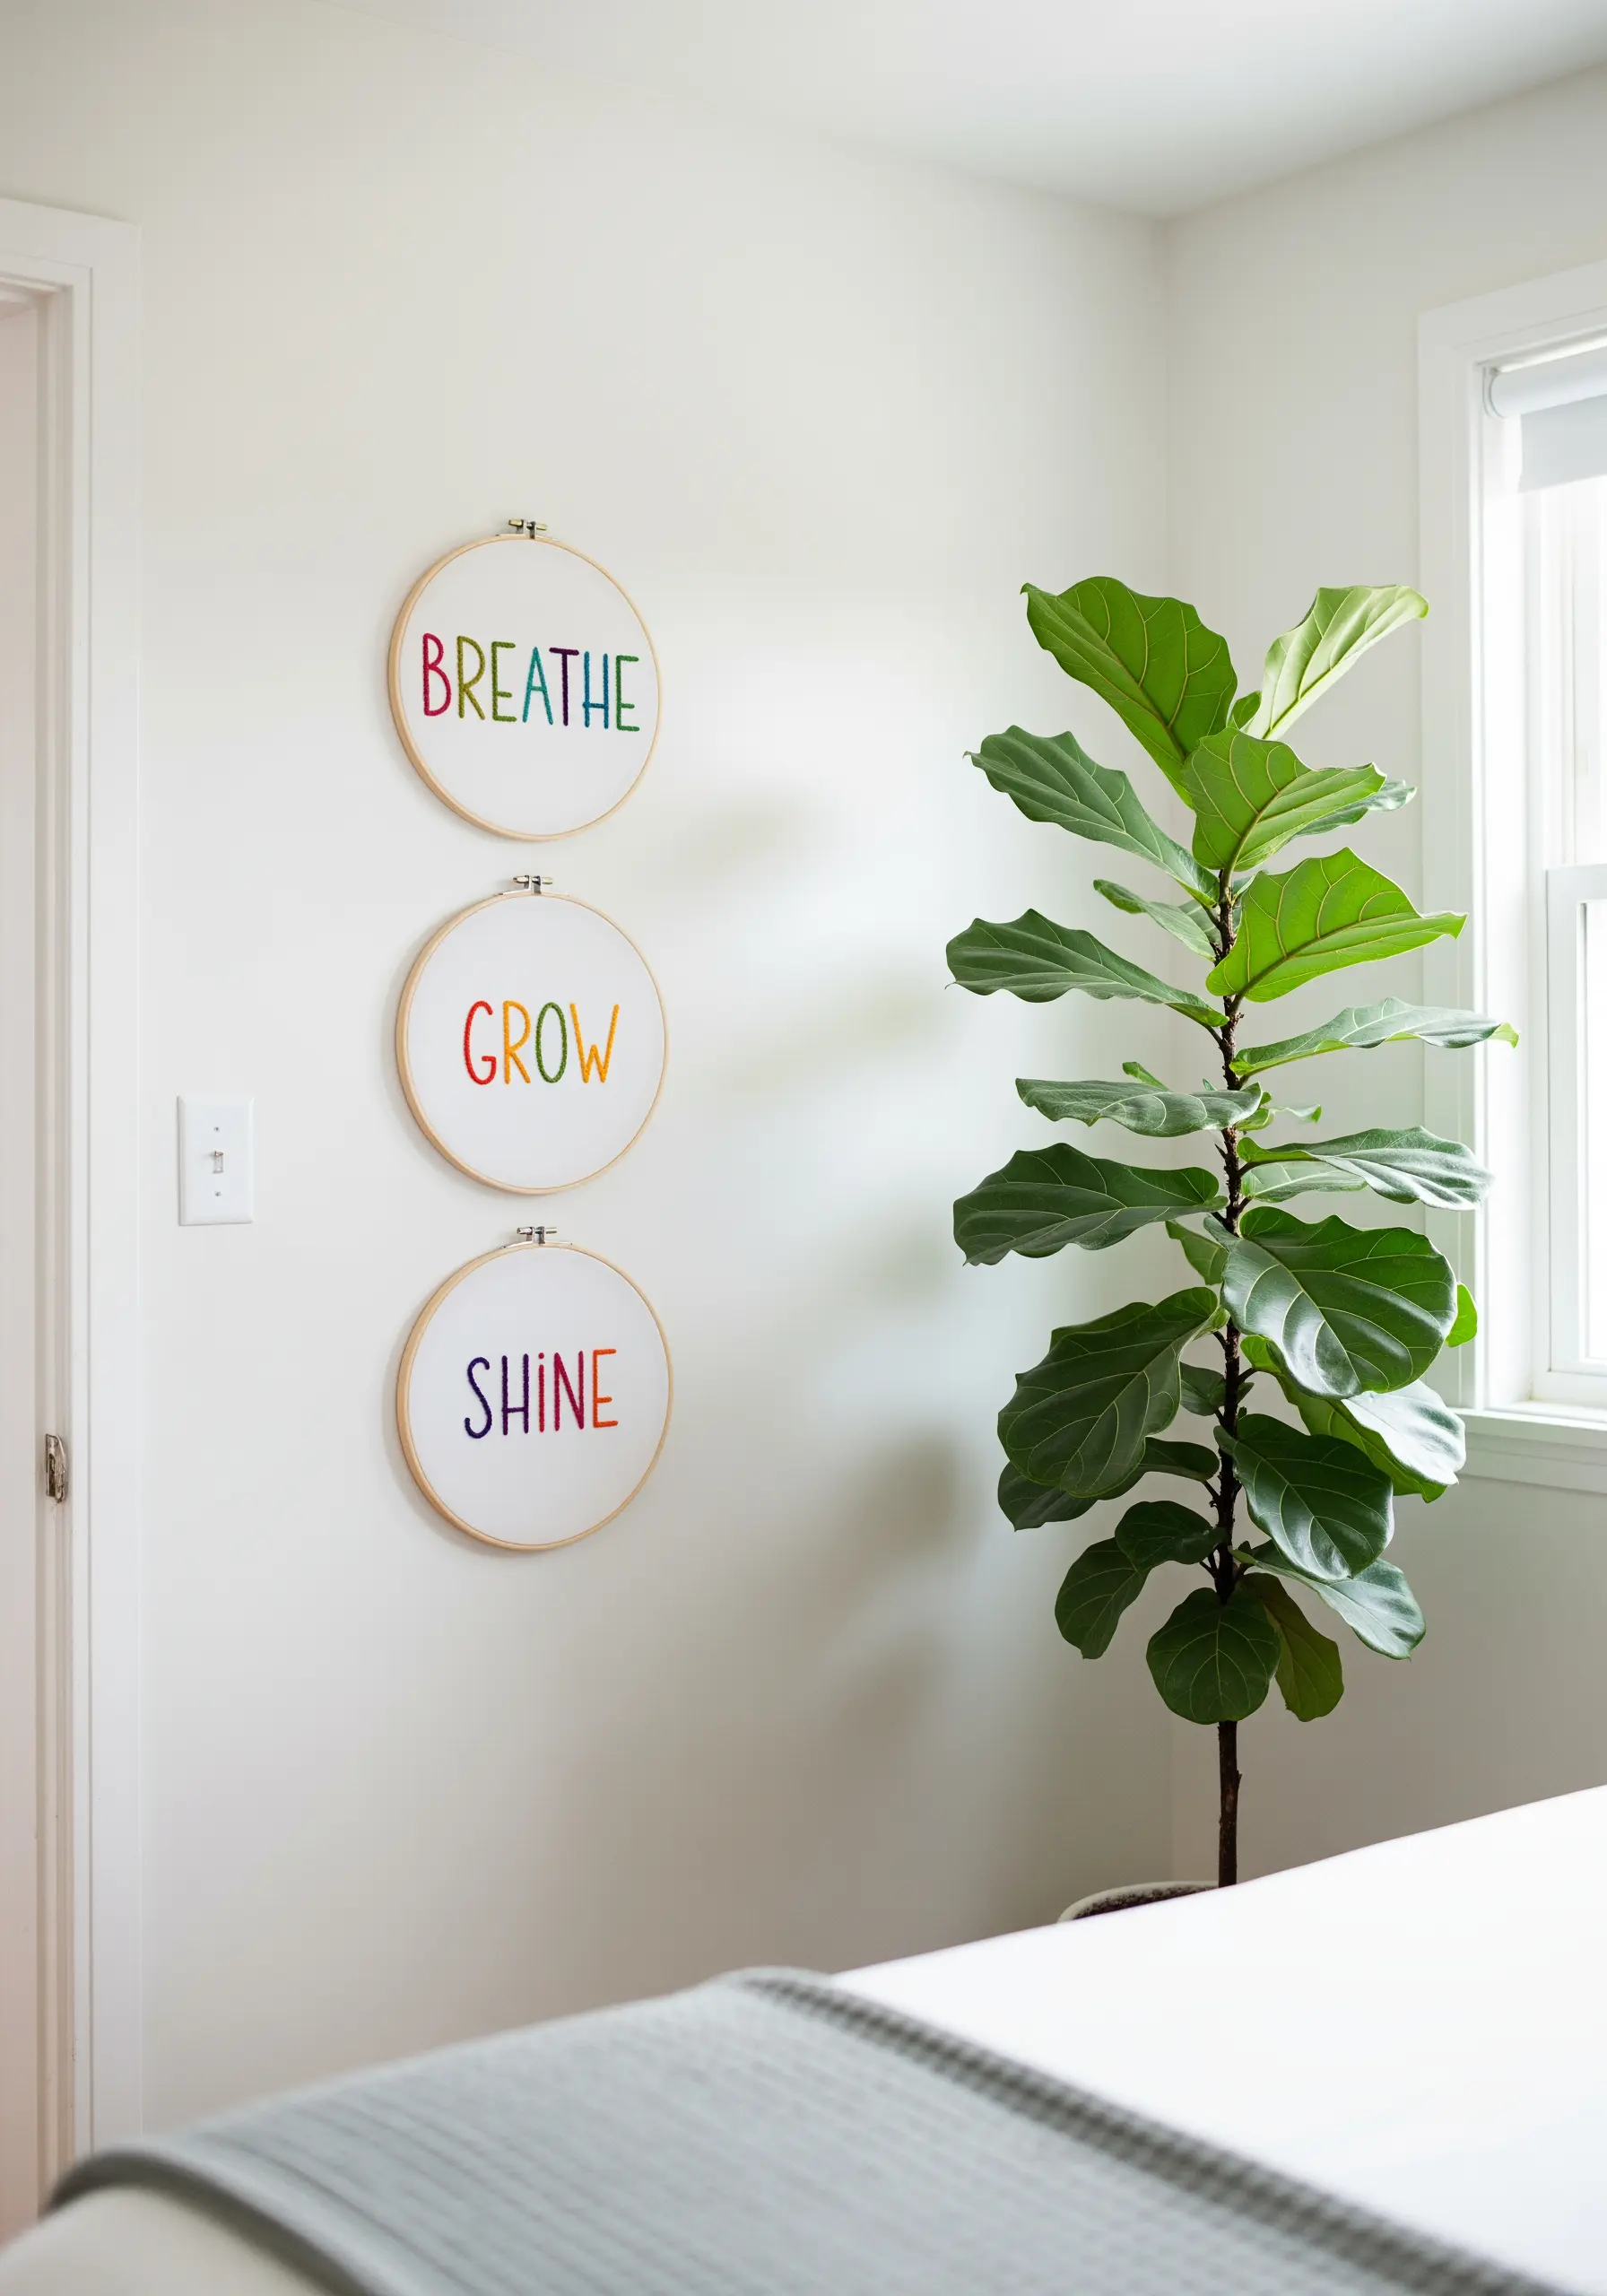
To achieve this gentle, watercolor-like transition of color, you have two options: use variegated embroidery floss, which changes color on its own, or blend the colors manually.
To blend, stitch each letter with two strands of floss, gradually swapping one color for the next as you move across the word.
For example, start with two strands of red, then switch to one red and one orange, then two orange, and so on.
This technique creates beautiful ombre gradient thread embroidery ideas perfect for uplifting words.
24. Explore Texture with Tone-on-Tone Florals
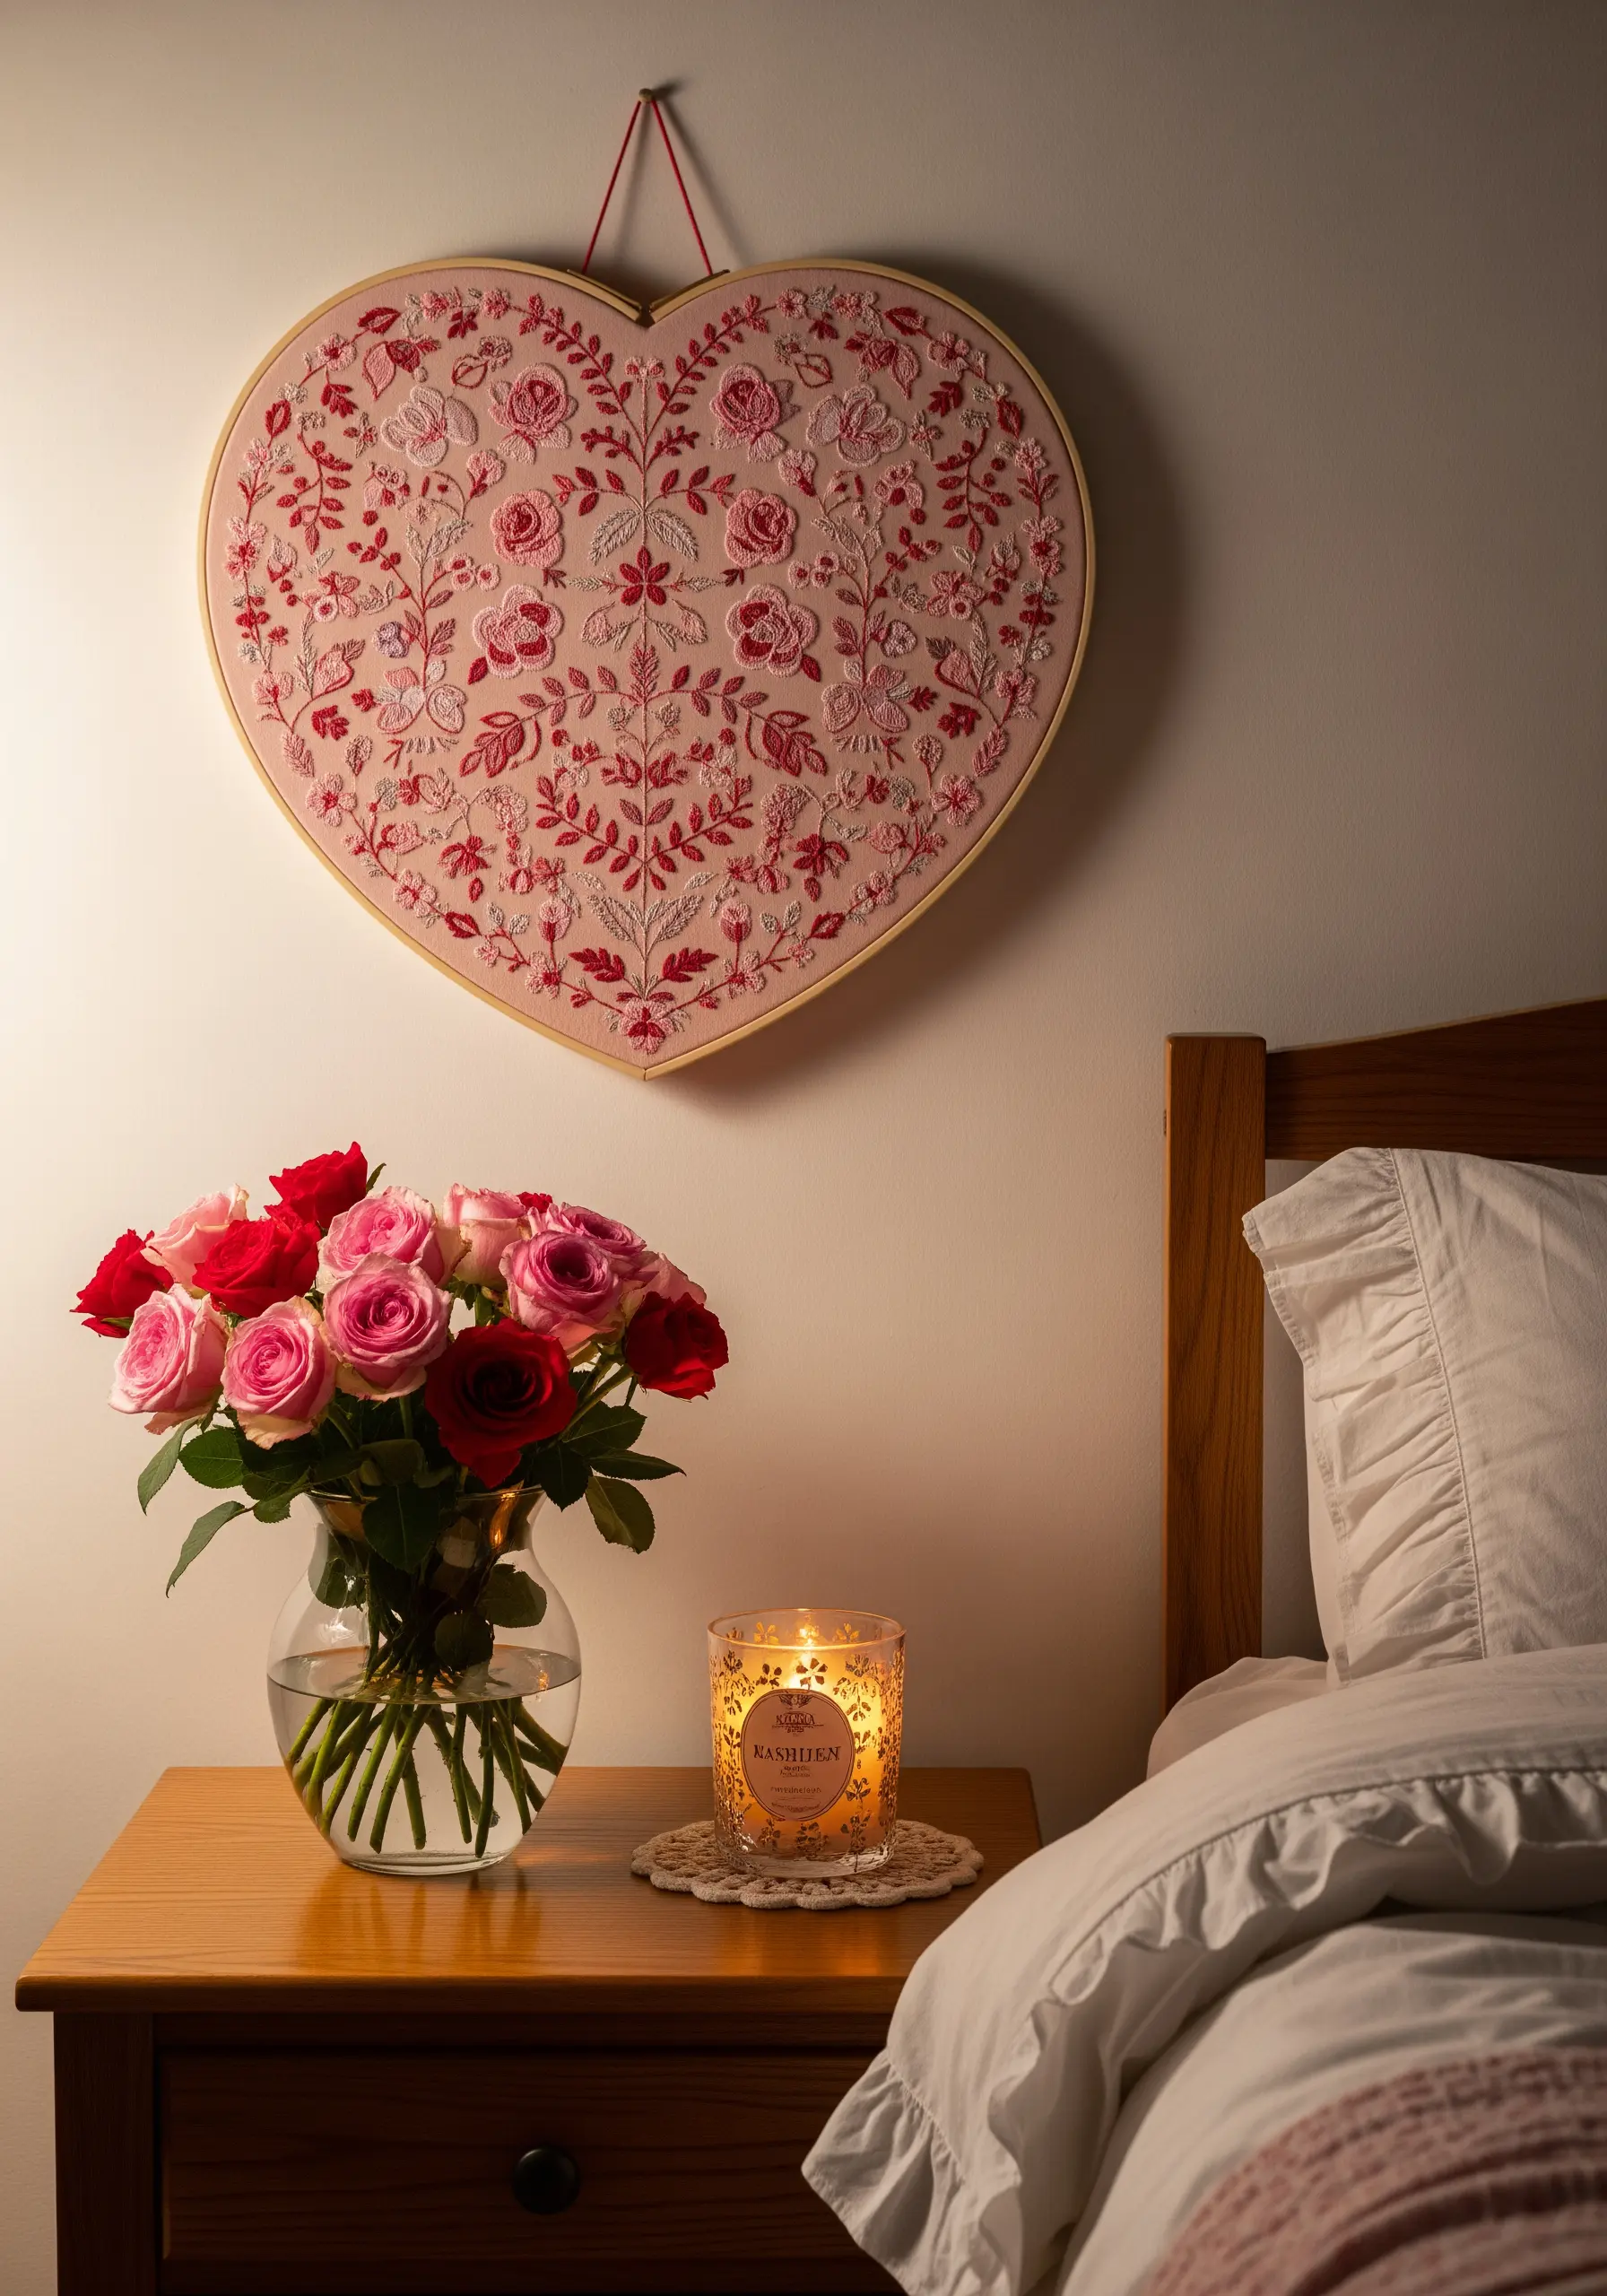
This elegant design proves that texture can be more powerful than color contrast.
By stitching with pink and red threads on a pink fabric base, you draw the eye to the dimension and form of the stitches themselves.
Incorporate a variety of highly textural stitches: bullion knots for rosebuds, woven wheels for full blooms, and dense French knots for filler flowers.
This monochromatic approach results in sophisticated and romantic embroidery patterns perfect for couples’ bedrooms.
25. Craft a Cozy Scandinavian Winter Scene
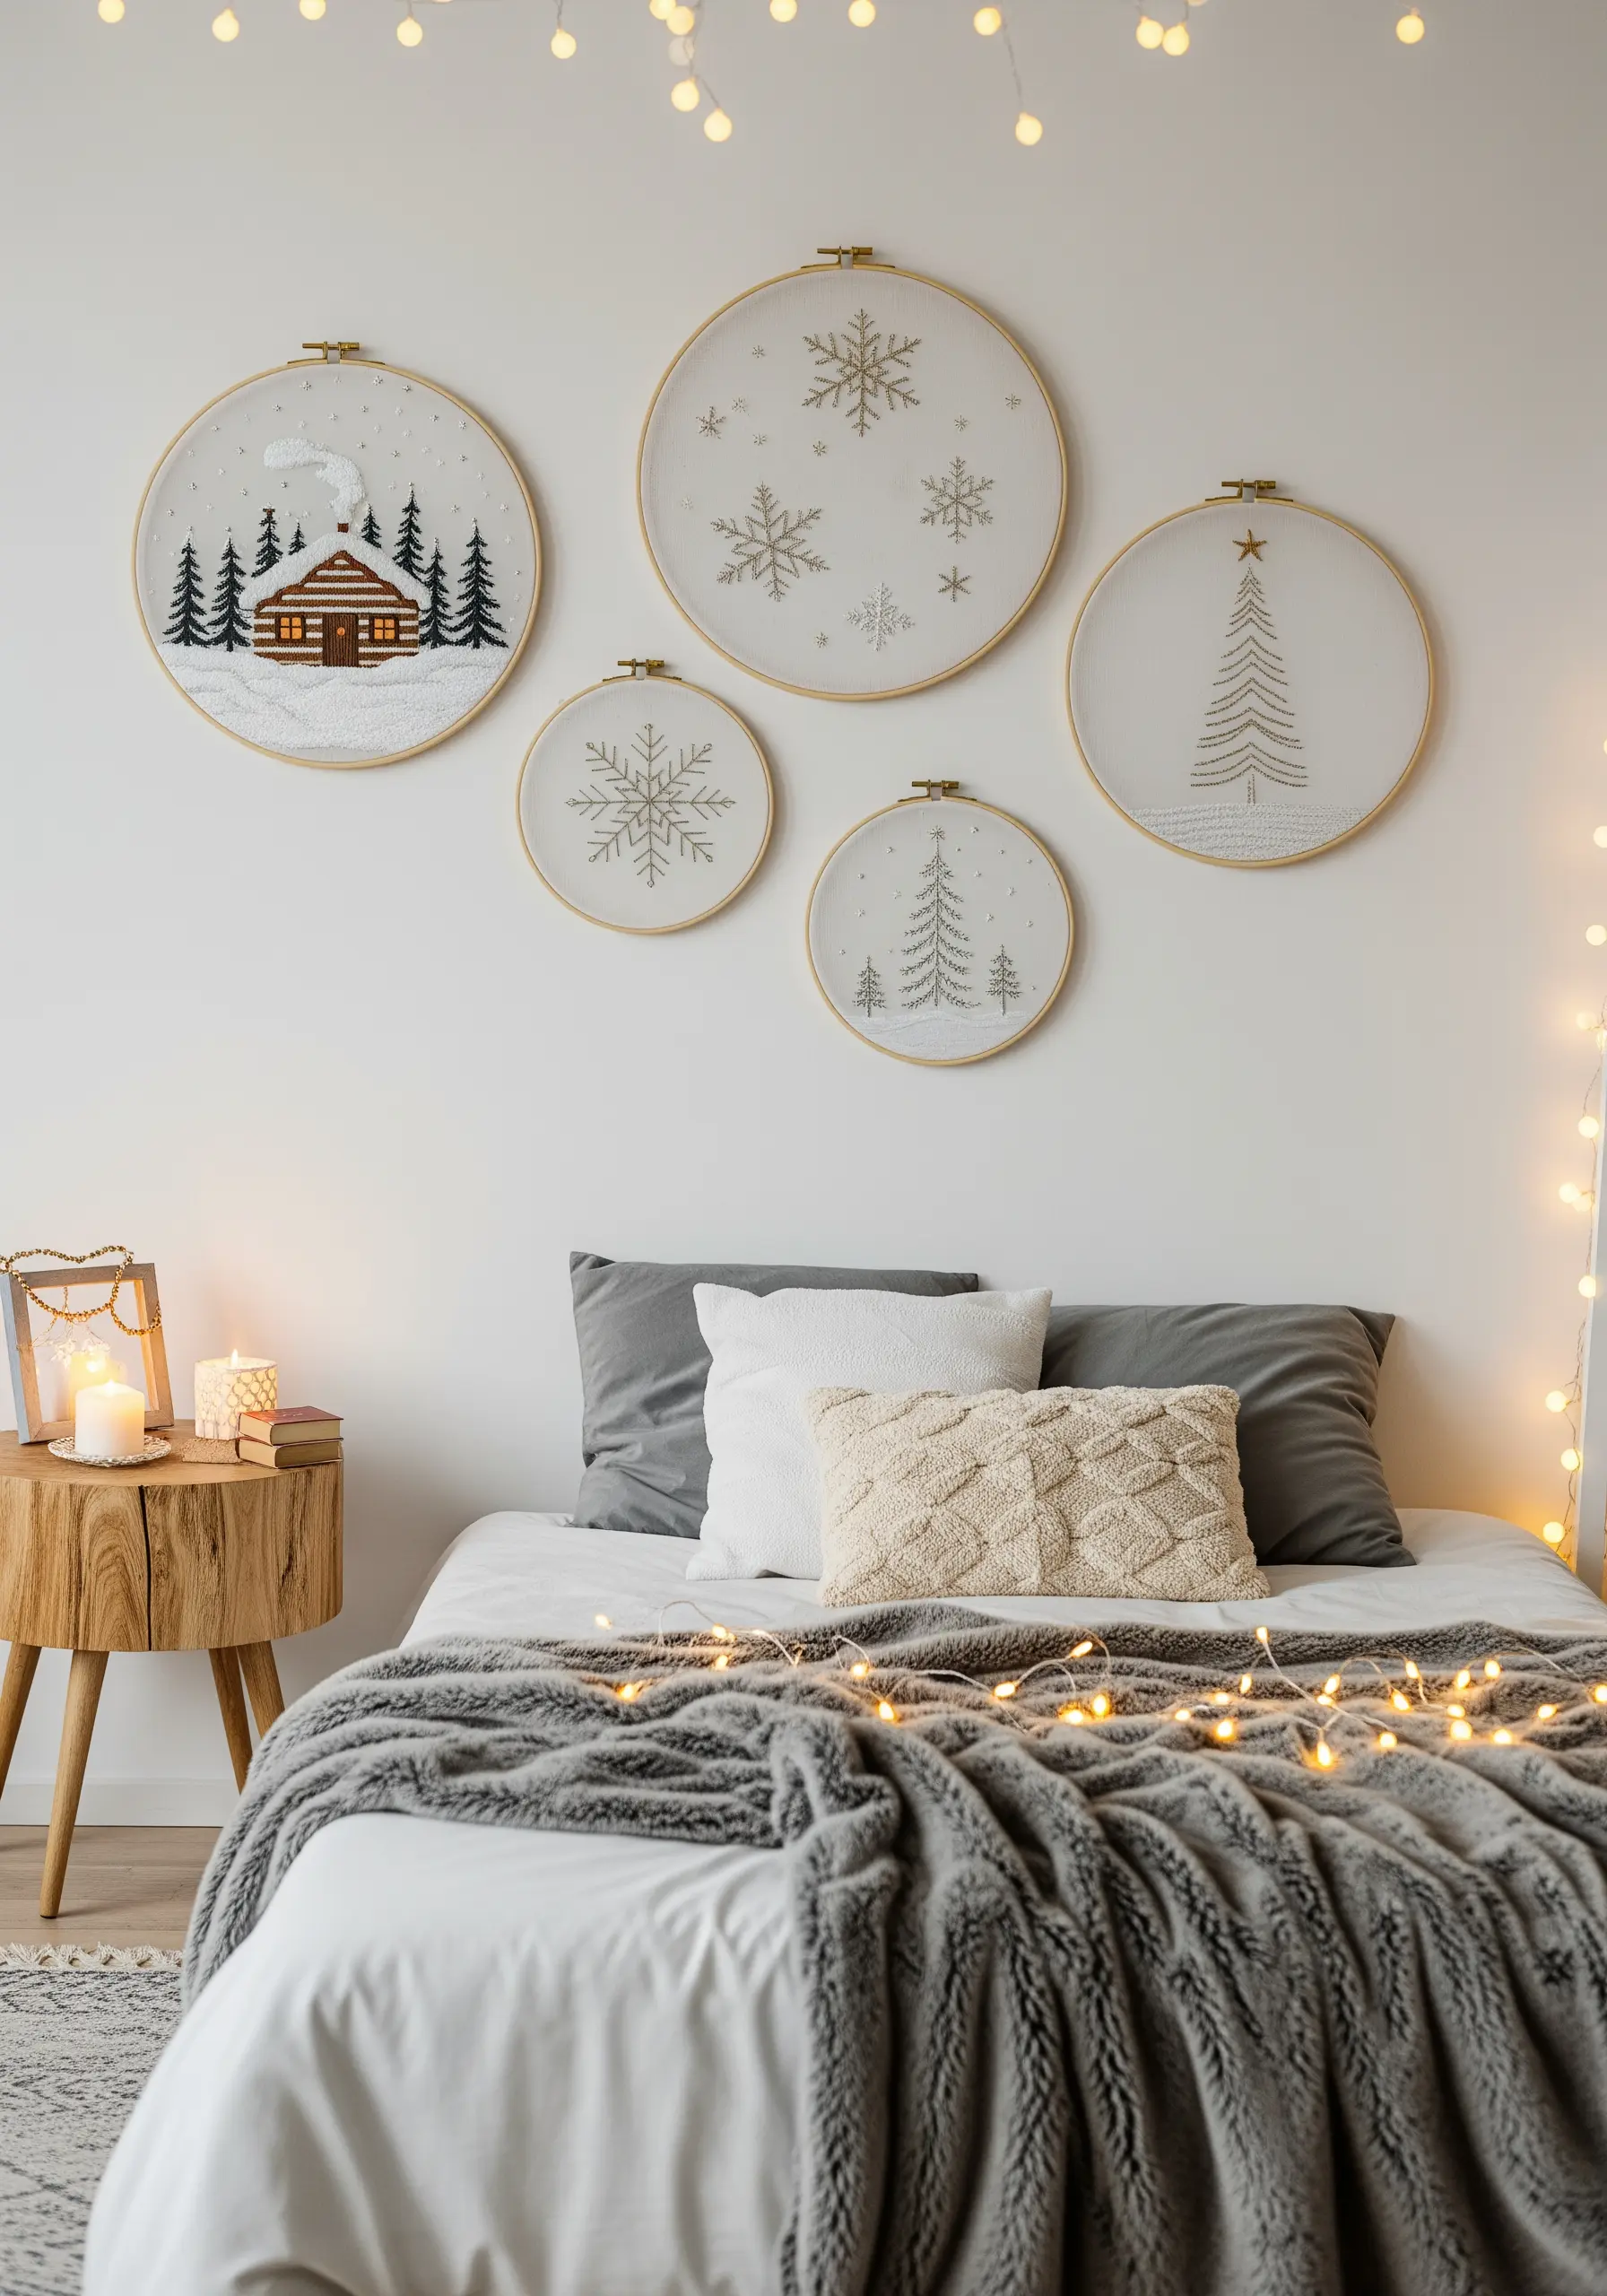
Capture a crisp, Nordic winter aesthetic by using a minimalist color palette on a neutral oatmeal or gray linen.
Use a bright white or metallic silver thread to stitch snowflakes, using a combination of straight stitches and French knots to create unique designs.
For the cabin, use simple backstitches for the logs and a warm yellow satin stitch for the windows to create an inviting glow.
These soft and serene stitching projects are perfect for creating a cozy atmosphere.
26. “Paint” a Portrait with Fabric Collage
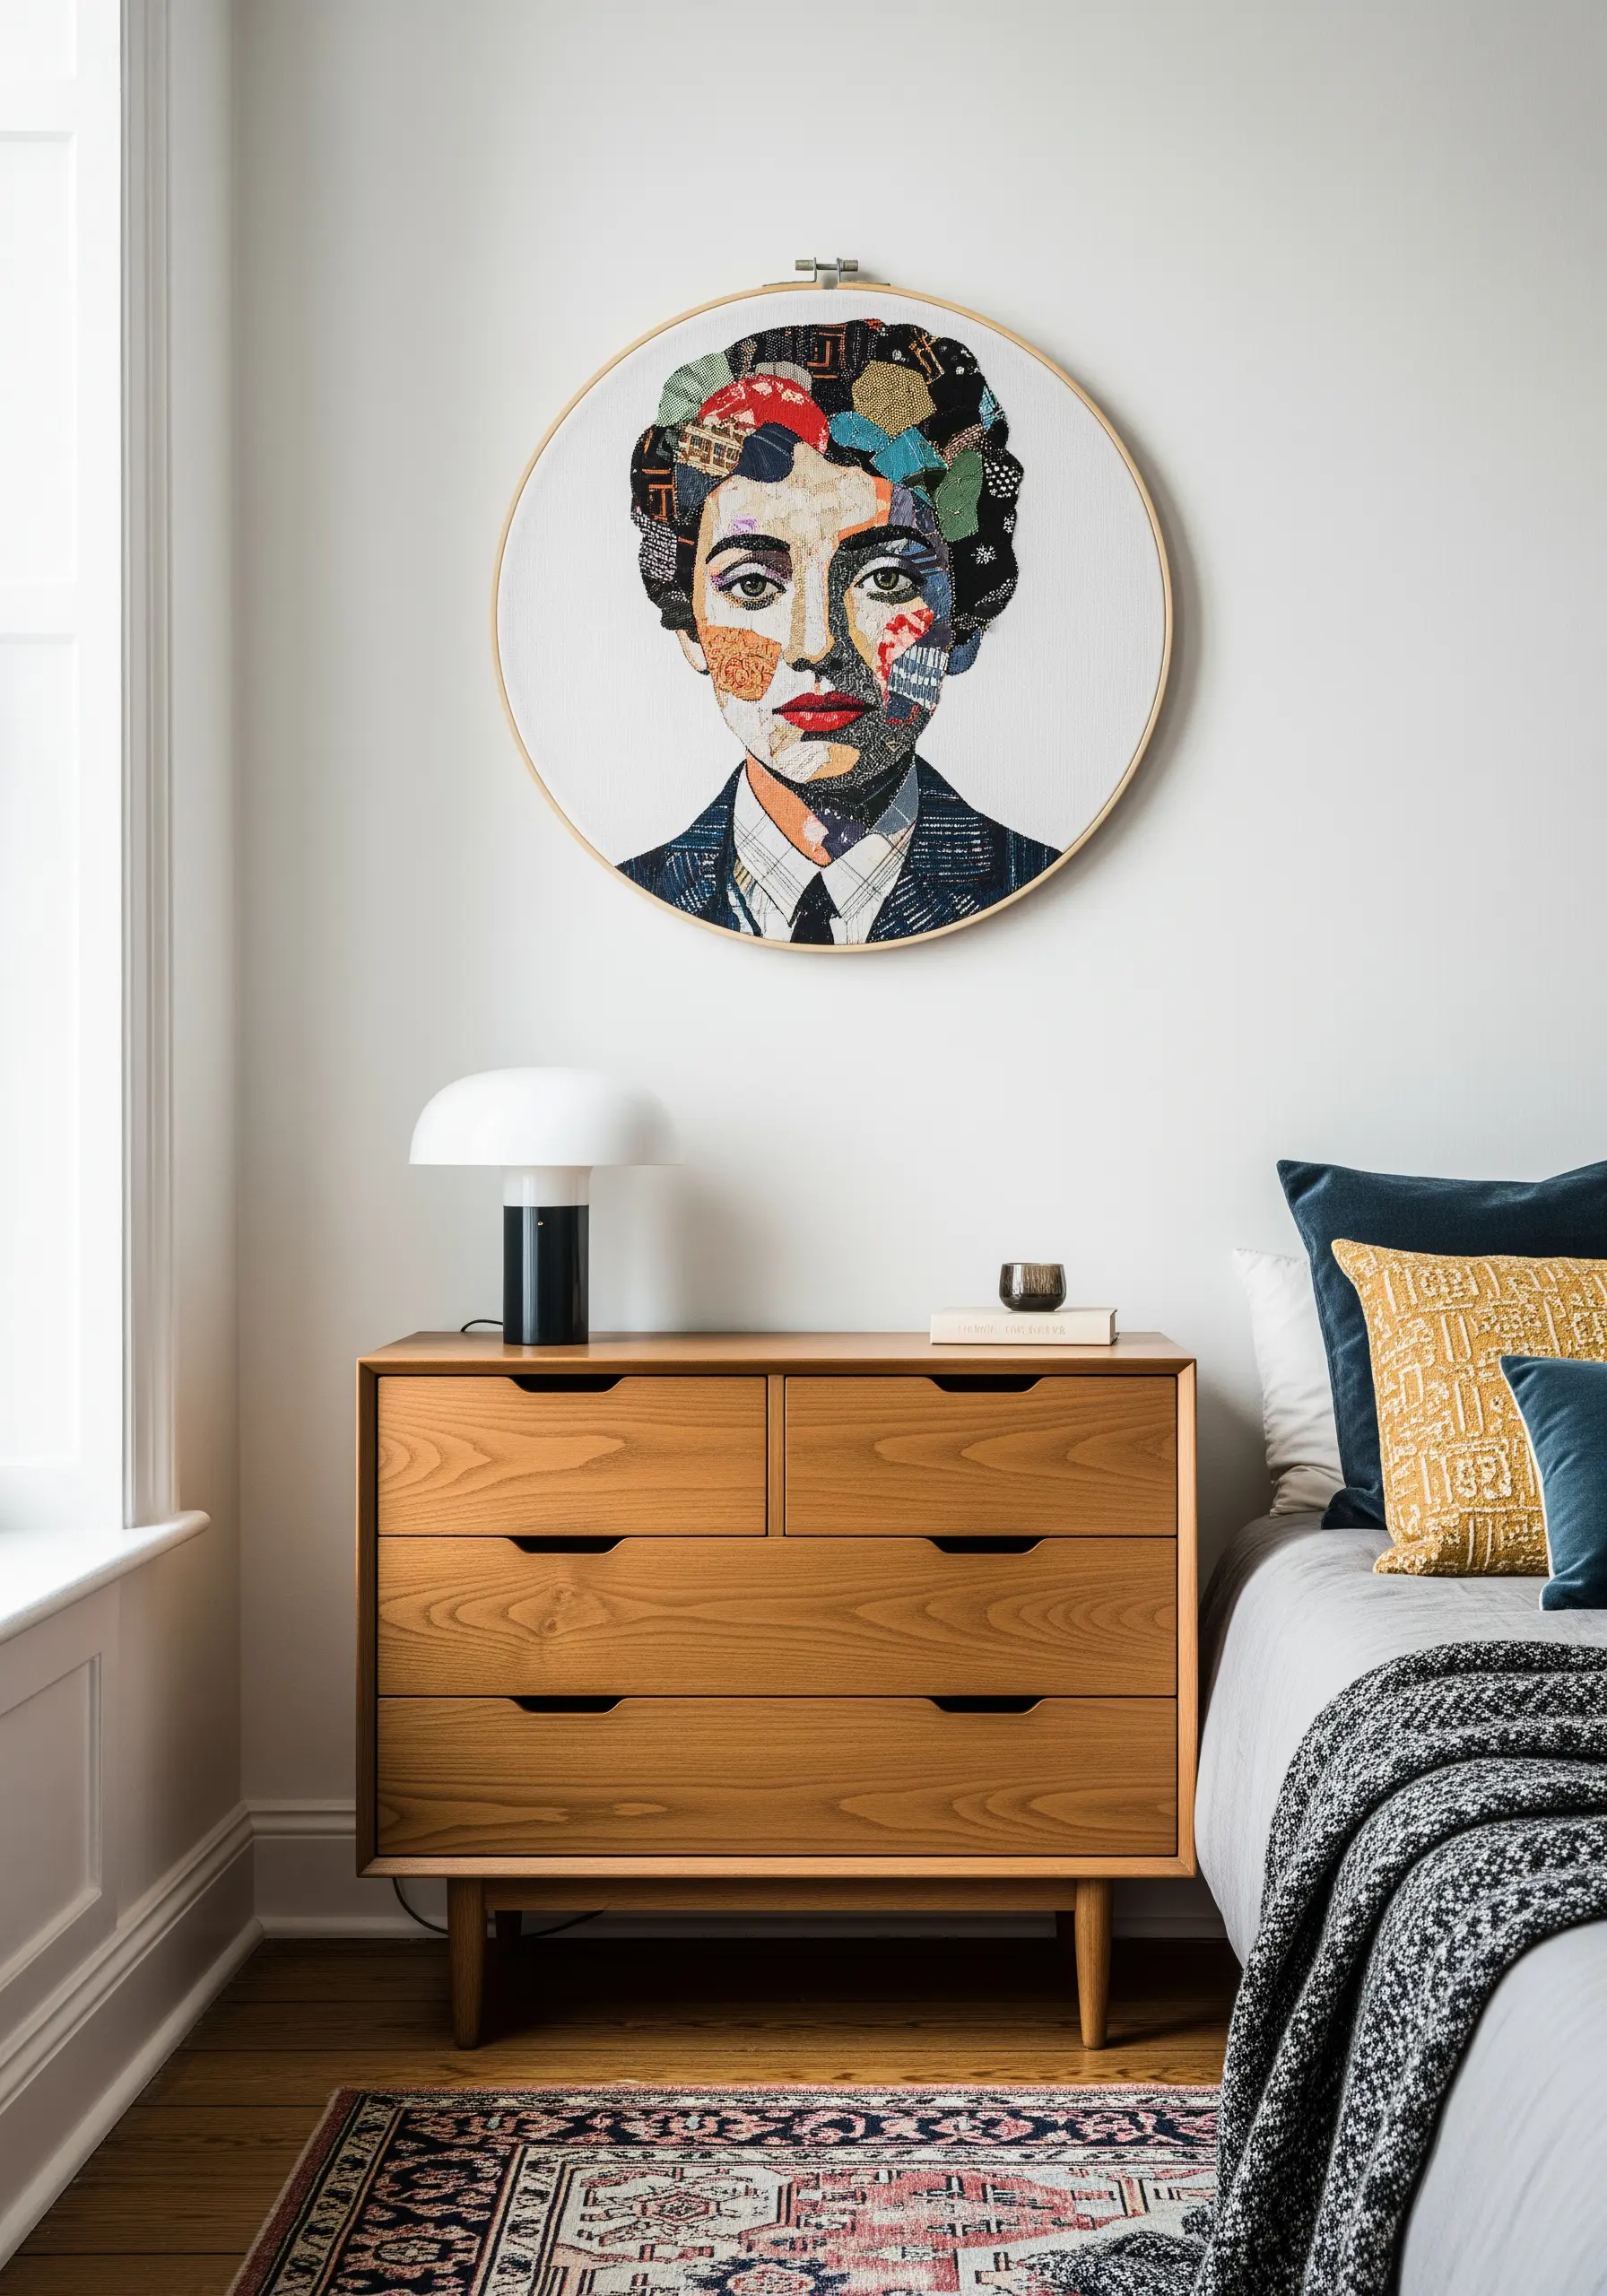
Create a stunning, painterly portrait by using fabric scraps as your palette.
Cut small, abstract pieces from various patterned fabrics and arrange them on your base canvas to build the shapes, shadows, and highlights of a face.
Secure the pieces with a fabric-safe adhesive or small, discreet stitches.
Finally, use embroidery to add defining details—like the outline of the lips or the curve of an eyebrow—which unifies the collage and brings the portrait into focus.
These fabric collage embroidery projects are incredibly expressive.
27. Fill a Wall with Stitched Sunshine
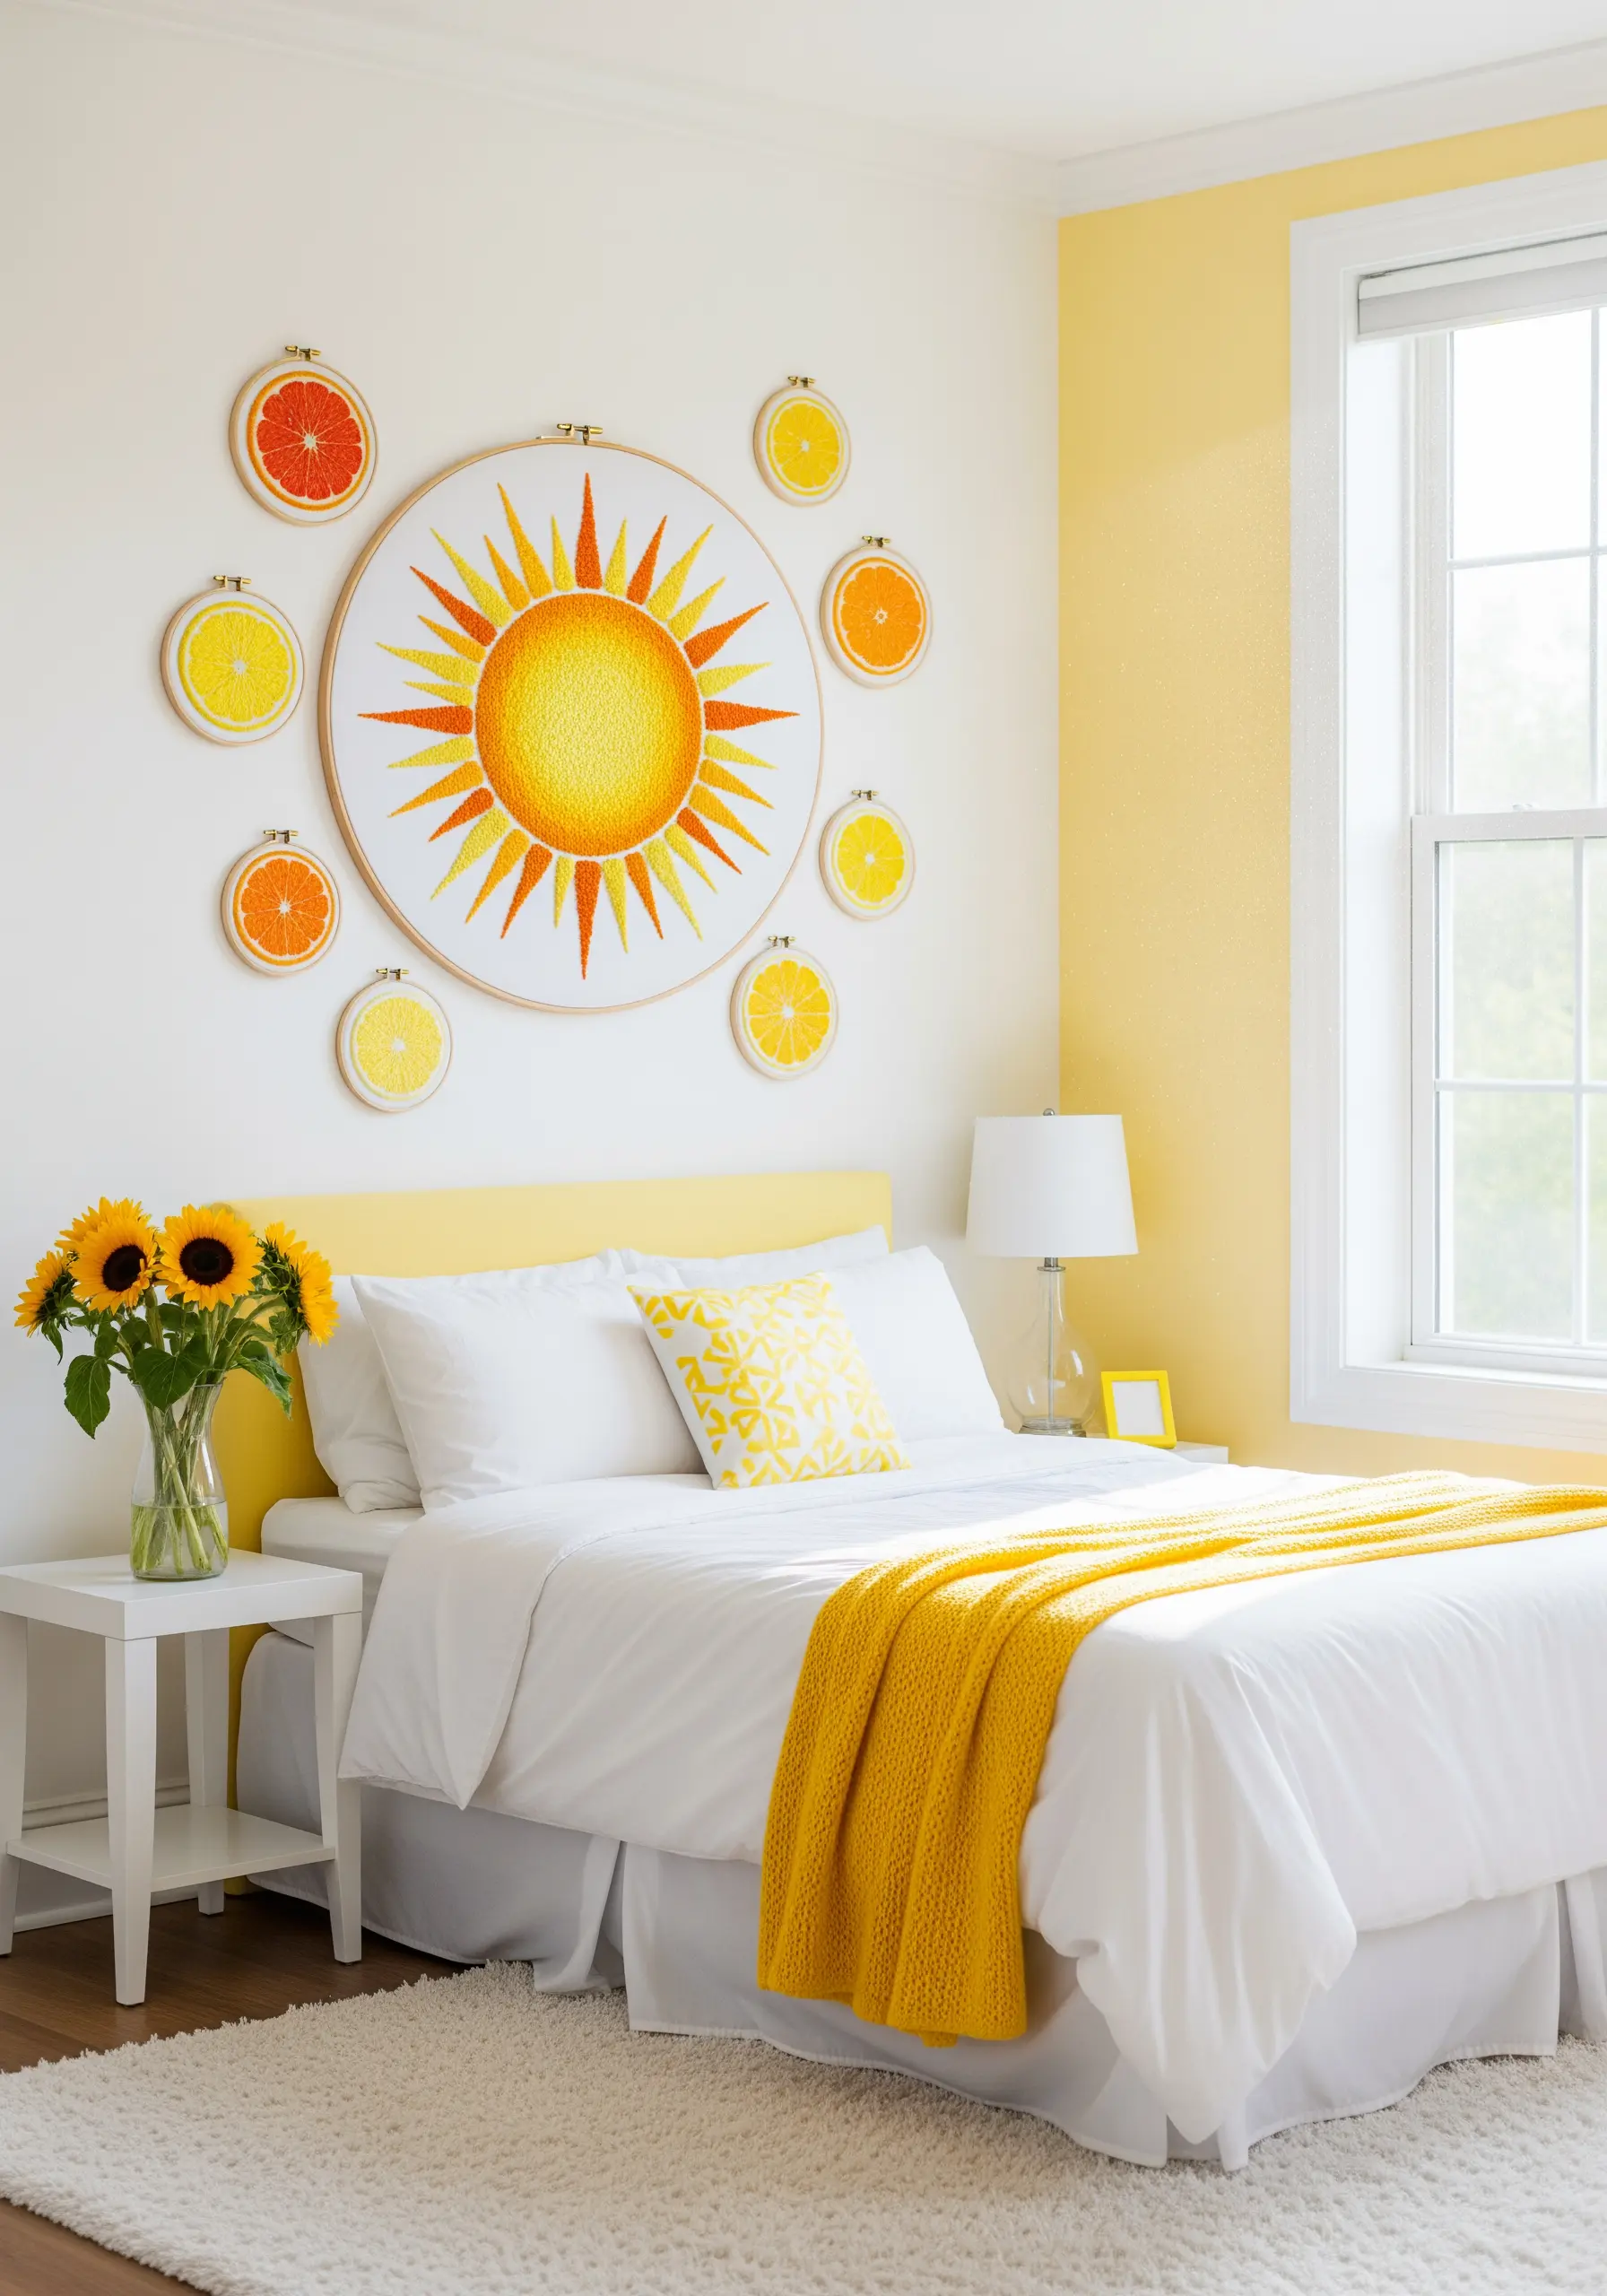
This joyful gallery wall creates a burst of positive energy in any room.
To achieve the radiant, blended look of the sun, use a long-and-short stitch with at least three shades of yellow and orange, which allows the colors to melt into one another.
For the surrounding citrus slices, use a padded satin stitch to give them a plump, juicy texture that stands out from the fabric.
This arrangement is one of the most effective color pop embroidery art ideas for a bright and happy space.
28. Add Dimension with Padded Satin Stitch
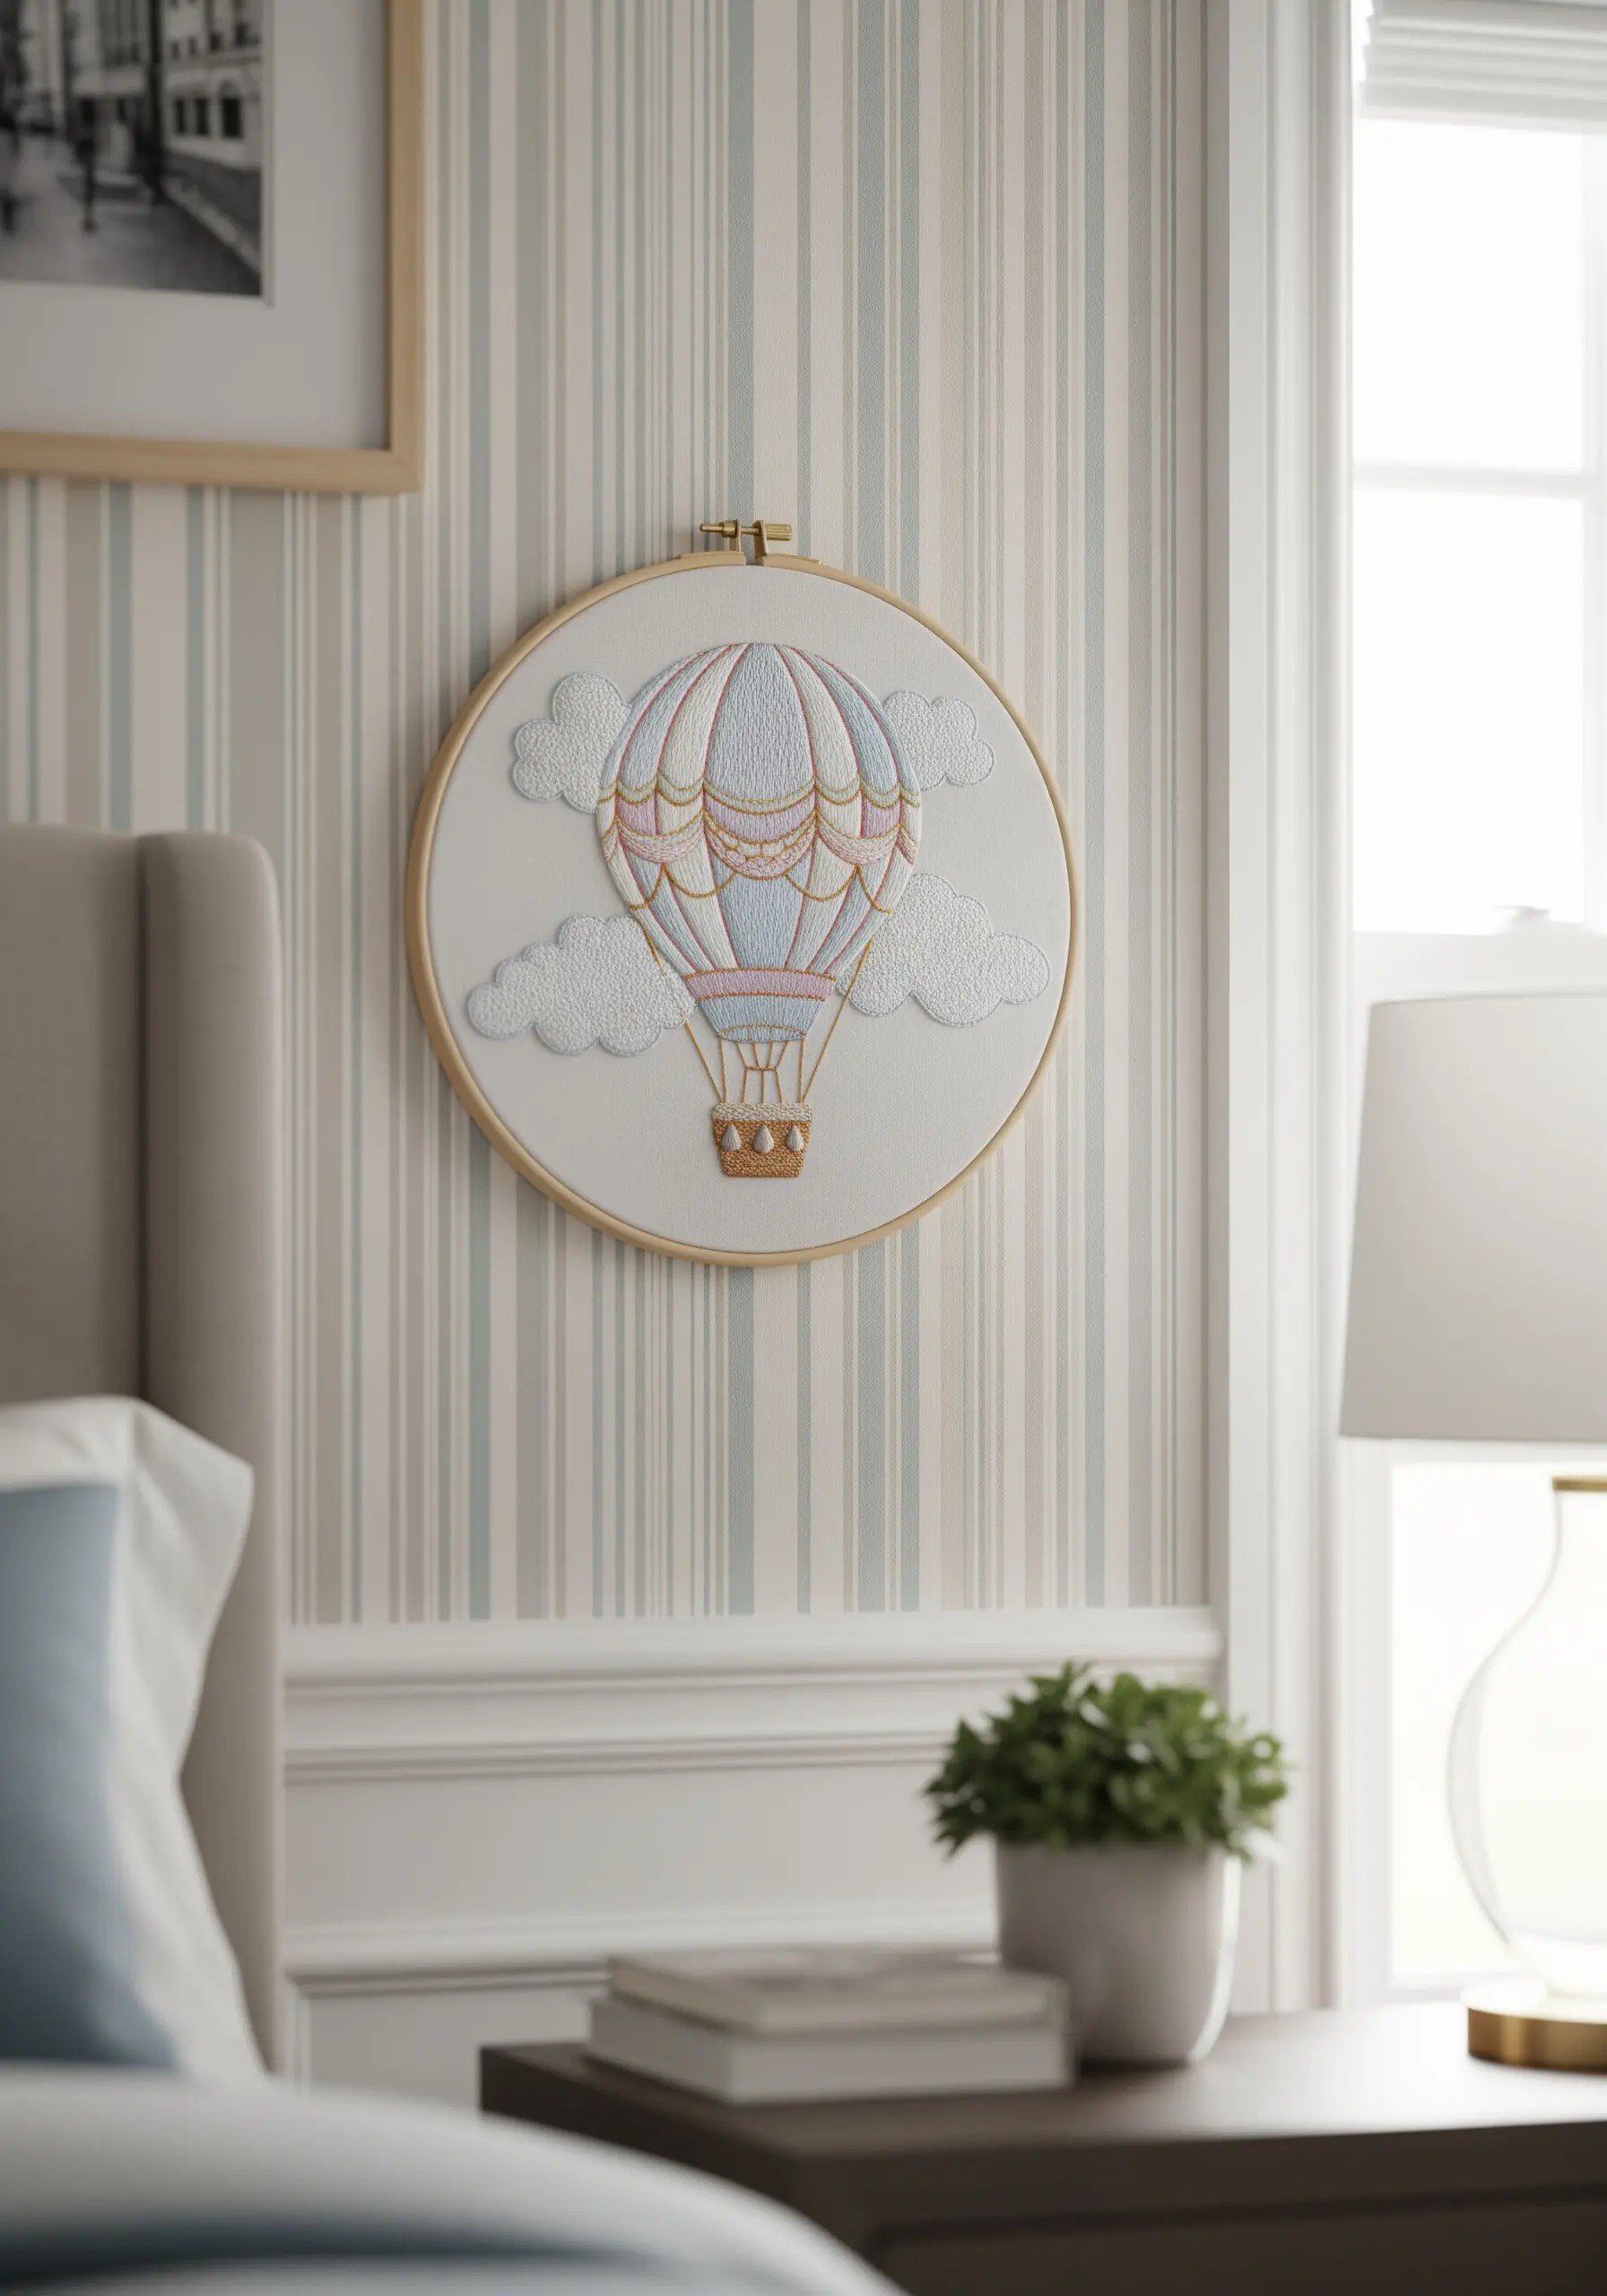
To give your embroidery a raised, three-dimensional effect, you must try padded satin stitch.
Before stitching your final layer, create a foundation of underlying stitches (like seed stitches or a grid of running stitches) within the shape you want to raise.
Then, work your smooth satin stitches over this padding at a perpendicular angle.
This simple preparation lifts the top layer of thread off the fabric, creating a soft, sculptural quality that makes it one of the best statement textured embroidery techniques.