

A terrarium isn’t just a container for plants; it’s a miniature, self-contained world. Capturing that magic in embroidery invites you to think like a designer, not just a stitcher. It’s about more than just recreating a leaf or a petal—it’s about building an entire ecosystem with thread, texture, and light.
Here, you’ll discover how to move beyond basic stitches to create dimensional forms that feel alive. We’ll explore how to use French knots to mimic soil, how padded satin stitch can create fleshy succulent leaves, and how a simple change in thread direction can suggest the curve of glass. Each hoop becomes a tiny biosphere where you control the composition and the story.
Forget feeling limited by flat designs. These ideas are here to show you how to layer, build texture, and play with perspective. Your needle is the tool you’ll use to cultivate these tiny gardens, one thoughtful stitch at a time. Let’s begin.
1. Master Dimensional Succulents
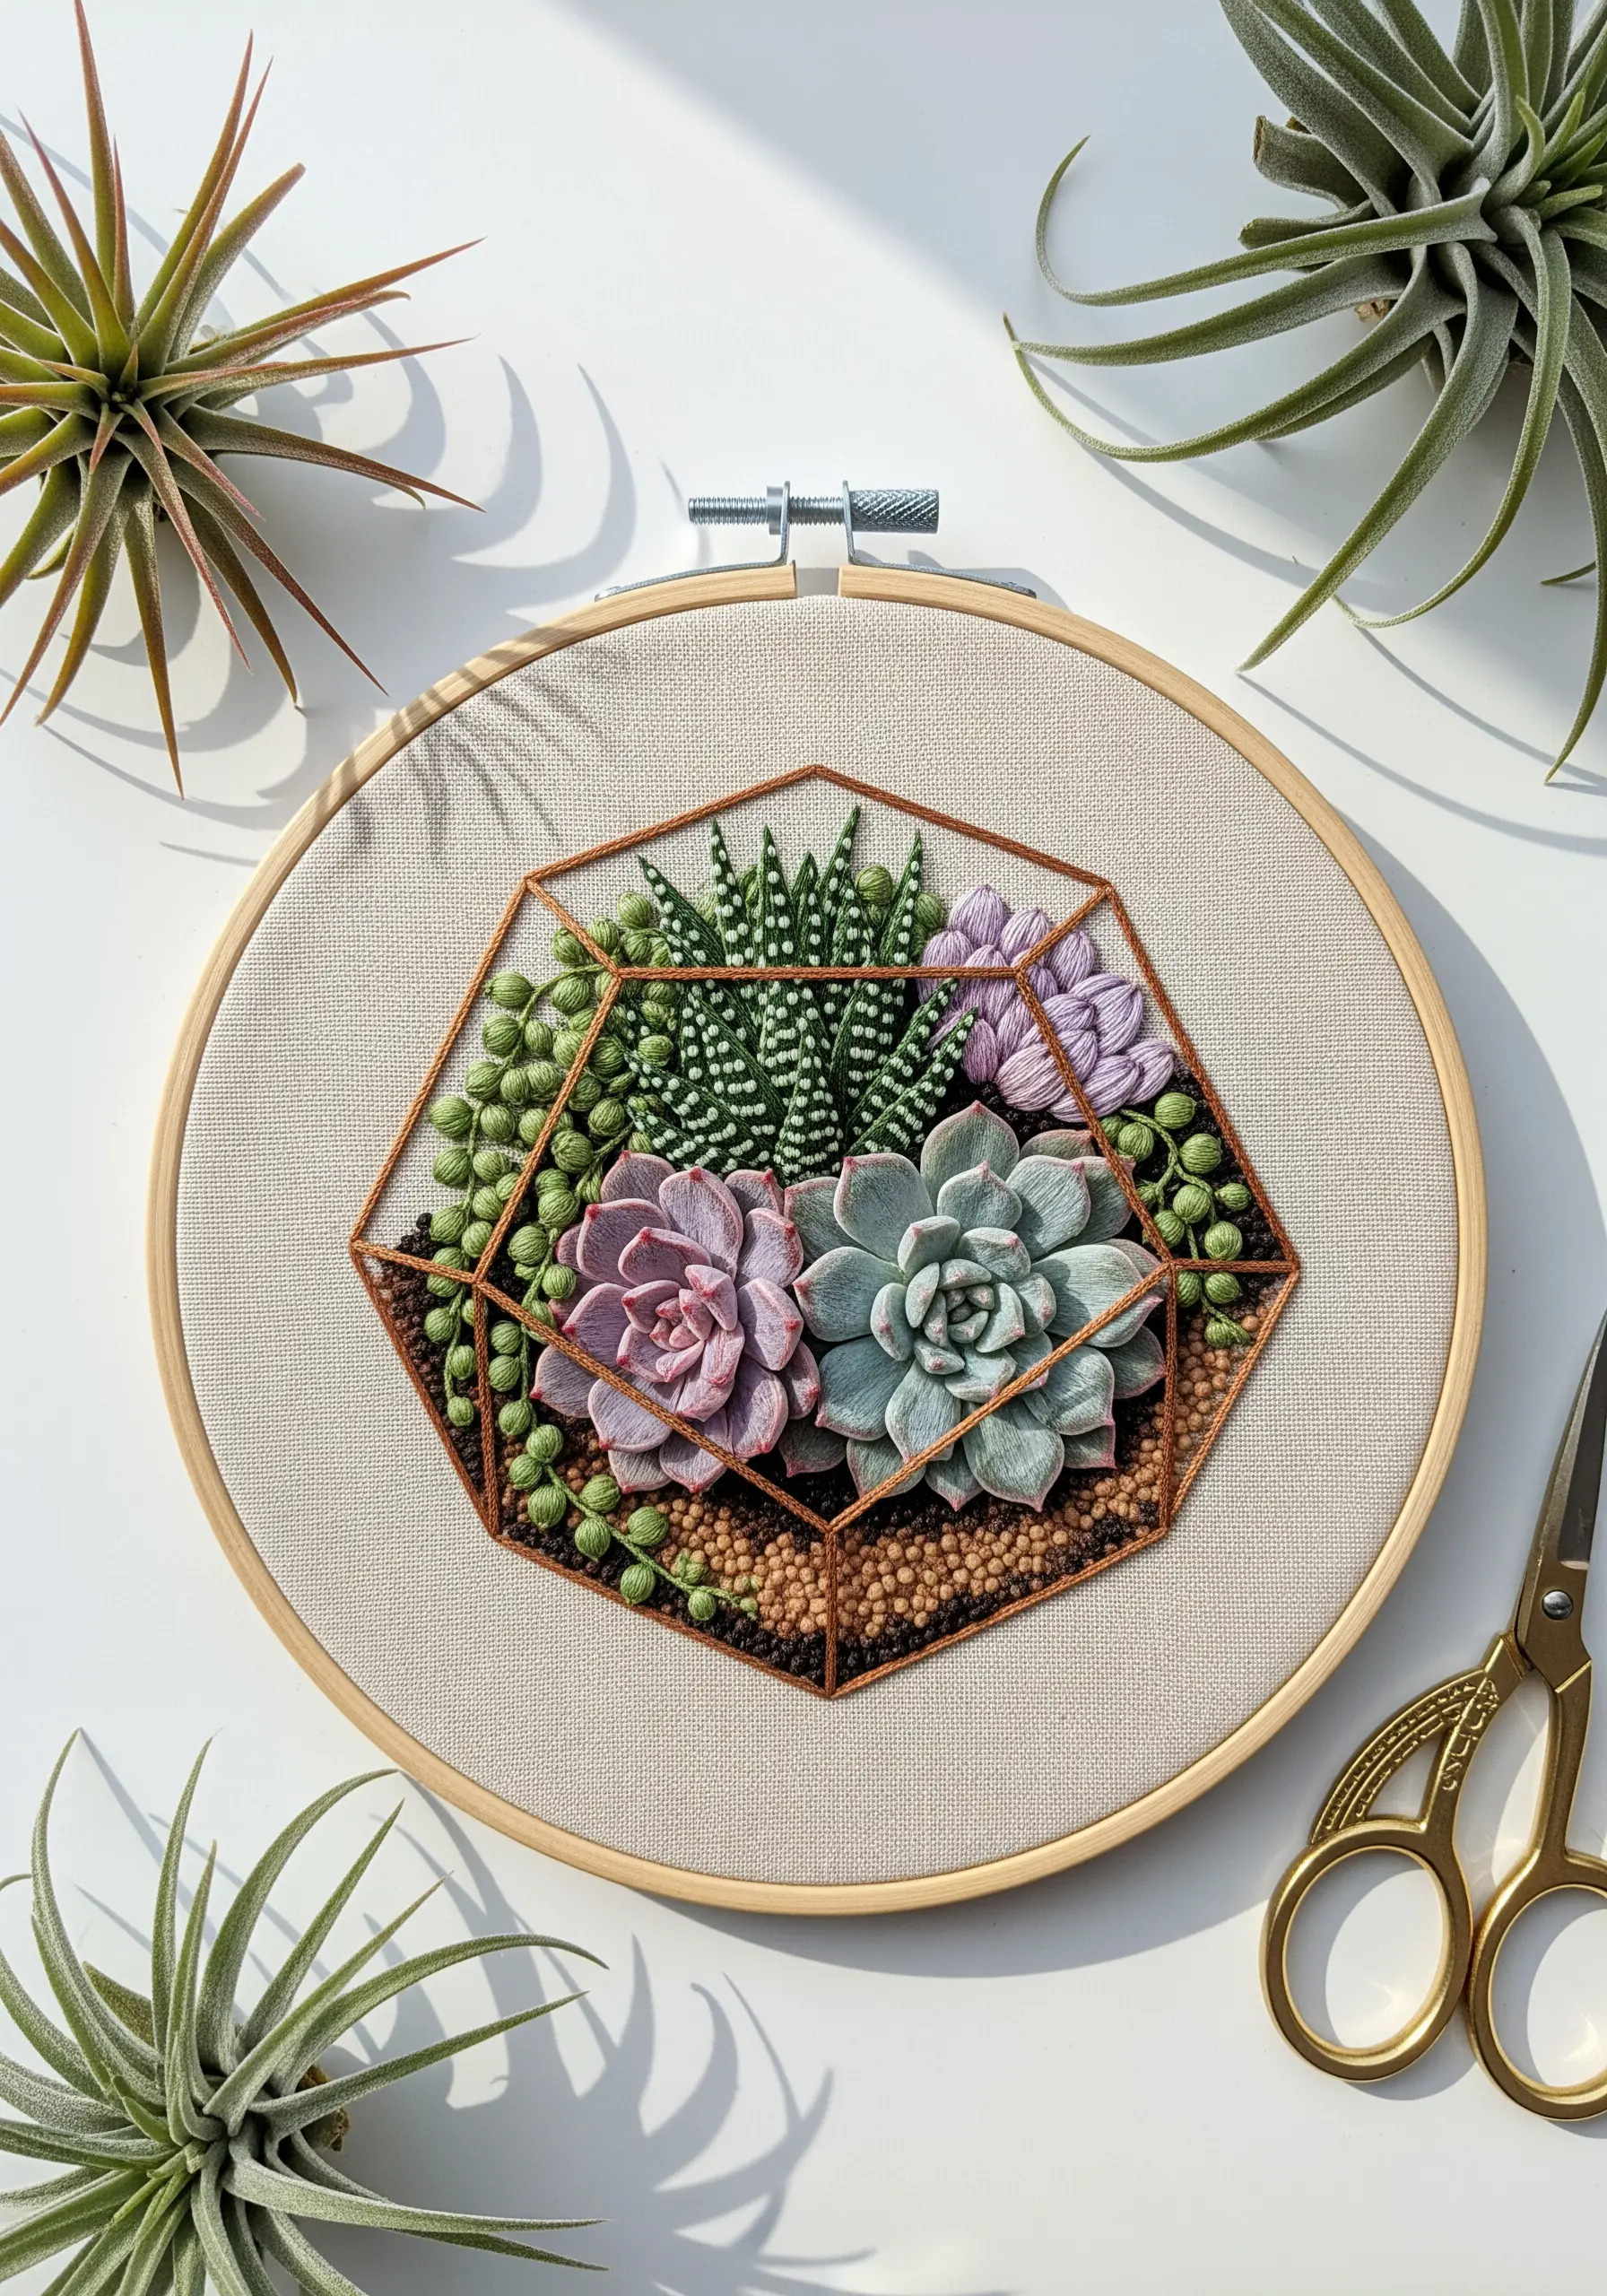
Create realistic, fleshy succulent leaves using padded satin stitch—first, lay down a foundation of straight stitches, then cover them with satin stitch angled in the direction of leaf growth.
For the ground cover, use a dense field of French knots in varied shades of brown and ochre to mimic soil and pebbles. This builds one of the best statement textured embroidery techniques for realistic depth.
Use bullion knots for the ‘String of Pearls’ plant; wrapping the thread more times creates a longer, more bead-like effect that drapes naturally.
A single strand of metallic copper thread for the geometric frame adds a sharp, clean edge that contrasts beautifully with the soft, organic plants.
2. Use High Contrast for Visual Impact
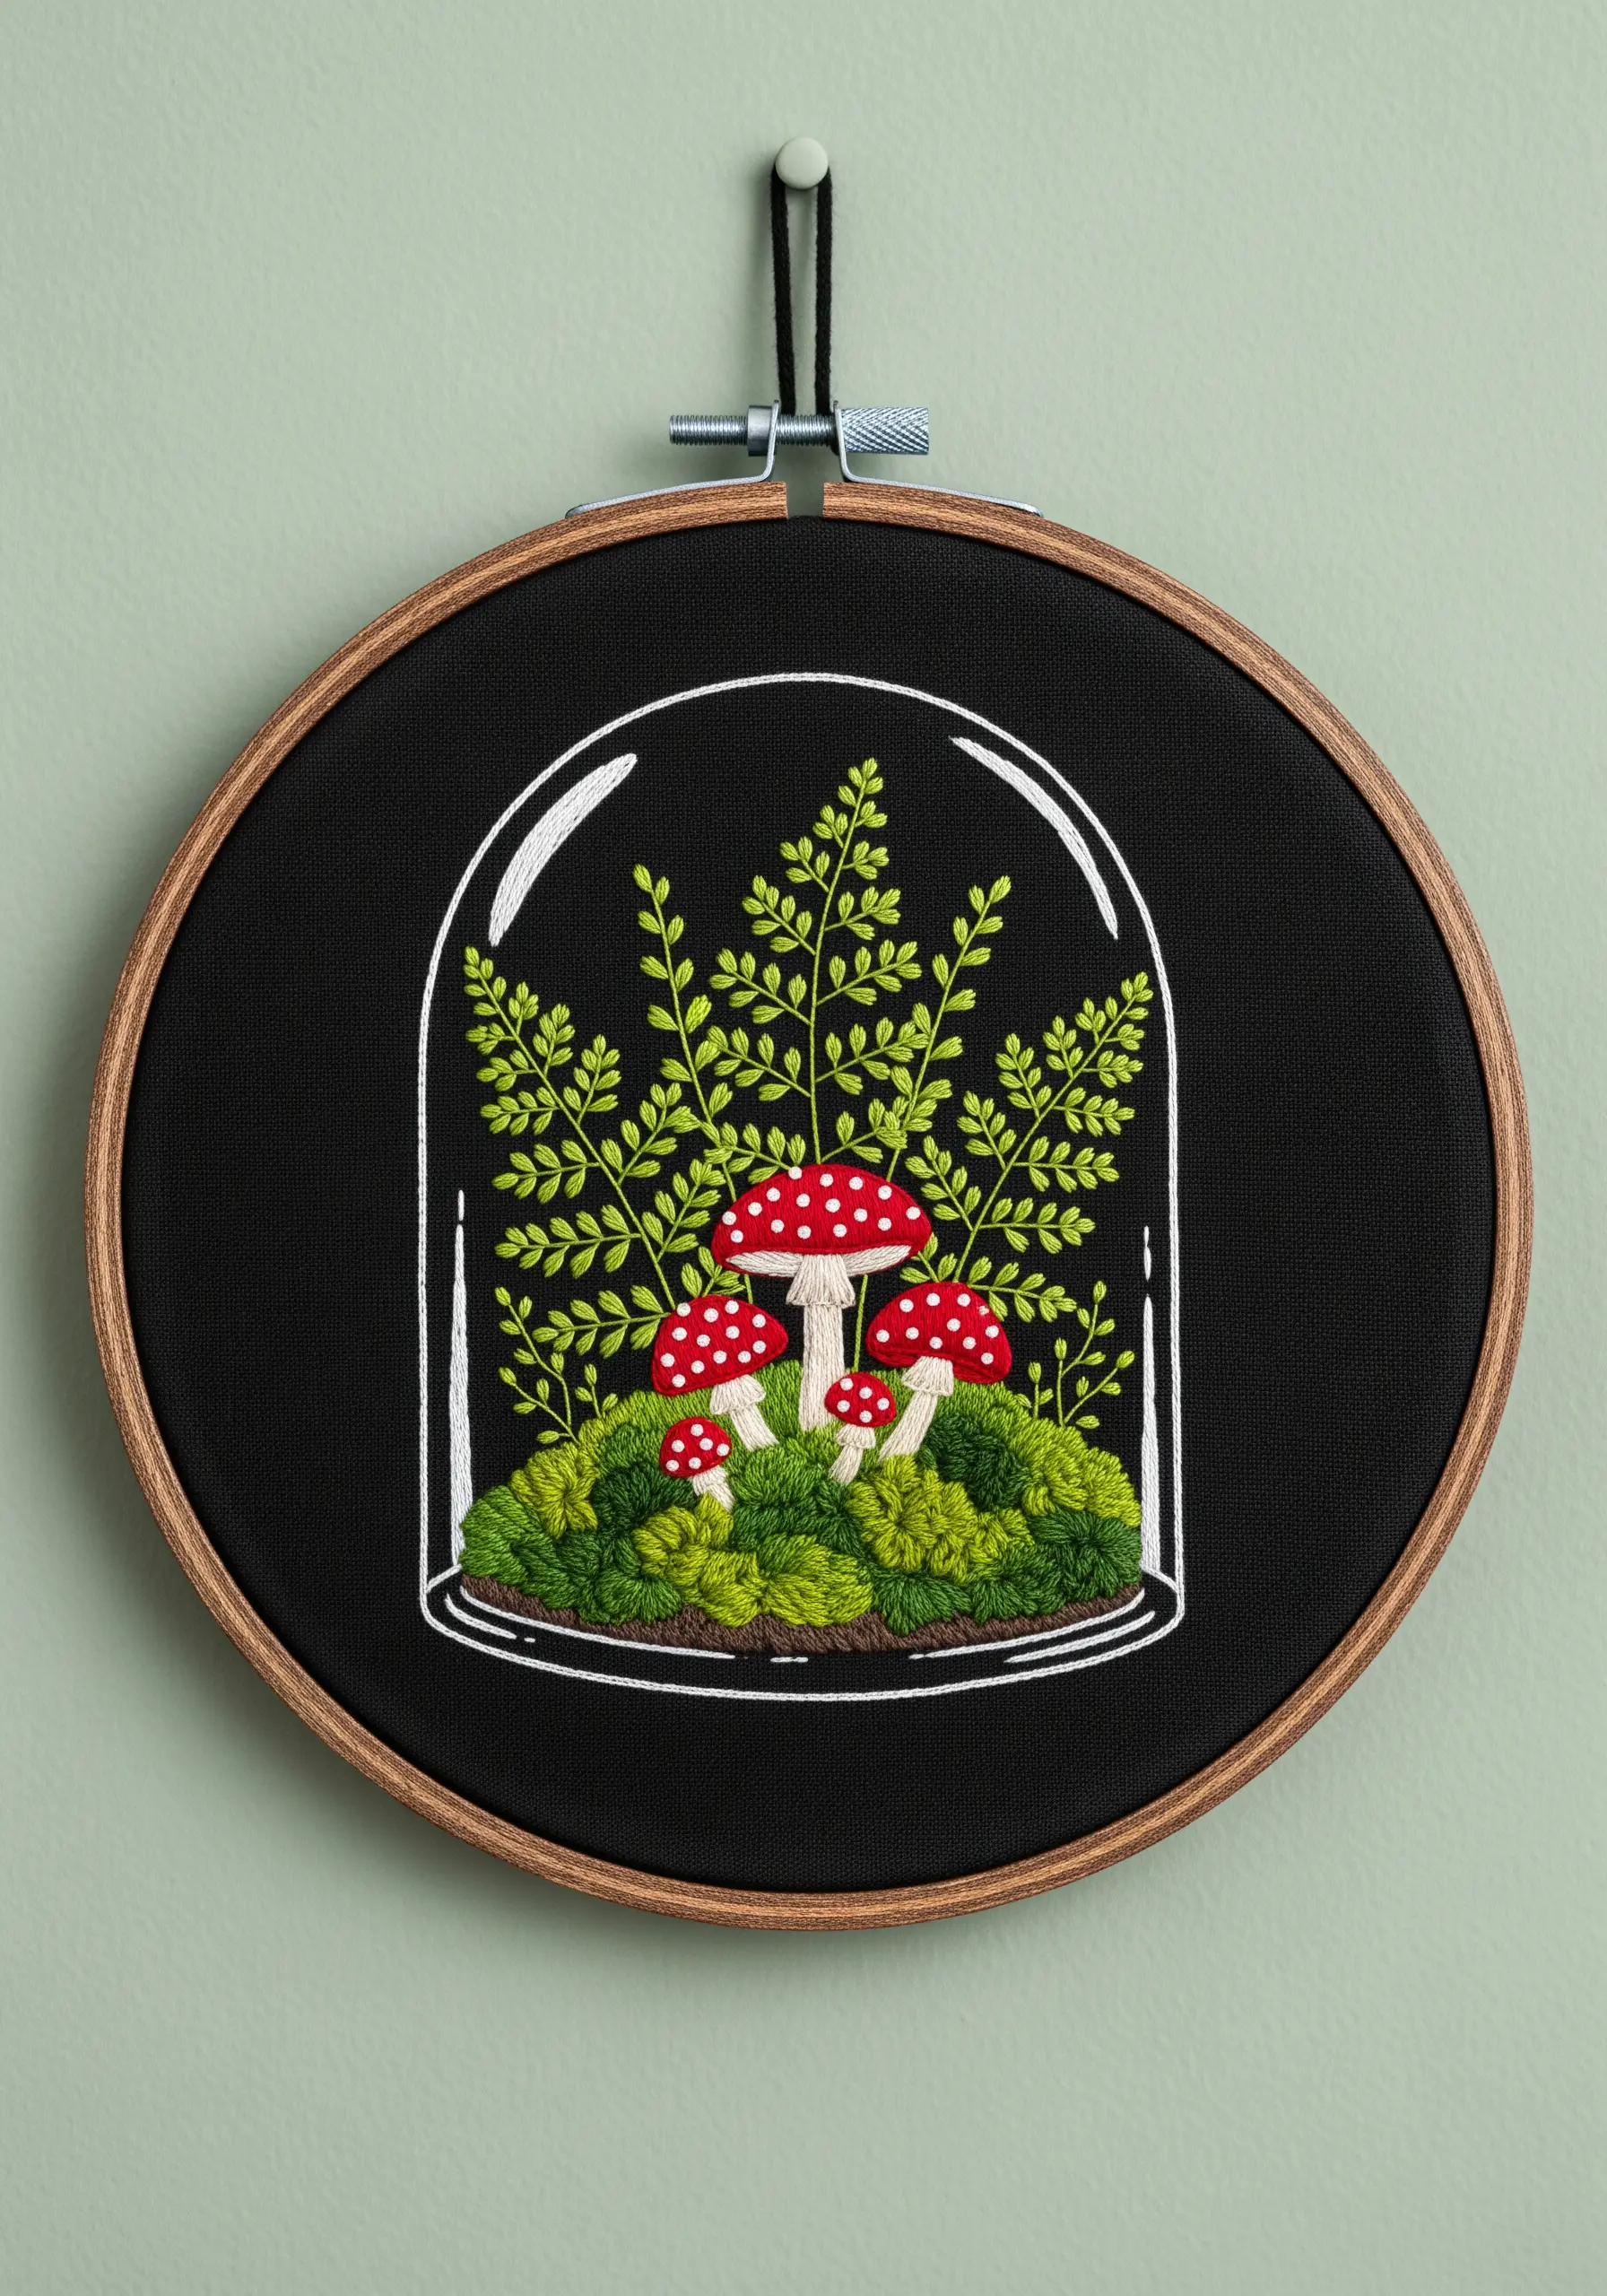
Stitching on black fabric instantly makes your colors appear more luminous and saturated, creating a dramatic, eye-catching effect.
To make the glass cloche outline look crisp and reflective, use a single strand of white or light gray thread in a precise backstitch. Add small, detached straight stitches to suggest highlights on the glass.
When filling the moss, layer two or three shades of green with French knots. A darker green base with lighter green knots on top gives the illusion of depth and natural texture.
This is one of those dramatic dark thread embroidery designs that relies on simplicity and contrast to tell its story.
3. Create Velvety Moss with Turkey Work
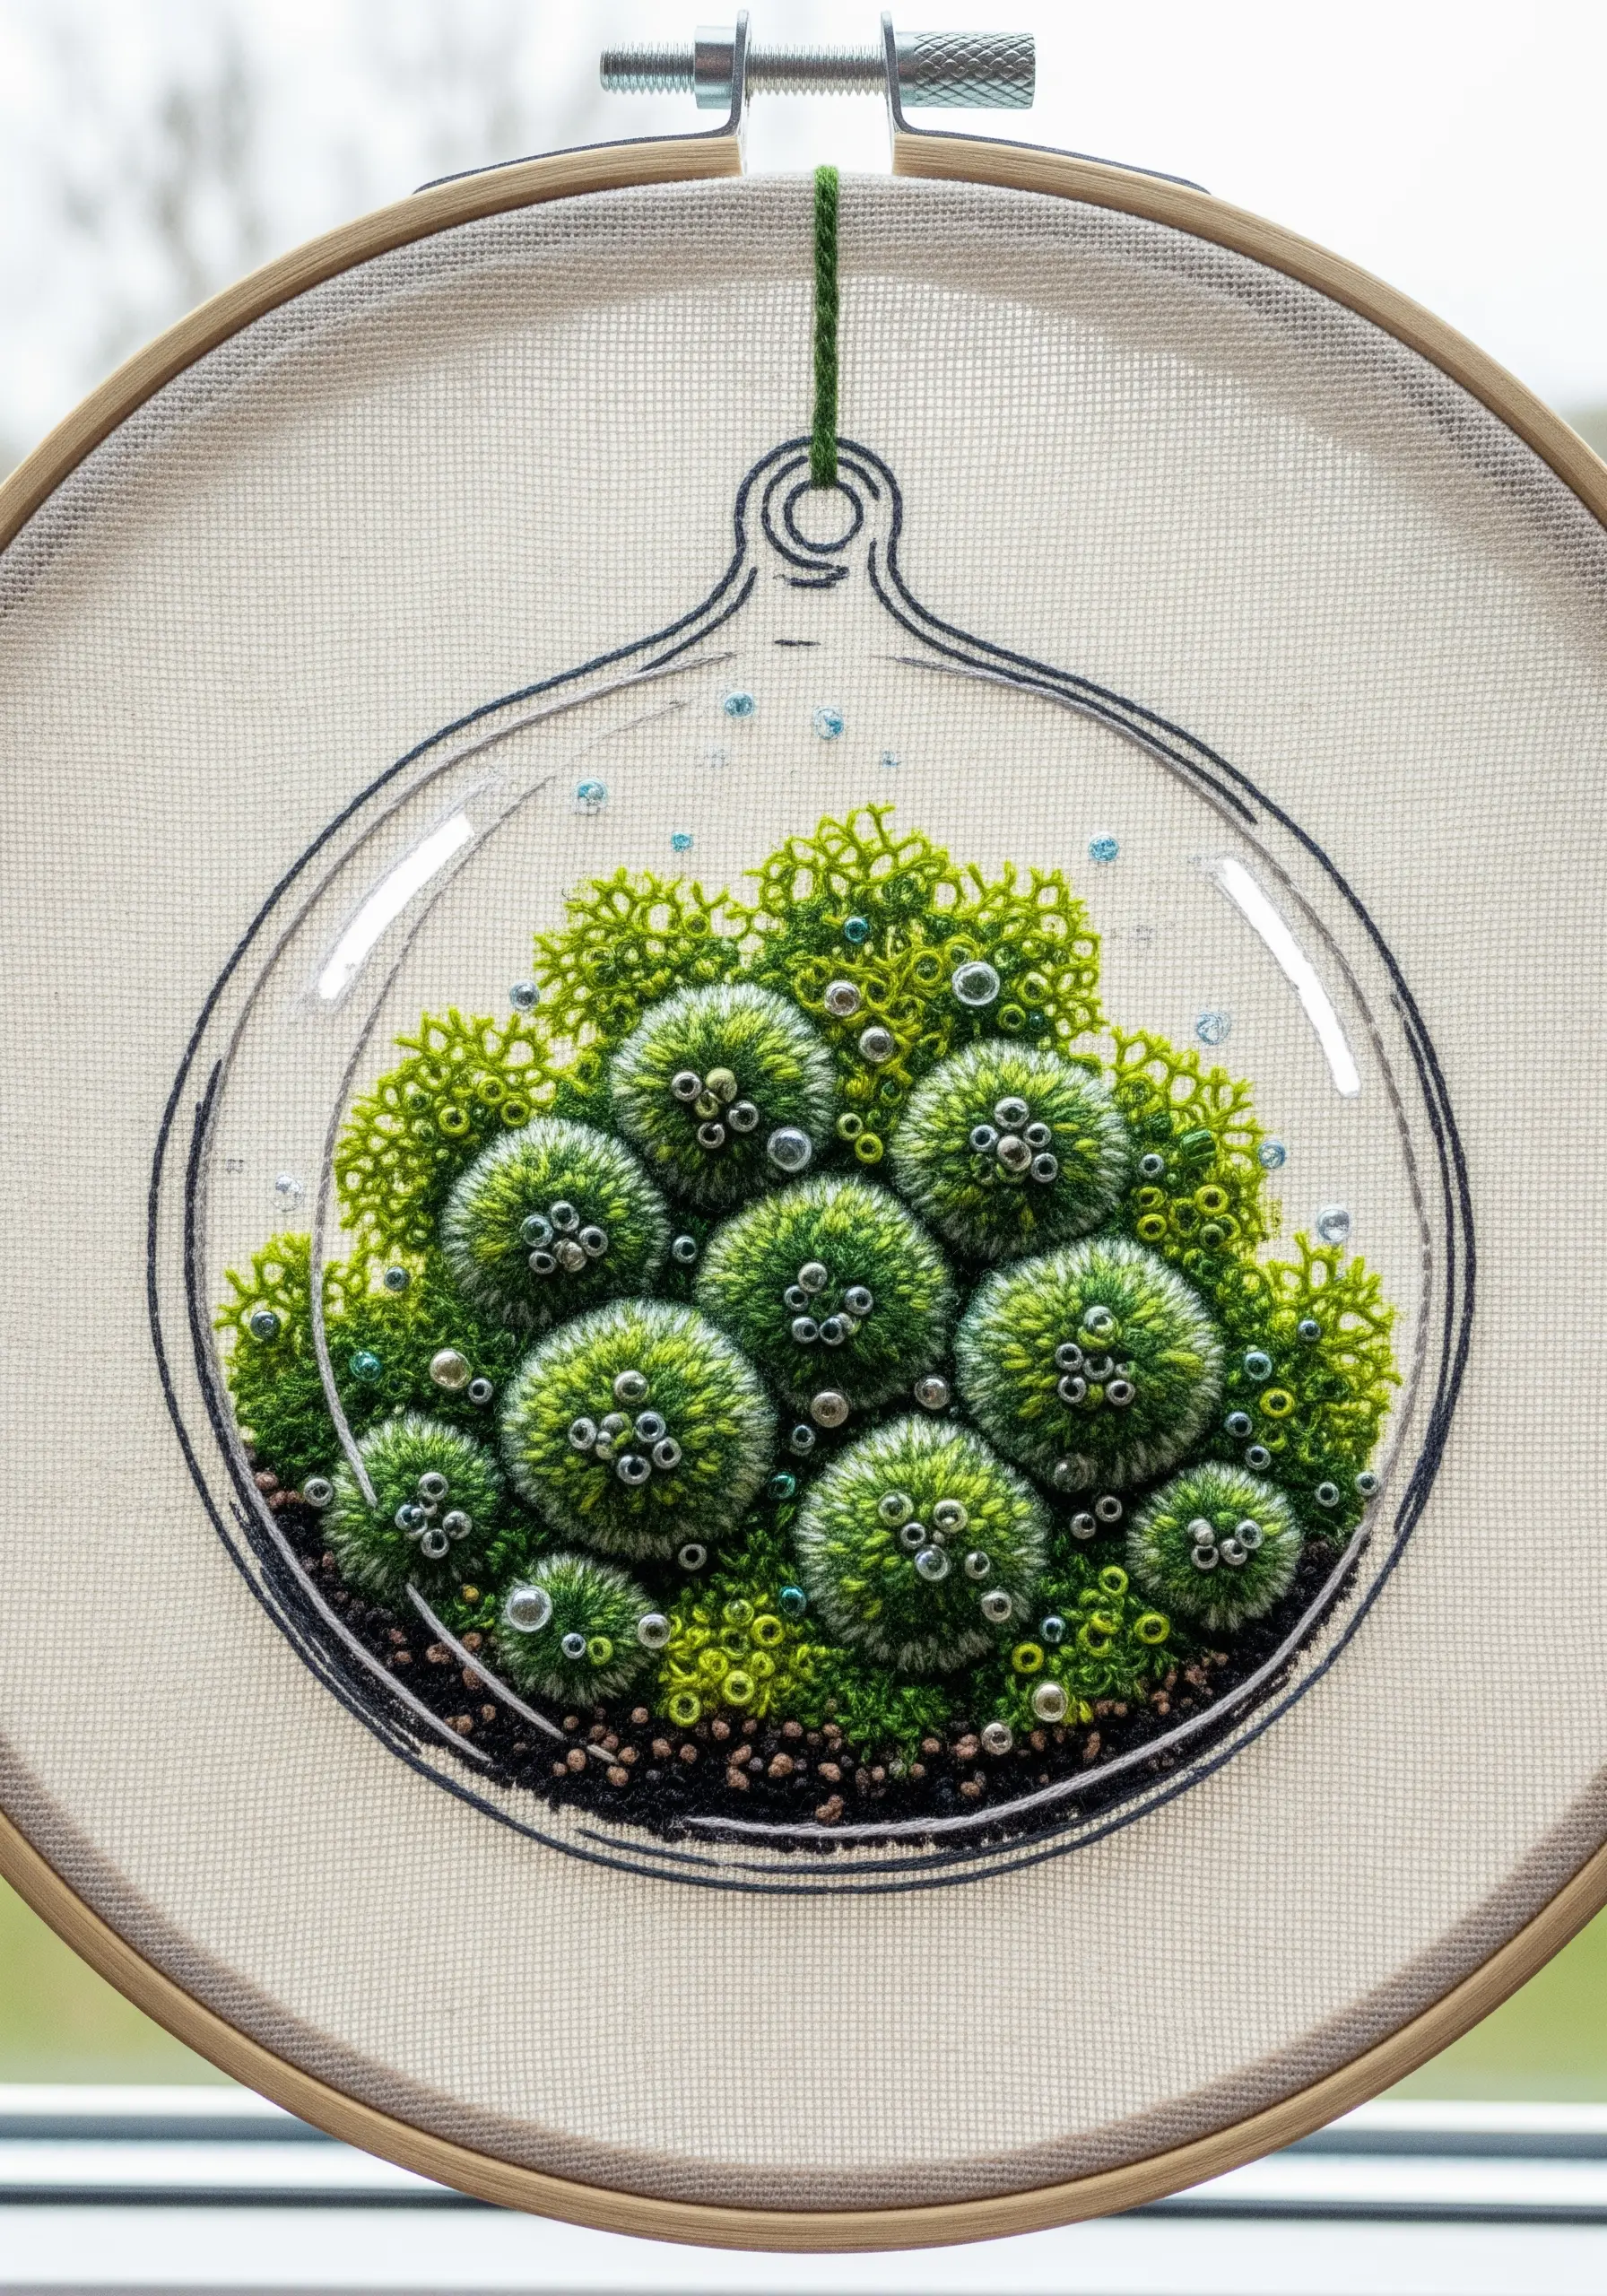
Achieve a lush, three-dimensional moss texture by using the turkey work stitch (or loop stitch). After completing the stitches, carefully trim the loops to create a dense, velvety pile.
Vary the height of your trimmed loops slightly to mimic the uneven surface of real moss balls. Use several shades of green floss blended together in the needle for a more natural, variegated look.
Incorporate tiny seed beads scattered among the moss to look like dewdrops or water bubbles, adding a subtle sparkle and enhancing the aquatic feel.
These organic texture embroidery designs are surprisingly simple to execute once you master the basic loop stitch.
4. Blend French Knots for a Pointillist Floor
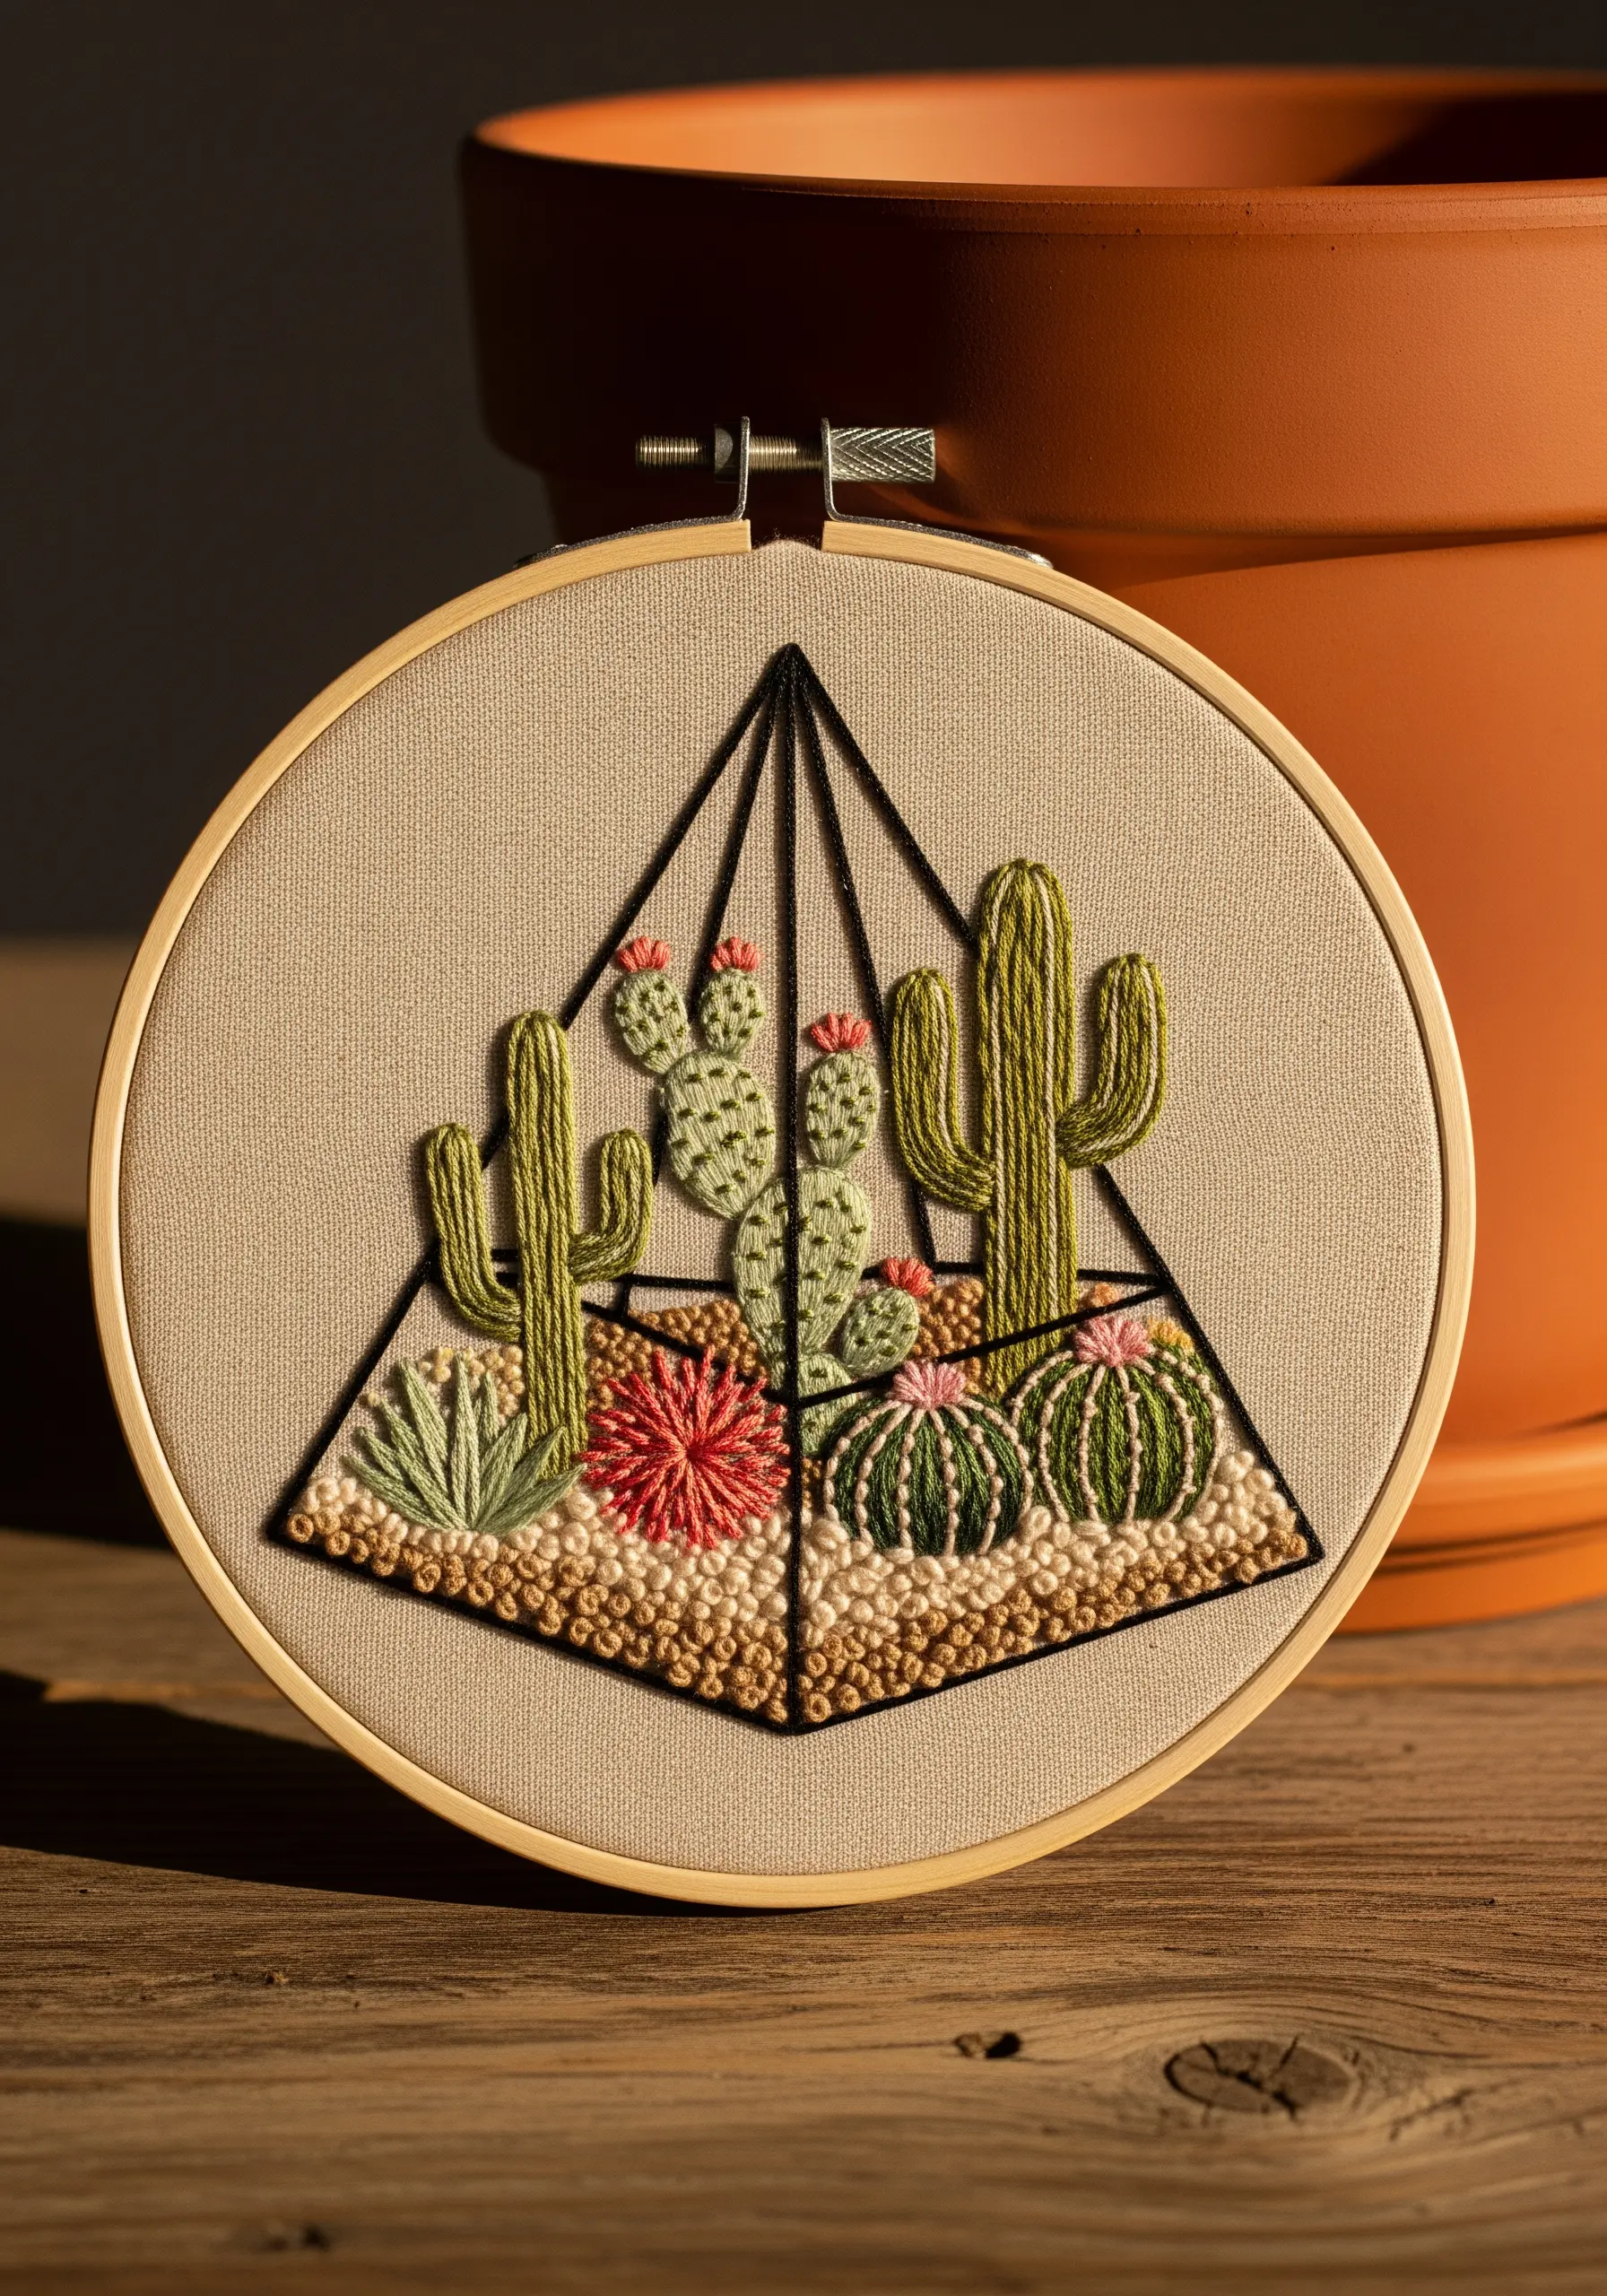
Instead of using a simple fill stitch for your terrarium base, create a textured ground with densely packed French knots.
Use three to four complementary colors—like sand, tan, and brown—and stitch them randomly to create a natural, stippled effect that resembles desert sand or fine gravel.
To define your cacti, outline them with a darker shade of green using a split stitch before filling them. This simple step makes the edges cleaner and the shapes more defined against the textured background.
The sharp, clean lines of the geometric container create a modern frame, highlighting the detailed stitch work within and making for elegant, minimal embroidery projects that double as thoughtful gifts.
5. Stitch a Bioluminescent Scene
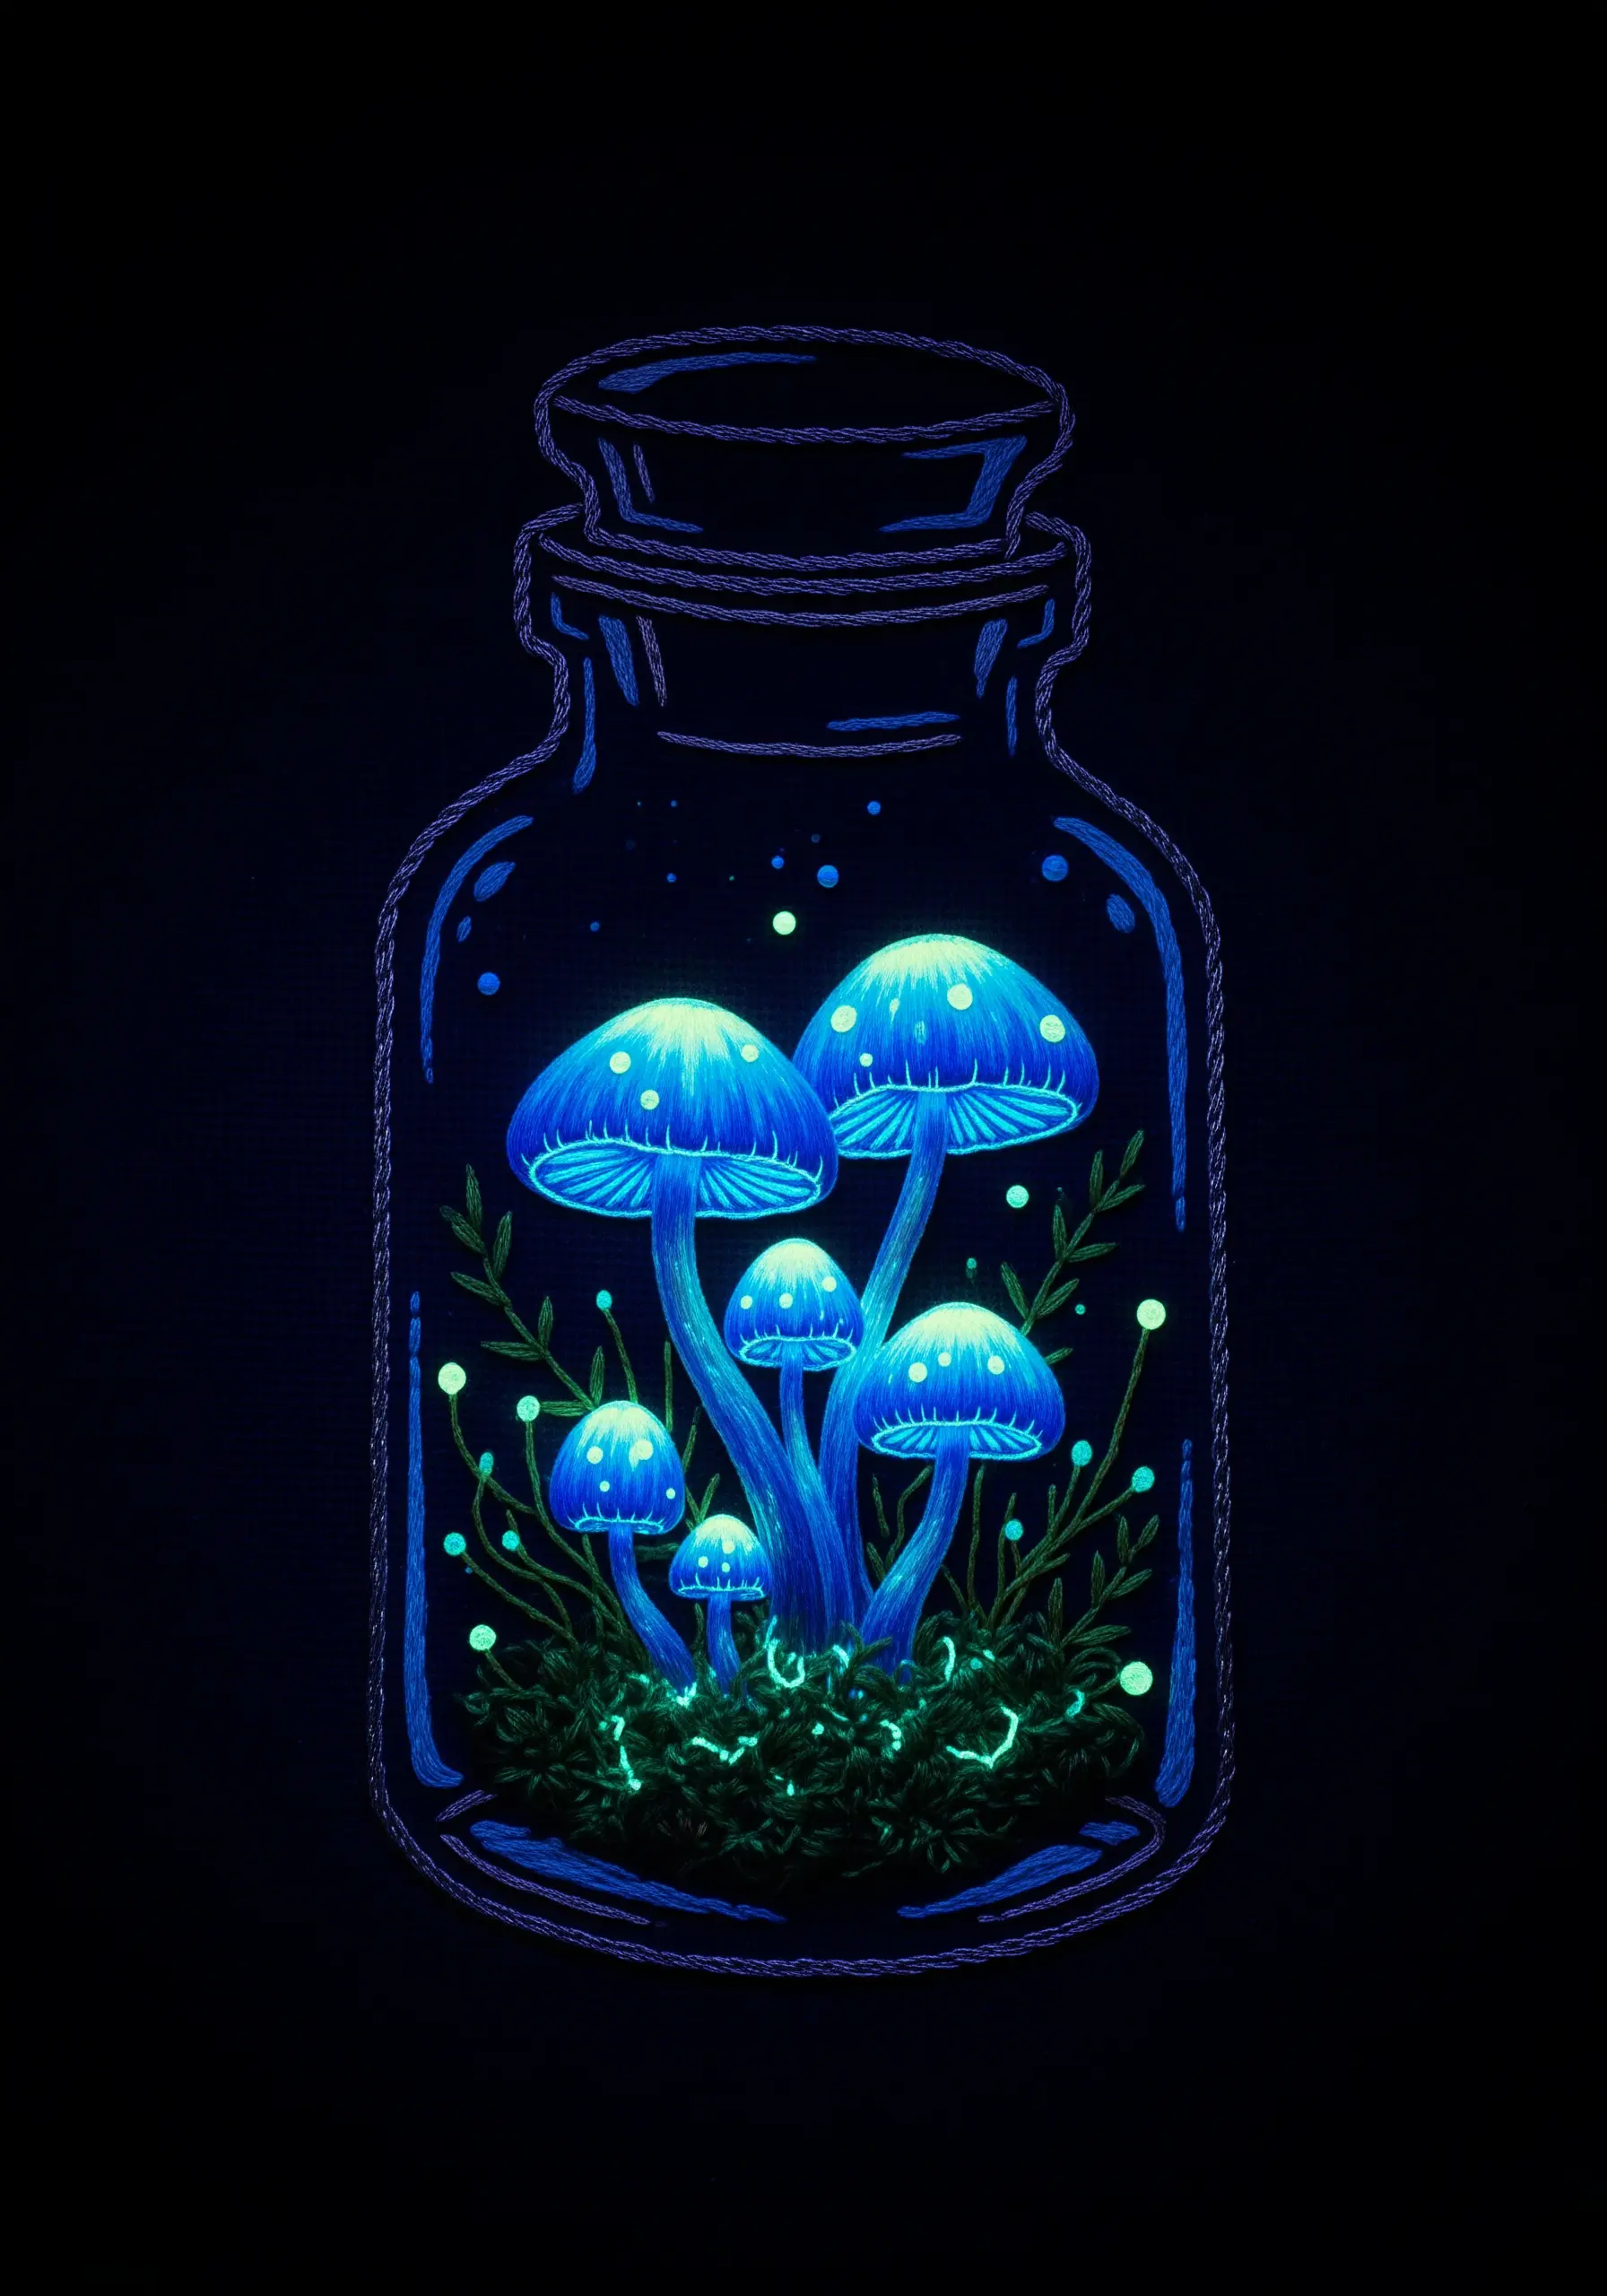
To achieve a glowing effect, use fluorescent or glow-in-the-dark embroidery floss against a black or dark navy fabric. This creates maximum visual impact, especially under a blacklight.
Create a soft, ethereal glow on the mushroom caps by blending white thread with your main fluorescent color using long and short stitch. This mimics the way light diffuses in the dark.
For the tiny glowing spores, use single-strand French knots or seed stitches with your brightest glowing thread. This adds a magical, sparkling quality to your miniature ecosystem.
This approach transforms your hoop into one of those modern neon on black thread art ideas that truly comes alive in low light.
6. Frame Florals with Architectural Detail
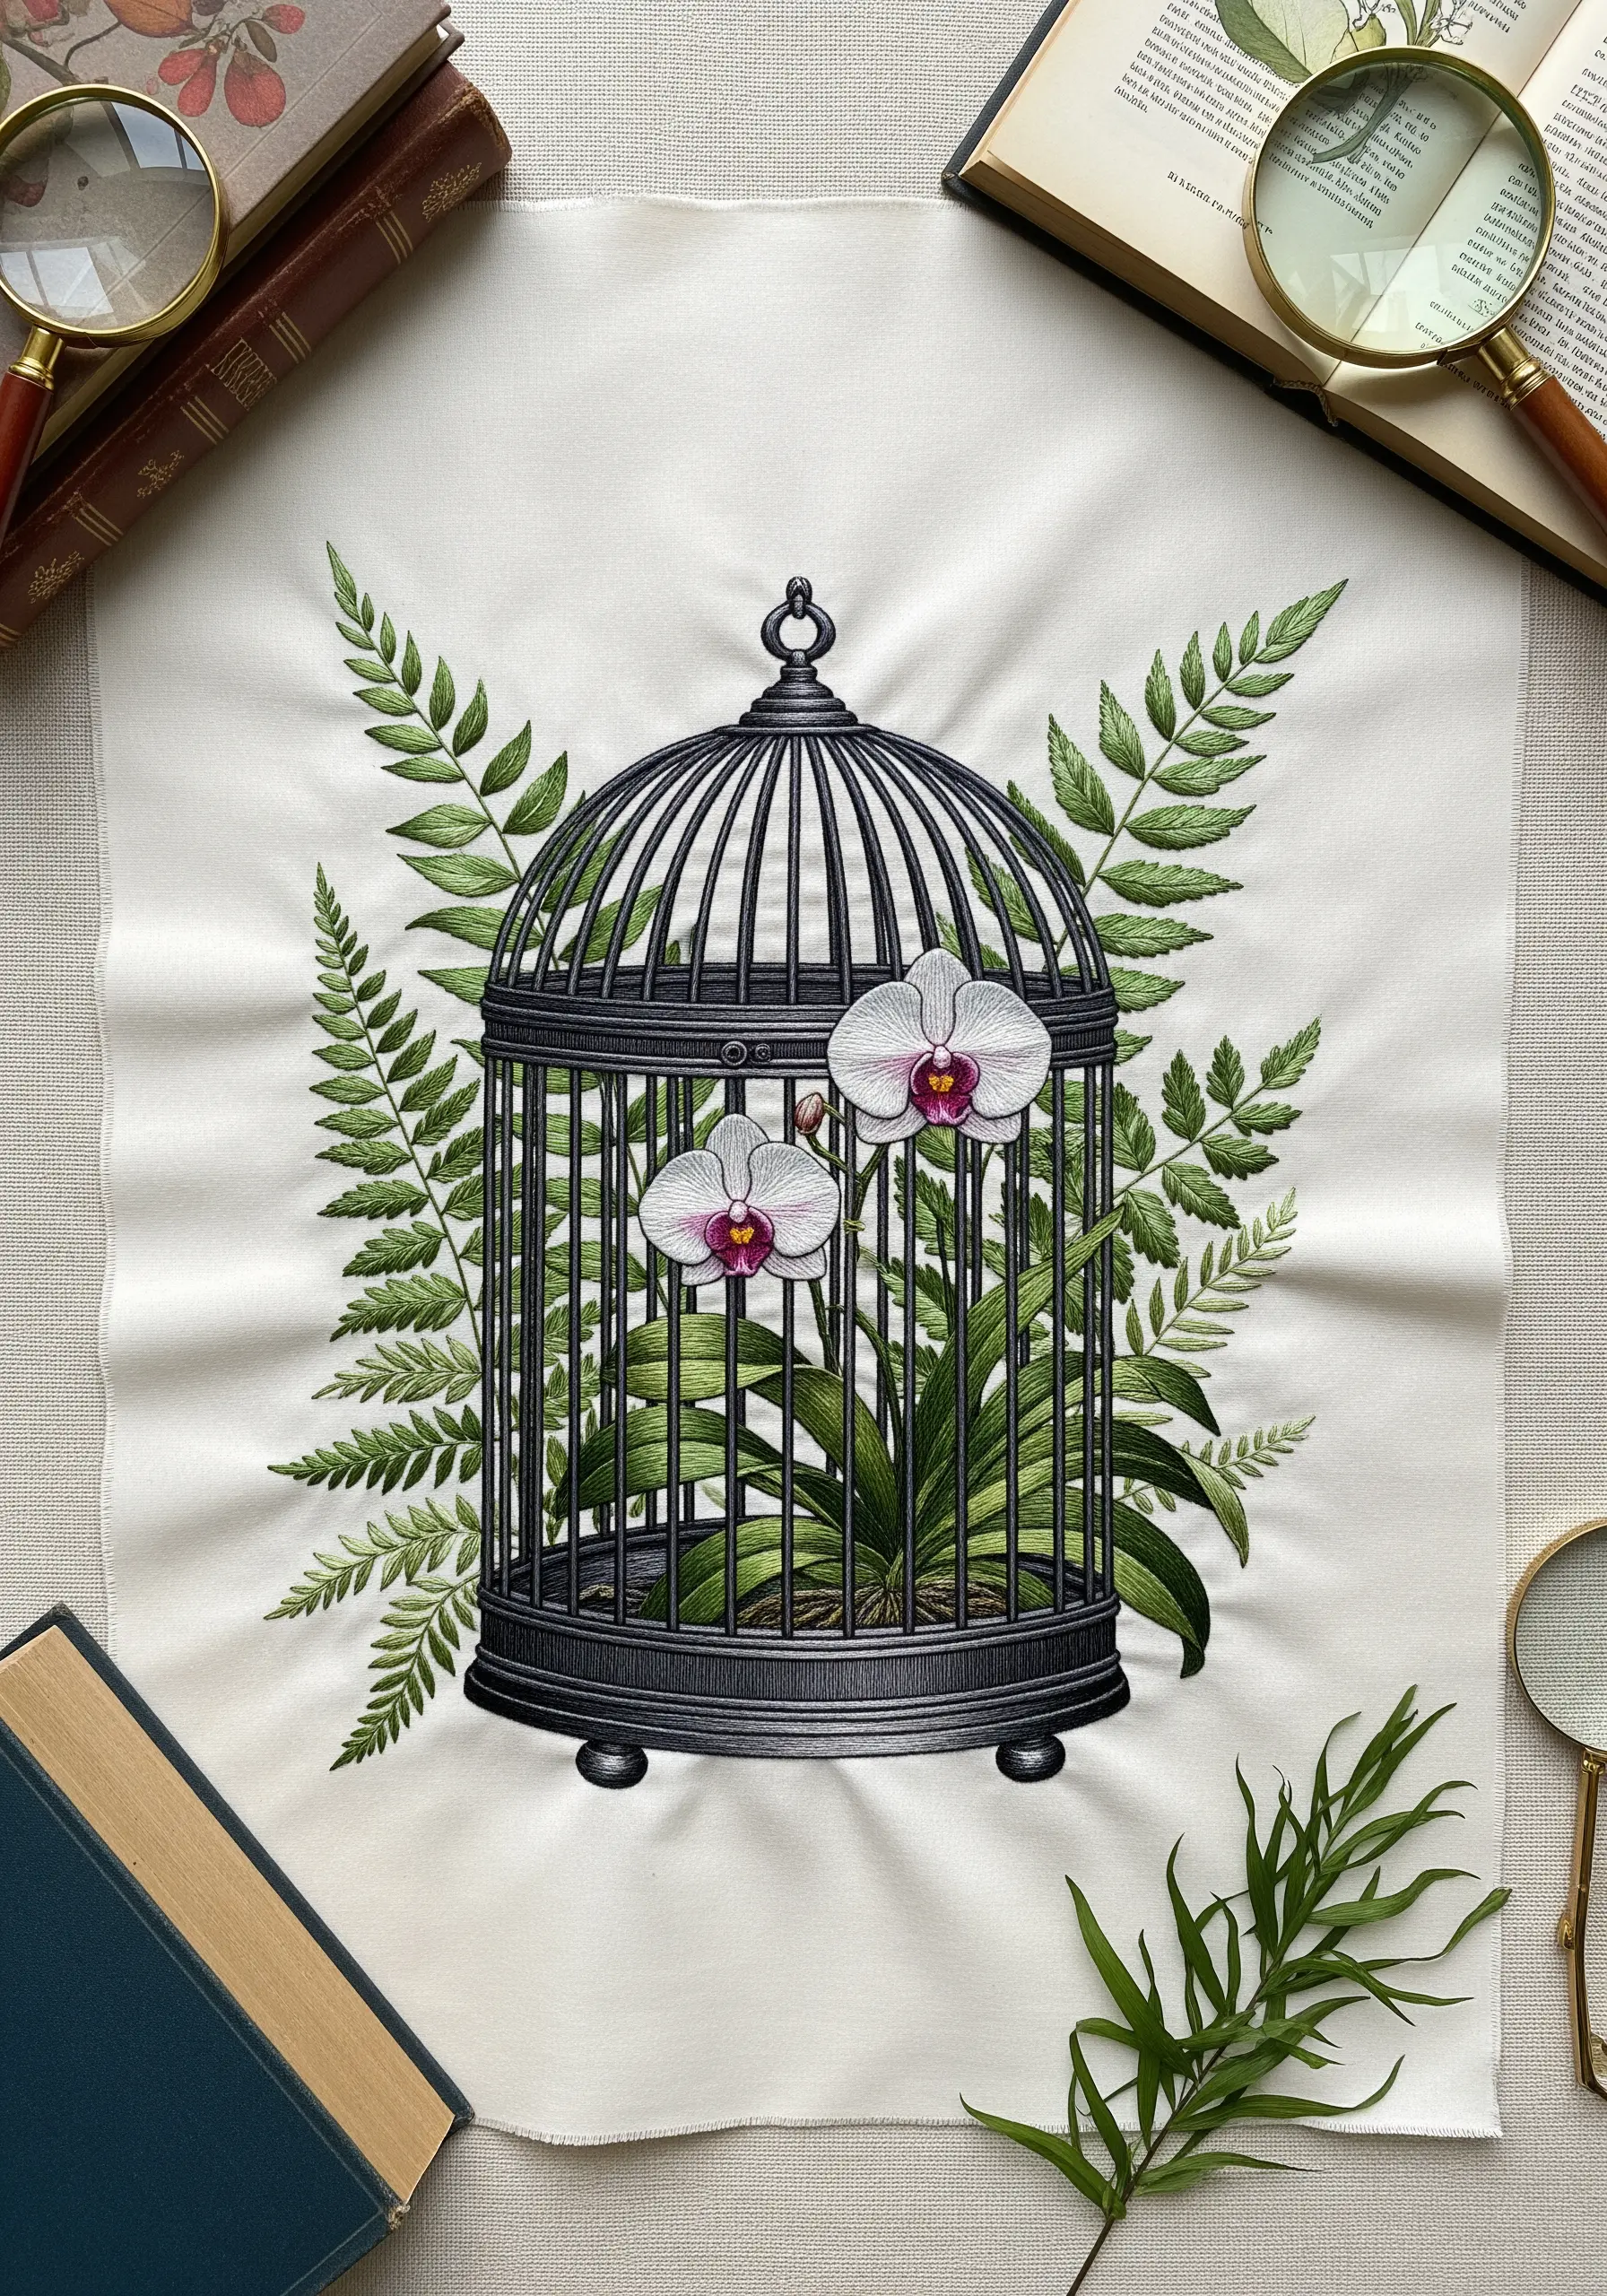
Achieve the look of wrought iron or vintage metal by using a dark gray or charcoal thread for the birdcage. A whipped backstitch will give the bars a rounded, three-dimensional quality.
Place your main floral element—like this orchid—partially behind the cage bars. This creates a sense of depth and containment, making the composition more dynamic.
For the delicate fern leaves, use a fishbone stitch. This creates a central vein and allows the stitches to angle outward, perfectly mimicking the structure of a real fern frond.
This project has the feel of heirloom-style table linen embroidery patterns, blending classic botanical art with a contained, narrative quality.
7. Illustrate a Story with Line Art and Color
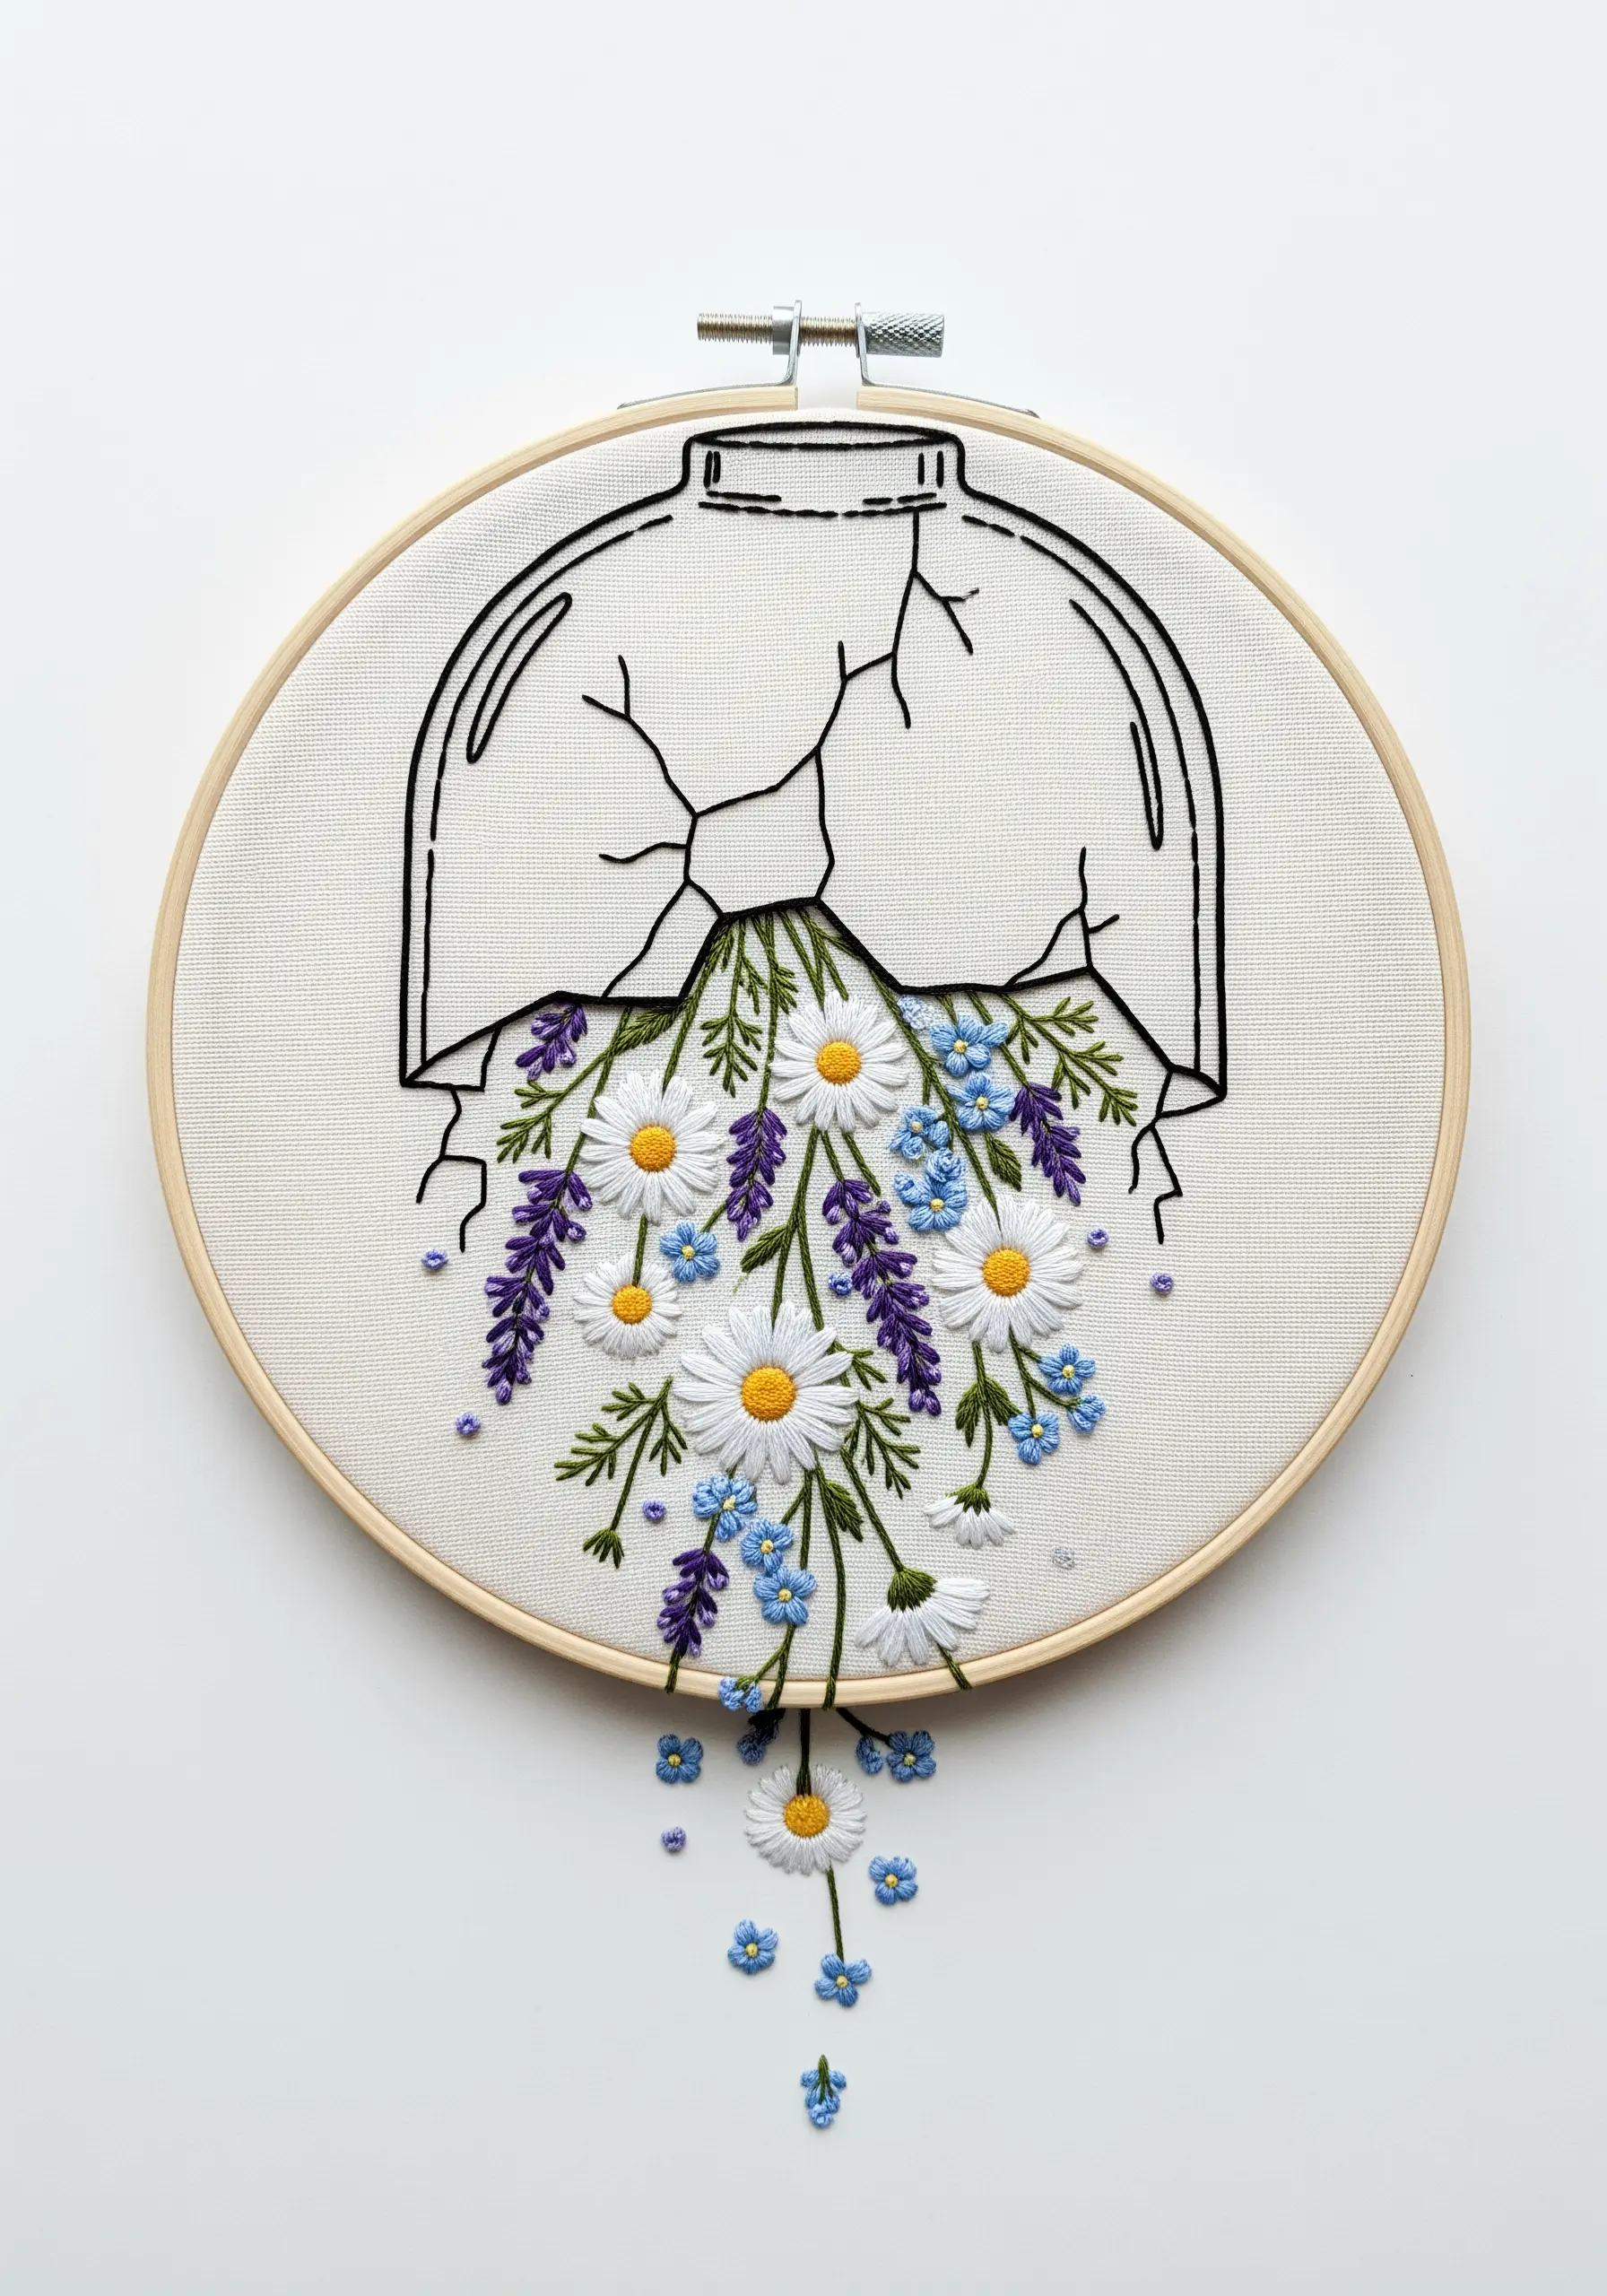
Combine bold, graphic line art with selective pops of color for a modern, illustrative style. Use a consistent backstitch for the broken jar to keep the lines clean and uniform.
Arrange your flowers to look like they are spilling out from the break in the jar. This dynamic composition creates a sense of movement and narrative.
Let a few stray flowers or petals fall below the main composition. This small detail enhances the feeling of abundance and movement, making the piece feel alive.
Try working with one-line floral embroidery motifs that you can ‘break’ apart to create this overflowing effect.
8. Pack a Terrarium with Dense Foliage
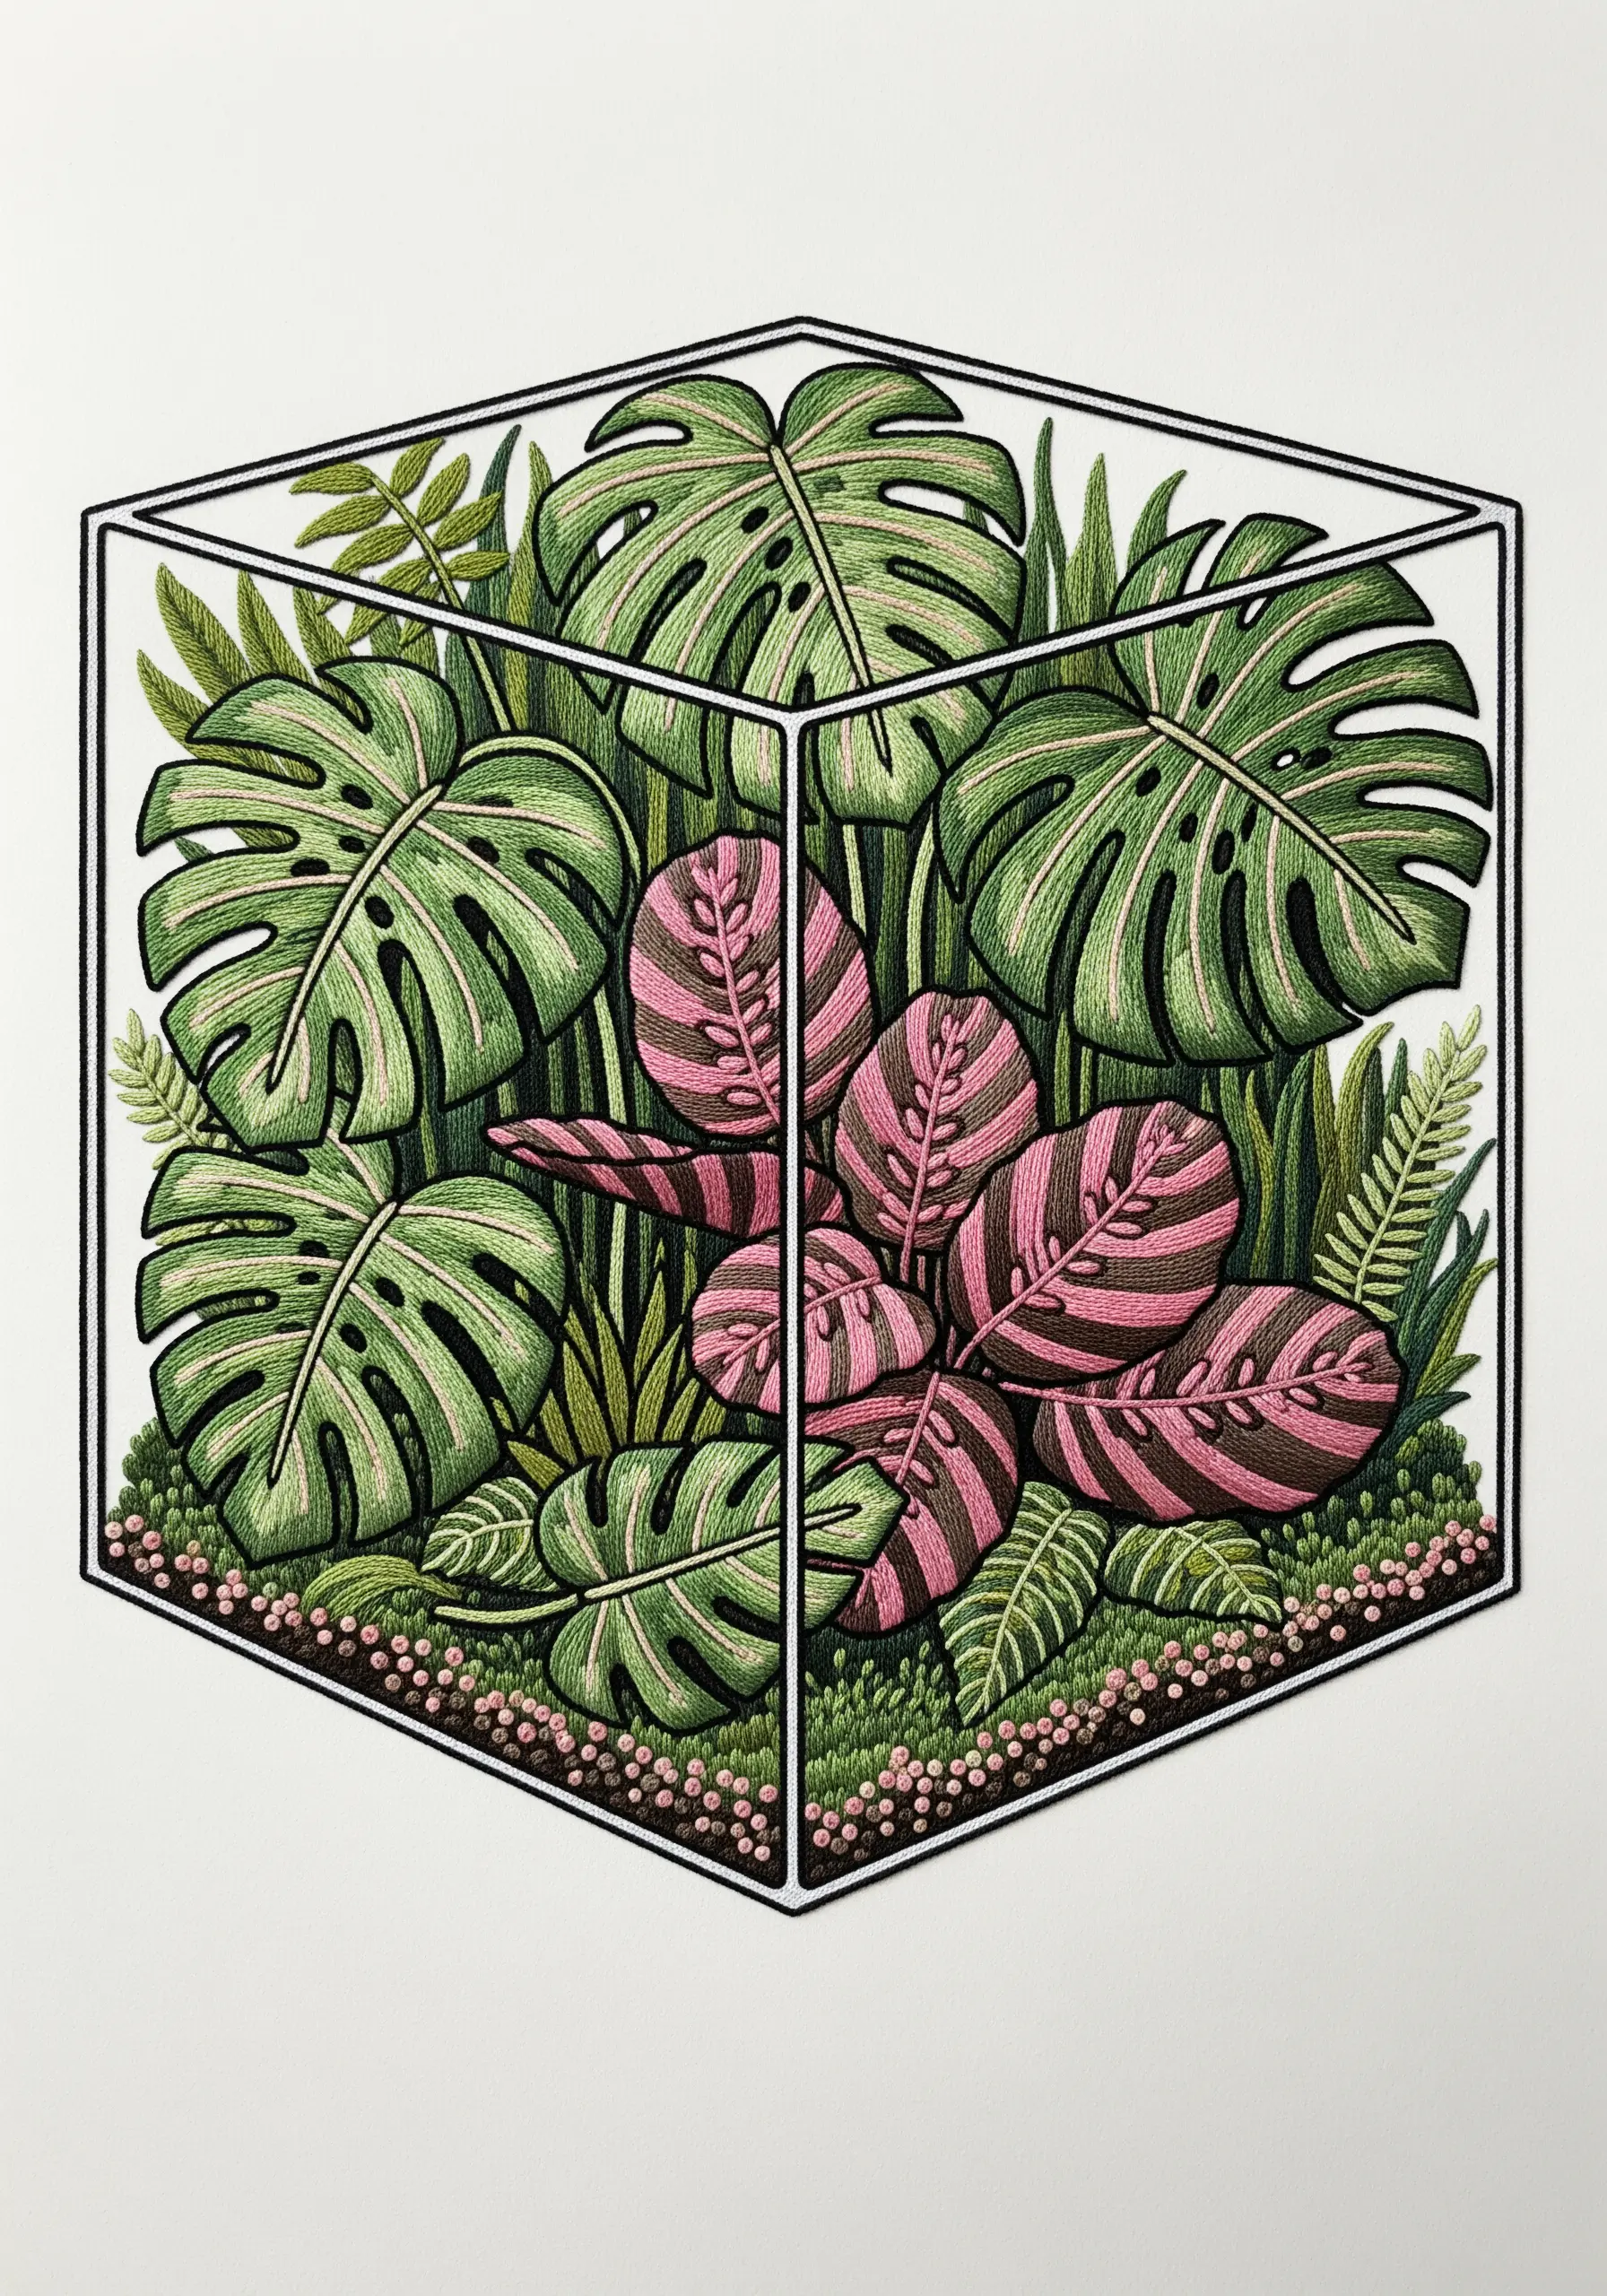
Create a lush, overgrown look by layering different types of leaves and plants. Position larger leaves, like the Monstera, in the foreground and fill the background with smaller, simpler leaf shapes.
Use long and short stitch to create subtle color variations on the leaves. Blending two or three shades of green gives them a more realistic, light-dappled appearance.
For the pink Calathea leaves, stitch the stripes first in a dark pink, then fill in the lighter pink sections. This ensures the veins remain sharp and defined.
A project this dense is a perfect way to create a botanical garden sampler, allowing you to try out different fill stitches and color blends in one cohesive piece.
9. Embrace Simplicity with a Single Specimen
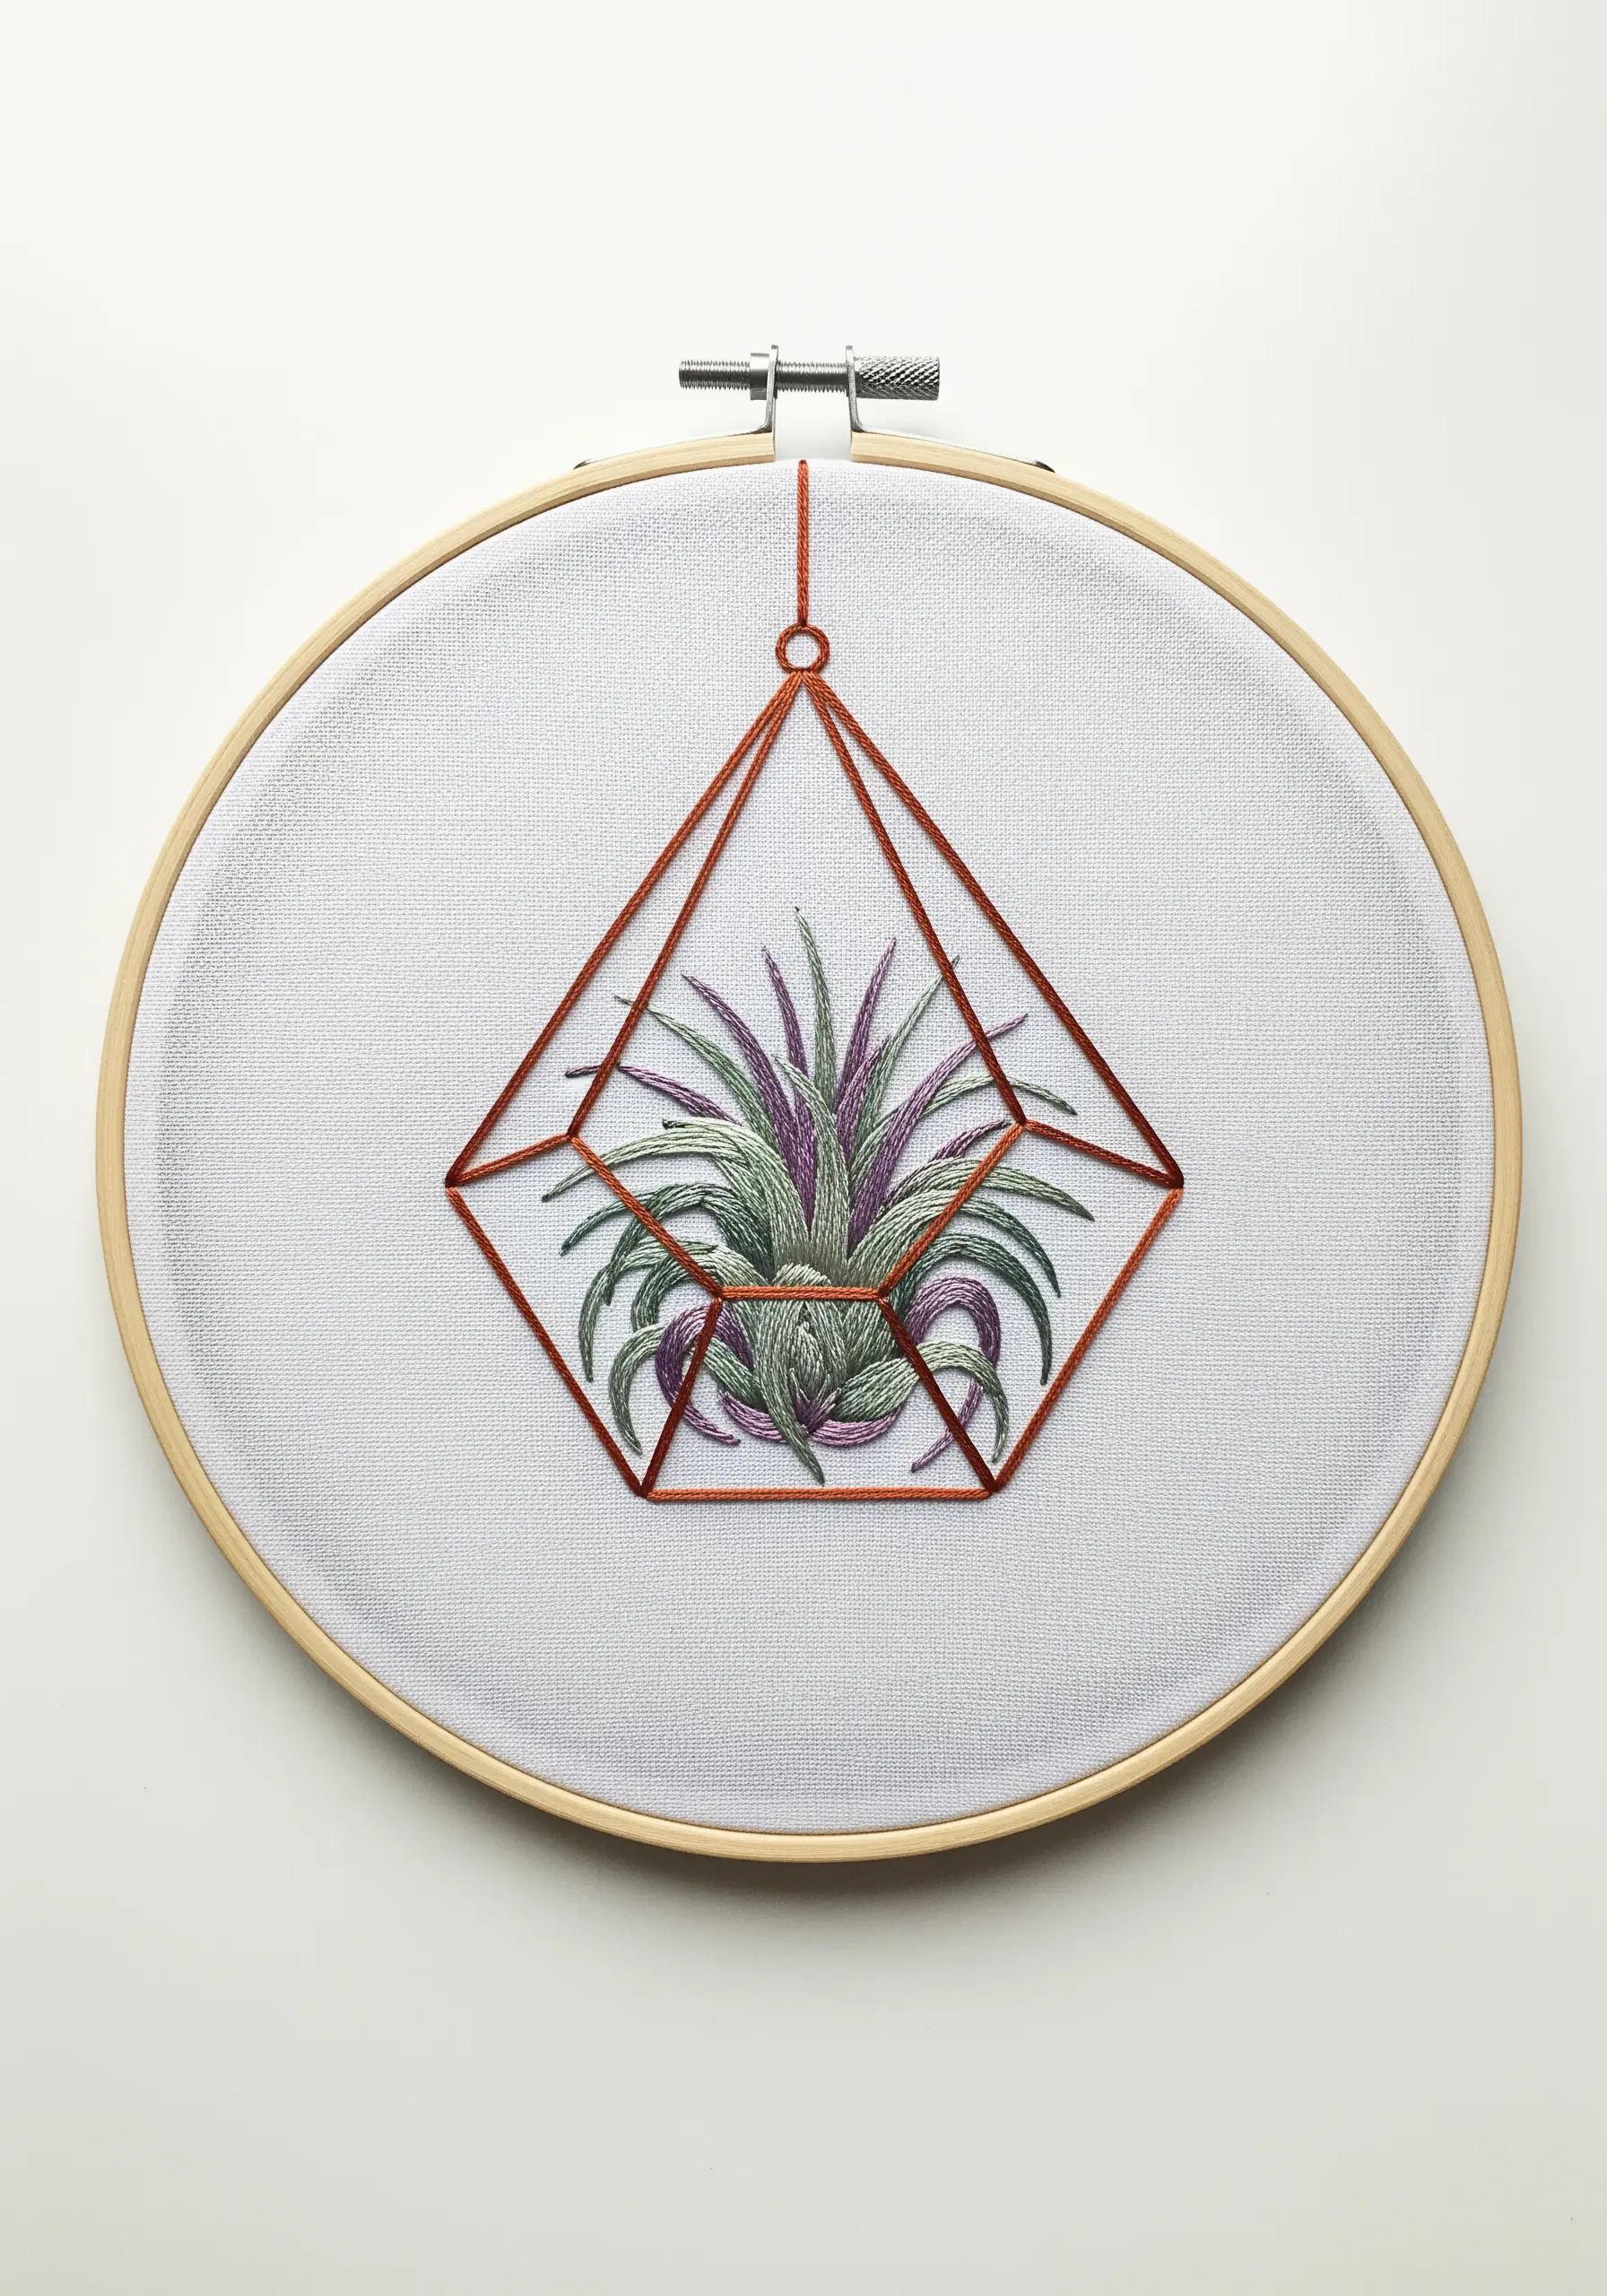
Sometimes, a single, beautifully rendered plant is more impactful than a crowded scene. Focus on capturing the unique form and color of one botanical element.
For this air plant, use a fishbone stitch for the leaves, allowing the central spine to define their shape as they radiate outwards. Blend shades of green and purple to capture its natural coloration.
The clean, geometric lines of the hanging terrarium act as a frame, drawing the eye directly to the plant. Use a whipped backstitch with a copper or gold metallic thread for a polished finish.
This design makes one of the most effective minimalist embroidery patterns perfect for entryway decoration due to its clean and immediate appeal.
10. Stitch Realistic Soil Layers
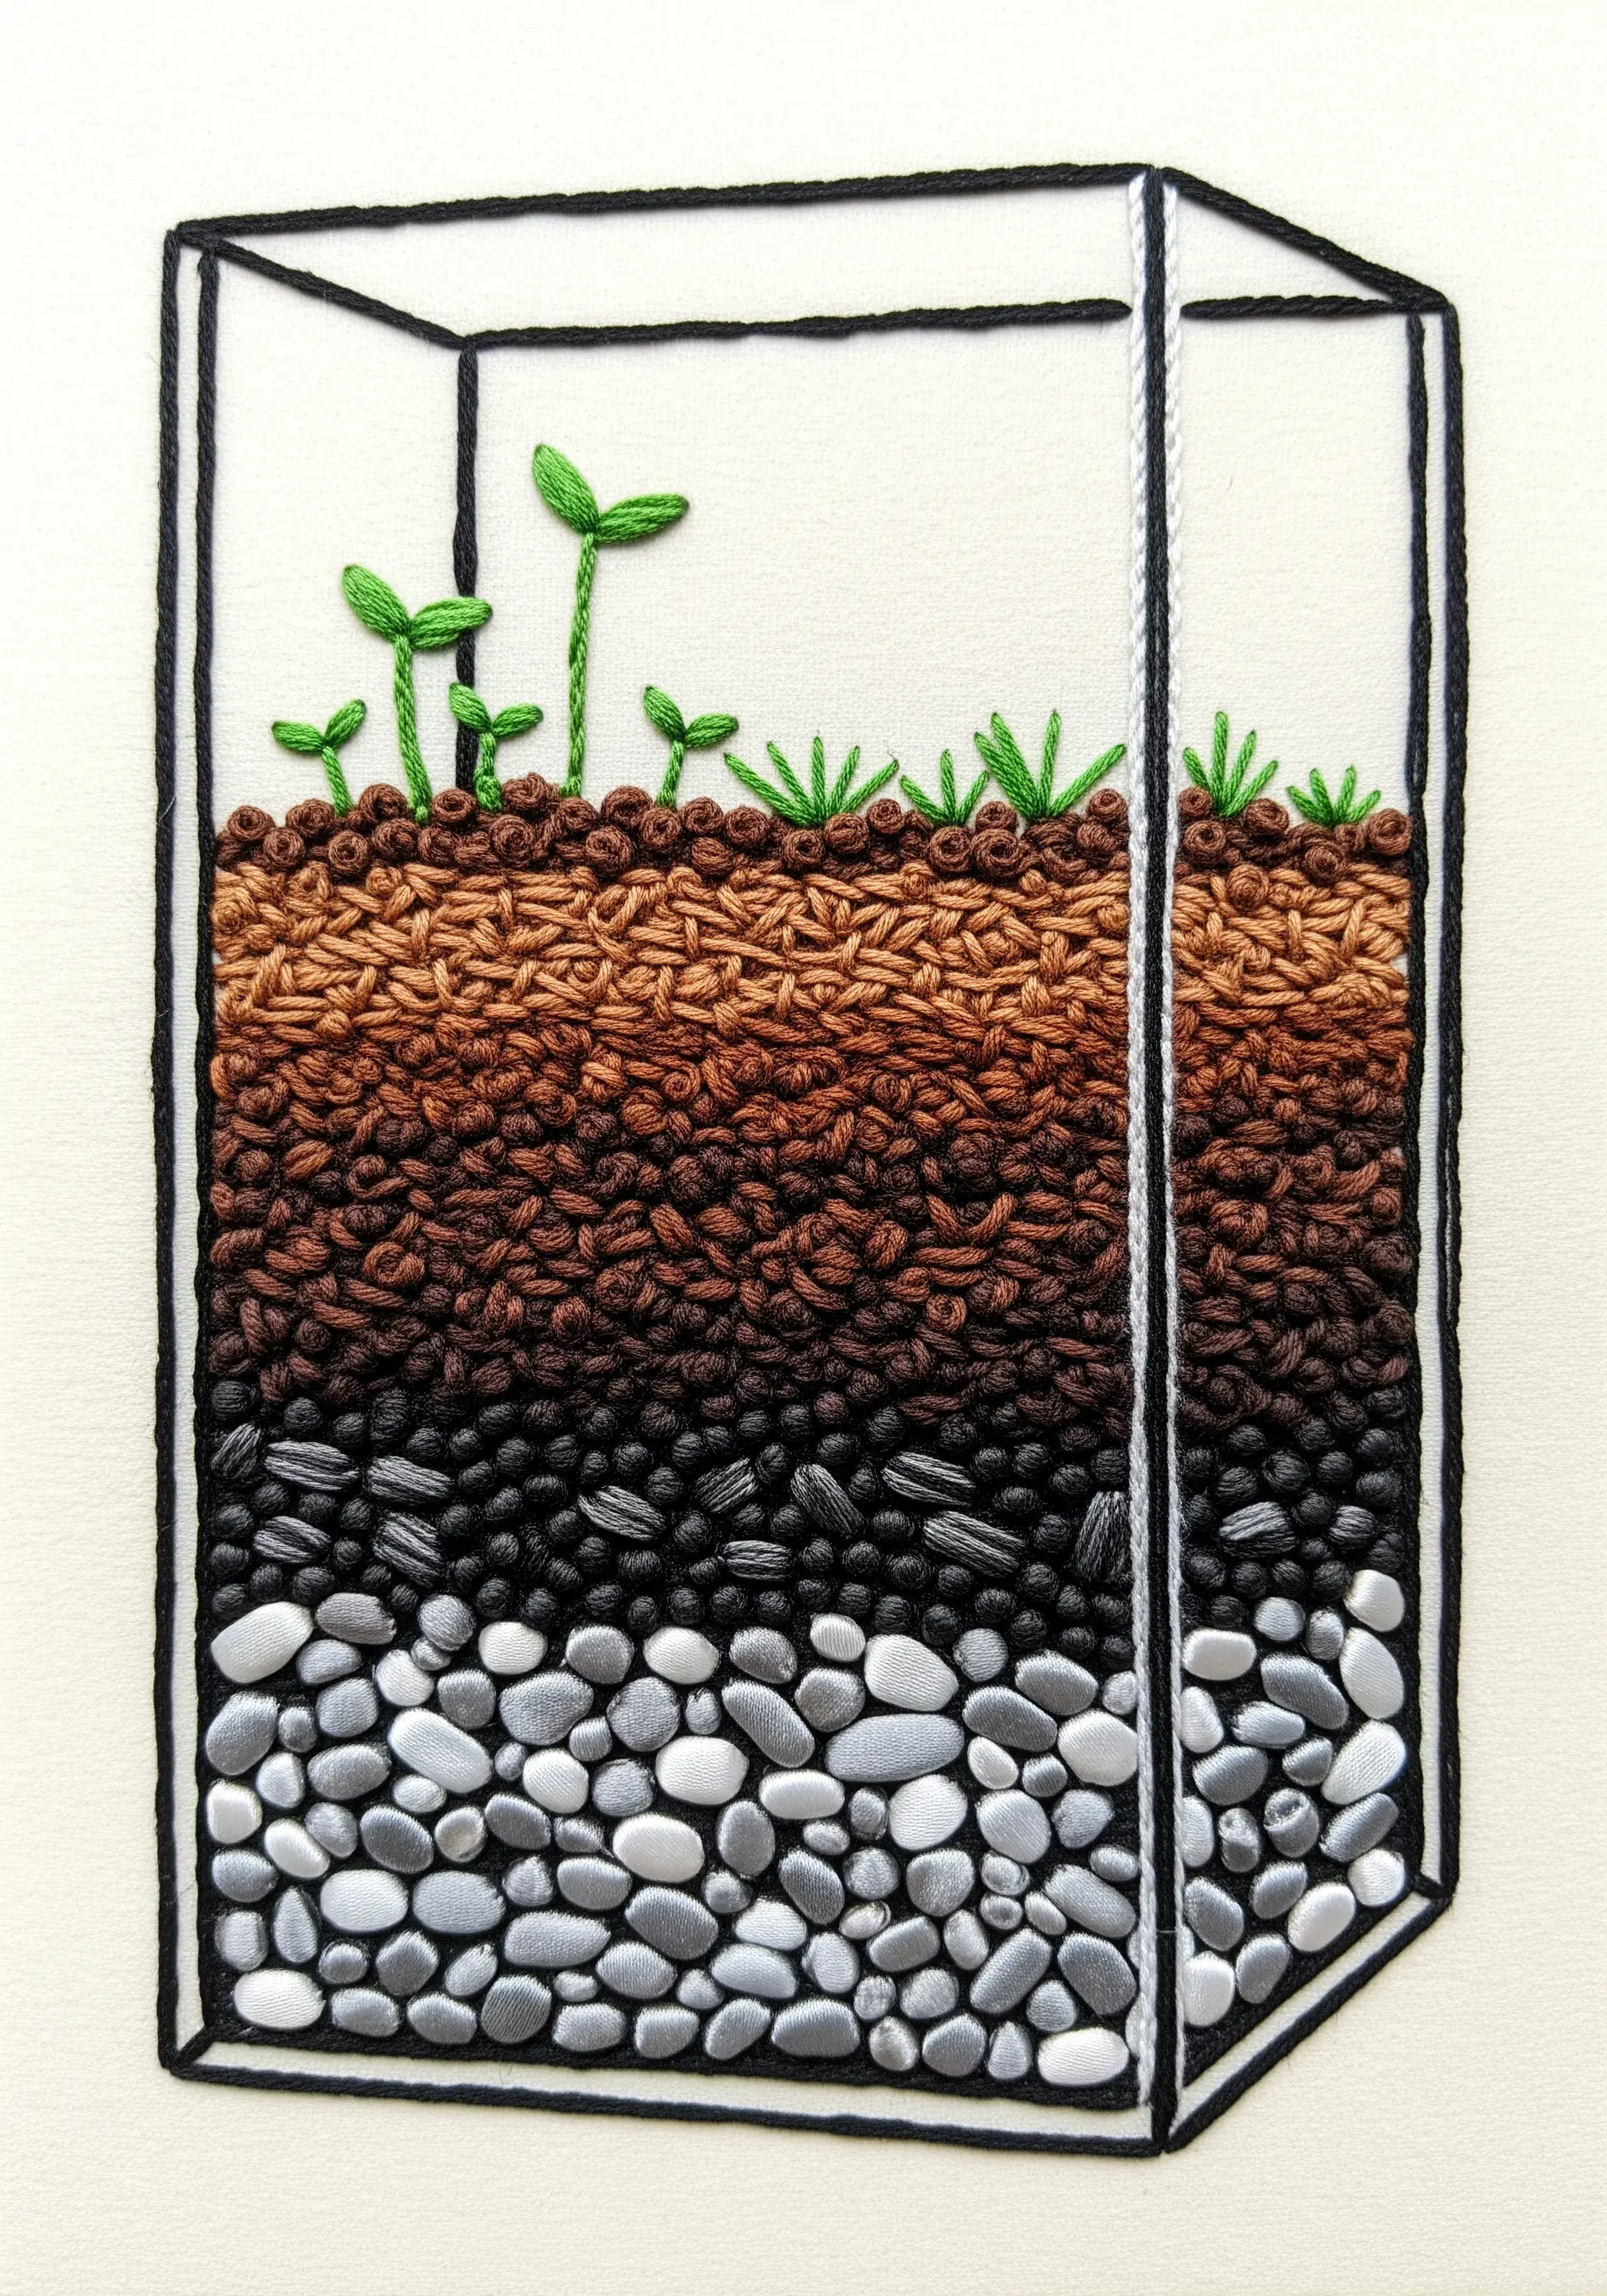
Illustrate the science of a terrarium by stitching distinct soil layers. Use different stitches and colors for each stratum to create visual and textural contrast.
For the topsoil and darker earth layers, use seed stitch and French knots in varying densities. This gives an organic, crumbly texture.
The smooth river stones at the bottom can be rendered with satin stitch. Use shades of gray, white, and silver, and vary the direction of your stitches to make each stone look unique and rounded.
This project is a fantastic way to explore ways to embroider natural textures, from soft earth to hard stone, all within one design.
11. Incorporate Beads and Crystals
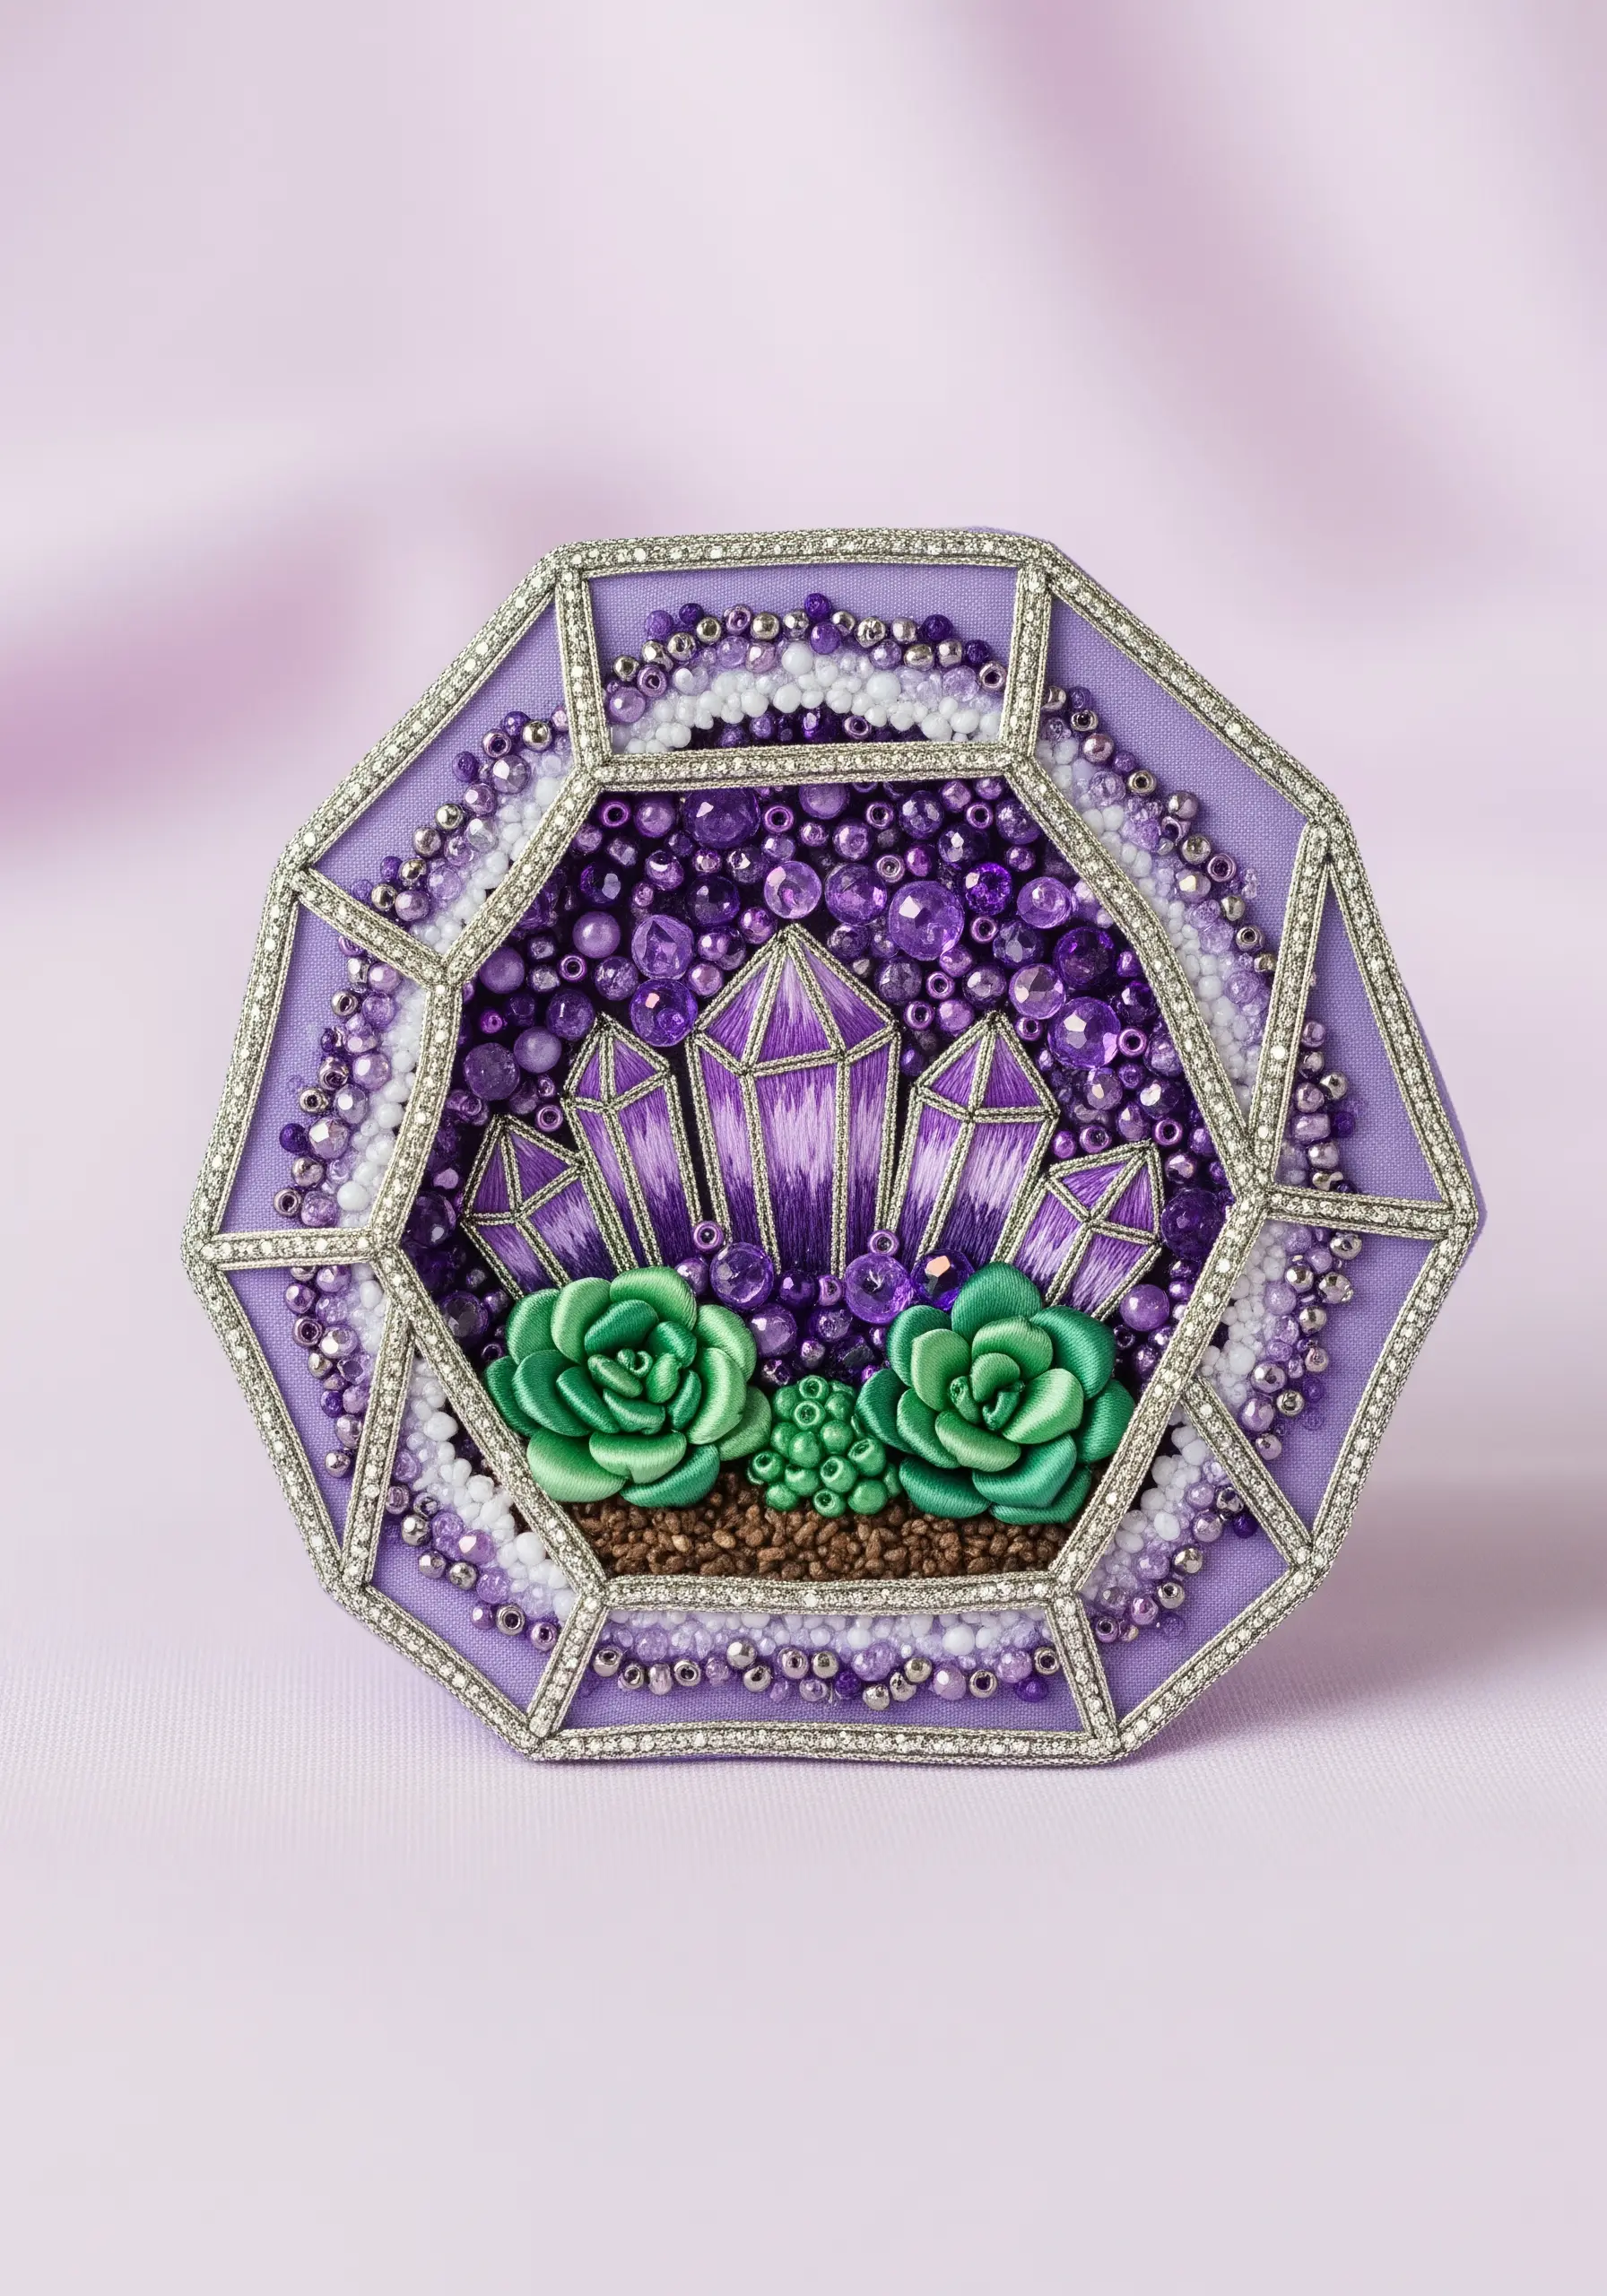
Elevate your terrarium design by integrating beads and metallic threads for a touch of opulence. Couch shimmering silver thread to create the frame, giving it a structured, jewelry-like finish.
For the amethyst crystals, use a directional satin stitch with several shades of purple to mimic facets. Outline each crystal with a single strand of silver thread to make it pop.
Fill the background with a mix of purple and iridescent seed beads instead of thread. This creates a rich, textured surface that catches the light beautifully, enhancing the crystal theme.
This technique turns your hoop into luxury metallic thread wall decor, blending fiber art with beading.
12. Capture an Autumnal Collection
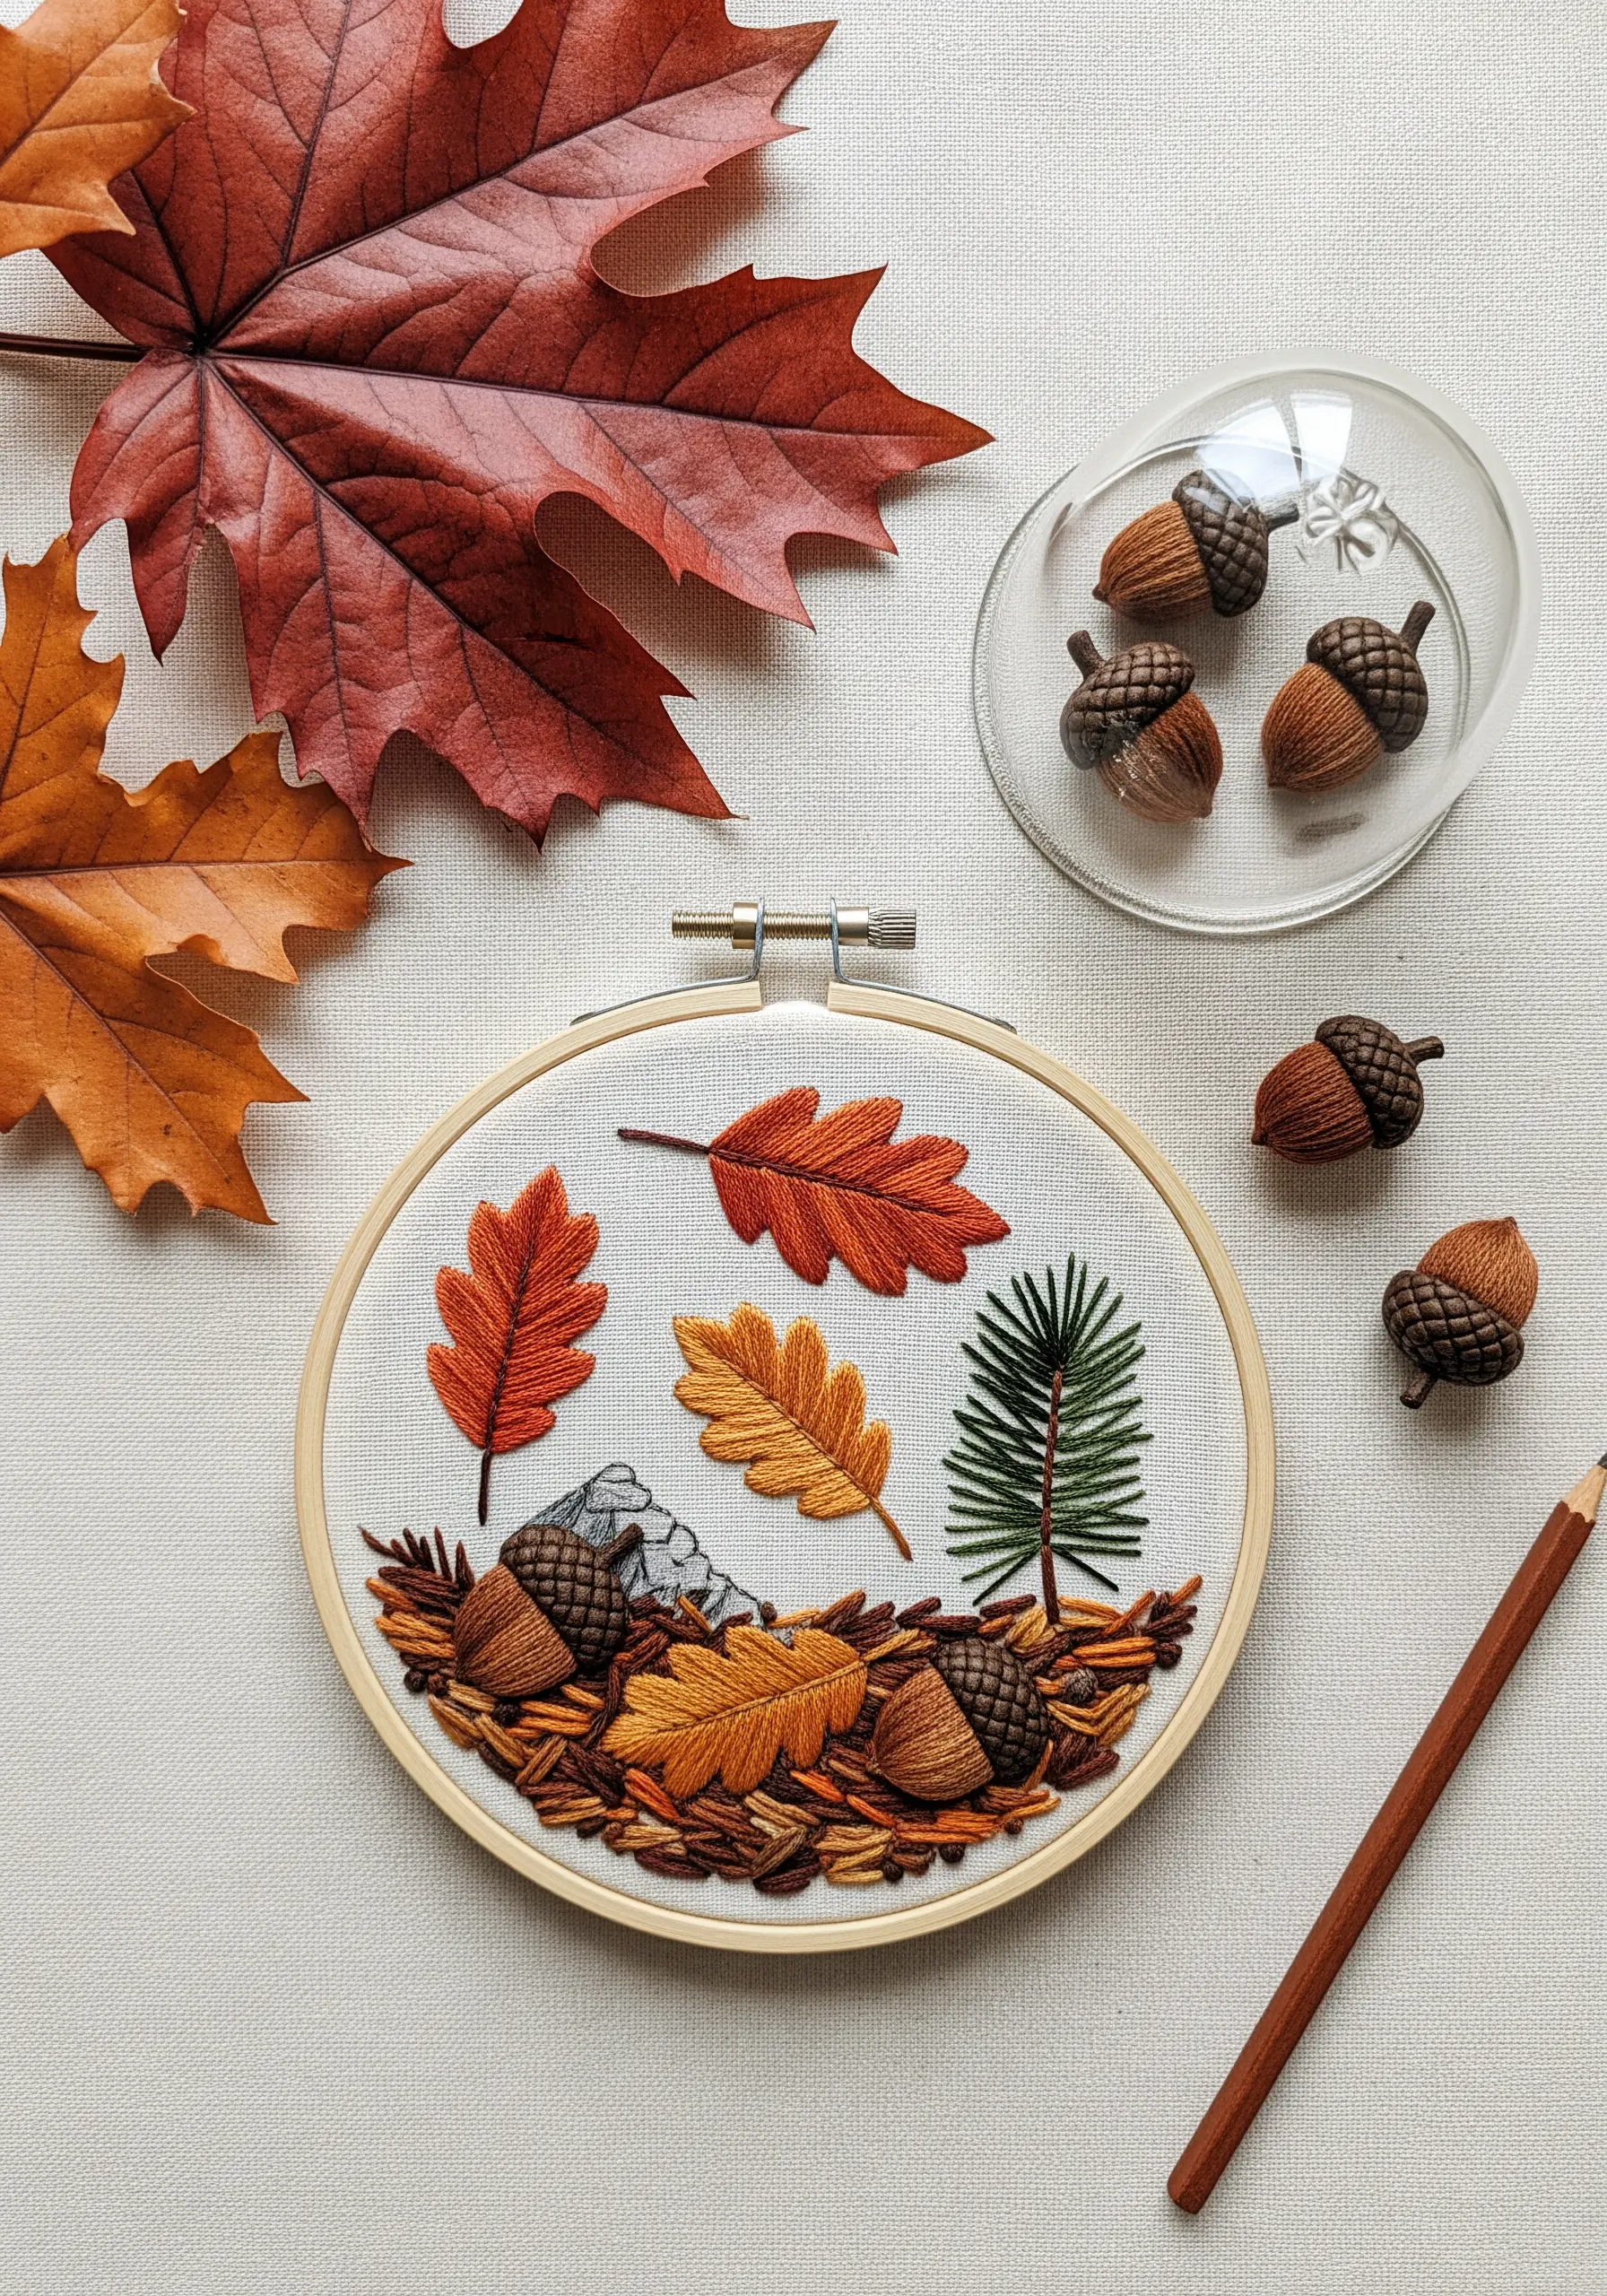
Create a seasonal terrarium by focusing on the colors and textures of autumn. Use long and short stitch to blend reds, oranges, and yellows in the fallen leaves, giving them a realistic gradient.
For the acorns, use a padded satin stitch for the smooth nut and French knots or turkey work for the textured cap. This contrast in texture makes them appear more lifelike.
Scatter small, straight stitches in shades of brown at the base to represent leaf litter and twigs, grounding the entire composition.
This is a wonderful example of seasonal framed embroidery pieces that capture the feeling of a specific time of year.
13. Illustrate Spring Bulbs in a Mason Jar
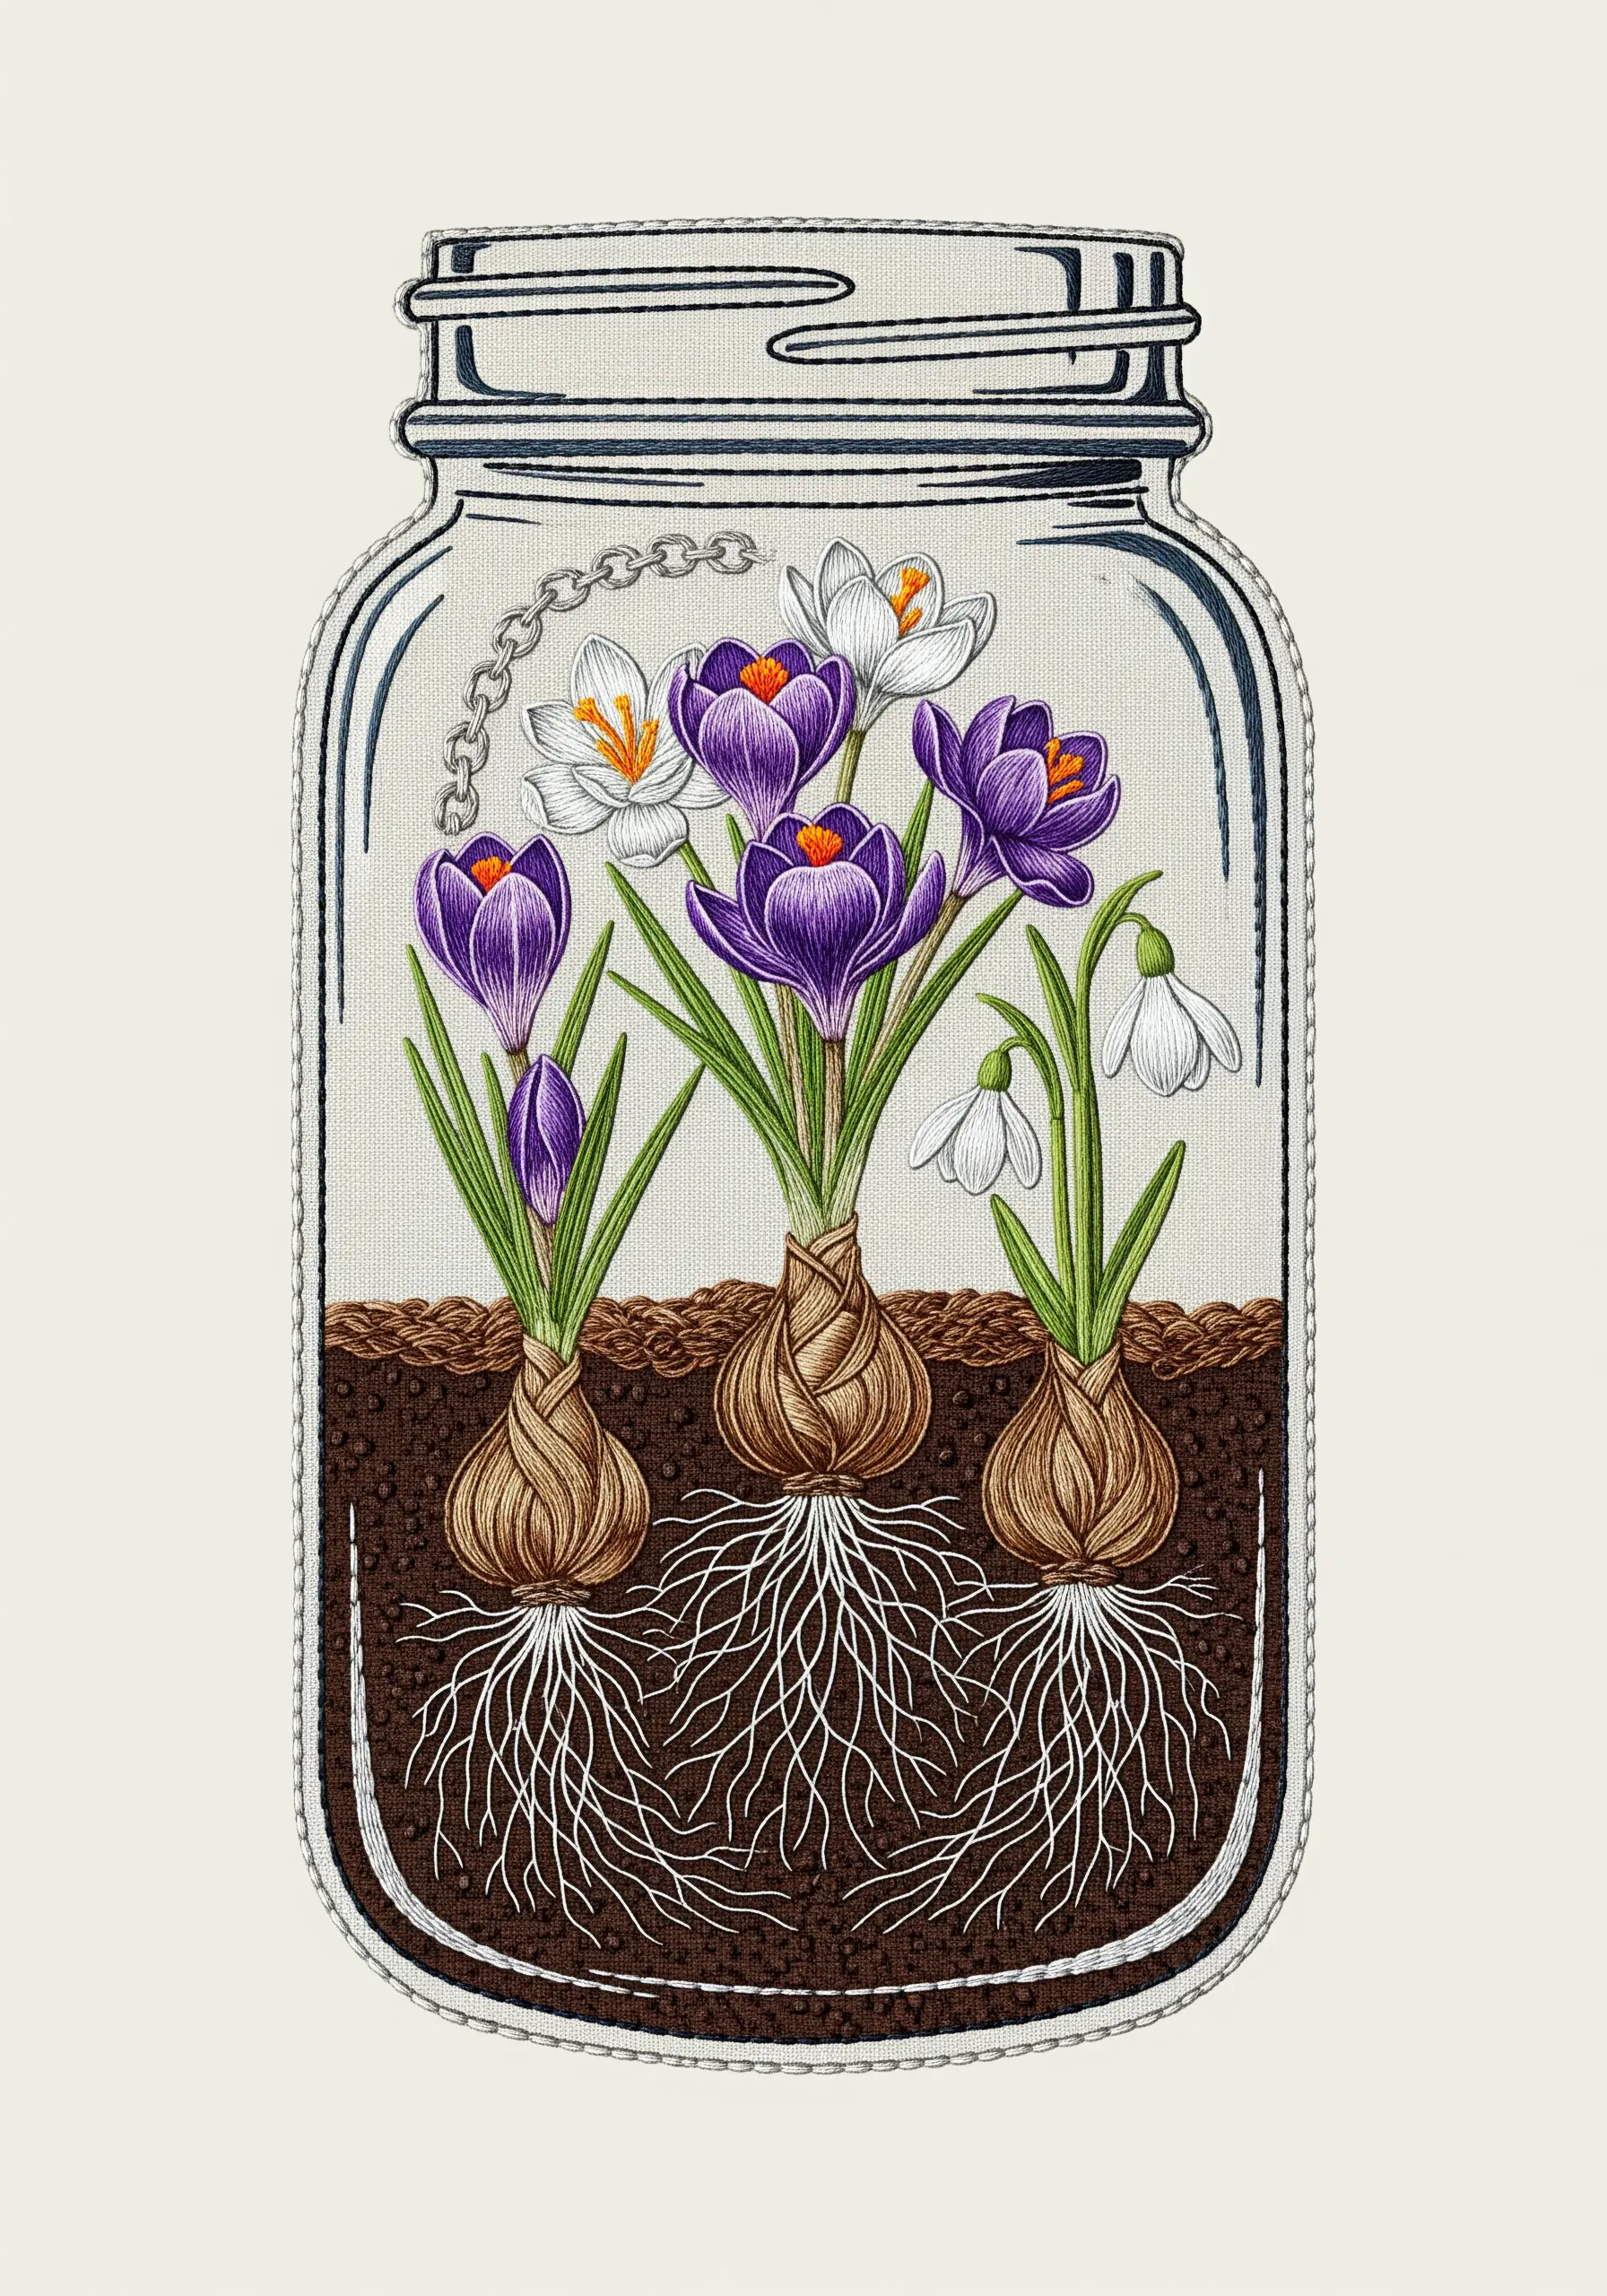
Show the entire life cycle of a plant by stitching the bulbs and roots below the soil line. Use detached chain stitches or long, wandering straight stitches for the delicate root systems.
For the crocus bulbs, use a light brown satin stitch, adding subtle darker lines to indicate texture and layers. This small detail adds a surprising amount of realism.
The denim-like texture on the jar is achieved with a simple backstitch outline on a fabric with a visible weave, like linen or Aida cloth. The chain link detail adds a charming touch.
This is one of the most beginner-friendly embroidery patterns to try this month, as it uses basic stitches to create a lovely composition.
14. Use Appliqué for Bold Shapes
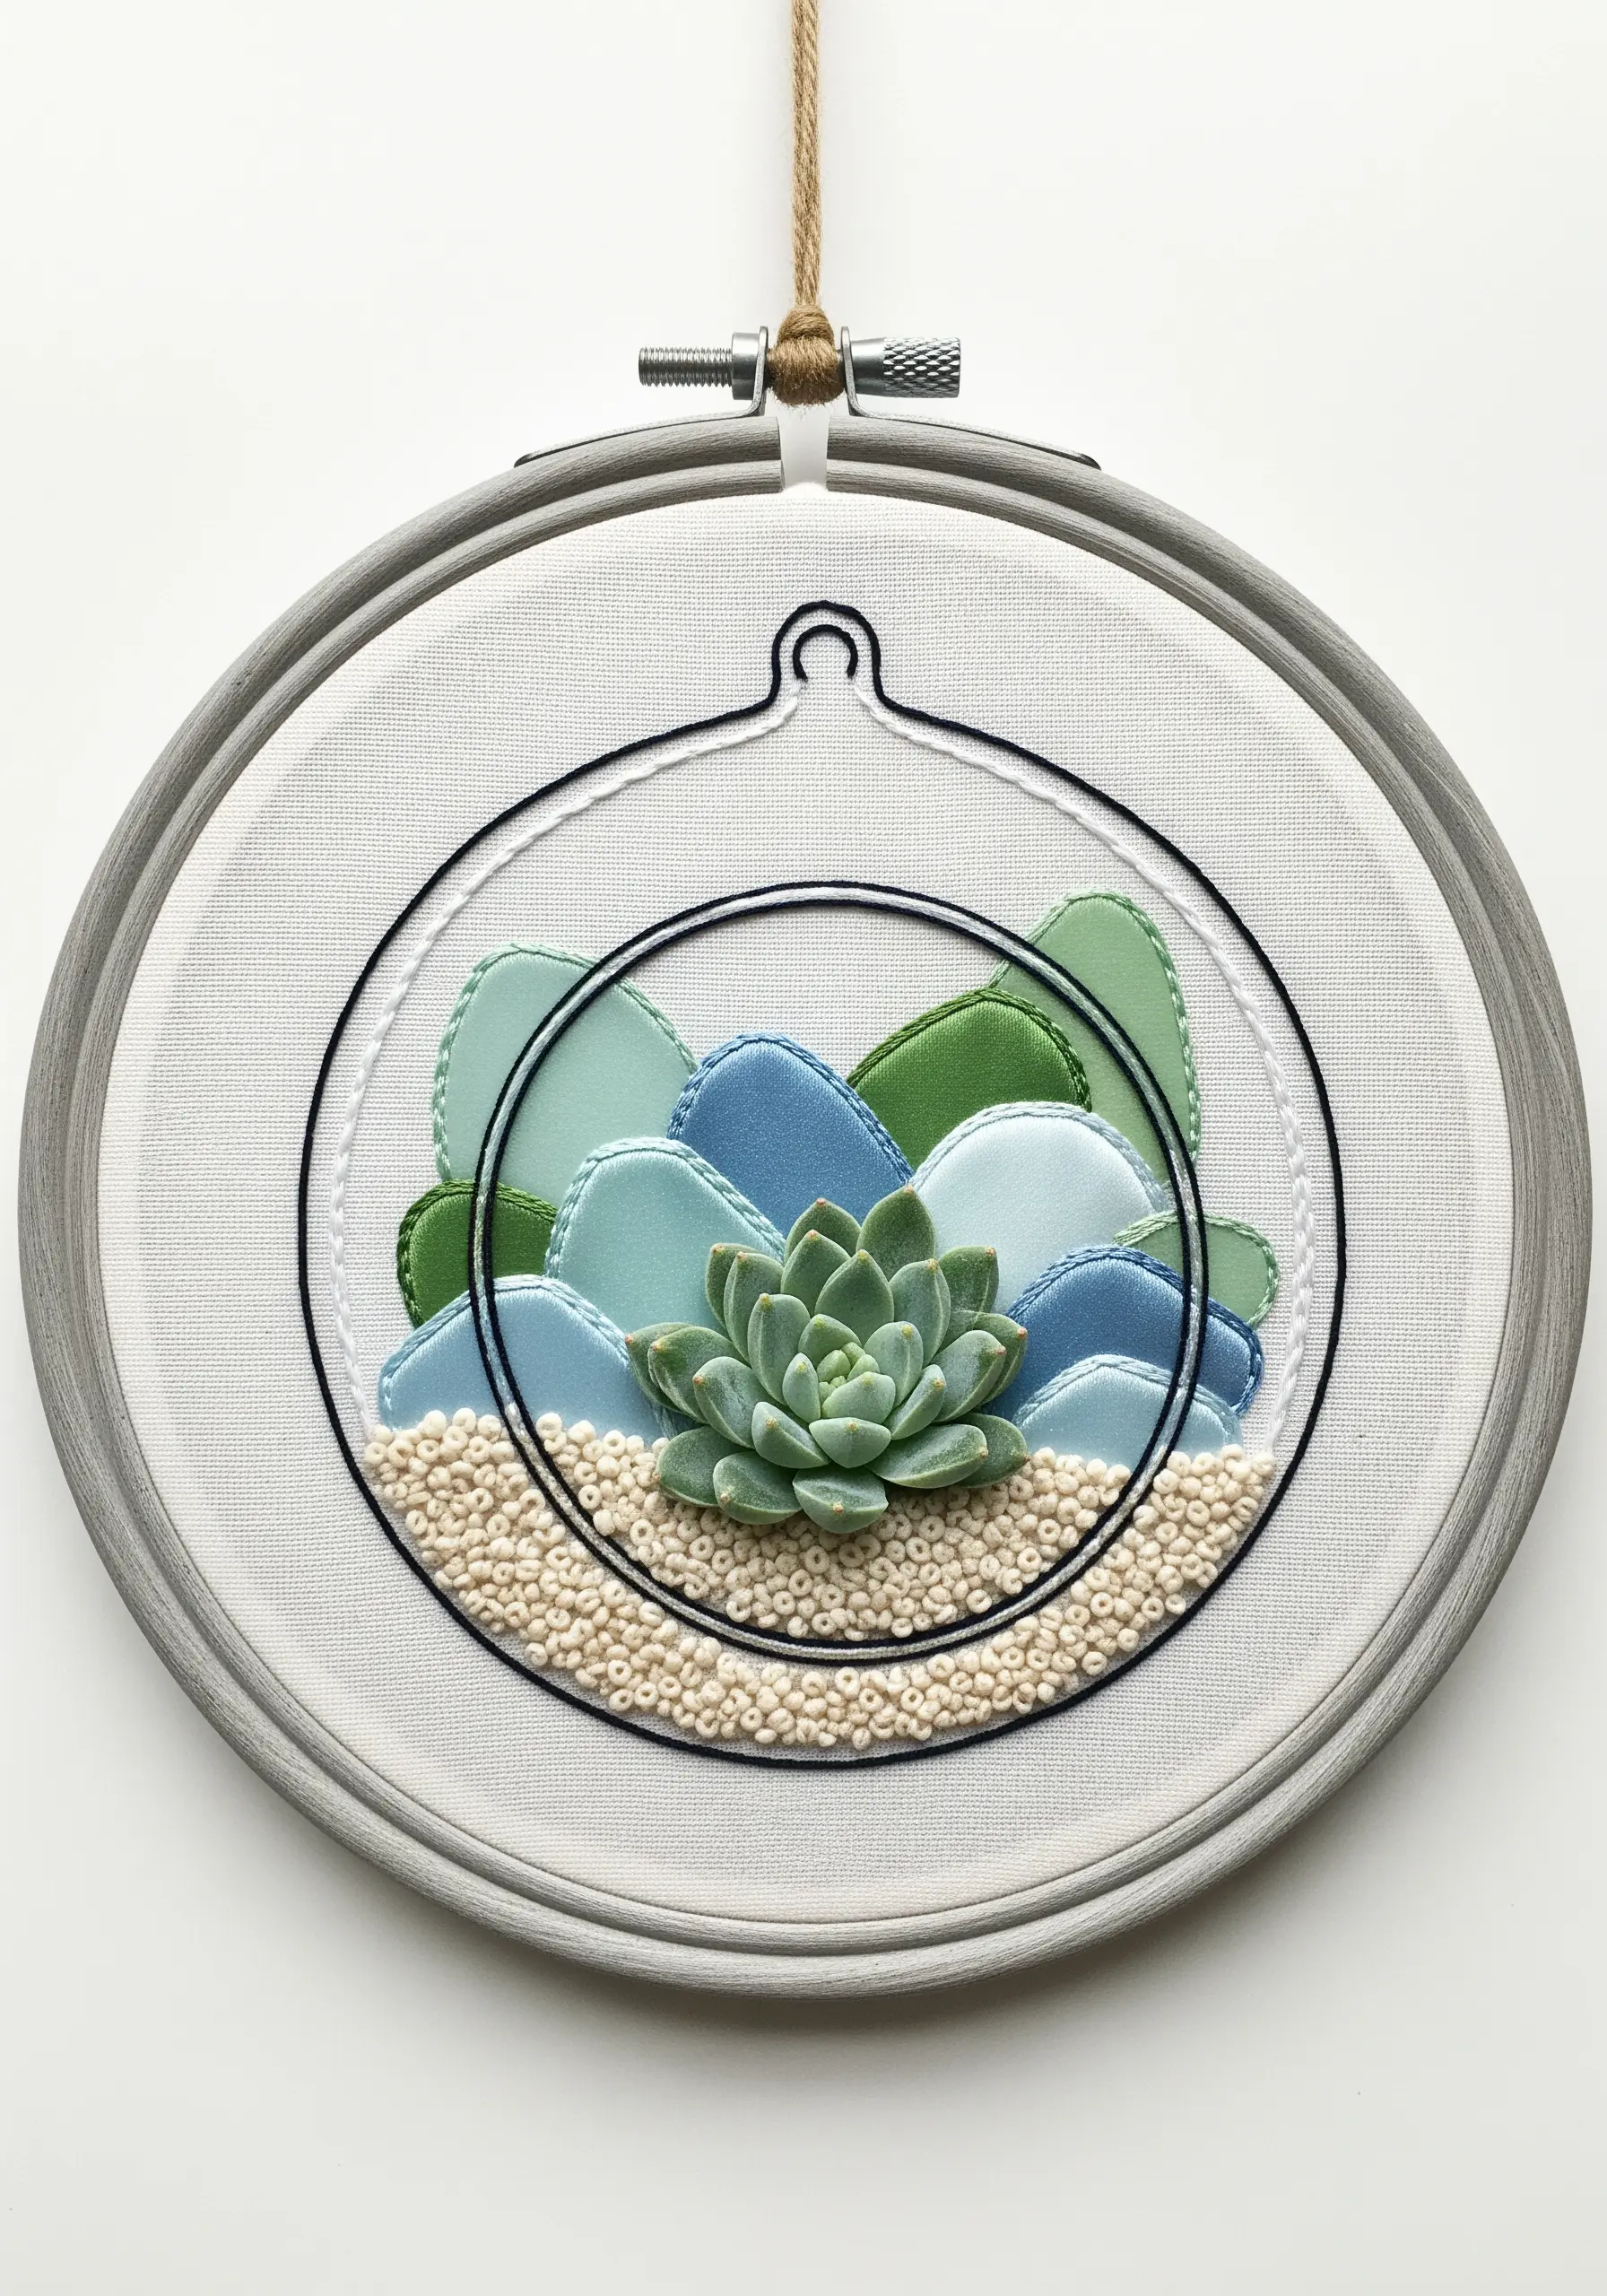
Incorporate fabric appliqué to create bold, layered shapes within your terrarium. Cut out smooth, stone-like shapes from felt or cotton fabric in shades of blue and green.
Secure the appliqué pieces with a simple whipstitch or a decorative backstitch around the edges. This adds another layer of texture and definition to your design.
Place a single, highly detailed embroidered element, like the central succulent, on top of the appliqué background. The contrast between the flat fabric shapes and the dimensional stitching makes the succulent the focal point.
Explore more fabric collage embroidery ideas to see how scraps can transform your work.
15. Create a Celestial Nightscape Patch
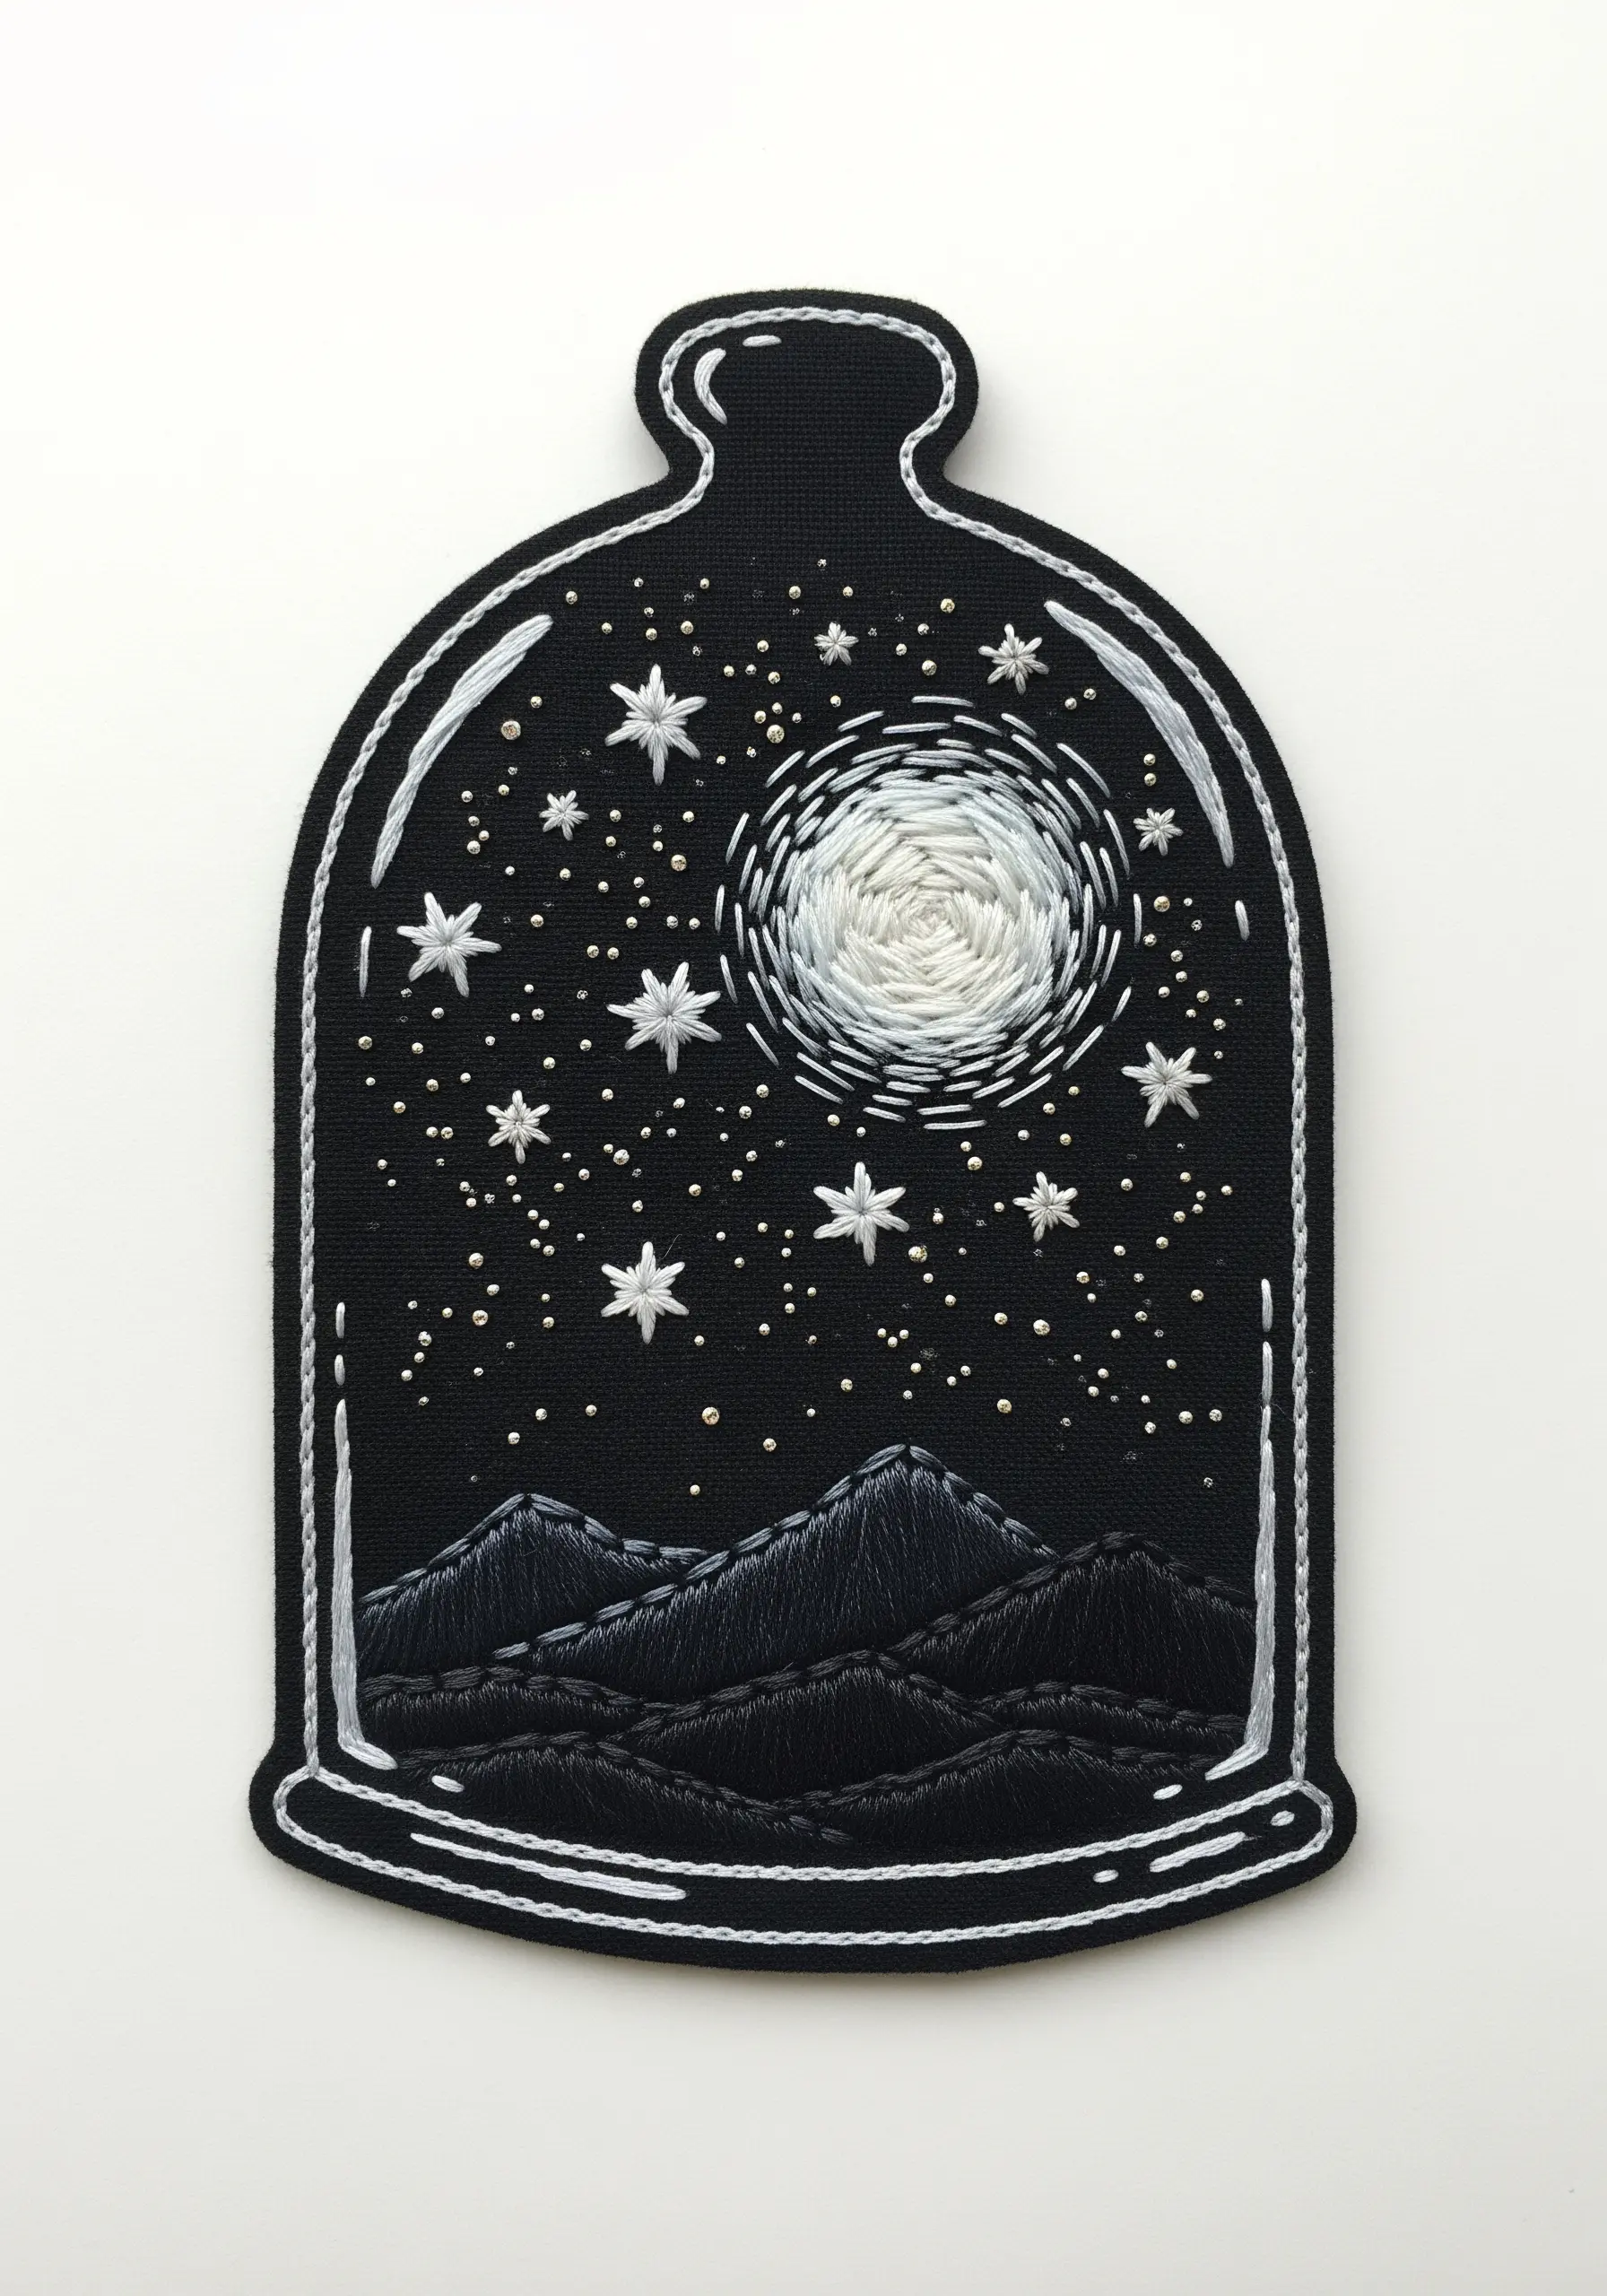
Design your terrarium as a self-contained patch by stitching right to the edge of the fabric and cutting it out. Finish the border with a whipped backstitch or a tight satin stitch for a clean edge.
For the moon, use a circular satin stitch, spiraling from the center outwards. Blending shades of white, gray, and cream will give it a luminous, textured surface.
Use a combination of star stitches and tiny French knots for the night sky. This variation in size and shape creates a more dynamic and believable starfield.
You can find more inspiration in our collection of moon and stars embroidery ideas.
16. Replicate Twisted Bark Texture
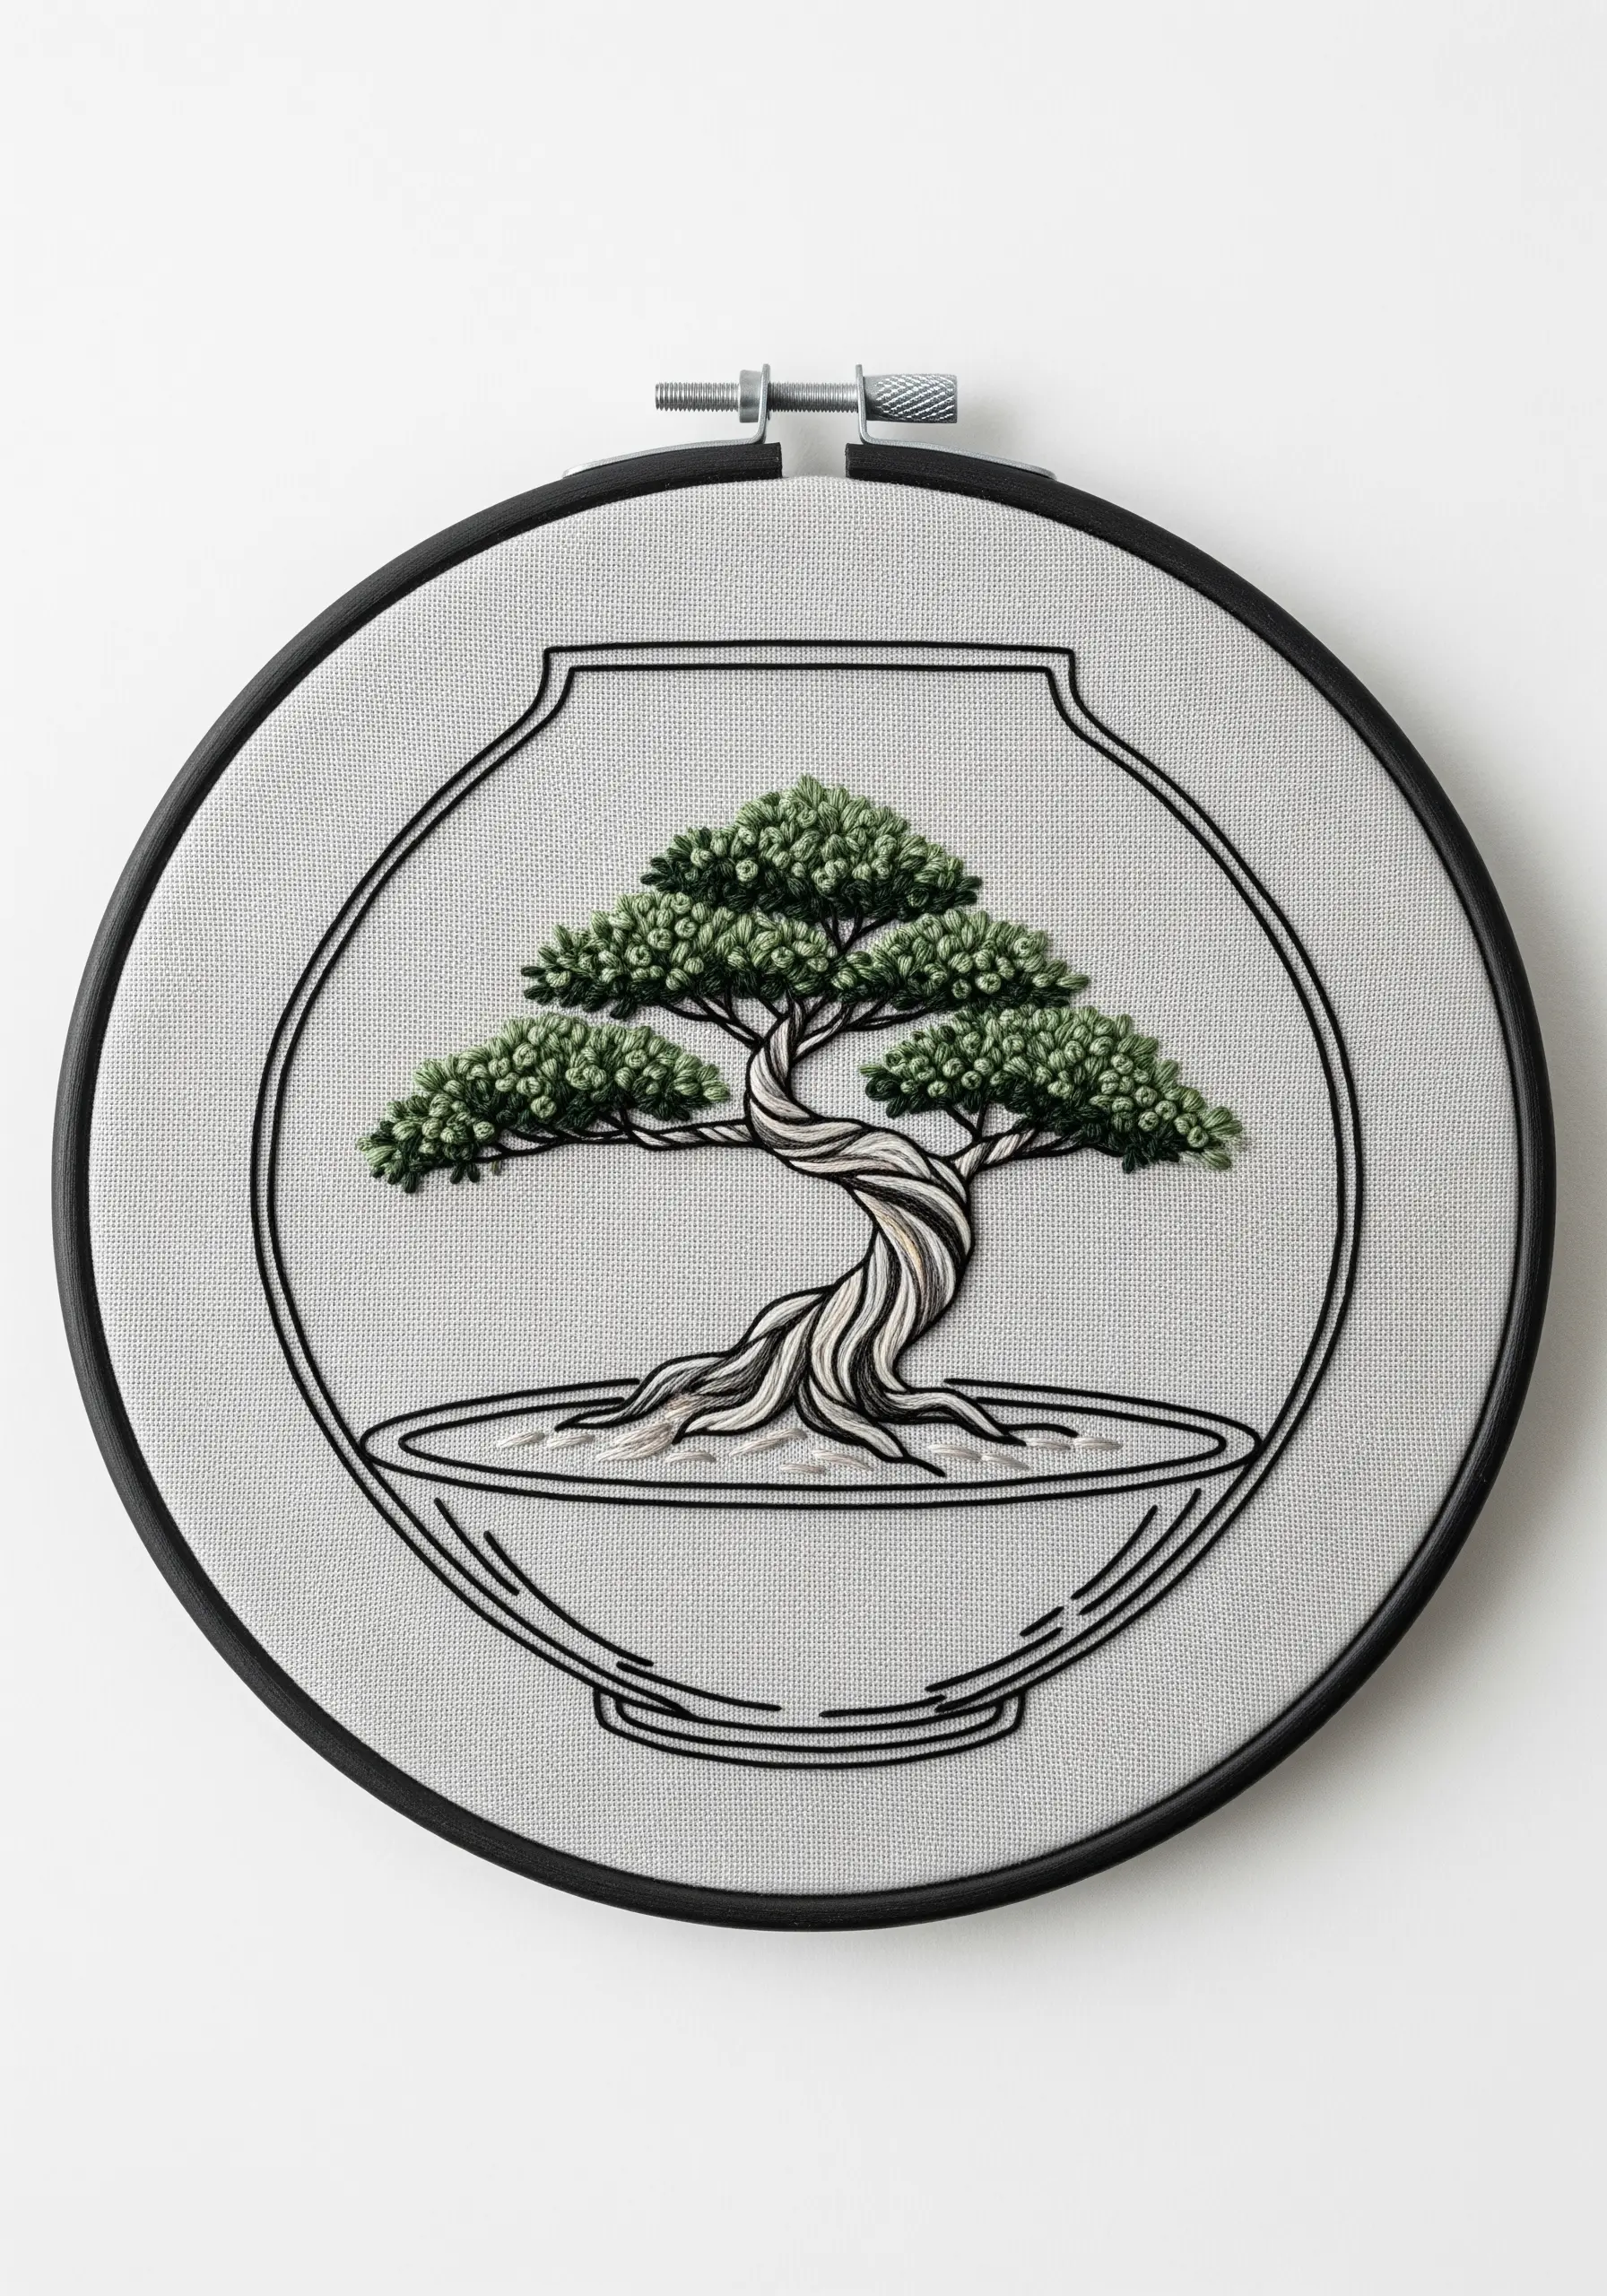
To create the gnarled, twisted trunk of a bonsai tree, use a stem stitch with multiple threads, varying the color slightly.
Lay down your main lines of stem stitch, following the curves of the trunk. Then, add more lines of stitching right alongside them, using slightly different shades of brown and gray. This layering technique builds dimension and mimics the texture of old bark.
For the dense foliage, use clusters of French knots or colonial knots. Pack them tightly together in cloud-like shapes to replicate the pruned look of a bonsai.
This is a great chance to practice tree ring and bark texture embroidery patterns on a small scale.
17. Stitch Carnivorous and Unusual Plants
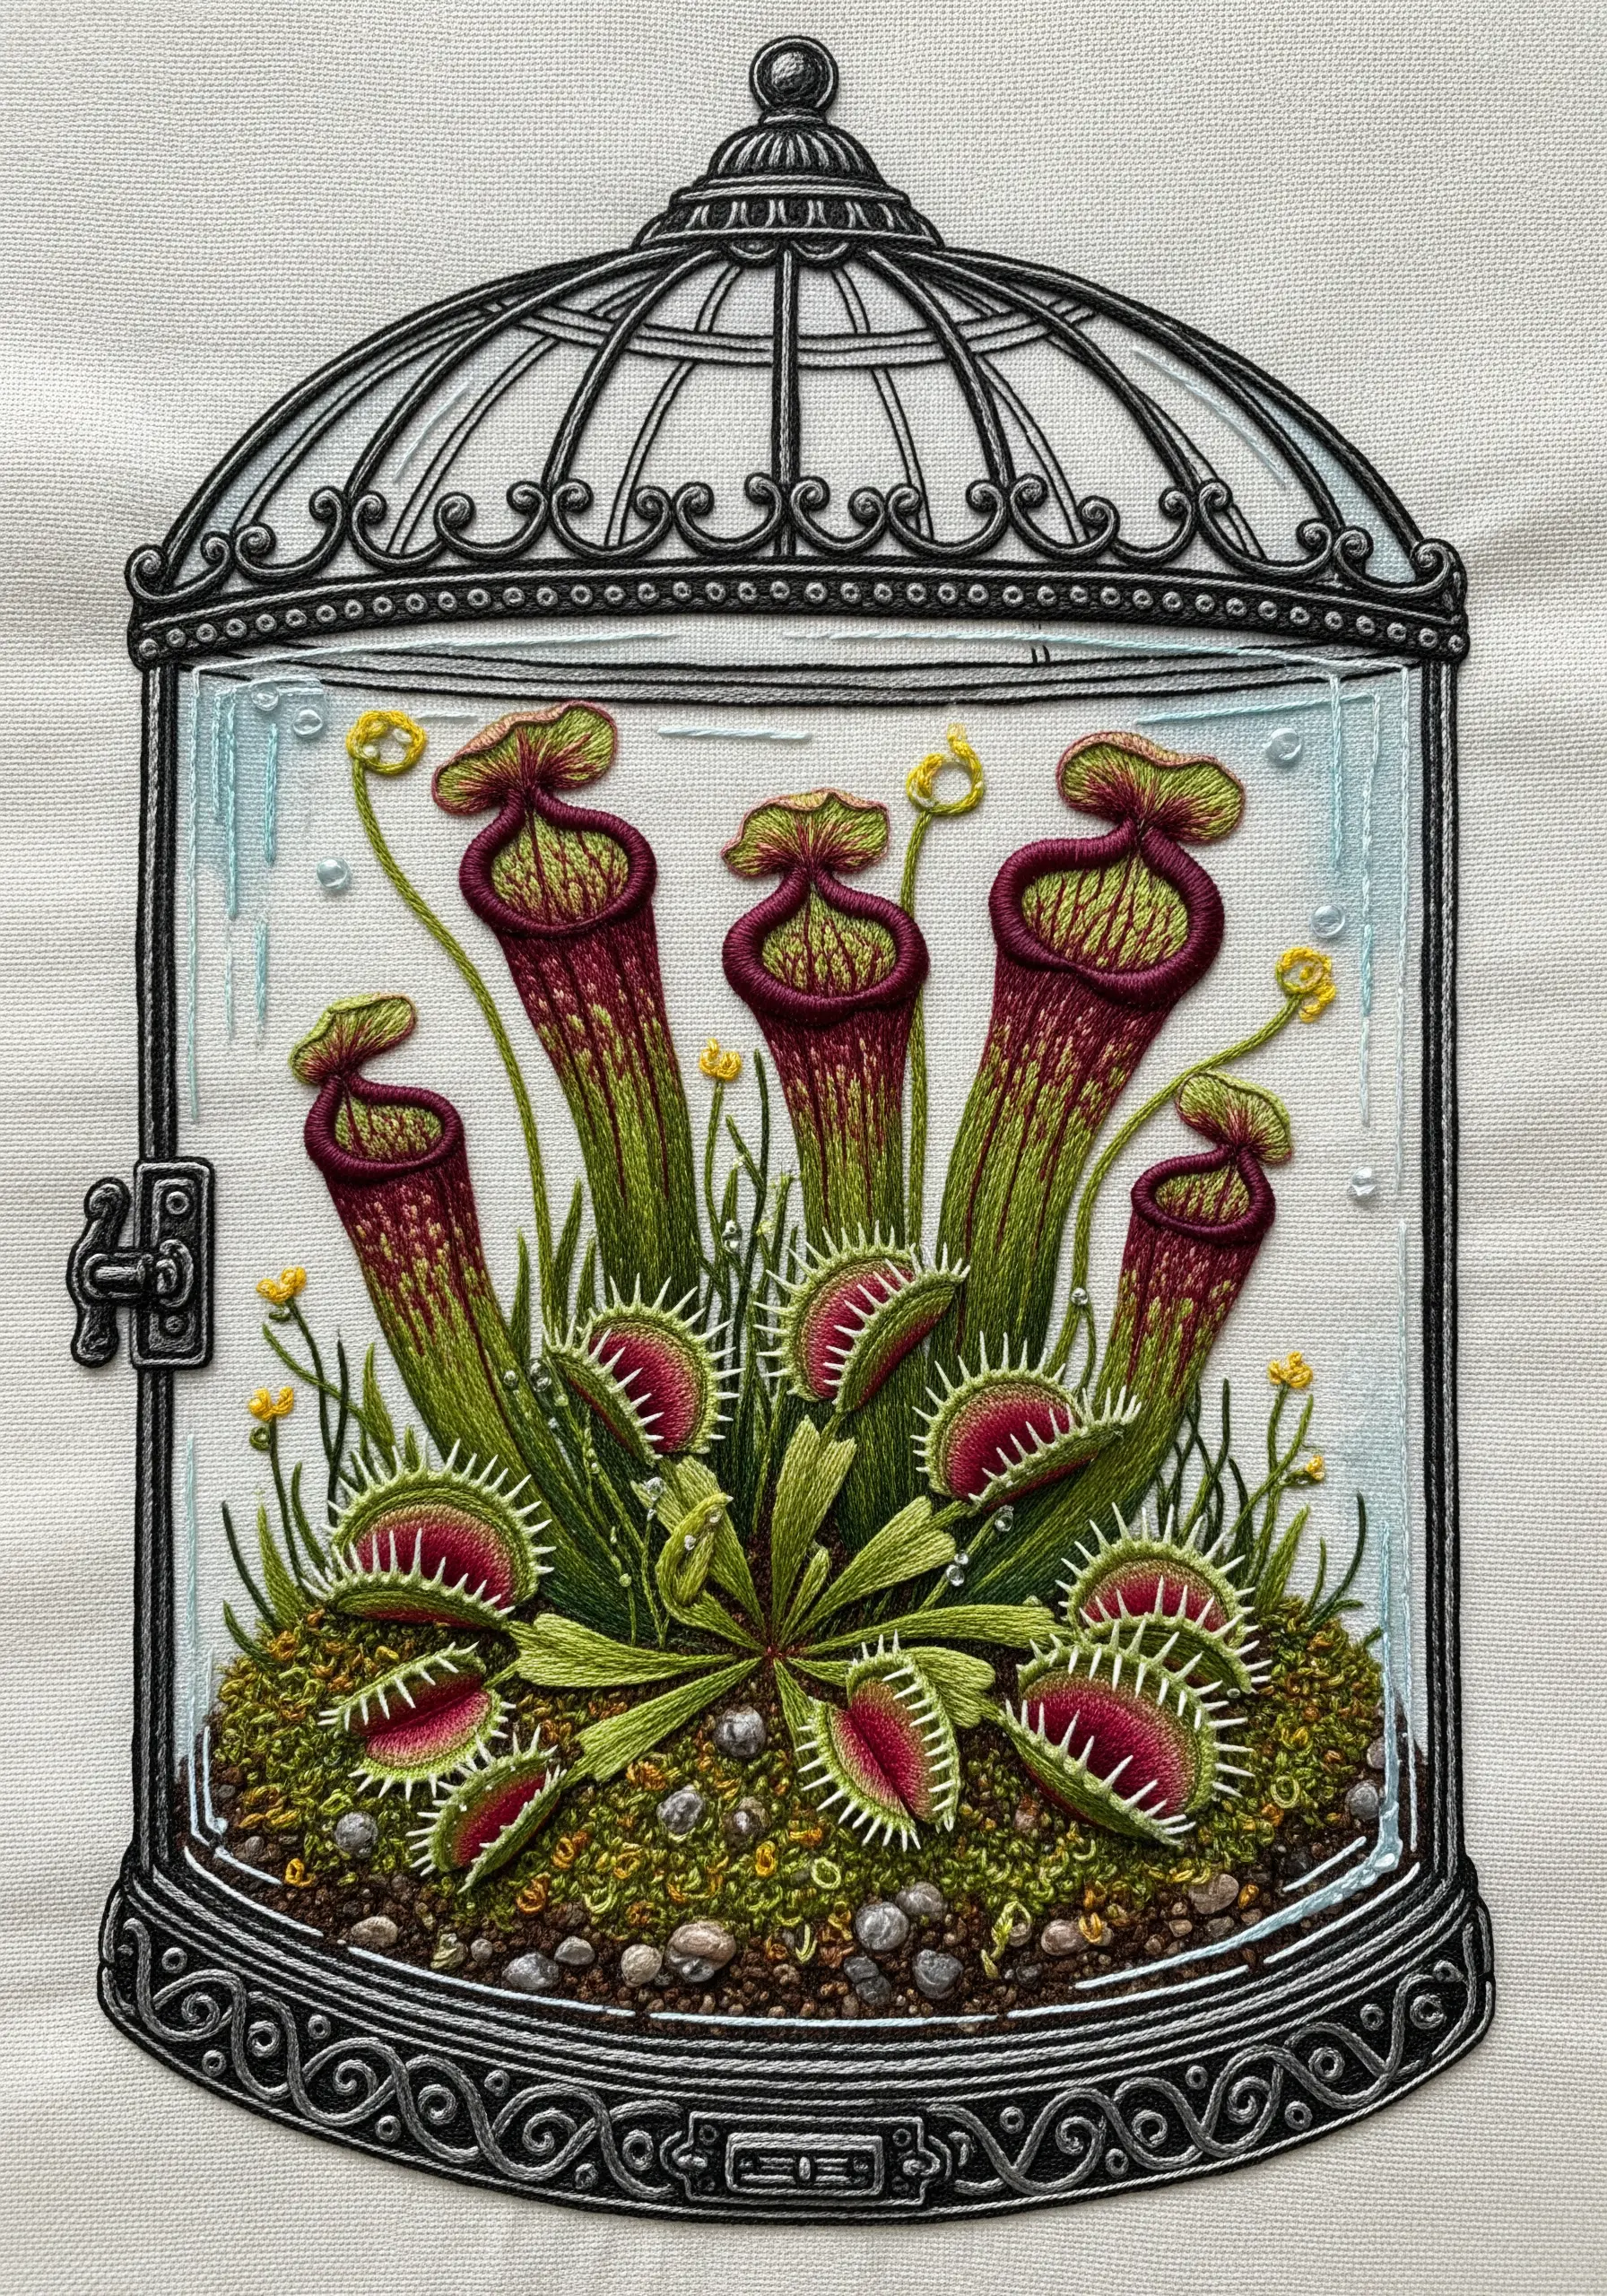
Move beyond common botanicals and explore the unique forms of carnivorous plants like the Venus flytrap and pitcher plant.
For the pitcher plants, use long and short stitch to blend reds and greens, capturing their distinctive coloring. A few carefully placed straight stitches at the opening can suggest the hood of the plant.
The ‘teeth’ of the Venus flytrap can be created with tiny, sharp straight stitches or detached chain stitches in a contrasting color. This small detail makes them instantly recognizable.
These deep tones are perfect for fans of evening garden floral embroidery ideas looking for a unique subject.
18. Add Hand-Lettered Labels
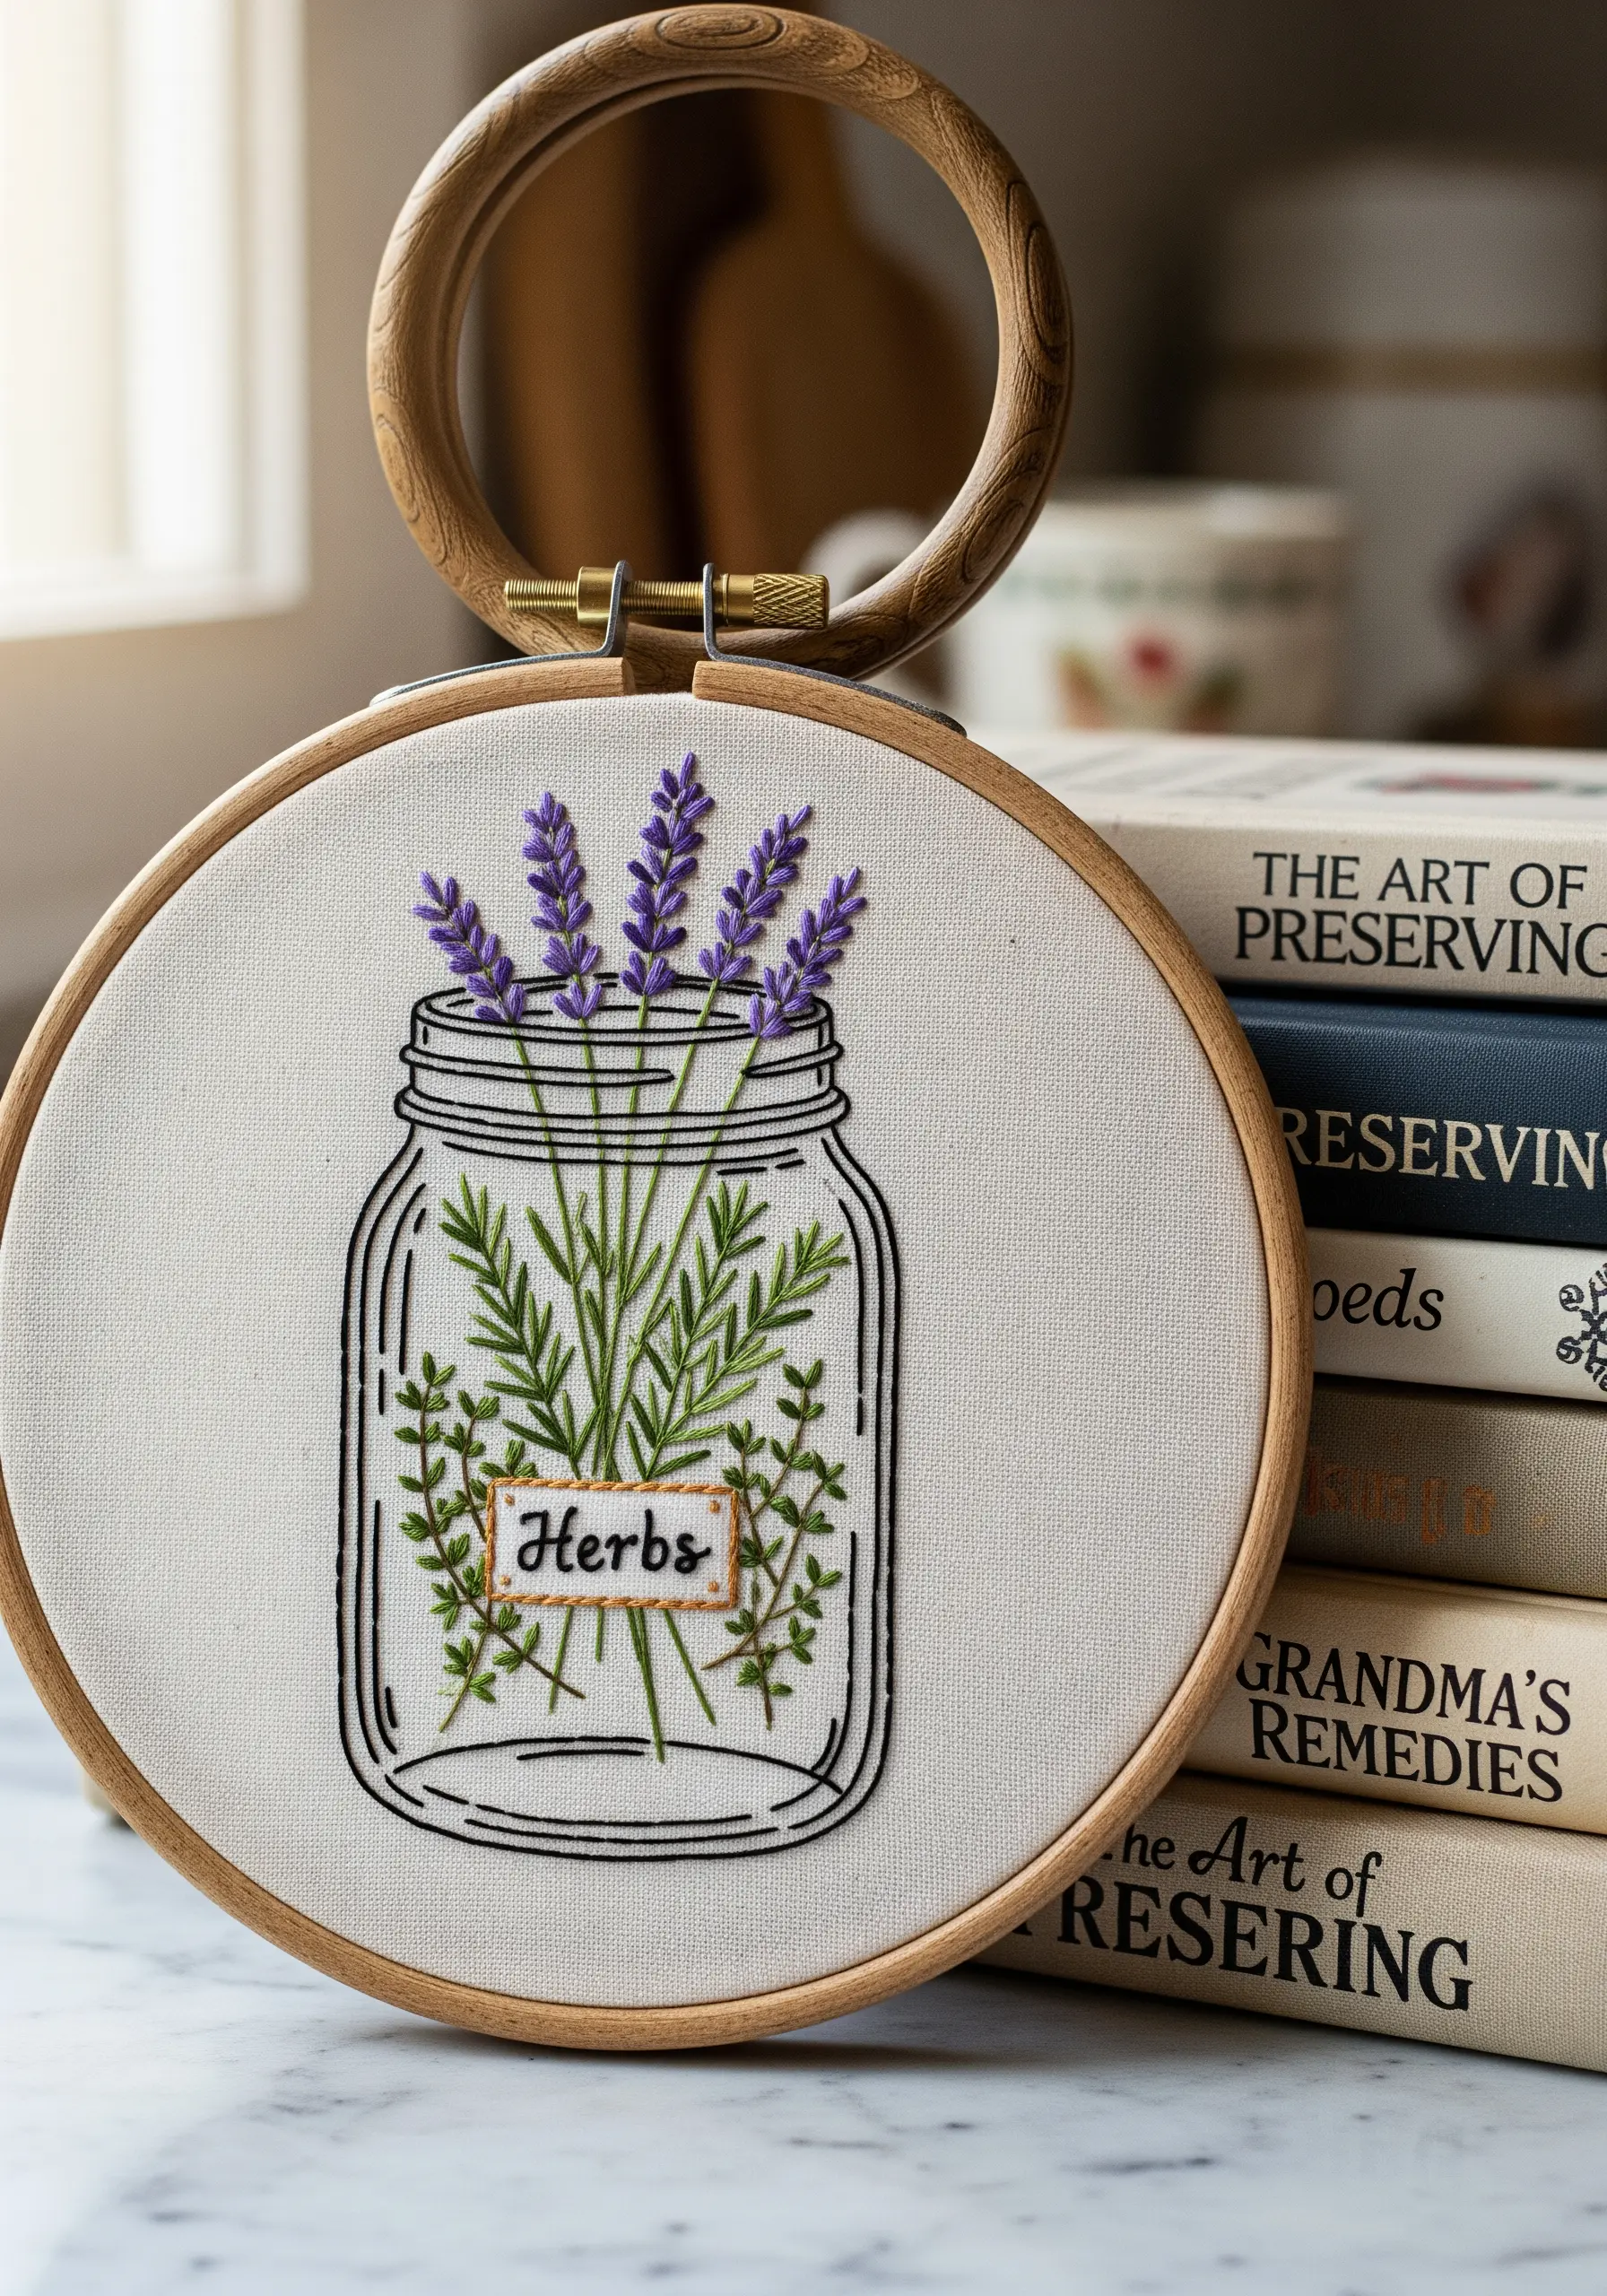
Personalize your botanical design by adding a small, hand-stitched label. Use a single strand of thread and a tiny backstitch to create clean, readable lettering.
To create the label itself, stitch a simple rectangular outline and fill it with a light seed stitch to mimic the texture of paper or cardstock.
For delicate herbs like rosemary and lavender, use simple straight stitches and French knots. The simplicity of the stitches ensures the focus remains on the overall arrangement and the charming label.
This concept is perfect for those who love garden herb embroidery patterns and want to add a personalized touch.
19. Capture Underwater Worlds
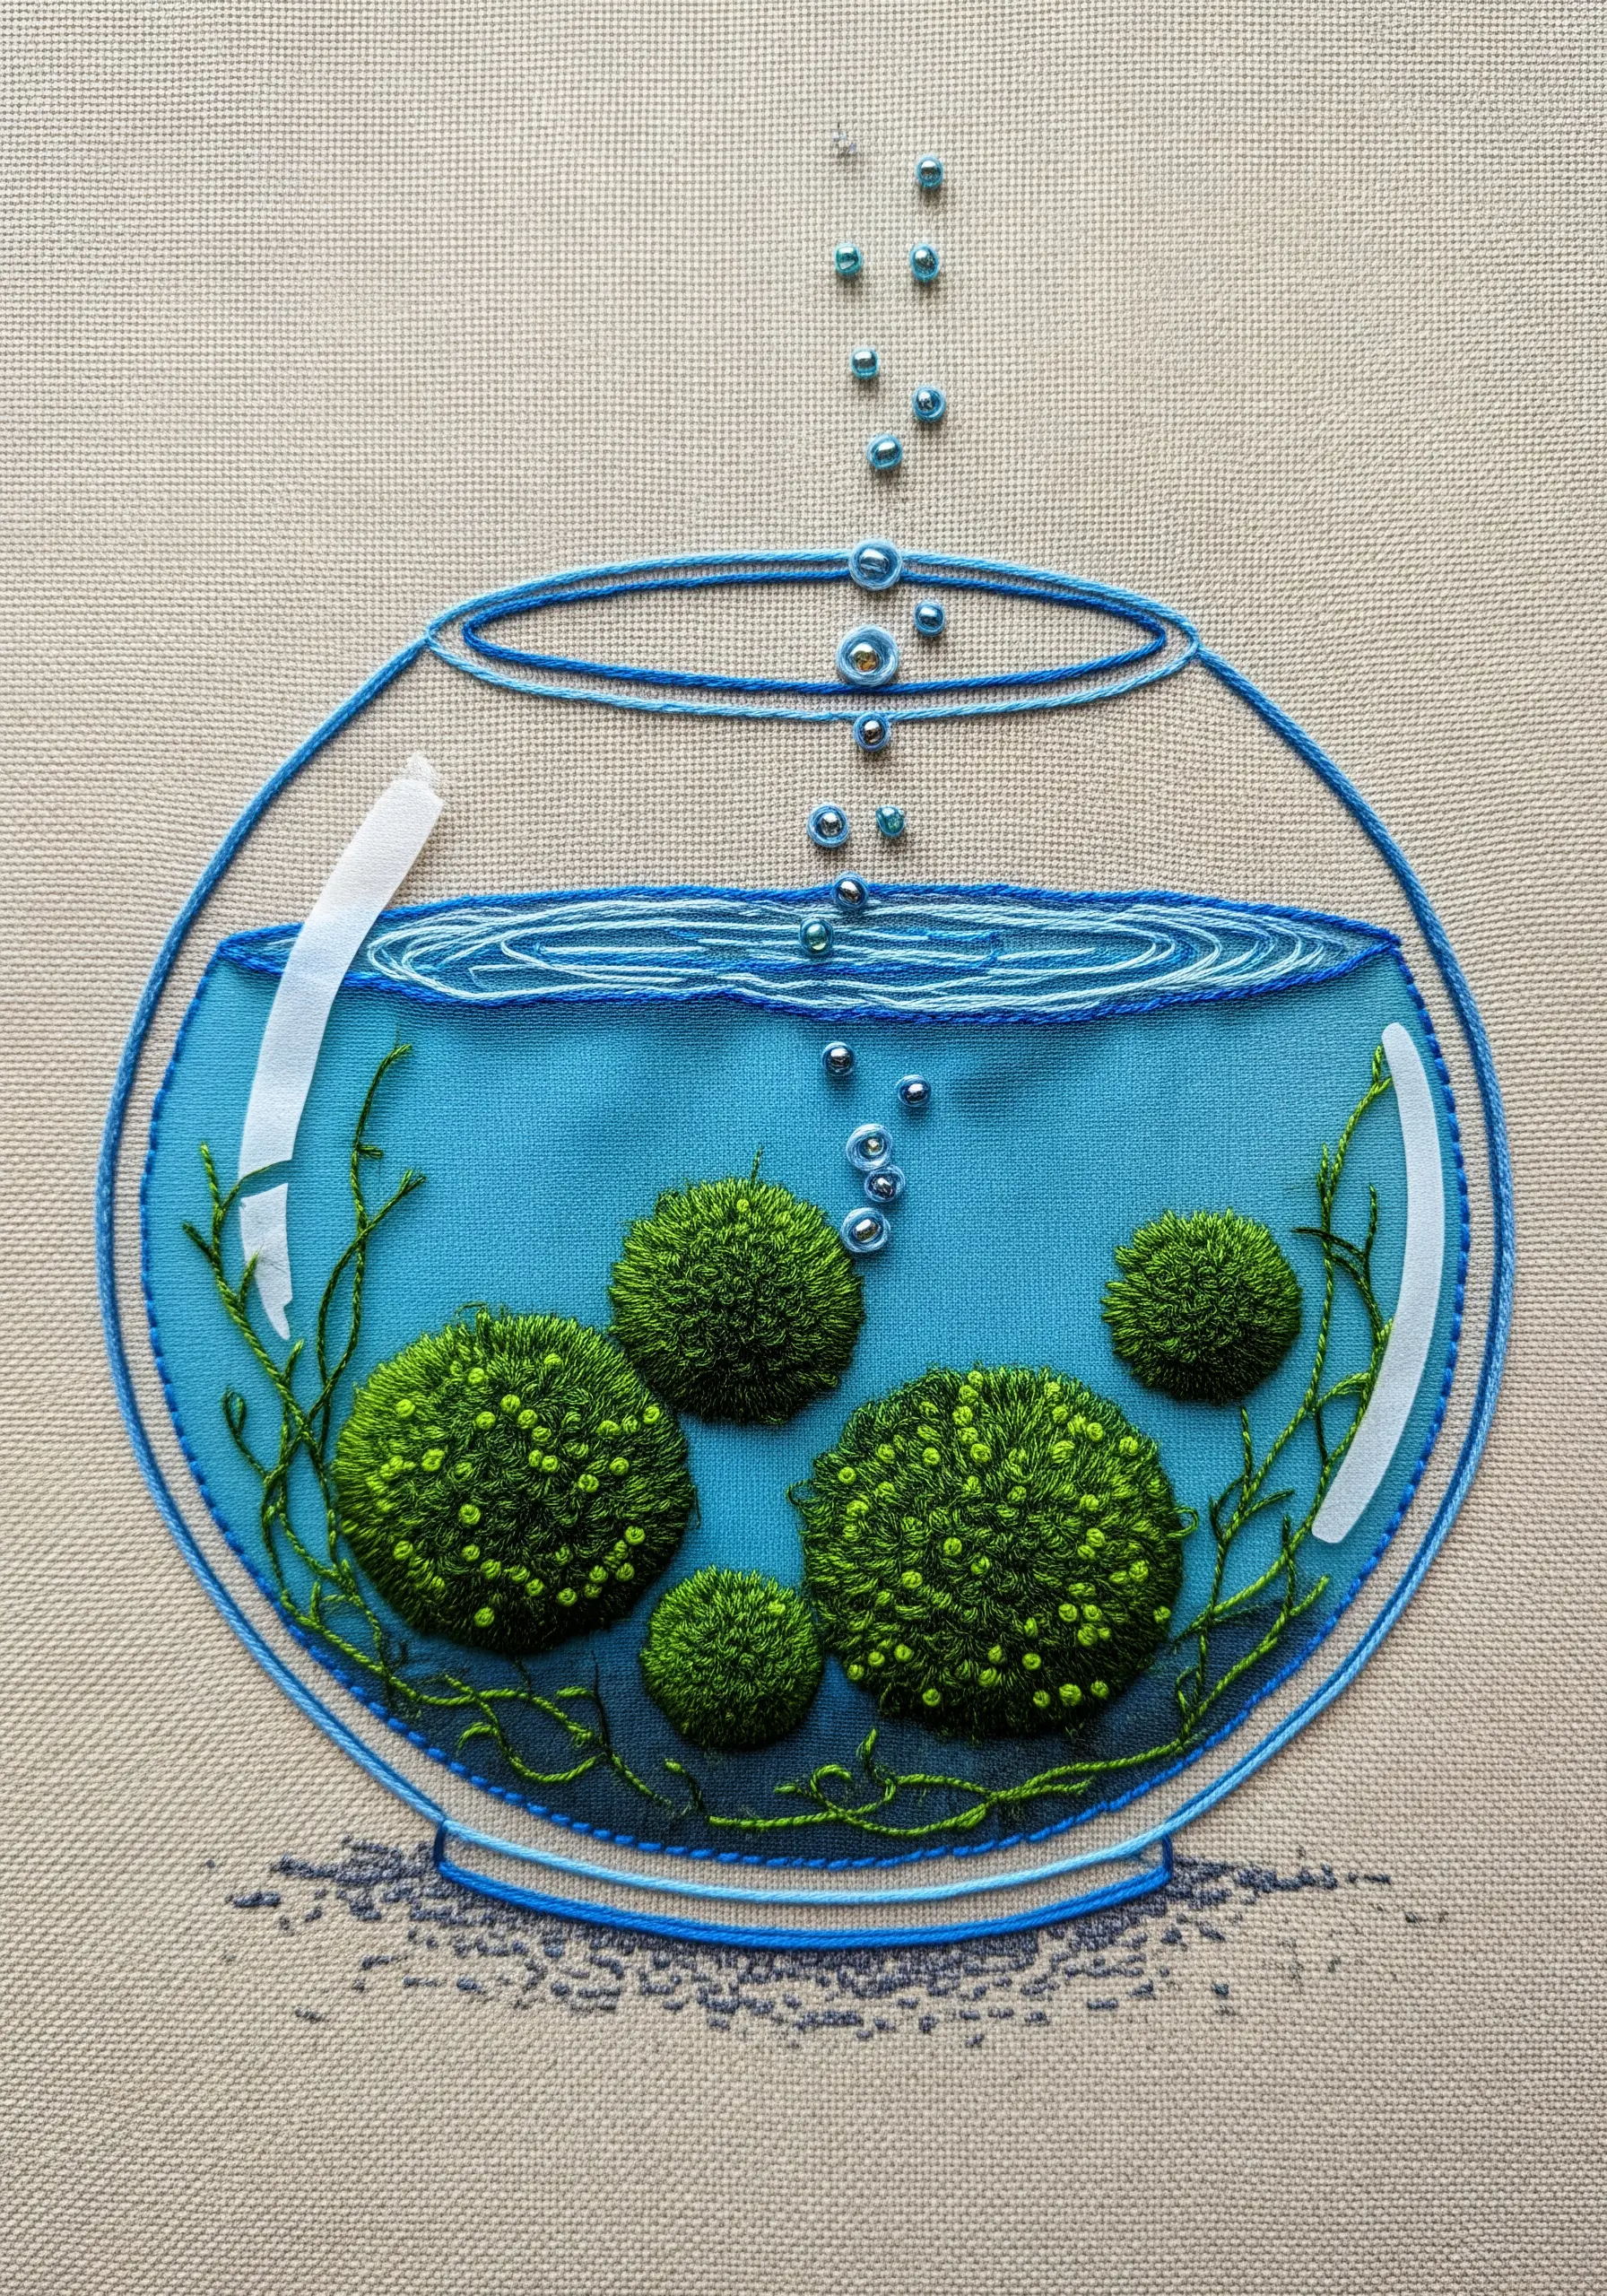
To create the illusion of water, use a watercolor-painted fabric background or fill the space with long, horizontal satin stitches in shades of blue.
For Marimo moss balls, use a base of French knots in dark green, then add lighter green colonial knots on top. This two-toned effect gives them their classic spherical, fuzzy appearance.
Stitch tiny bubbles rising to the surface with small seed beads or French knots using a single strand of shiny white or light blue thread. This simple detail brings the underwater scene to life.
This design fits perfectly with tiny sea-inspired embroidery ideas that capture aquatic beauty.
20. Design a Fairytale Terrarium
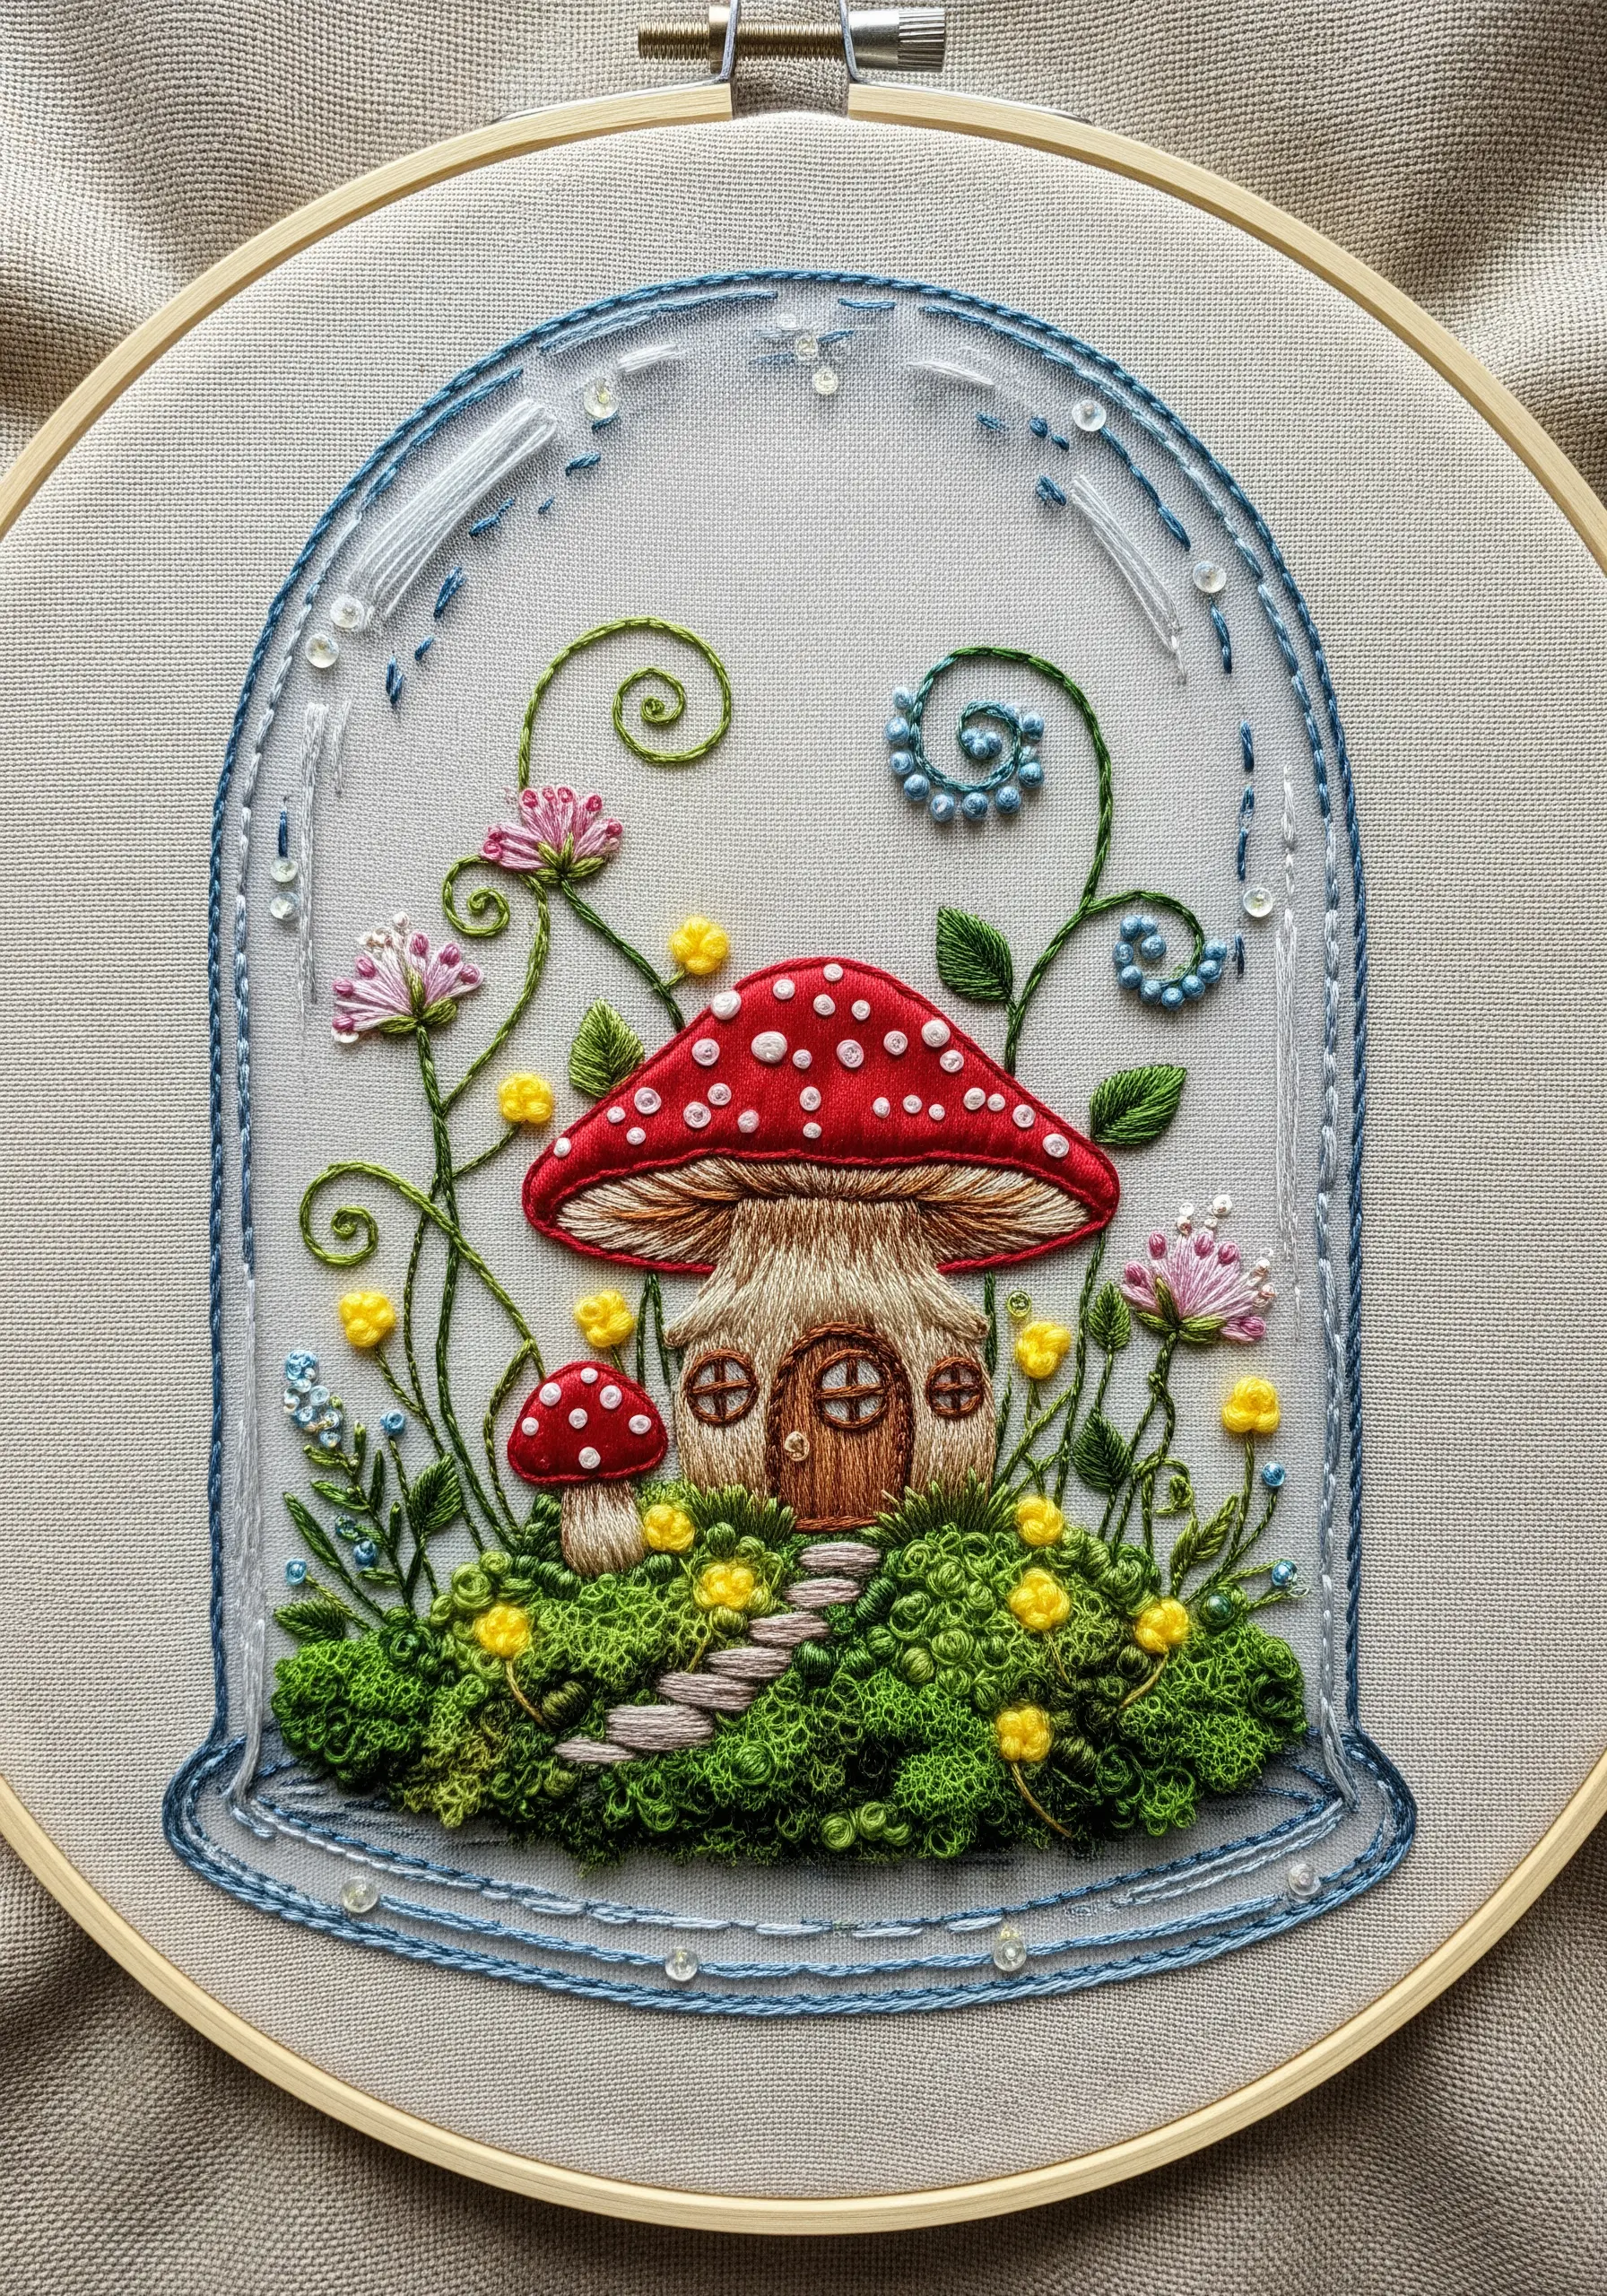
Create a whimsical scene by turning a mushroom into a tiny house. Use padded satin stitch for the red cap to give it a rounded, 3D shape before adding the white French knot spots.
Incorporate whimsical elements like swirling vines (stem stitch) and tiny, fantastical flowers made from bullion knots or lazy daisy stitches. A mix of bright, cheerful colors enhances the storybook feel.
Use sequins or iridescent beads sparingly to add a touch of magic, like glistening dewdrops or enchanted lights. This detail elevates the piece from a simple botanical to a fairytale scene.
Fans of whimsical designs will love these hedgehog and squirrel embroidery patterns for more cottagecore inspiration.
21. Blend Thread with Silk Flowers
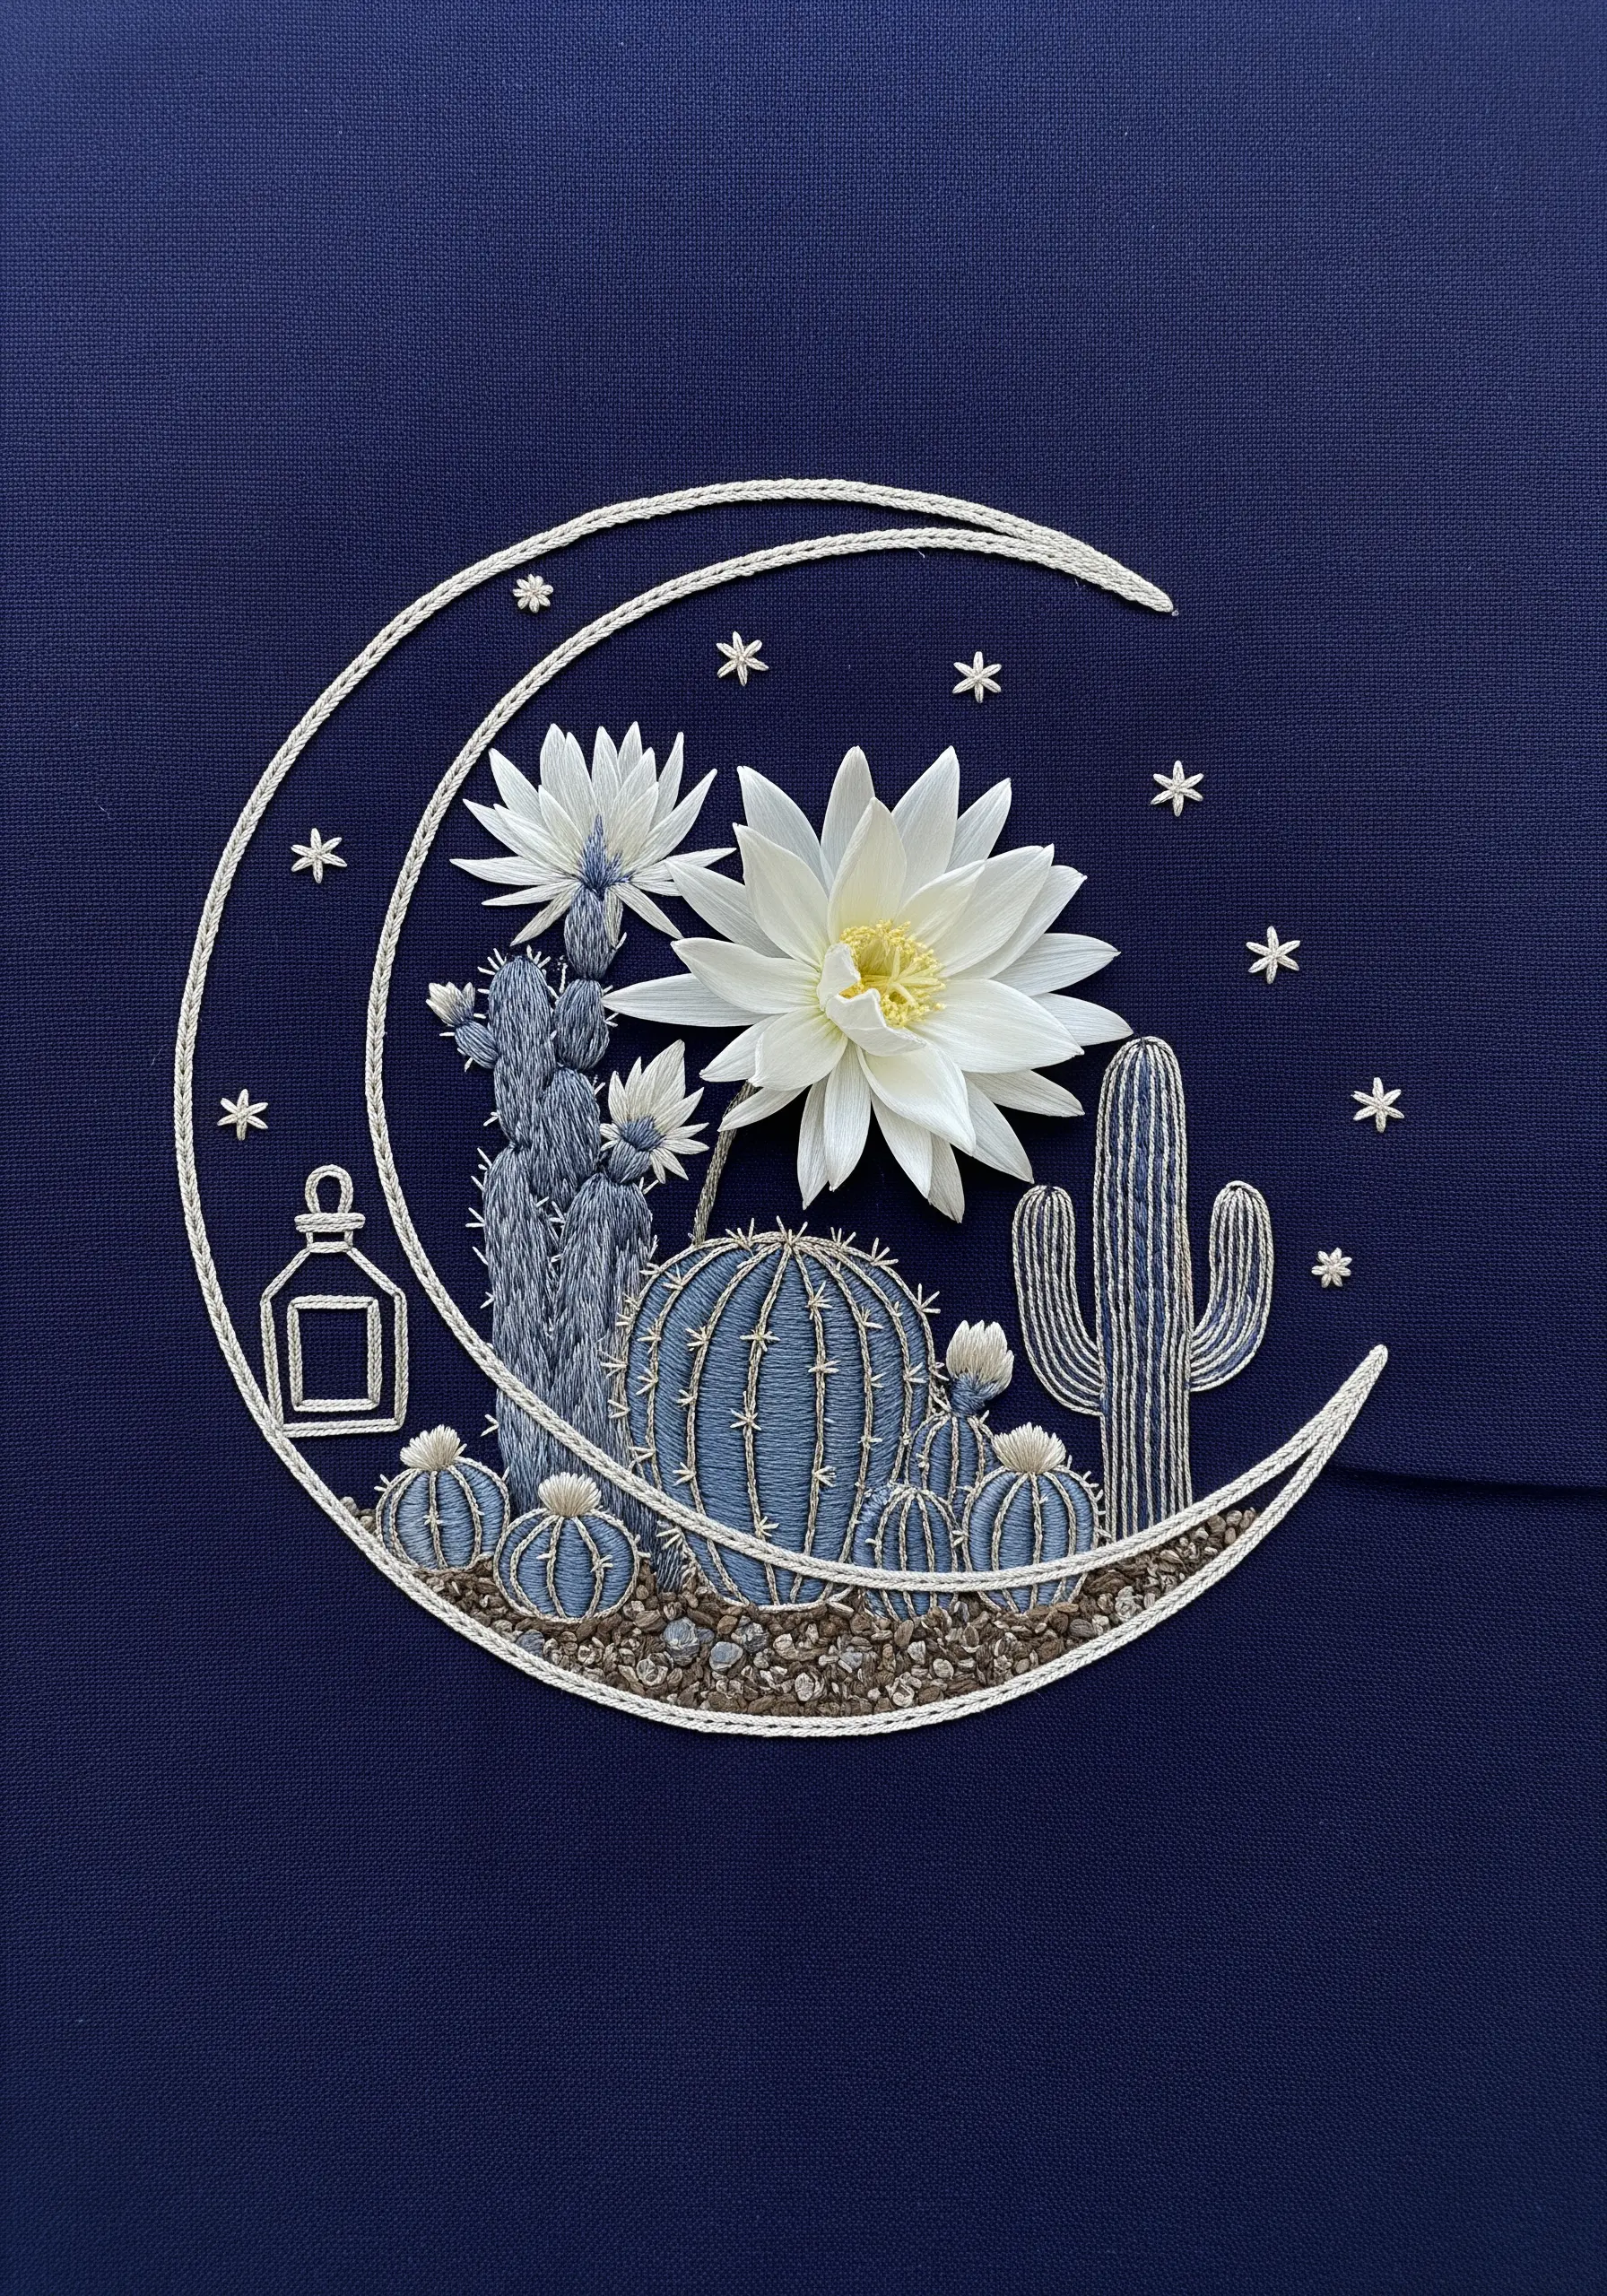
Incorporate small, artificial silk flowers into your design for instant, high-impact texture and realism. This mixed-media approach adds a surprising focal point.
To seamlessly integrate the flower, stitch leaves and stems that appear to grow around its base, securing it to the fabric. Use colors that complement the artificial flower to create a cohesive look.
Stitch the surrounding cacti with long and short stitches in muted blues and grays to allow the bright white silk flower to be the undisputed star of the composition.
This is a fresh take on ways to add pressed flowers to your embroidery, using a durable alternative for lasting beauty.
22. Take Your Stitches Off the Hoop
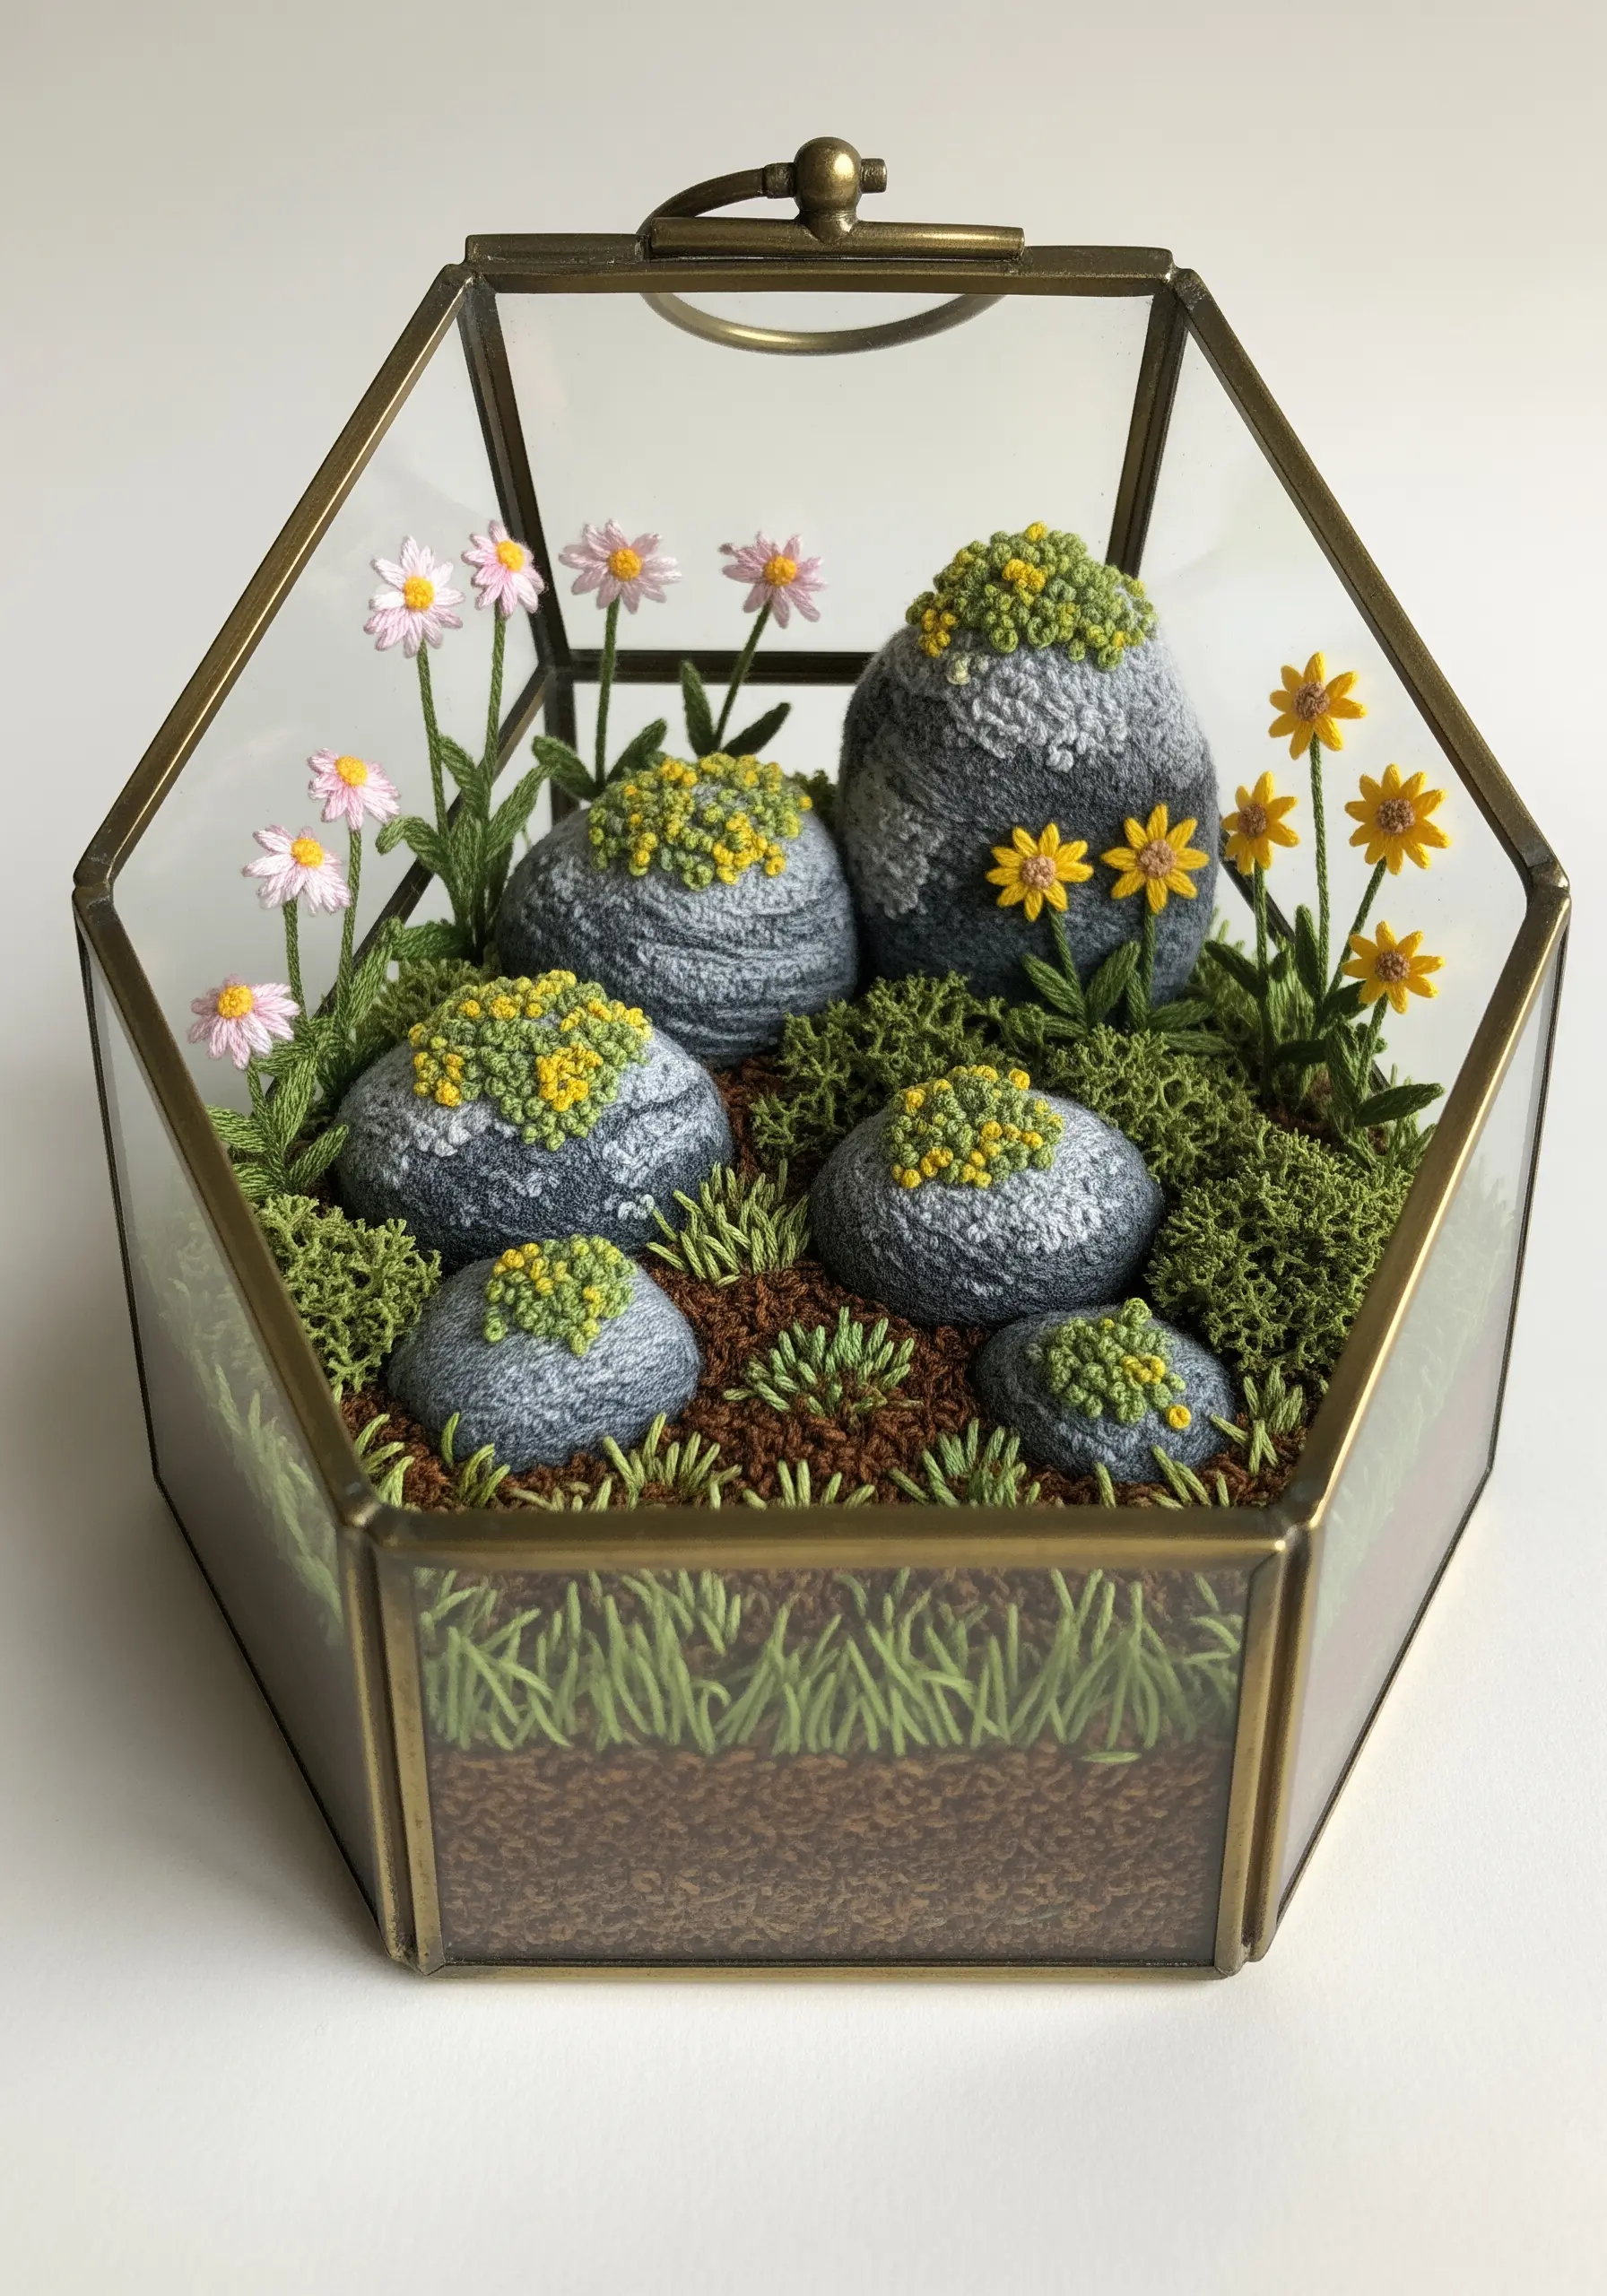
Create a truly three-dimensional piece by stitching your elements on felt or a stiff fabric, cutting them out, and arranging them inside a real glass terrarium.
For the mossy rocks, embroider gray felt with satin stitch, then add clusters of French knots in green and yellow on top before cutting out the shape.
Construct the flowers with detached buttonhole stitches for petals and a French knot for the center. Leave a long thread tail to act as a stem, which you can use to position it in the terrarium base.
These handmade art pieces bridge the gap between 2D embroidery and 3D sculpture.
23. Illustrate a Floating Island
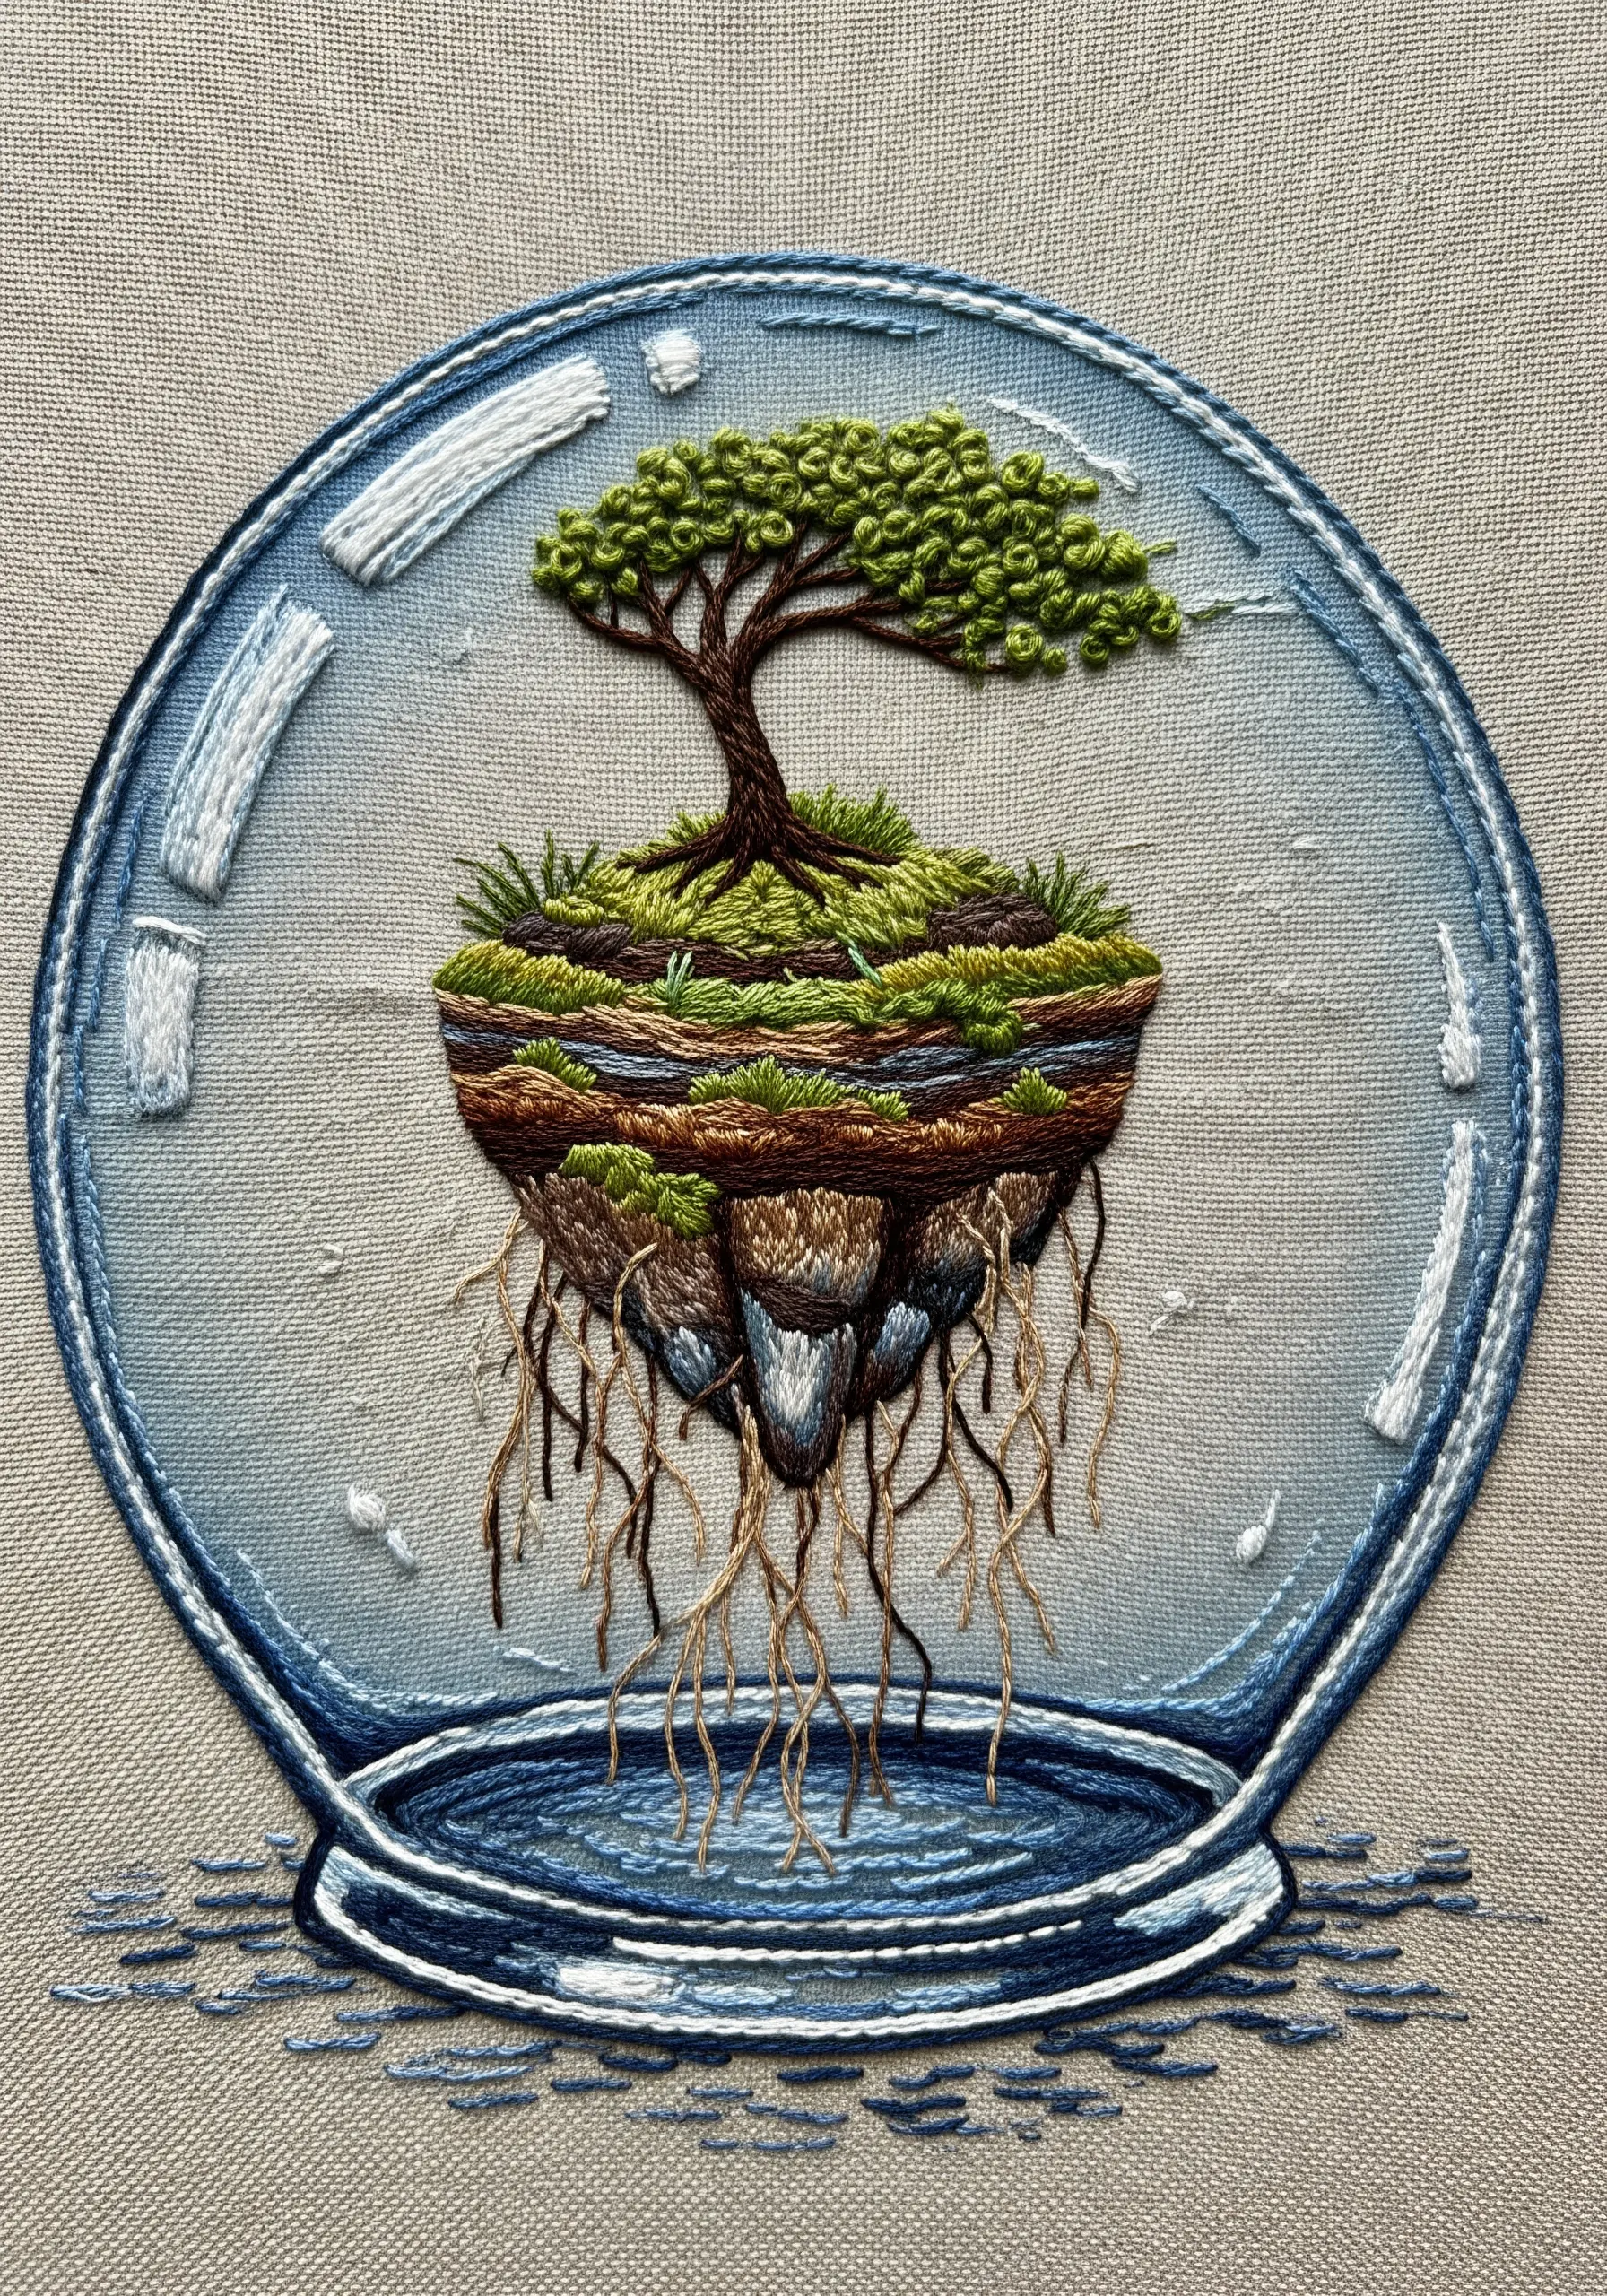
Create a surreal and magical scene by stitching a floating island ecosystem inside a glass sphere. This imaginative concept pushes the boundaries of a traditional terrarium.
To give the soil cross-section depth, use horizontal layers of satin stitch and seed stitch in various earth tones. Let the roots, made from long, trailing straight stitches, hang down below the island.
Use light blue and white threads to suggest reflections and highlights on the glass globe, which helps create the illusion of a transparent sphere.
This design makes a beautiful addition to nature-themed embroidery projects that invite wonder and imagination.
24. Combine Paleontology and Botany
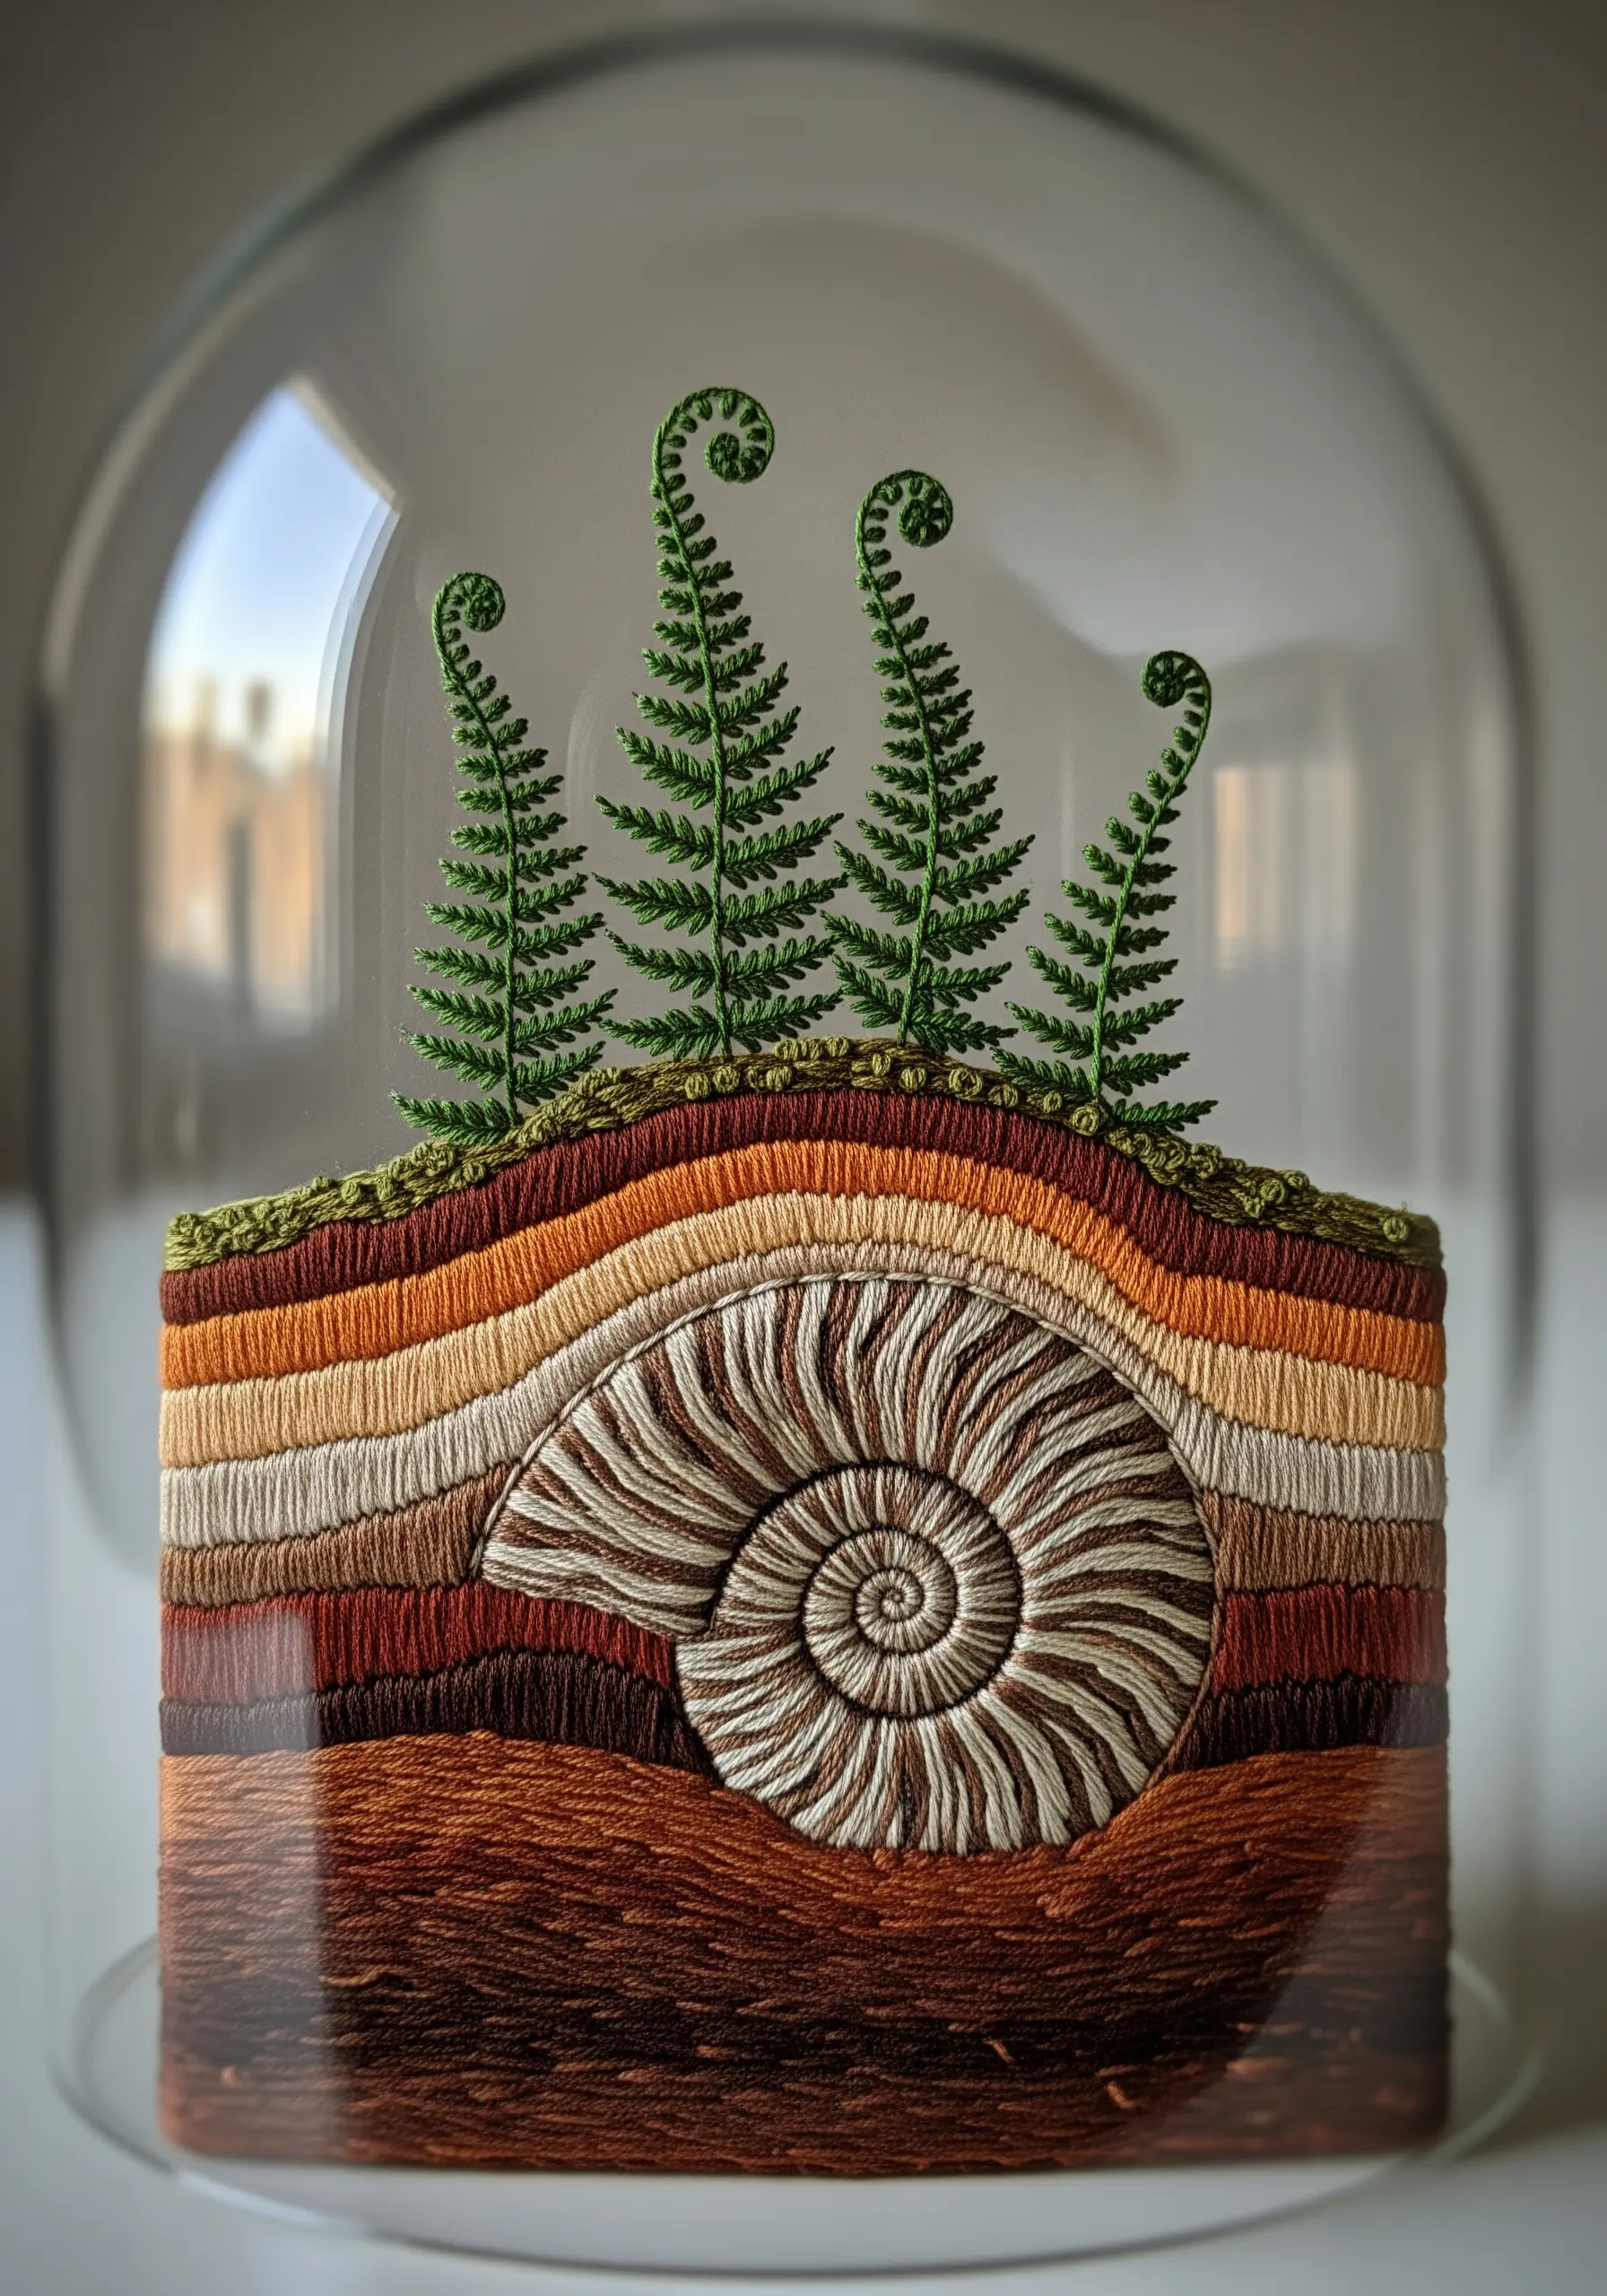
Juxtapose the ancient and the new by pairing a fossil with living plants. Use a tightly packed satin stitch, spiraling from the center, to create the intricate form of an ammonite fossil.
Varying the shades of brown, beige, and cream within the fossil’s segments will give it an aged, realistic appearance. The precision of the satin stitch is key to capturing its geometric beauty.
For the delicate ferns above, use fishbone stitch in a vibrant green. This contrast in color and form—the coiled fossil versus the upward-reaching ferns—makes the composition compelling.
This is a creative way to use nature-inspired string art patterns to explore deeper geological and biological themes.
25. Stitch a Bottled Bouquet
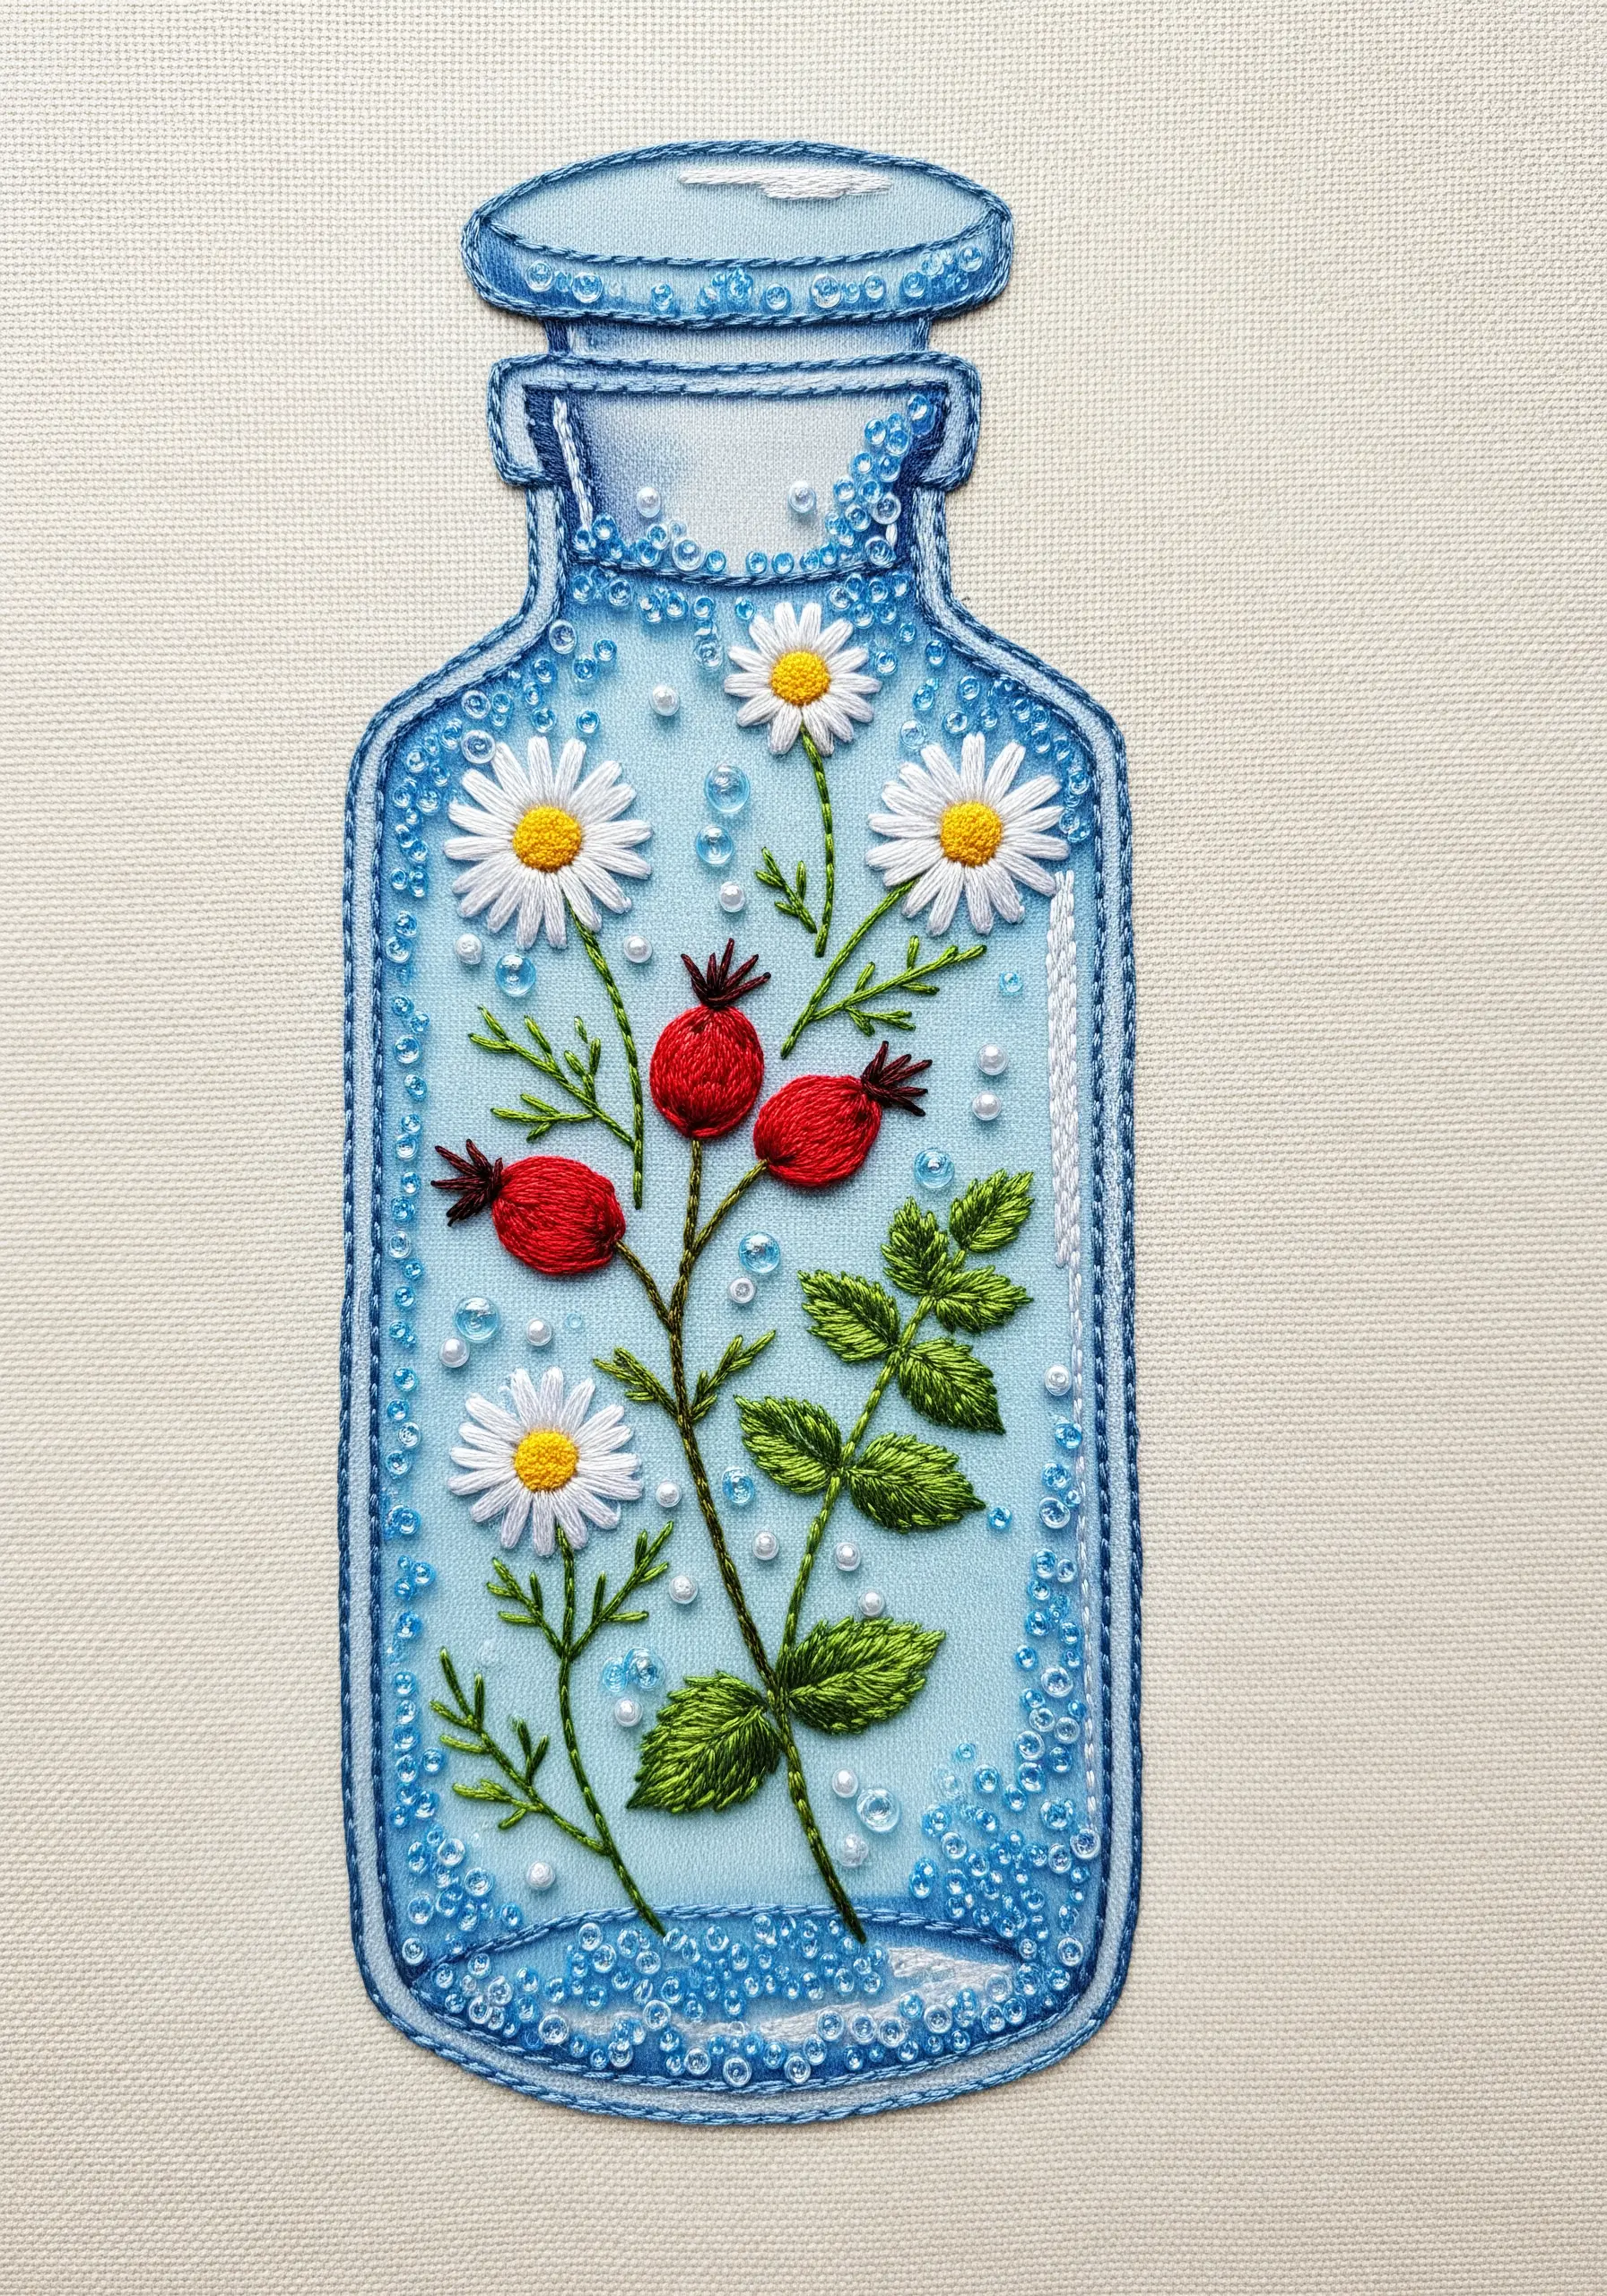
Capture the charm of a hand-picked bouquet by arranging different floral elements inside a stitched bottle. Use beads for berries and bubbles to add texture and a playful touch.
For the rosehips, use a padded satin stitch in red to give them a plump, rounded shape. Add a few dark straight stitches at the end to define the blossom end.
Use a single strand of white thread to create delicate highlights on the bottle’s edges, suggesting the transparency and curve of the glass.
This design could easily be adapted for spring bouquet embroidery ideas, making it a perfect handmade gift.
26. Build a Monochromatic Moss Garden
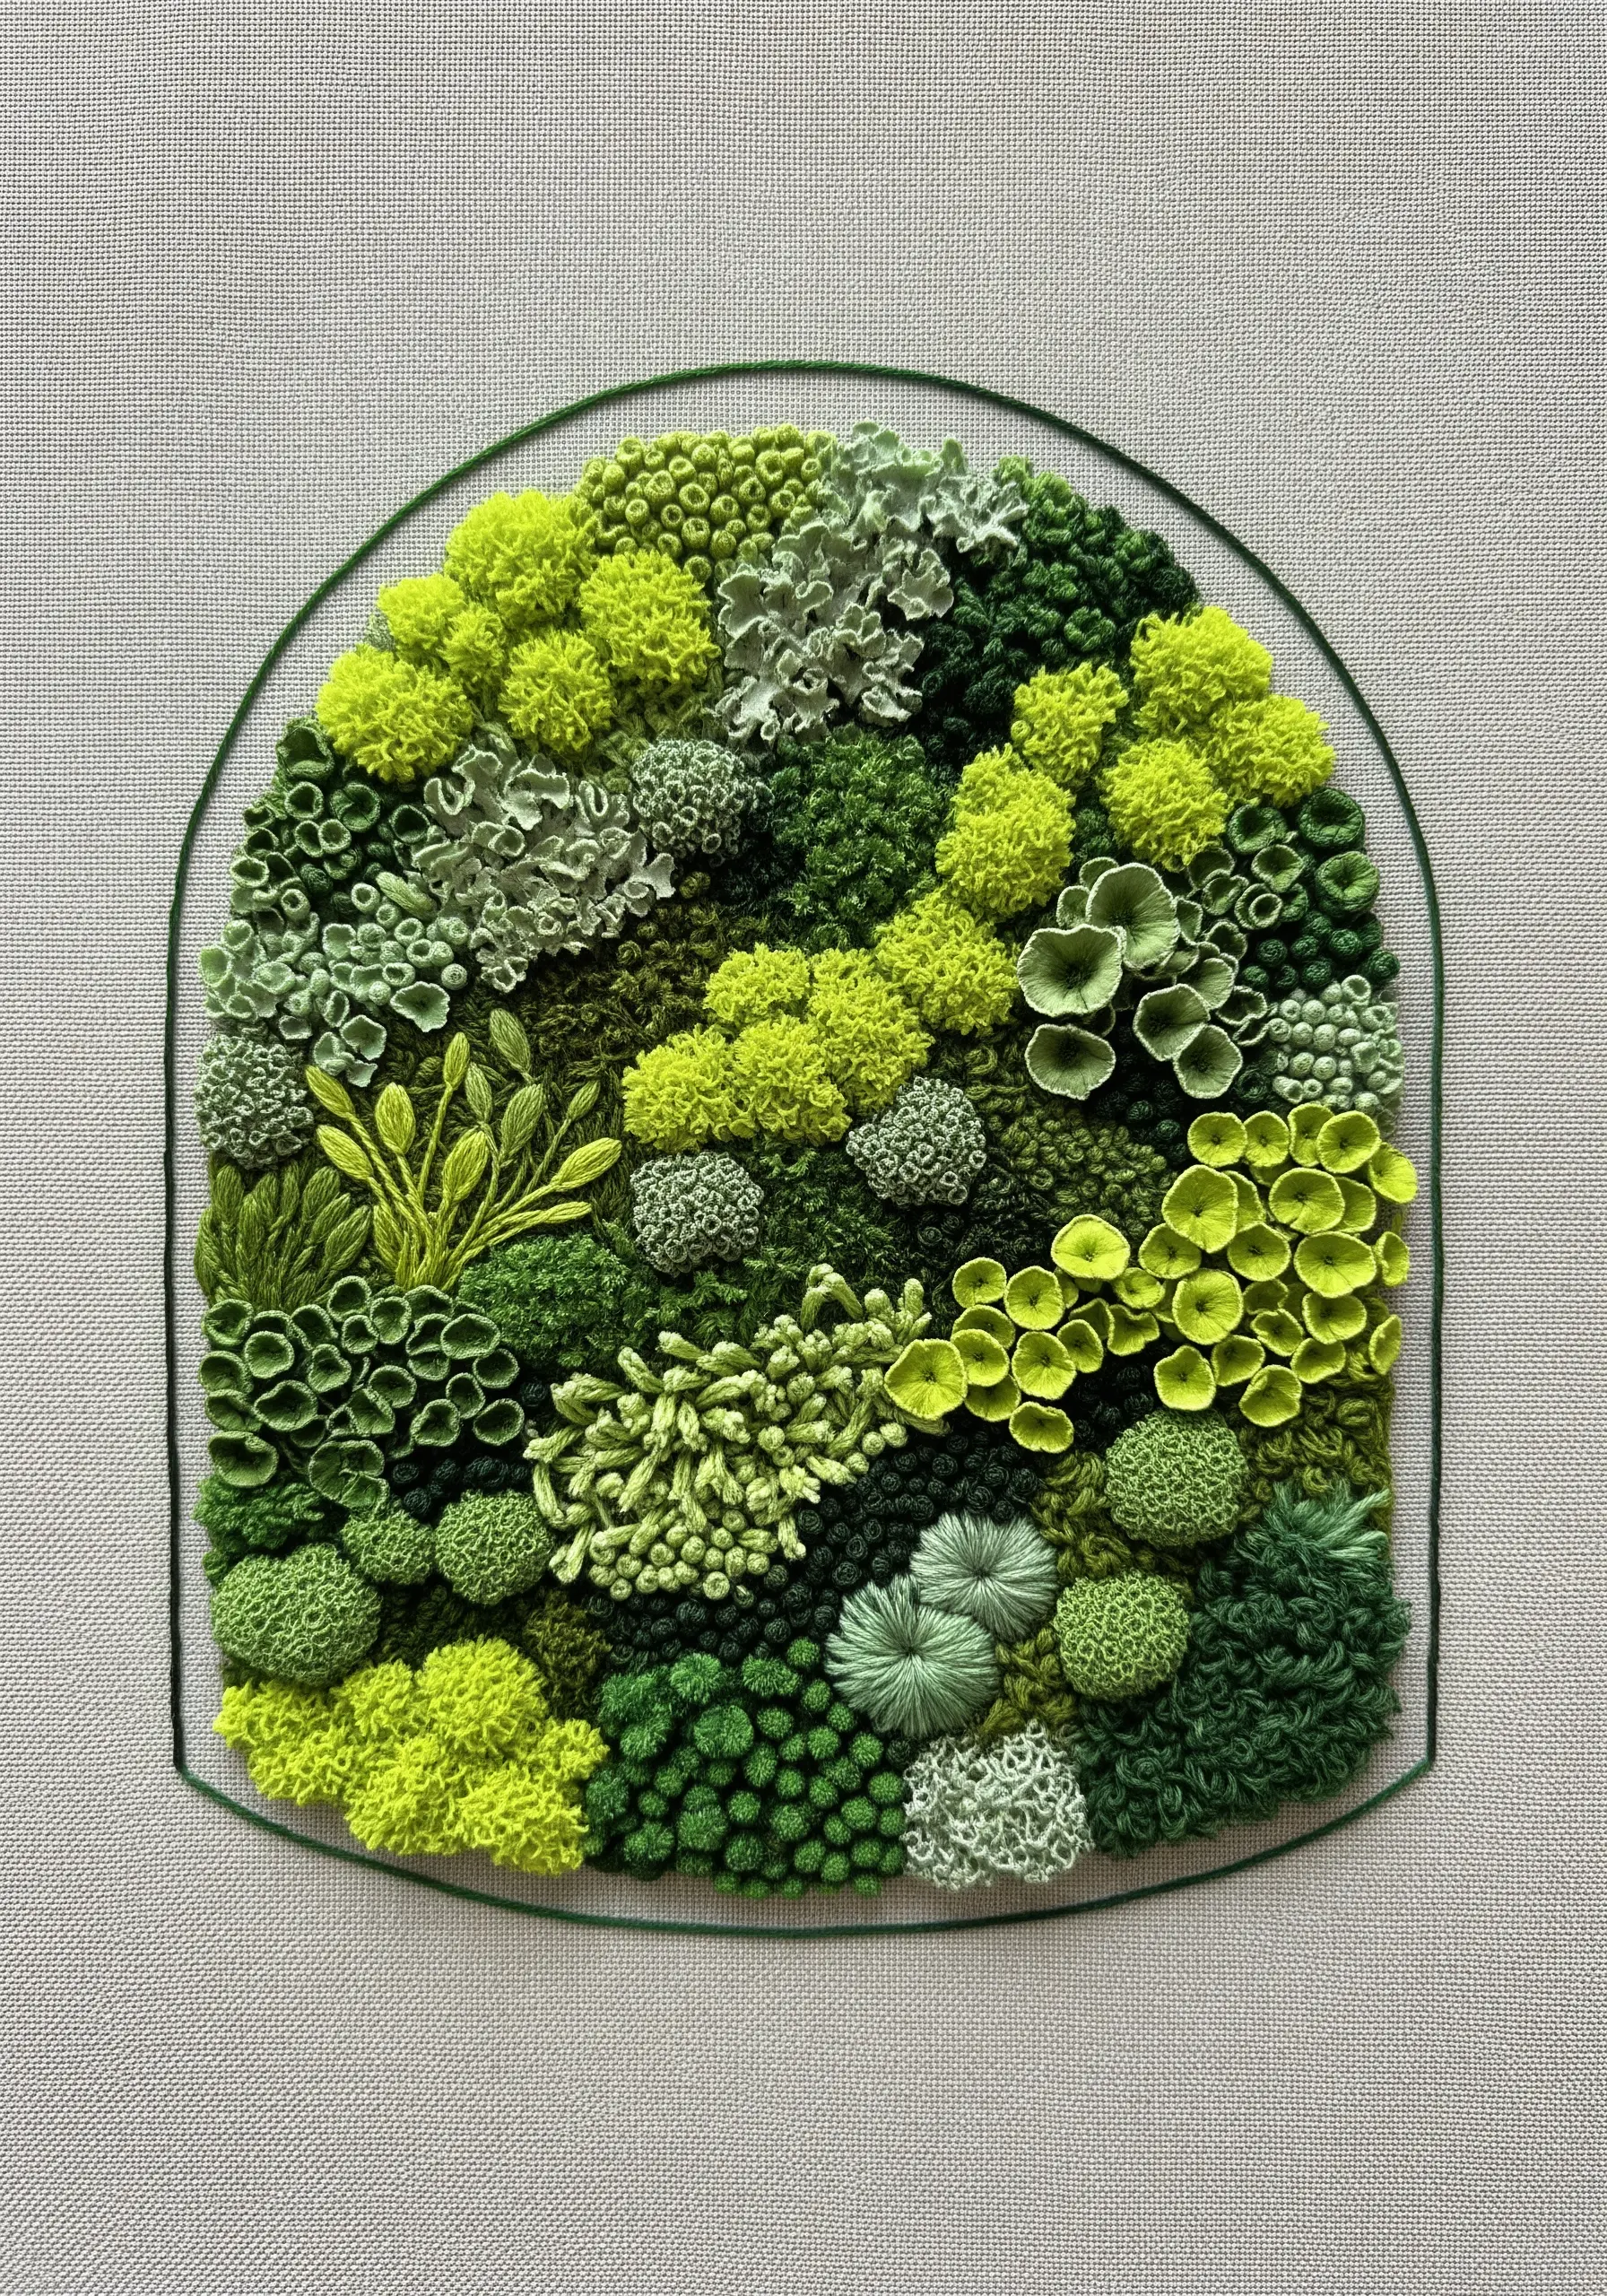
Explore texture by creating a composition almost entirely from different shades of one color. This challenges you to rely on stitch variation, rather than color, to create interest.
Combine French knots, bullion knots, turkey work, and woven wheel stitches to create an incredible variety of moss and lichen textures. The result is a highly tactile piece.
Arrange your textures in clusters, allowing some areas to be dense and others more sparse. This mimics the way moss grows in nature and creates a more organic composition.
This technique is a perfect example of ways to use neutrals in leaf embroidery (or greens, in this case) to create stunning, organic art.
27. Use Satin Stitch for a Sunset Gradient
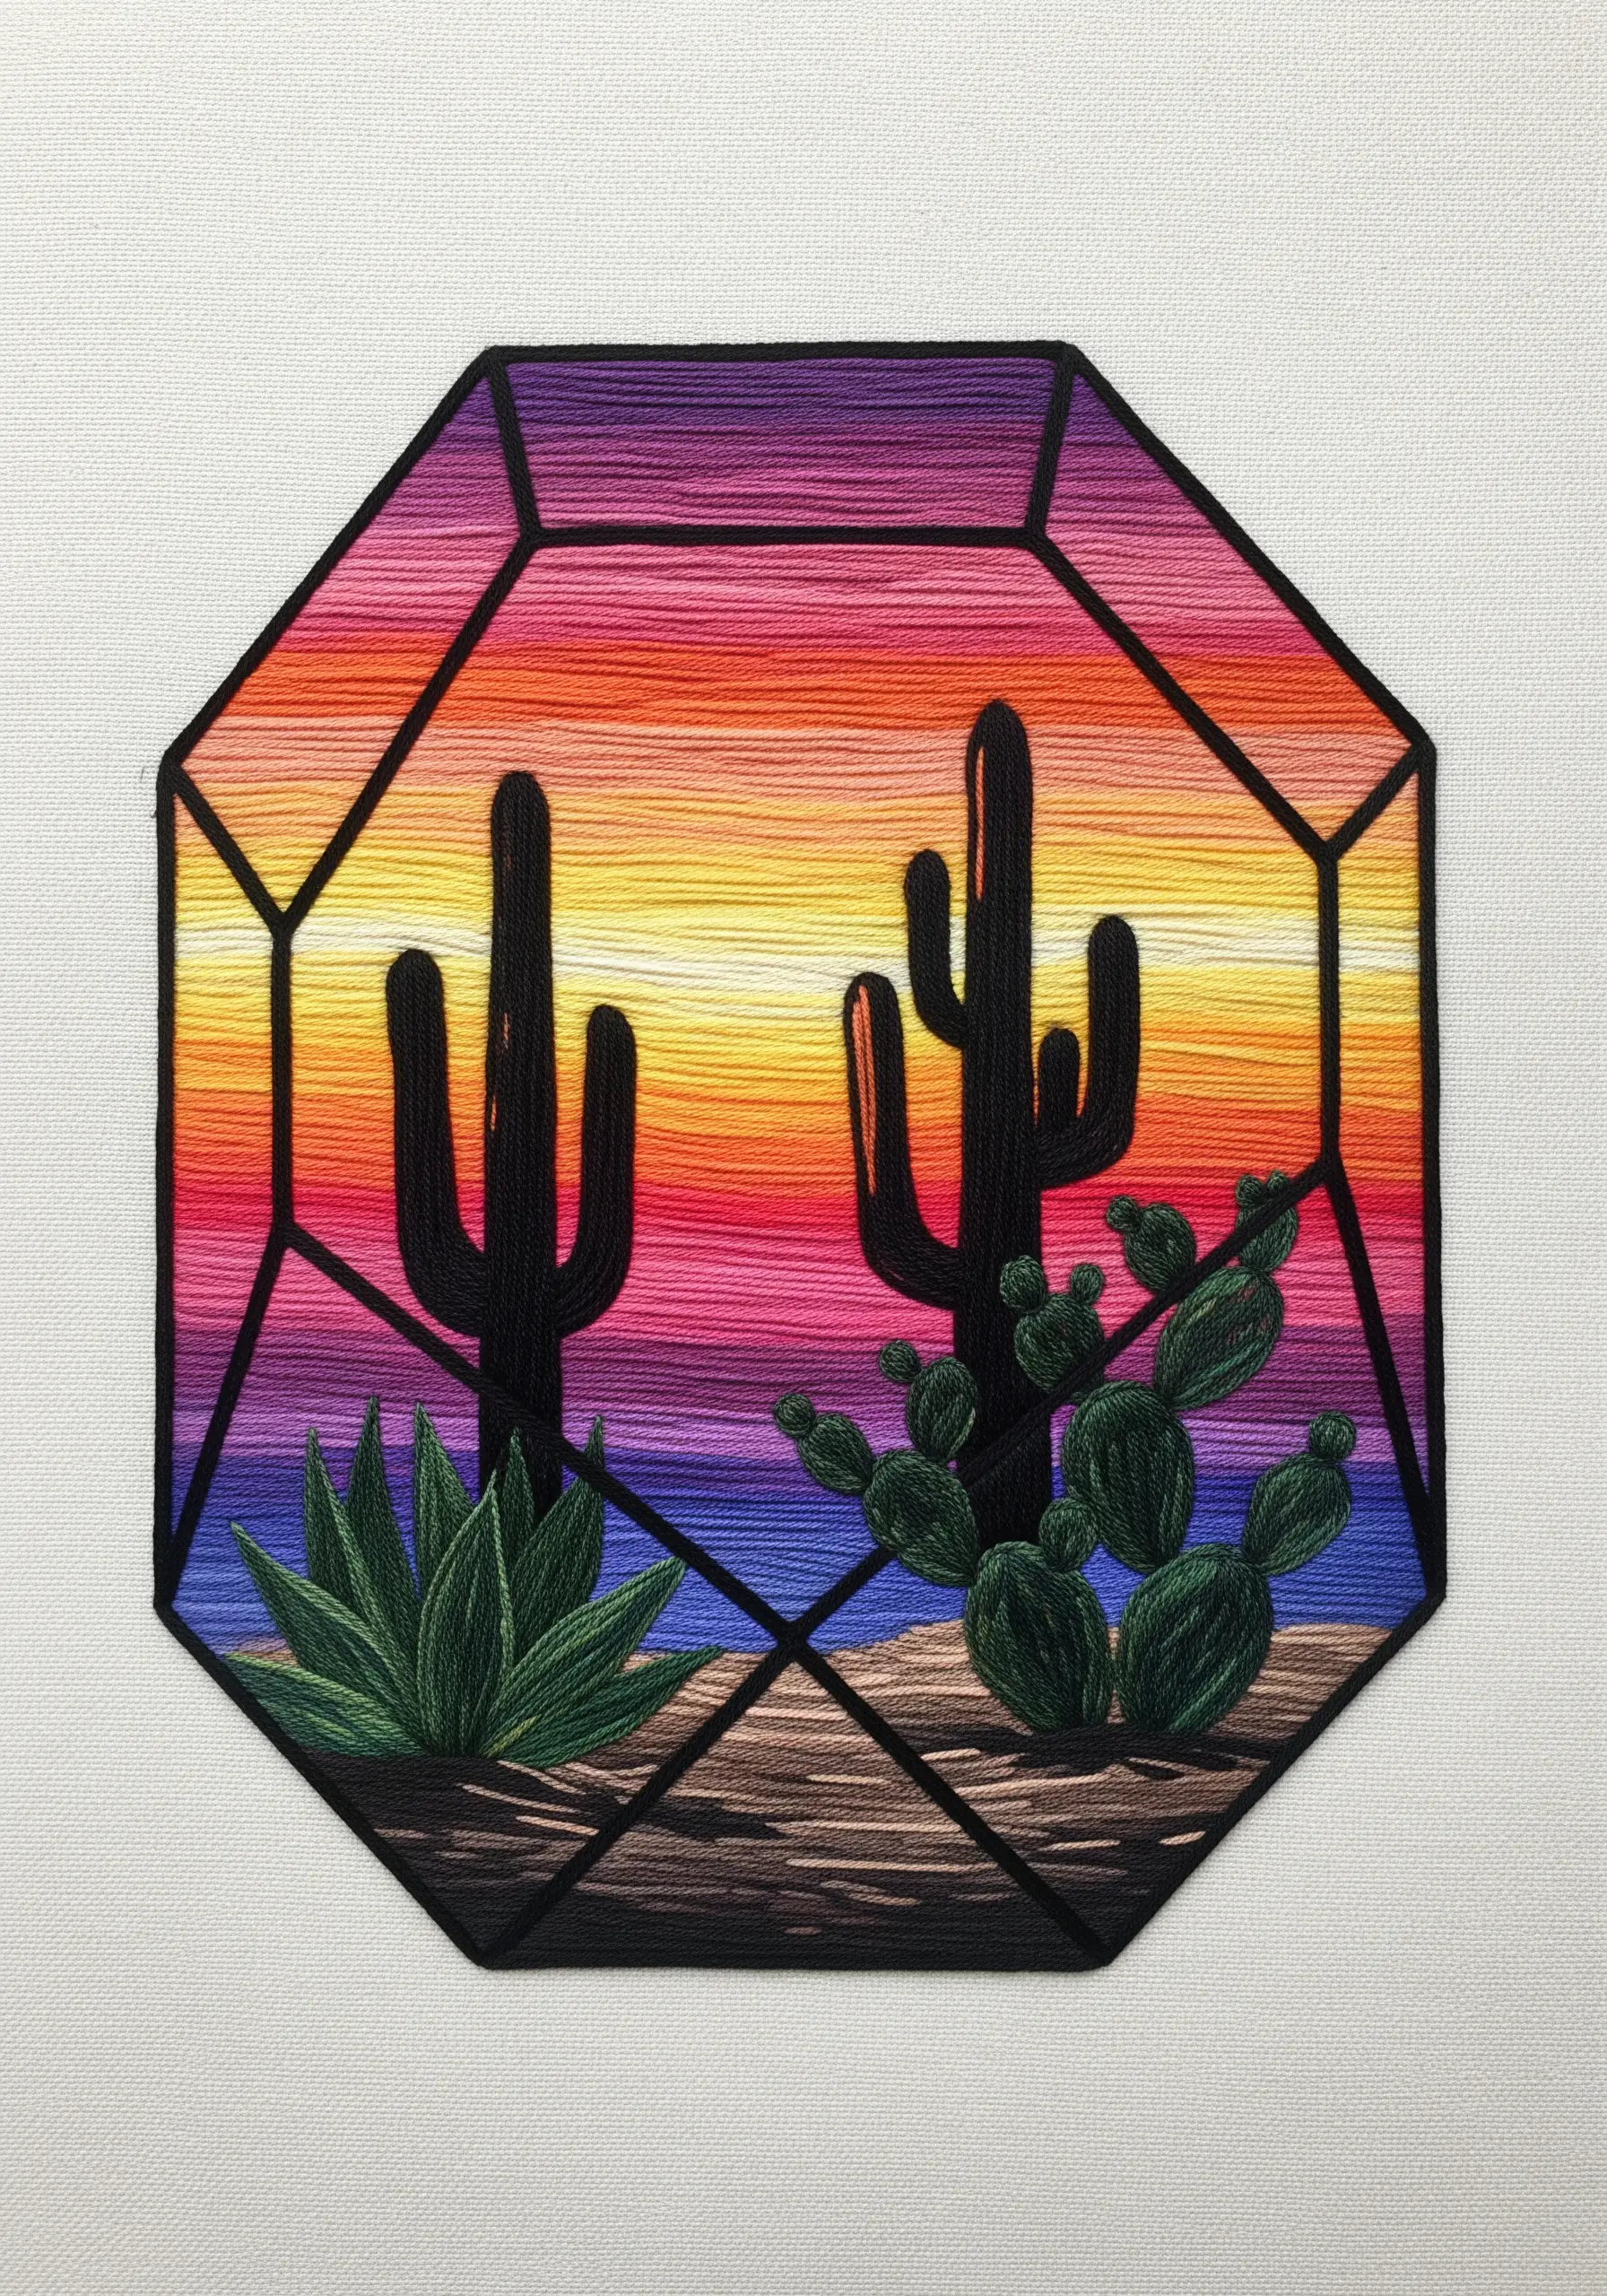
Instead of stitching individual plants, use the terrarium as a frame for a different kind of natural scene. Create a vibrant sunset by laying down horizontal bands of long satin stitches.
To blend the colors seamlessly, have the stitches from one color band interlock slightly with the stitches from the next, similar to a long and short stitch. This creates a soft, painterly gradient.
Stitch the cacti and foreground elements in solid black or a very dark green. This silhouette effect makes the colorful background even more dramatic and impactful.
Mastering this technique will open up many ombre gradient thread embroidery ideas for other projects.
28. Capture a Winter Scene in a Cloche
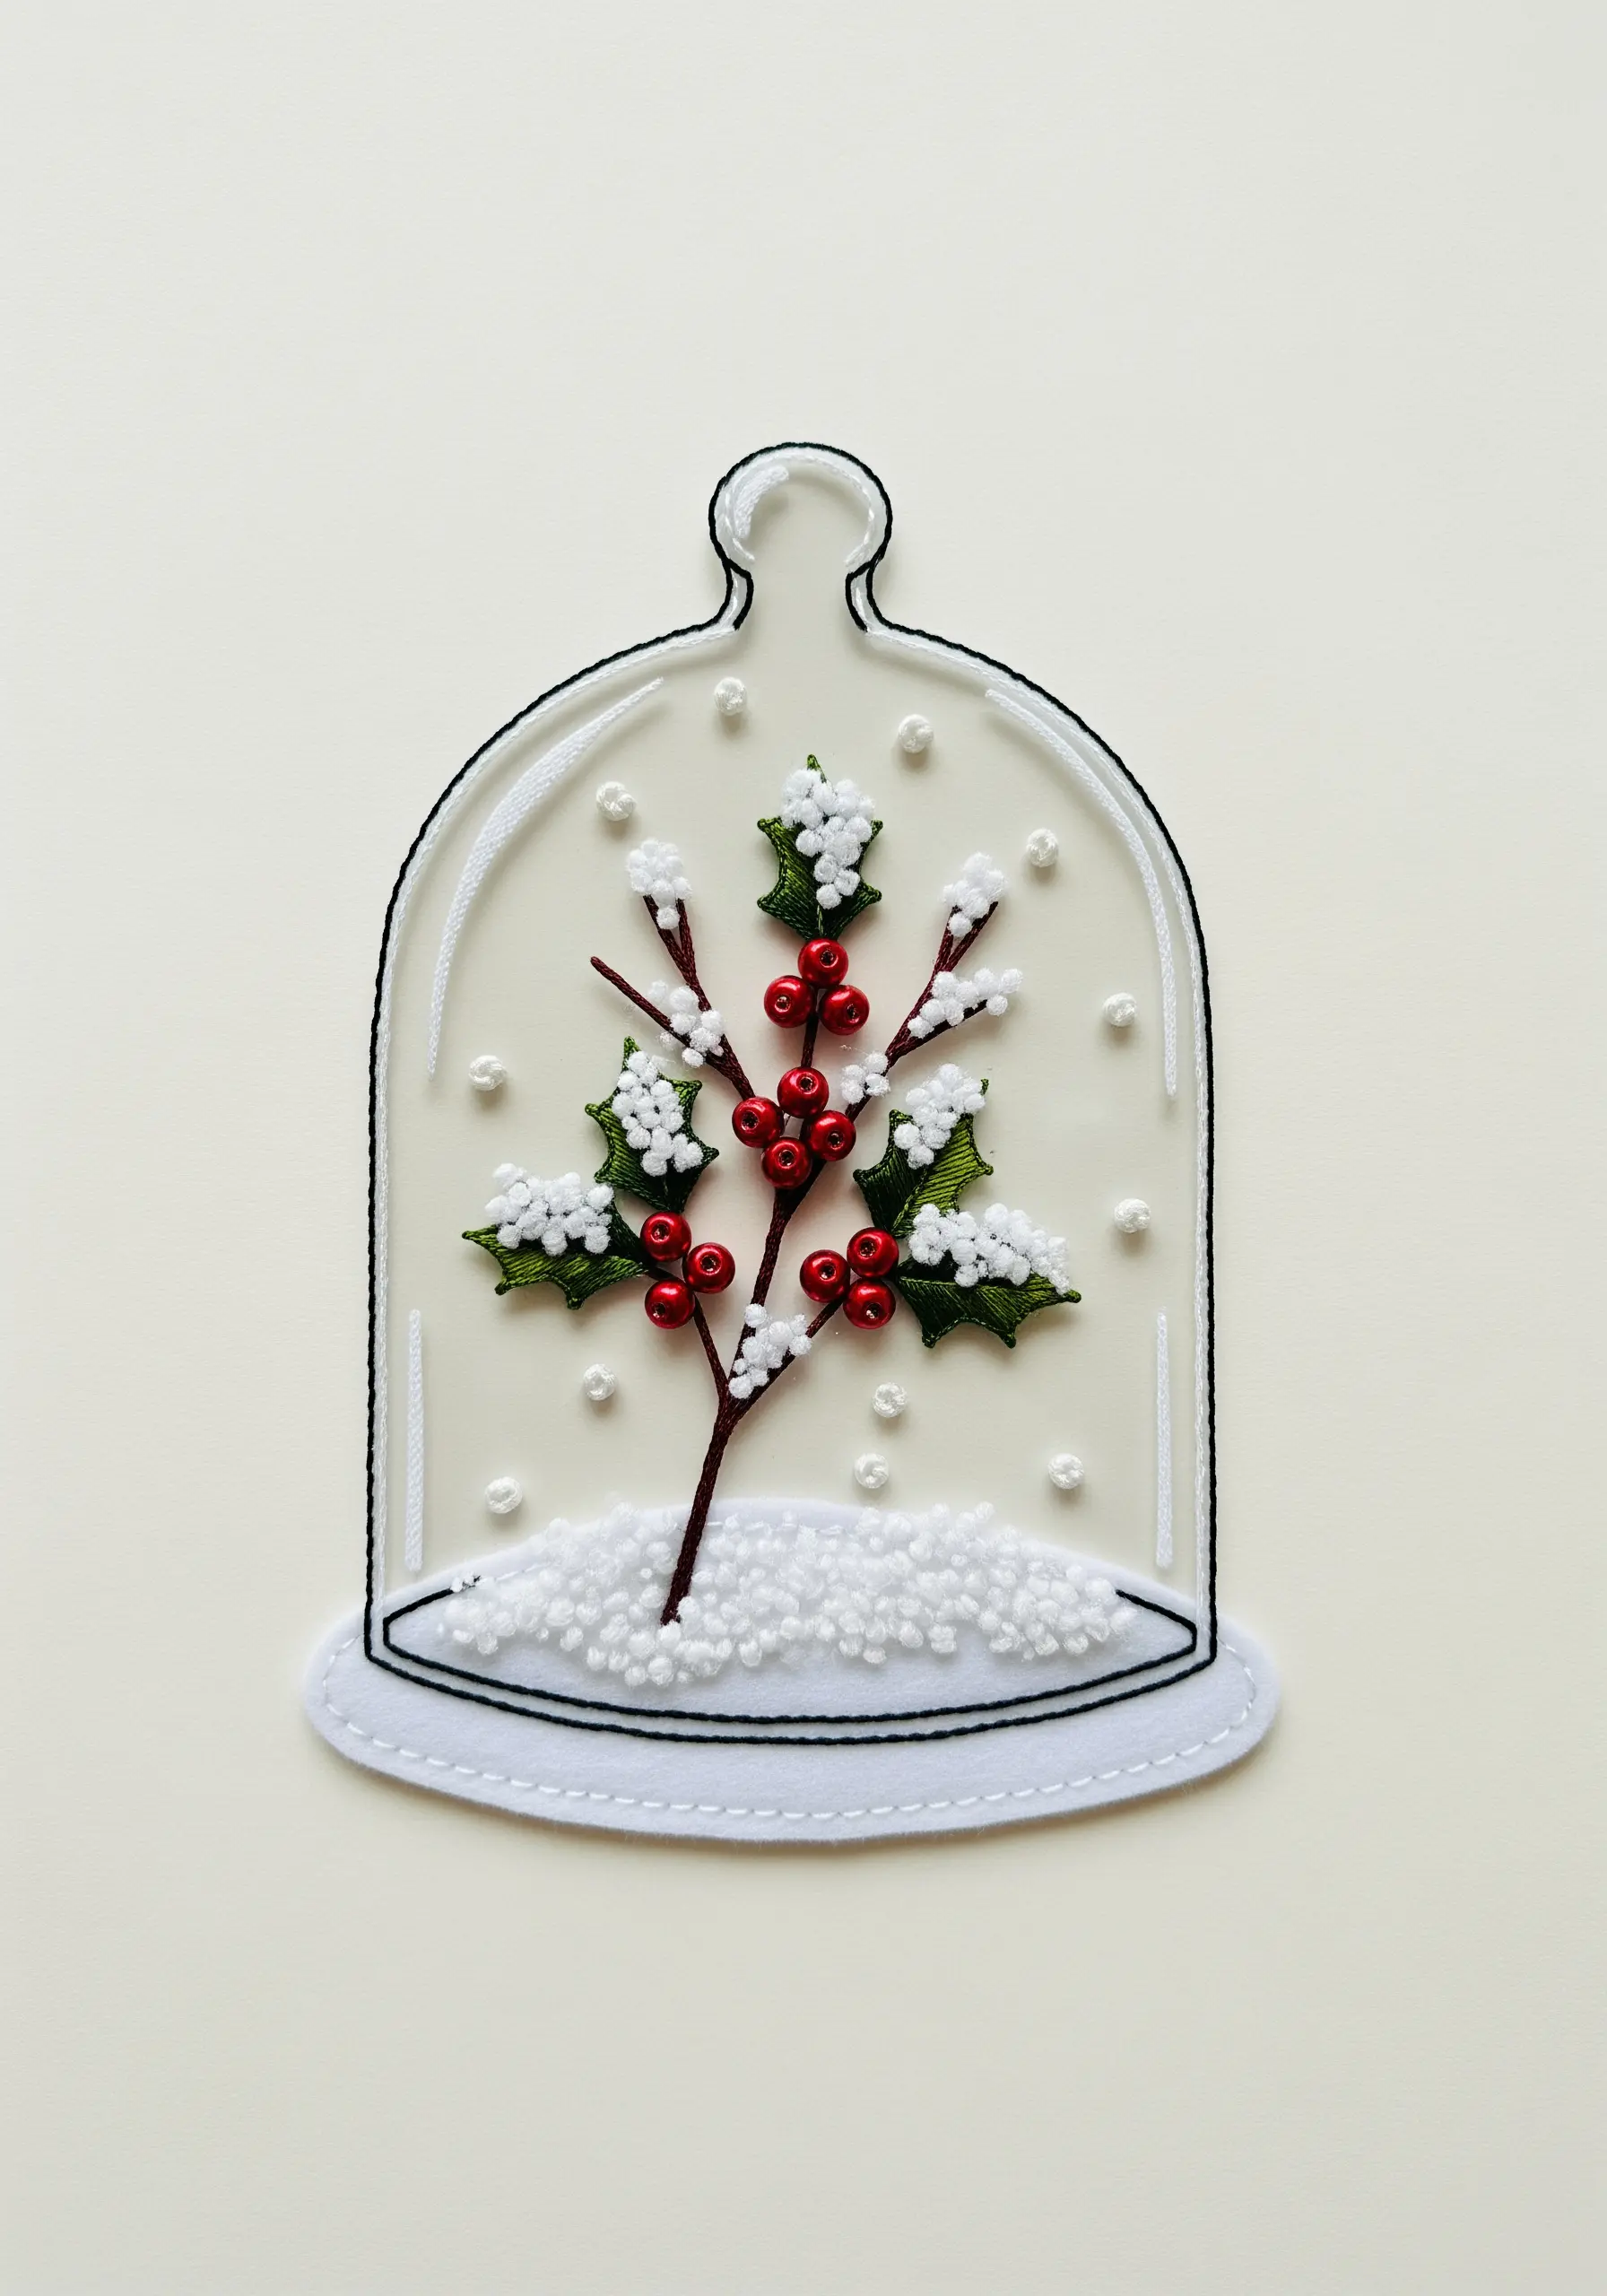
Create a cozy winter terrarium by stitching a sprig of holly covered in snow. Use felt appliqué for the snow on the ground and the base of the cloche for a soft, thick texture.
For the snow on the leaves, use colonial knots or French knots with fluffy white yarn or chenille thread. This gives the snow a more three-dimensional, piled-up look than standard cotton floss.
Use glossy red beads for the holly berries. Their shine and shape are more realistic than stitched knots and add a festive touch to the piece.
This is one of those soft and serene stitching projects that perfectly captures a quiet winter moment.
29. Weave an Intricate Botanical Tapestry
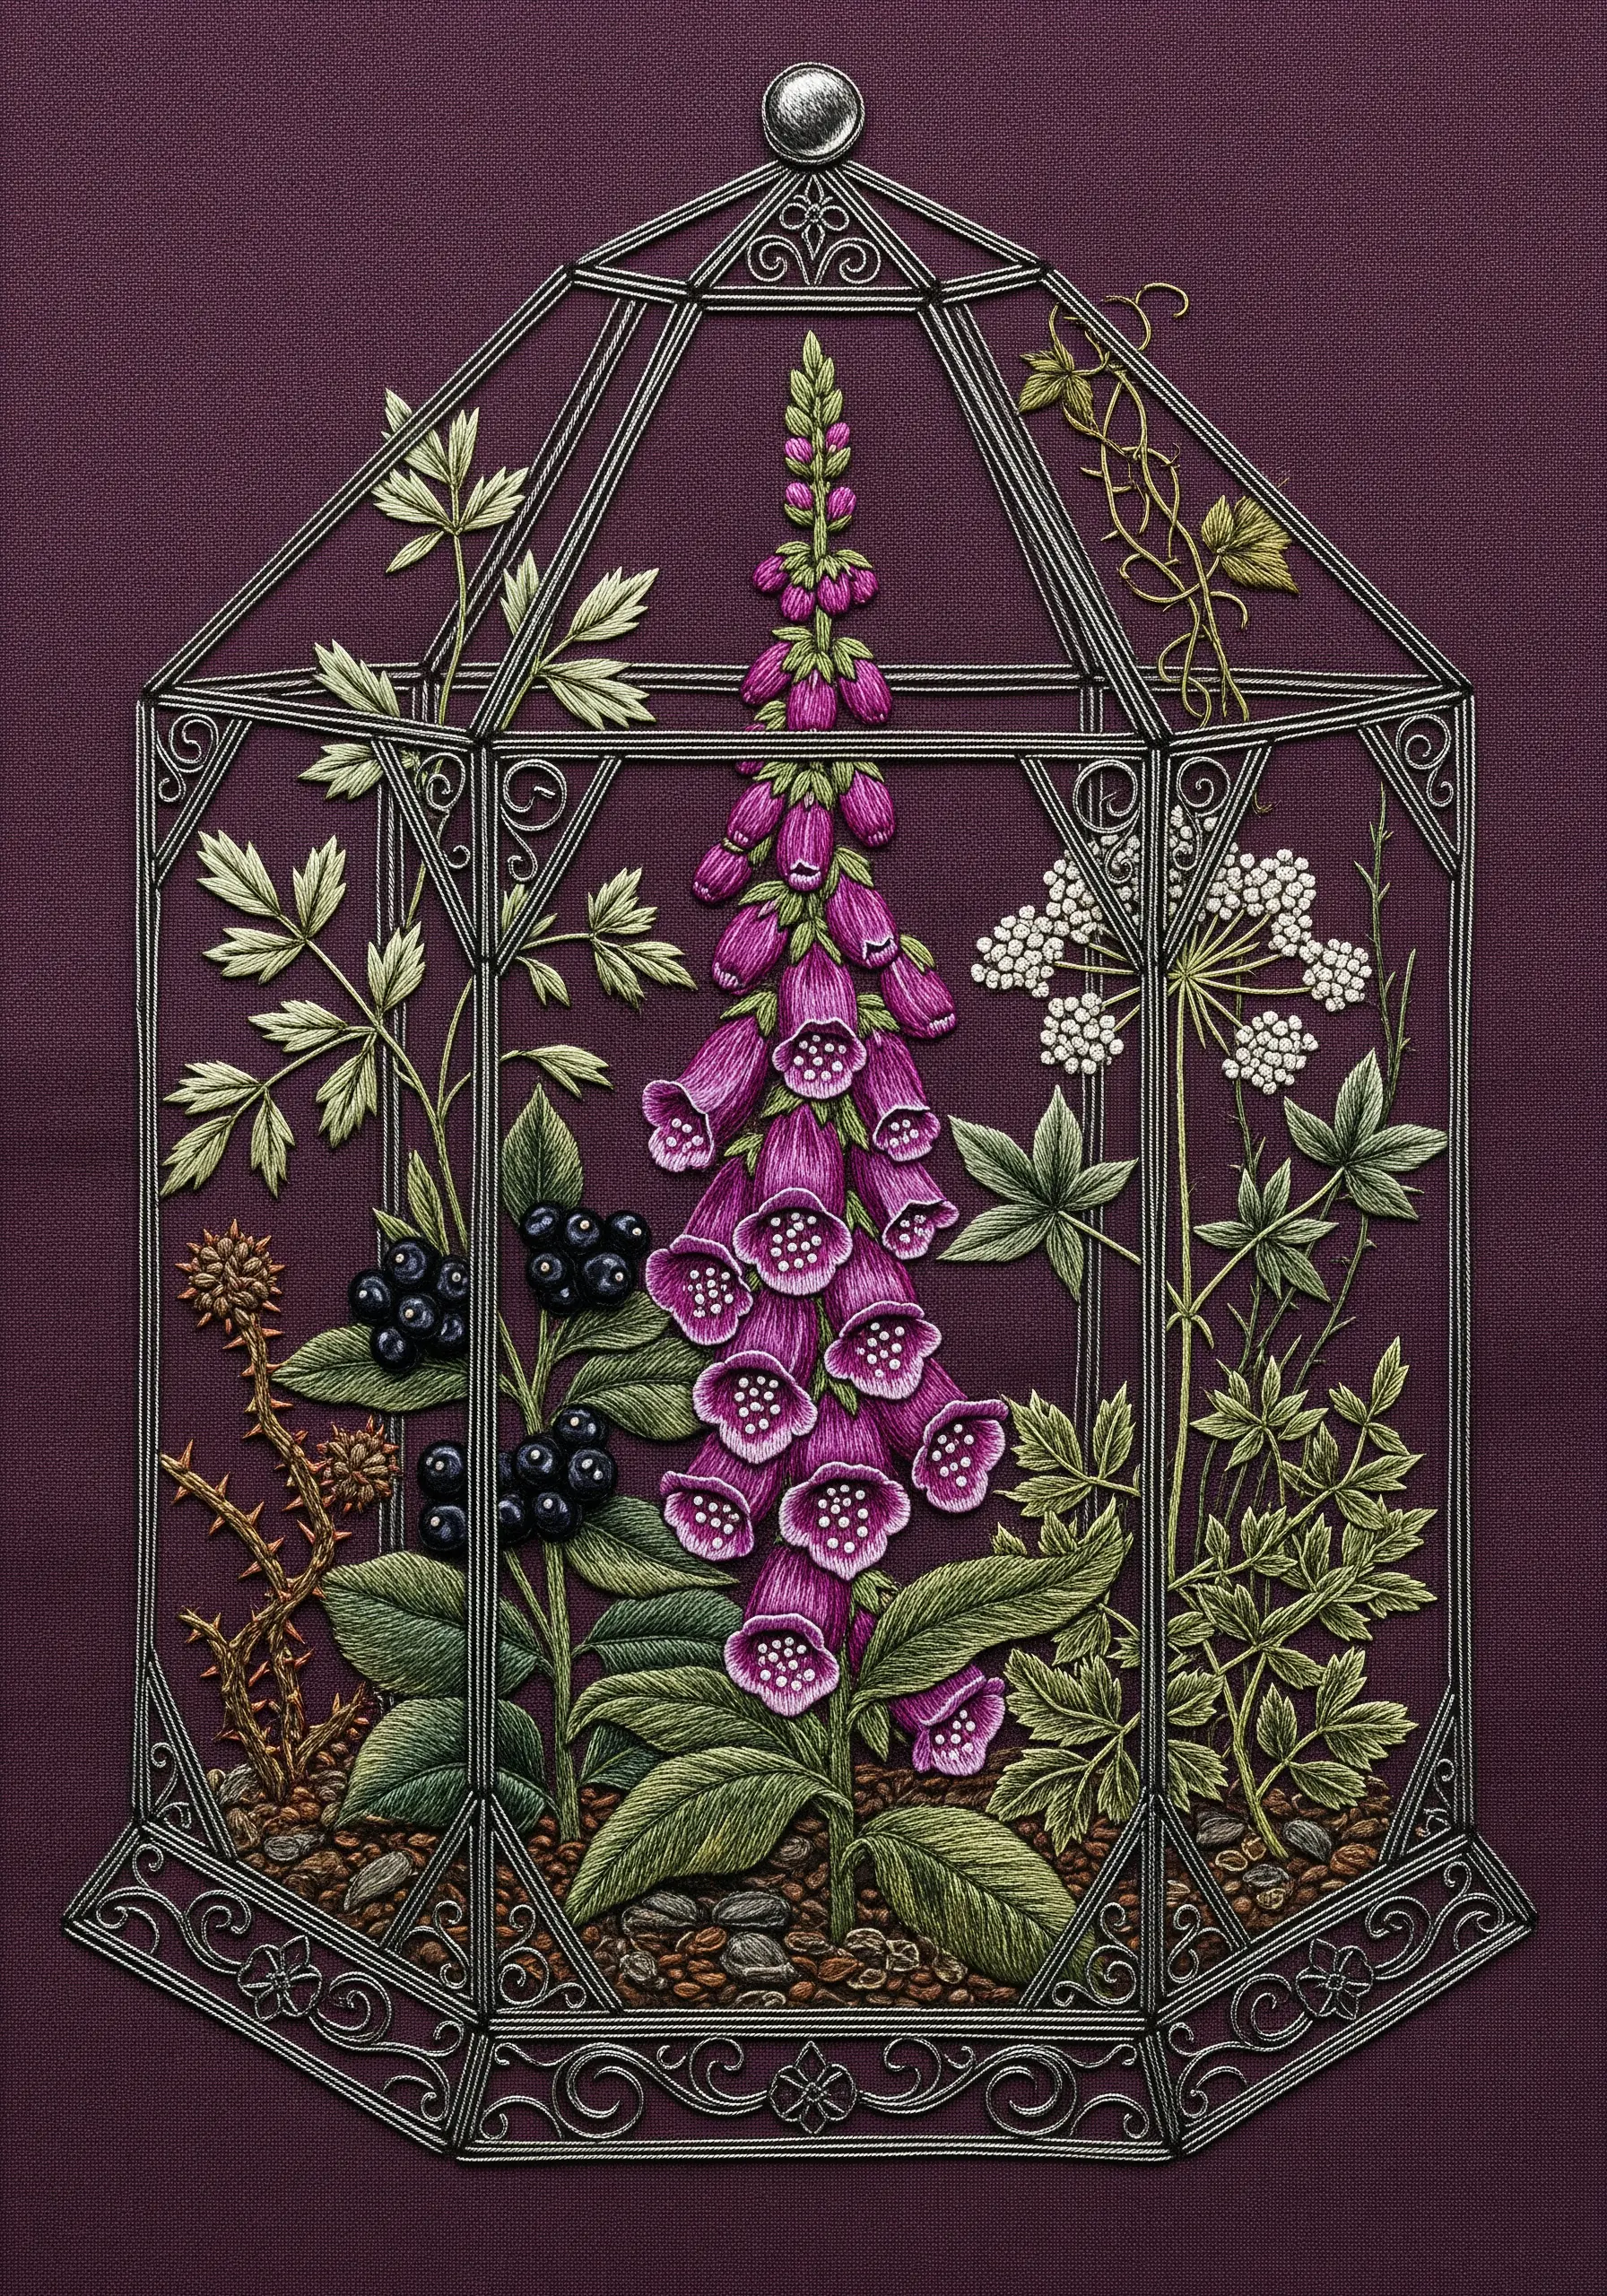
For a sophisticated, maximalist design, fill an ornate terrarium with a variety of finely detailed botanicals. Use a dark, moody background fabric to make the colors feel rich and deep.
Render the foxglove flowers with a satin stitch, adding French knot details inside each bell. This level of detail rewards close inspection.
Use a single strand of metallic or silky gray thread for the intricate terrarium frame. A whipped backstitch will give the lines a smooth, raised quality that mimics metalwork.
The overall effect recalls Dark Academia cushion embroidery patterns, full of detail, history, and romance.
30. Open the Doors of Your Terrarium
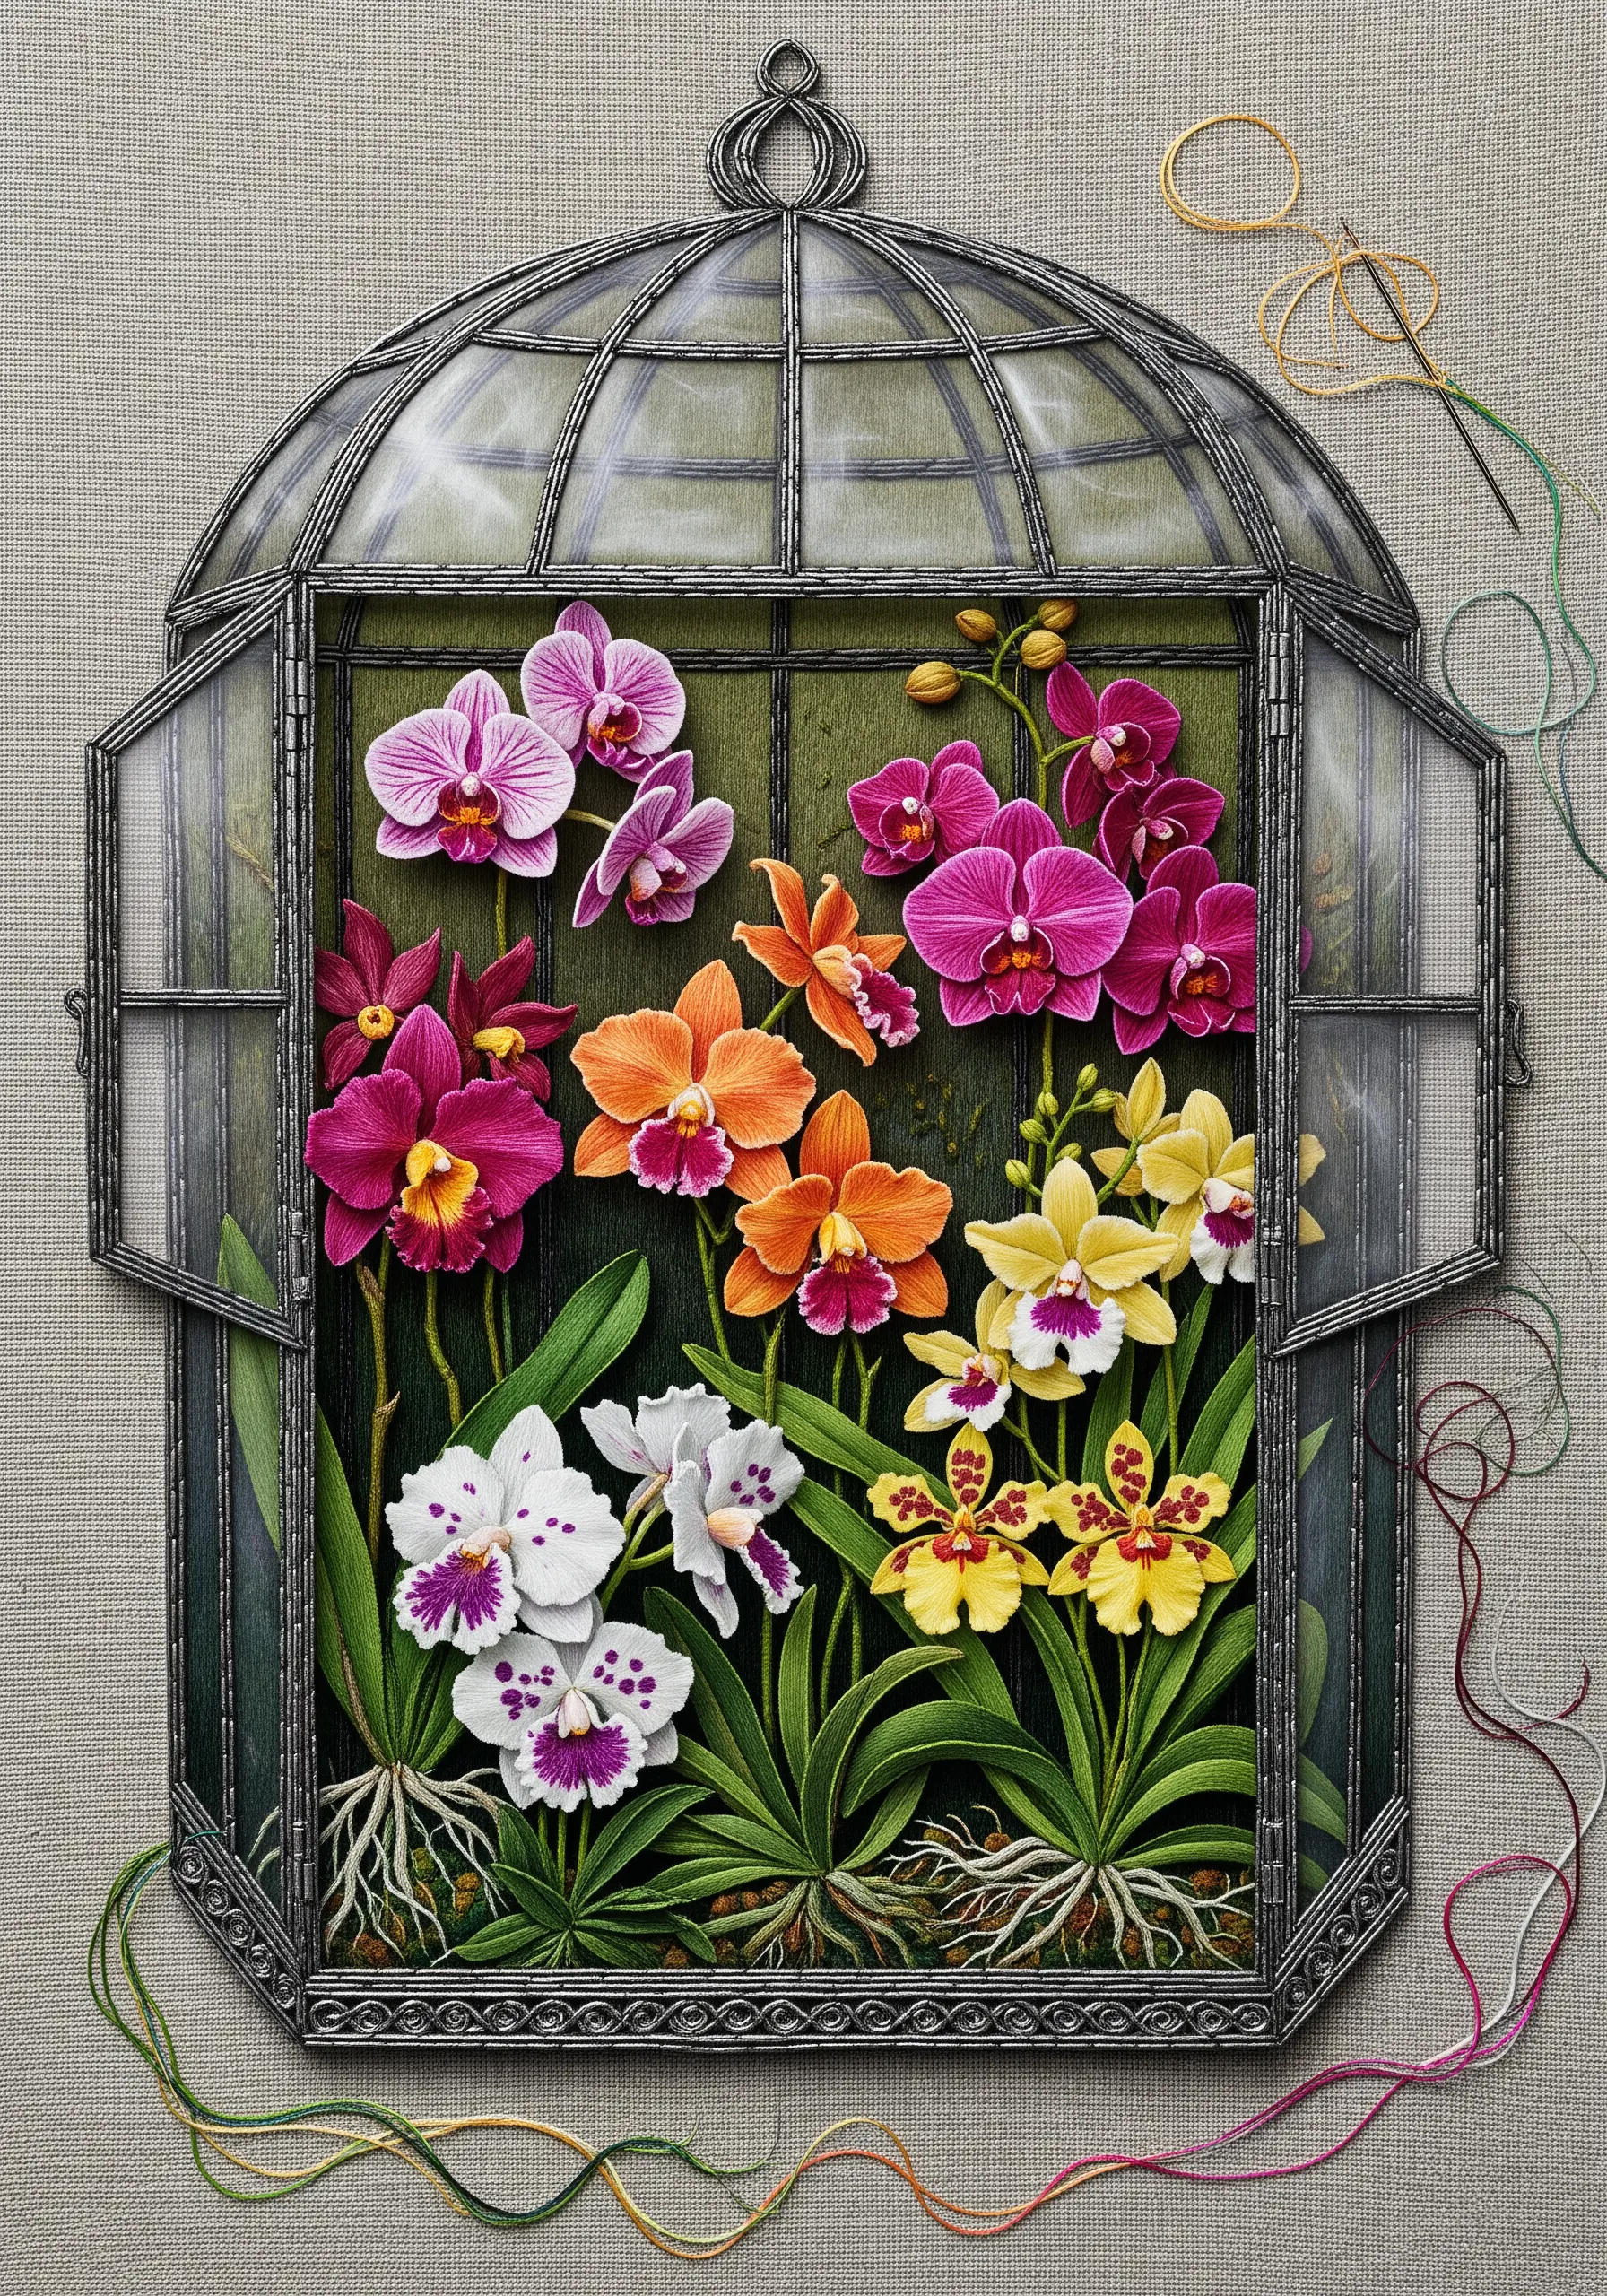
Create a dynamic composition by stitching your terrarium with the doors wide open, allowing the flowers to feel abundant and almost spill out.
Use a variety of stitches to give each orchid a unique texture. Combine satin stitch, long and short stitch, and even some detached chain stitches to capture the complexity of the different blooms.
Allow a few loose threads to trail off the fabric. This intentional, slightly ‘undone’ look adds a layer of artistic expression and makes the piece feel like a work in progress.
The painterly quality is reminiscent of wild garden floral embroidery ideas that capture nature’s beautiful chaos.
31. Create a Realistic Riverbed
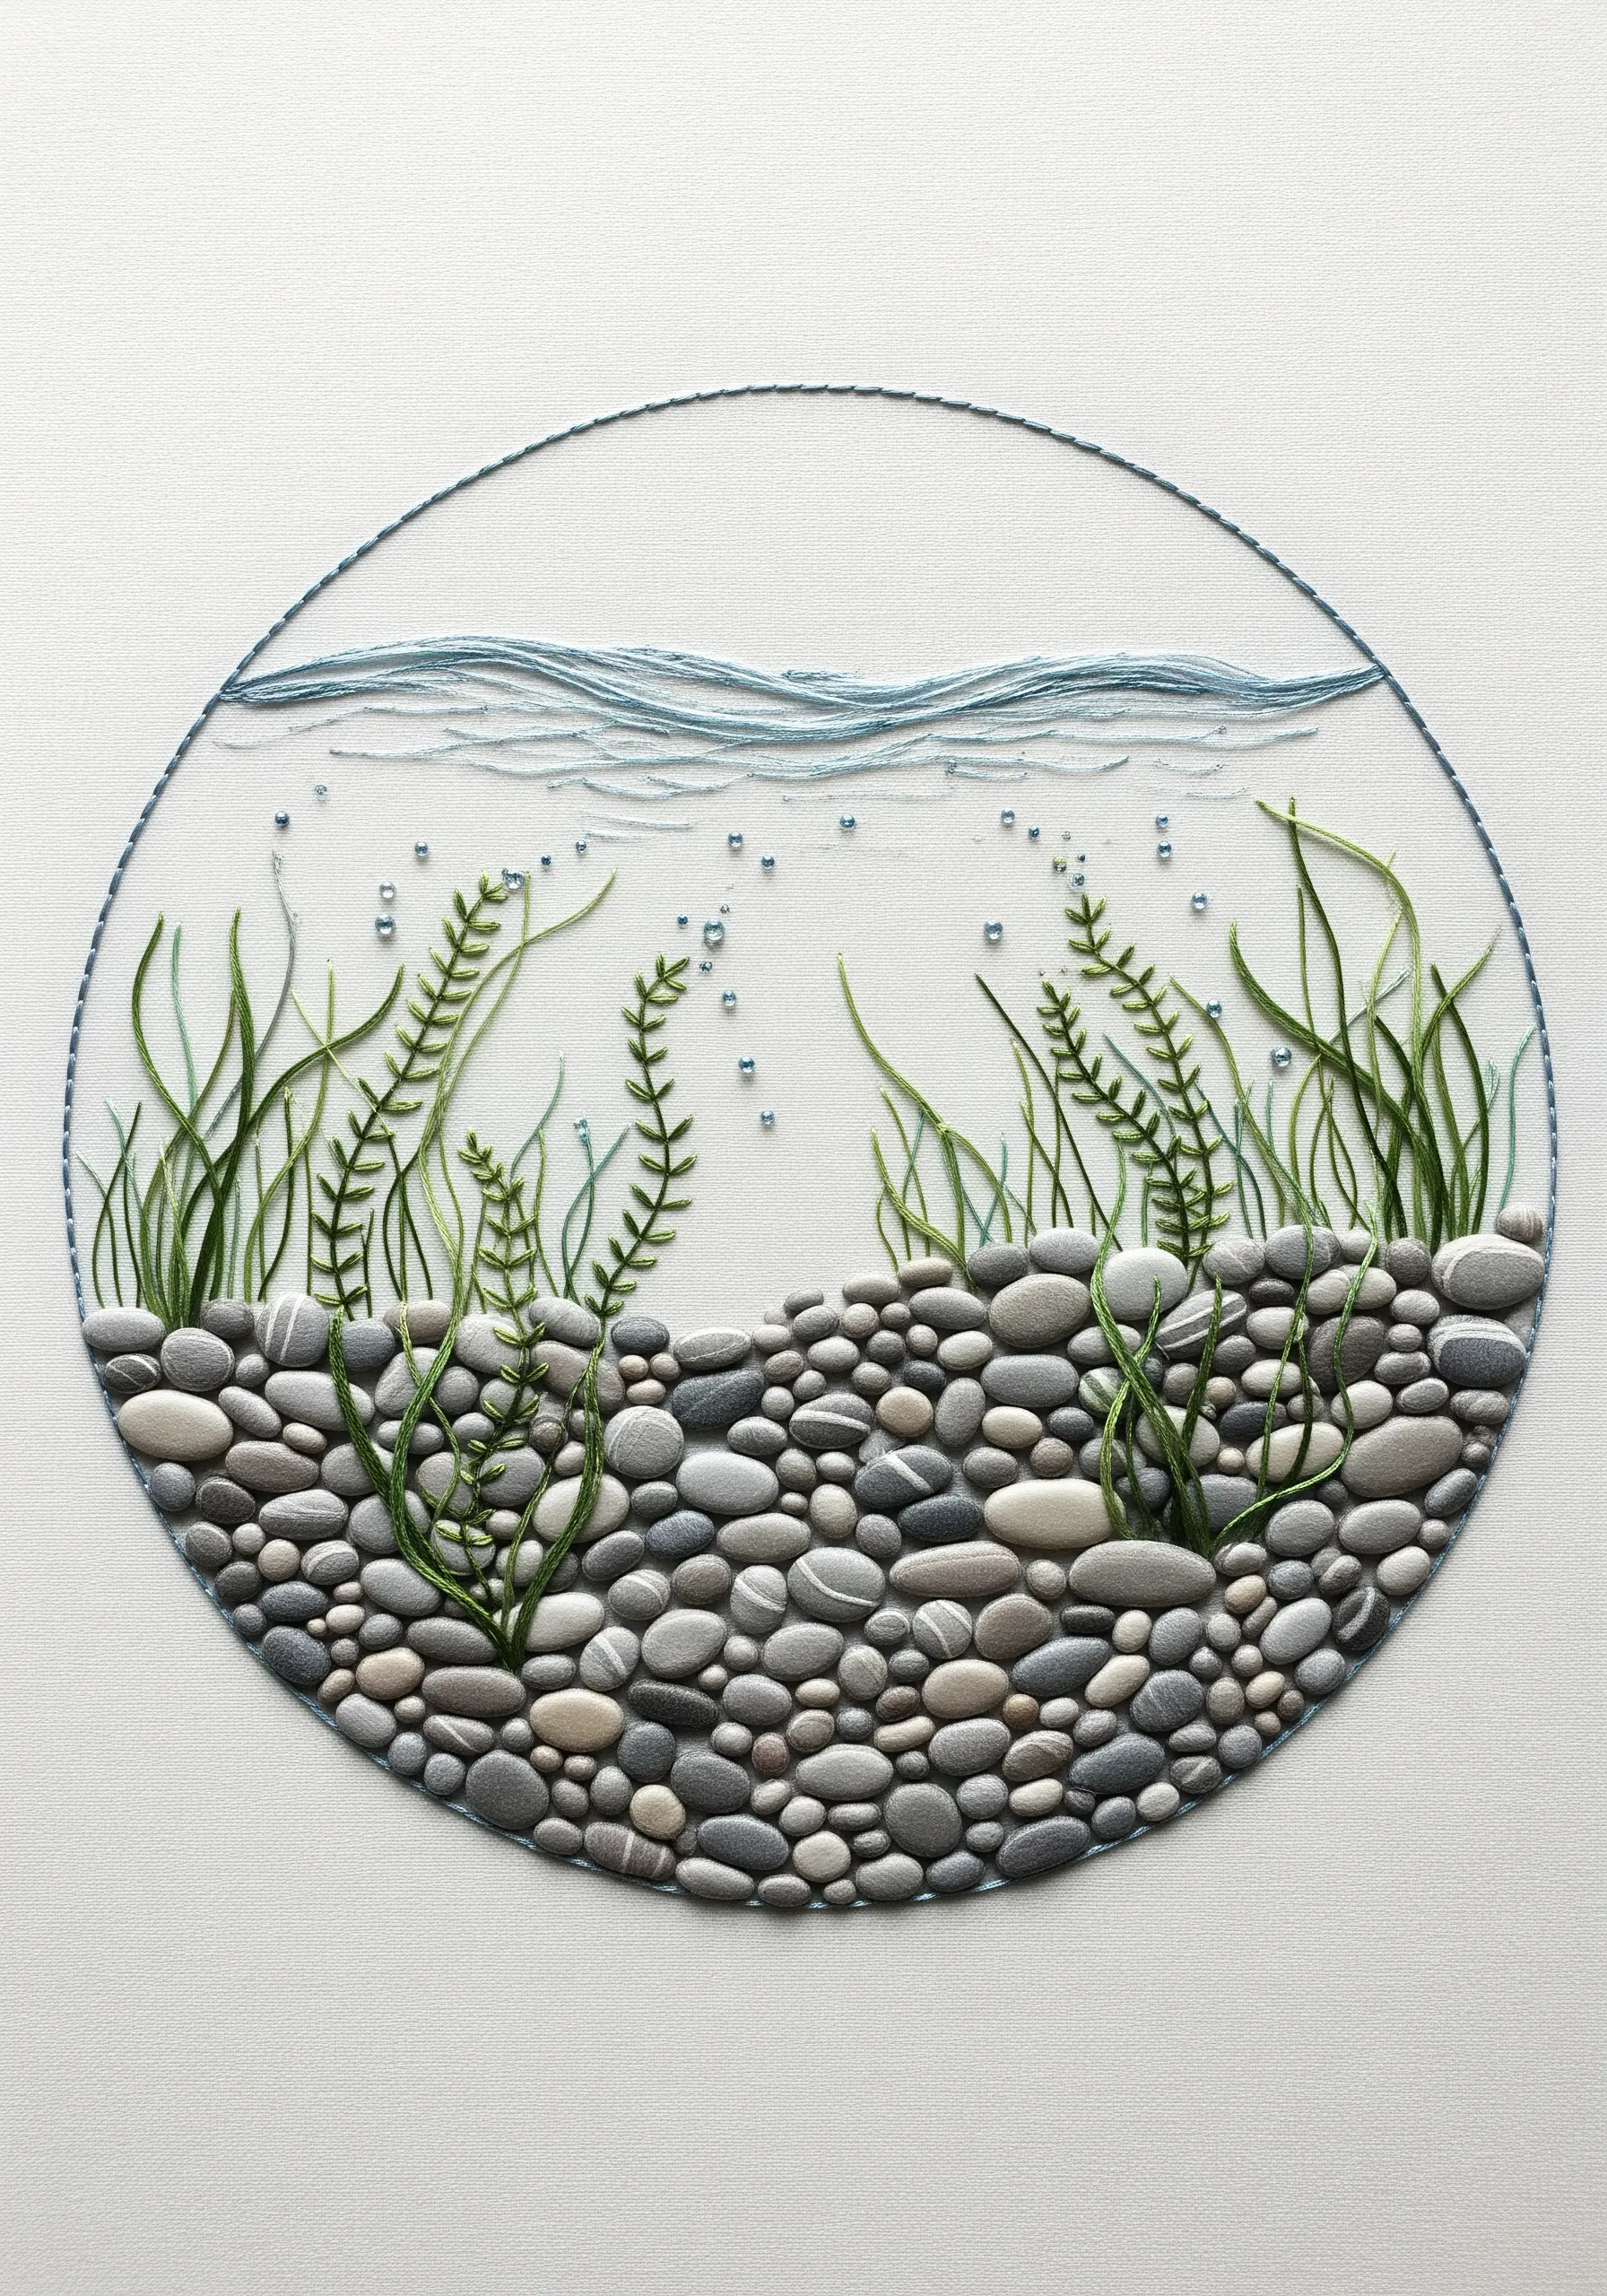
For a hyper-realistic pebble effect, use satin stitch to fill in individual stone shapes. Use a wide palette of grays, tans, and browns, and vary the direction of your stitches for each stone to make them look distinct.
Add subtle highlights and shadows to each pebble using one or two strands of a lighter or darker thread. This simple step will make them look rounded and three-dimensional.
For the delicate seaweed, use a whipped stem stitch or a simple backstitch. Its thin, flowing lines will contrast beautifully with the solid, smooth stones.
This is a perfect project for fans of coastal-inspired embroidery wall decorations, capturing a serene underwater moment.
32. Design a Hidden Grotto
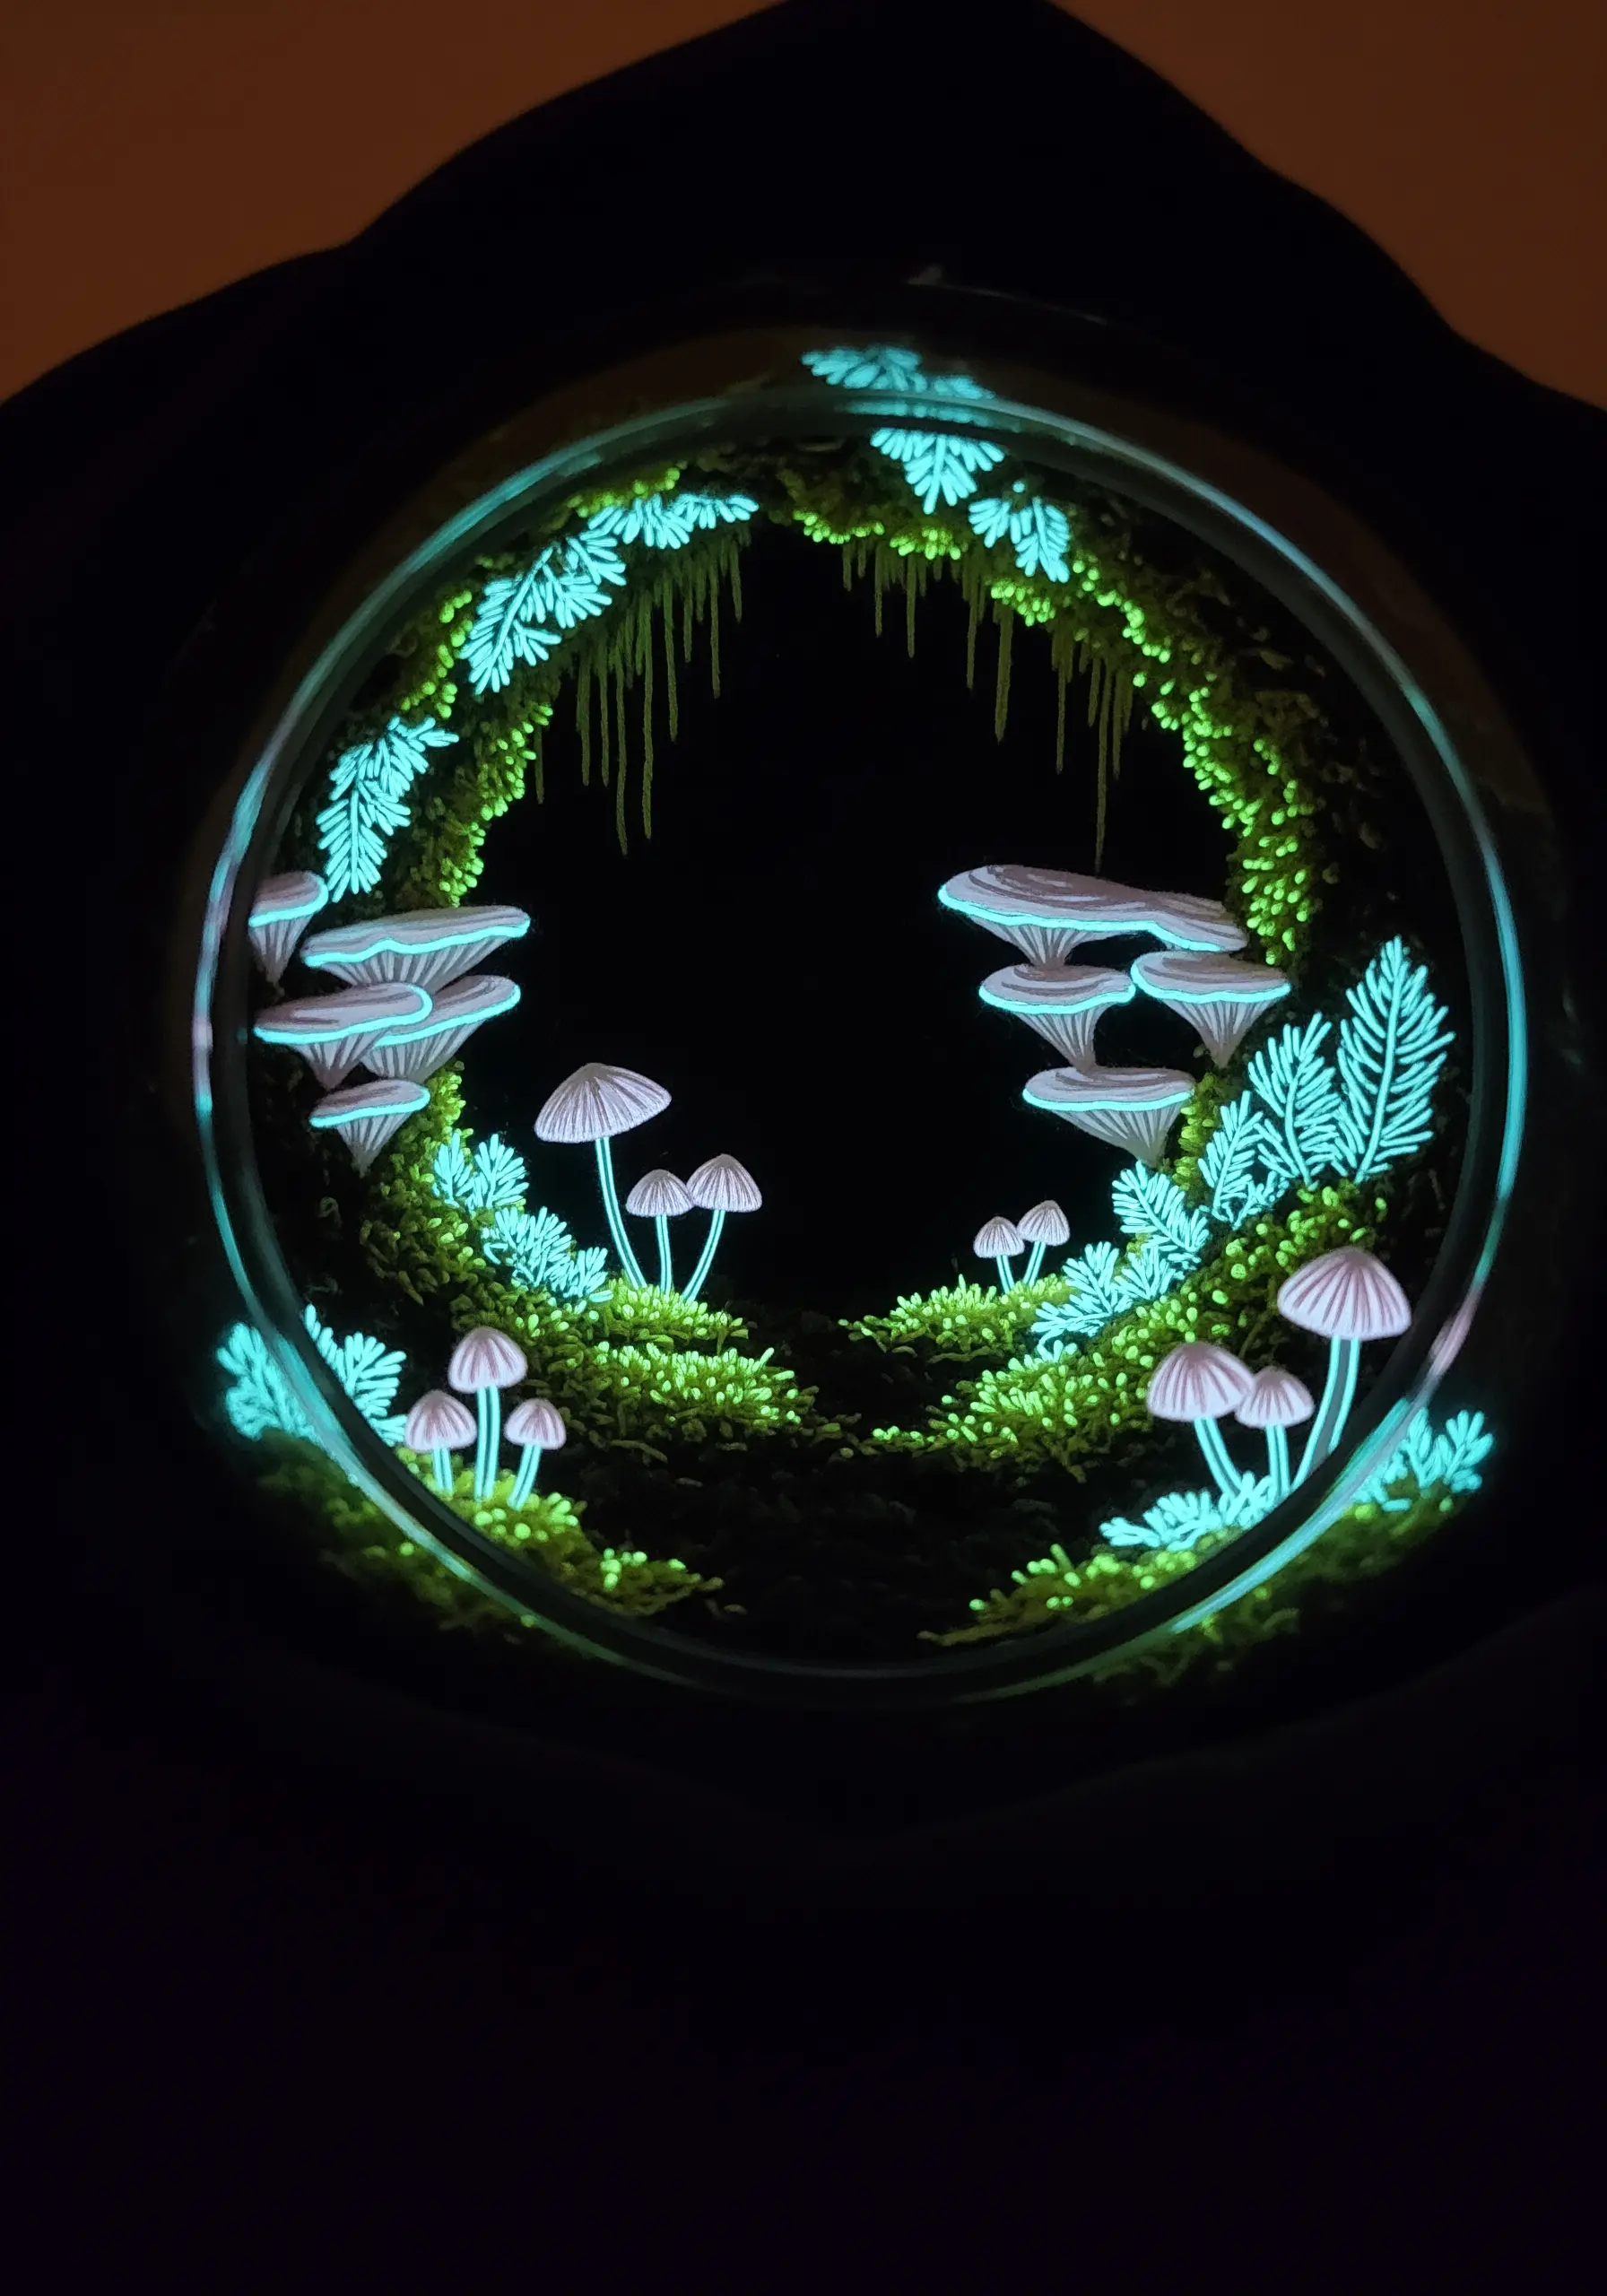
Create a sense of mystery and depth by stitching a scene that peers into a hidden world. Use glow-in-the-dark thread for the foliage and mushrooms against a completely black background.
Layer your stitched elements to create perspective. Place some moss and ferns in the extreme foreground, framing the opening, to make the viewer feel like they are looking through a portal.
Use a very fine, single strand of thread to add delicate details, like the gills on the underside of the mushrooms. This subtle detail adds incredible realism to the fantastical scene.
This design could be straight out of our collection of dreamy galaxy string art concepts, blending nature with cosmic wonder.
33. Stage a Prehistoric Scene
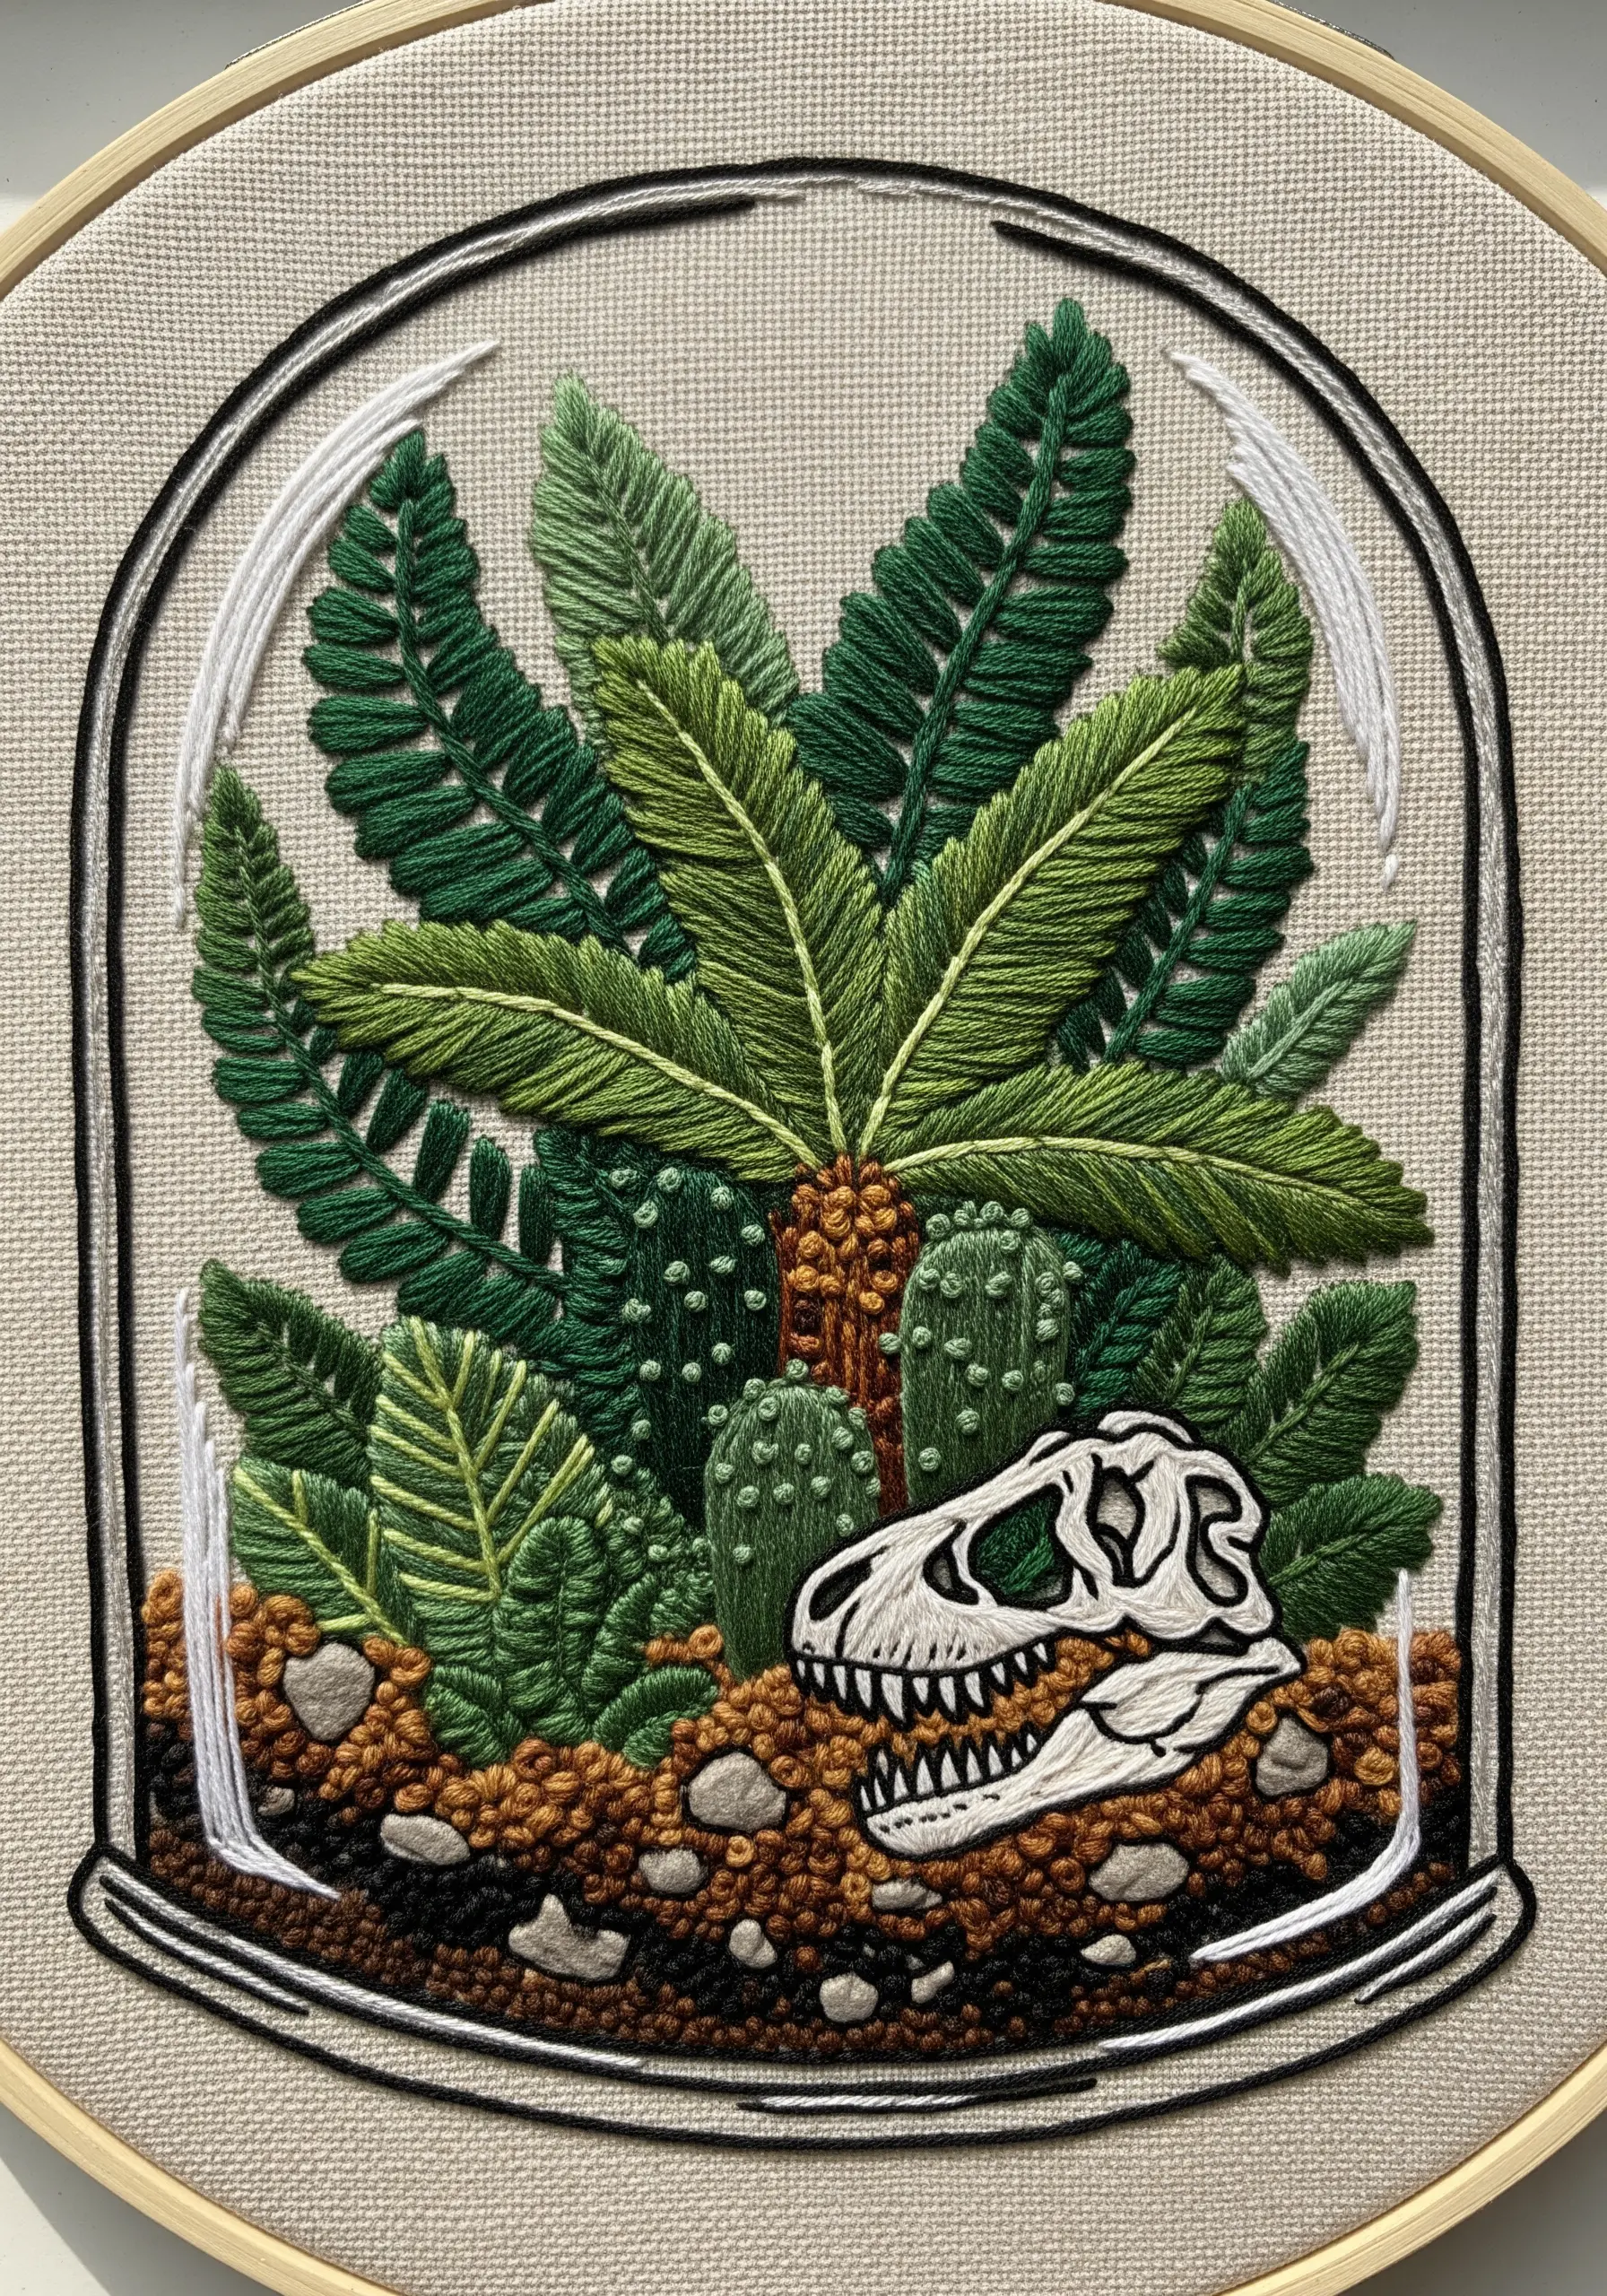
Combine botanical embroidery with a unique element, like a dinosaur skull, for a design that tells a story. Use an off-white or bone-colored thread and a tight backstitch for the skull’s outline and details.
Contrast the smooth, hard texture of the skull with lush, green foliage. Use fishbone stitch for the large fern leaves and French knots for the textured ground cover.
A few carefully placed gray satin-stitched rocks near the skull help to ground it in the scene and add another layer of texture to your miniature prehistoric world.
This type of clean, graphic composition is perfect for modern minimalist textile wall art designs.
34. Capture Pollinators in Motion
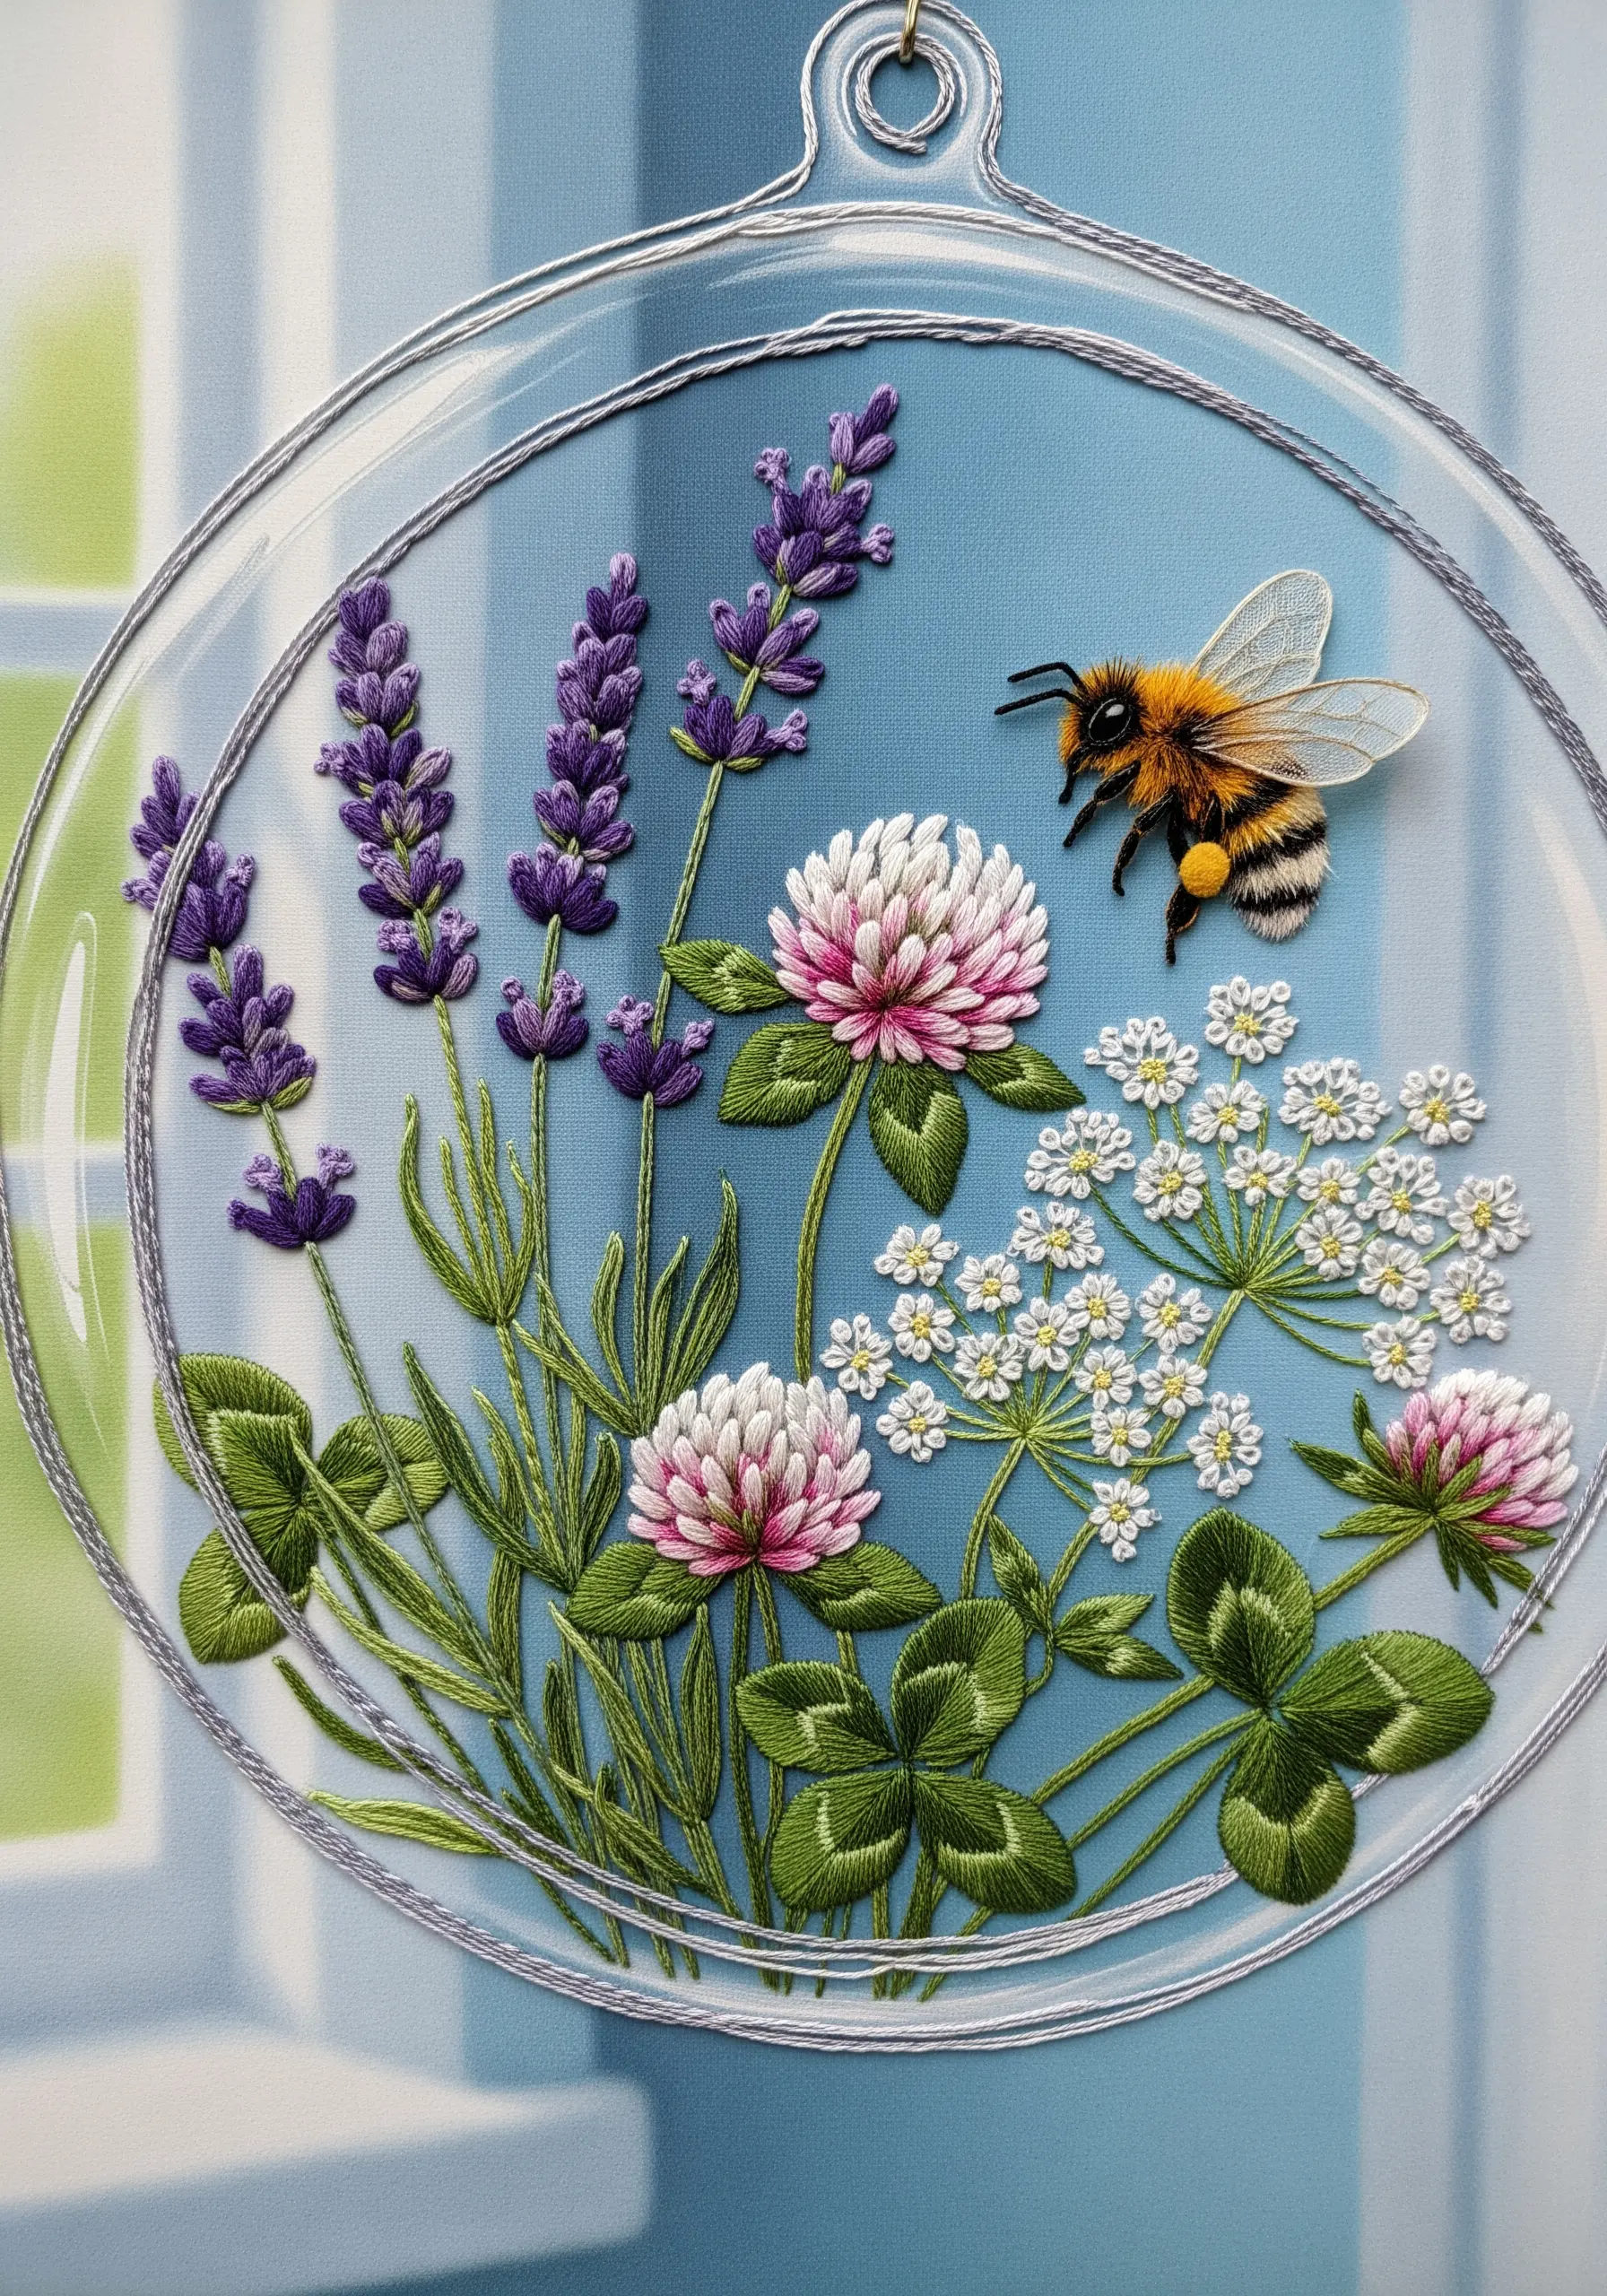
Bring your terrarium to life by adding an insect, like this bumblebee. Use stumpwork techniques—stitching the bee on a separate piece of fabric, cutting it out, and attaching it—to make it truly three-dimensional.
For the lavender, use a series of lazy daisy stitches stacked up a central stem. This is a quick and effective way to create the classic flower shape.
Use a very light, almost invisible thread like a silver metallic to create the glass highlights on the terrarium. This maintains the illusion of transparency without distracting from the vibrant scene inside.
This piece evokes the same peaceful feeling as these lavender-inspired embroidery designs for bedrooms.


