

Have you ever felt that your embroidery, while beautiful, could use a spark of unexpected magic? You’ve mastered the stitches, but now you want to create pieces that do more than just sit on the fabric—you want them to move, to bend, to trick the eye and start a conversation.
This is where the art of illusion comes in. It’s not about learning dozens of complicated new techniques. Instead, it’s about understanding how simple stitches, when combined with the clever use of color, direction, and perspective, can transform a flat piece of cloth into a dynamic, three-dimensional world.
Here, we will move beyond basic patterns and explore how to manipulate perception itself. You will learn to create depth with color theory, sculpt with thread, and build forms that defy logic. This is your invitation to stitch not just what you see, but what you can make others see, too.
1. Master the Warped Grid Illusion

Create the compelling illusion of a distorted surface by manipulating stitch length and placement within a simple grid.
First, draw a perfect grid on your fabric, then carefully fill alternating squares with black and white satin stitch.
The secret is to slightly curve the straight lines of your grid as you stitch, making some satin stitches longer and others shorter to simulate stretching and pinching.
Using a high-contrast palette on a neutral grey fabric maximizes the visual push-and-pull, forcing the eye to perceive depth where there is none.
2. Stitch an Impossible Triangle with Color Theory

This design leverages the Penrose triangle, an impossible object that fascinates the eye.
To achieve this effect, use long, straight stitches that wrap around the triangular form, letting the thread direction define each plane.
Select a variegated thread with a long color change, or blend 3-4 distinct shades from pink to blue to create a seamless gradient.
The deep navy fabric provides a dramatic background, making the vibrant thread colors appear to glow and enhancing the illusion of an impossible, twisting shape.
Explore contemporary rainbow blend stitches to master this gradient effect.
3. Build 3D Cubes with Directional Satin Stitch

Create a convincing three-dimensional effect by assigning a specific color and stitch direction to each face of a cube.
Use three distinct shades of thread: a light tone for the top surface (where light hits), a medium tone for one side, and a dark tone for the shadow side.
Fill each diamond-shaped plane with dense satin stitch, ensuring your stitches run parallel to one of the edges.
This disciplined approach to color and direction tricks the brain into seeing depth, turning flat shapes into a solid, geometric structure.
4. Create a Hypnotic Vinyl Record Effect

This illusion of a spinning disc is achieved through meticulously dense, concentric circles of color.
Use a single strand of floss and a tight backstitch or split stitch to maintain crisp color separation between each ring.
Arrange your colors in a spectral gradient, moving from warm to cool tones and back again to create a sense of continuous motion.
The black fabric background is essential; it absorbs light and makes the thread colors vibrate, mimicking the grooves on a record and pulling the viewer’s eye toward the center.
5. Sculpt with Thread Using Parametric Lines

Give your embroidery the illusion of flowing, sculptural form by stitching with precise, parametric lines.
Start by drawing two opposing wave patterns, then connect them with evenly spaced straight stitches using a single strand of black thread.
The magic happens where the lines converge and diverge—closer spacing creates shadows and depth, while wider spacing suggests highlights and raised surfaces.
This technique relies on precision and tension, transforming simple backstitches into a complex, undulating surface that appears to rise from the fabric.
6. Render a Sphere with Textured Stippling

Achieve a photorealistic, shaded sphere by using thousands of tiny, varied stitches instead of traditional satin fill.
Fill small circular sections with a mix of French knots, seed stitches, and short straight stitches, varying the density to create light and shadow.
Use a lighter thread (like white or silver) and pack the stitches tightly where light would hit the sphere, then space them out or switch to a grey thread for the shadowed areas.
This pointillist approach creates a granular texture that gives the orb a tangible, almost planetary feel, especially against a stark black background.
7. Weave a Hypnotic Portal with Thick Cords
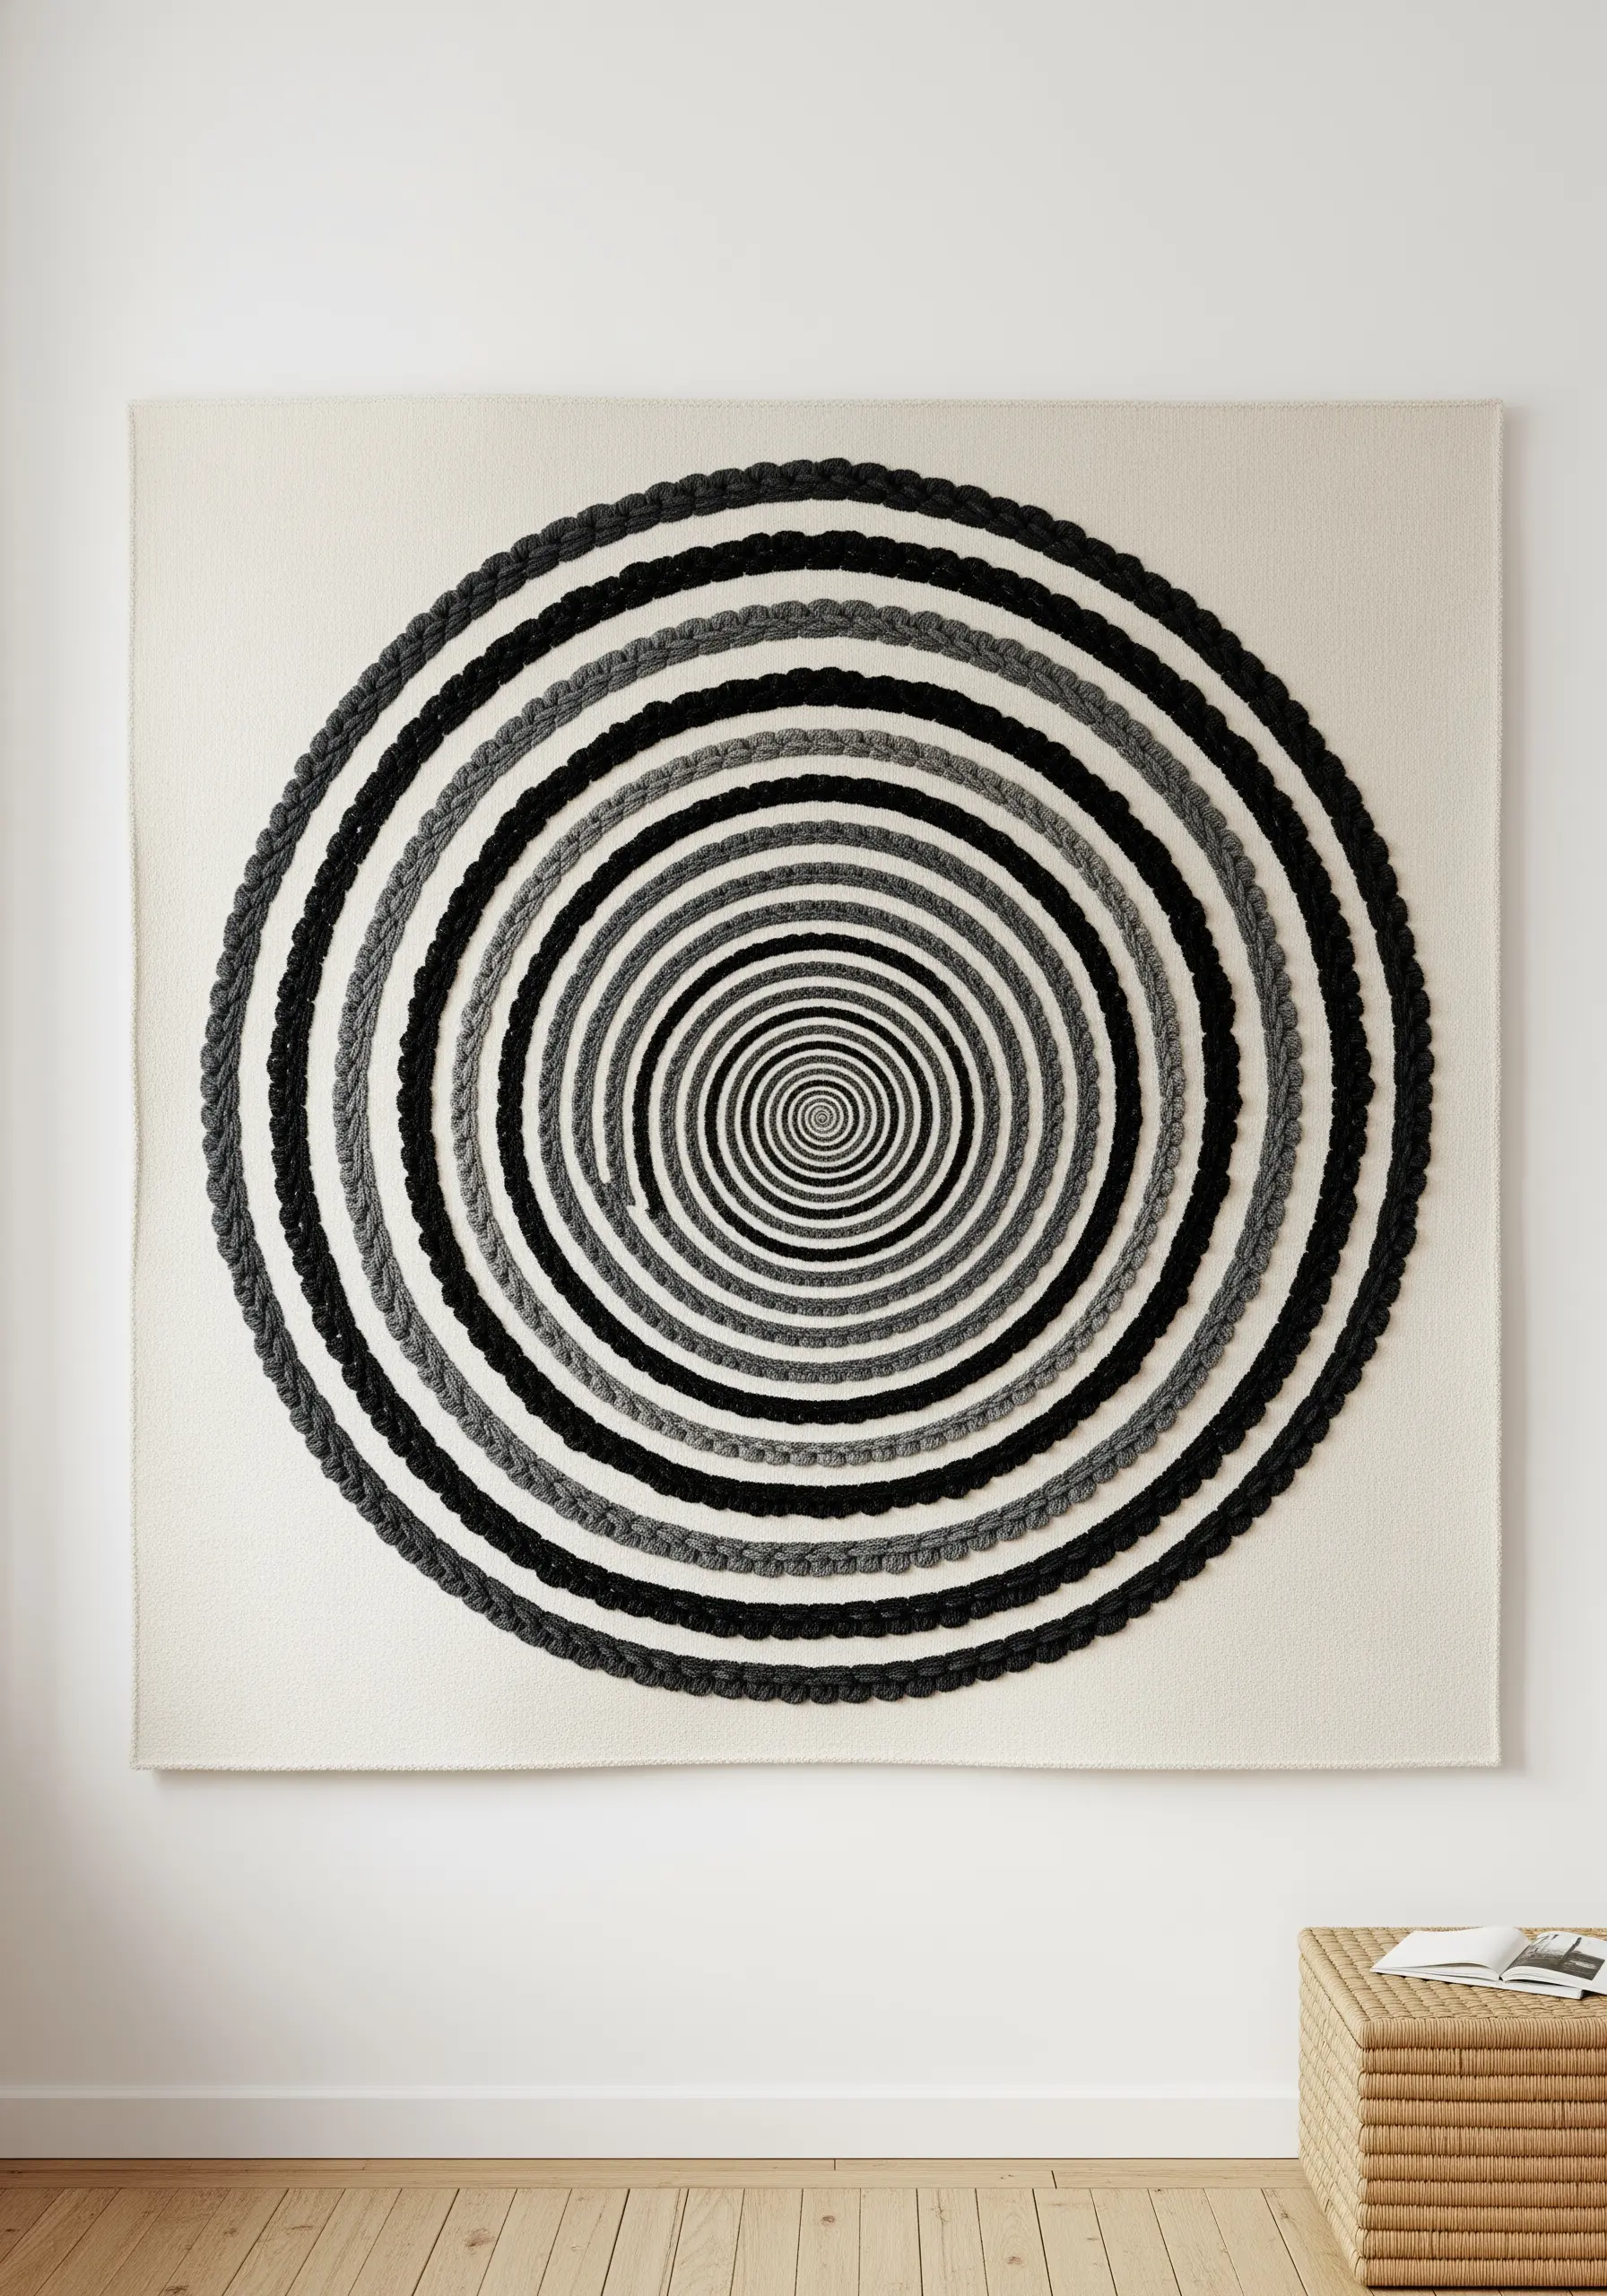
Transform a simple spiral into a powerful focal point by incorporating texture and weight.
Instead of thin floss, use thick yarn or braided cord and couch it onto a heavy canvas backing, laying it down in a continuous spiral.
Alternate between two colors, like black and grey, to create vibrating rings that enhance the hypnotic effect.
This method turns a flat graphic into one of the large-scale embroidery tapestries that commands attention, with the raised texture adding a physical depth that complements the visual illusion.
8. Play with Light and Shadow in Monochrome

Explore the classic checkerboard illusion by adding a diagonal split between positive and negative space.
Use a highly textural stitch, like a raised satin stitch or basketweave stitch, to fill each square. This gives the surface a tactile quality.
For one half, use light grey thread on a white fabric ground. For the other, use a darker grey on a black fabric ground, or fill the alternate squares with black thread.
This stark division tricks the eye, making the two halves feel like separate yet connected dimensions defined by light and shadow.
9. Mimic Flowing Fabric with Curving Satin Stitch

This piece creates the illusion of folded, liquid-like fabric using only vertical lines of satin stitch.
The key is to vary the width of your black and white stripes. Wider white areas appear to bulge forward, while pinched black areas recede into shadow.
To enhance the effect, subtly change the angle of your satin stitches to follow the curve of each fold.
This requires careful planning but results in a stunning sense of movement and dimension, proving that you don’t need complex stitches to create a complex look.
10. Define Geometric Forms with Directional Fill

Create a crisp, tessellated look by filling each geometric segment with satin stitches that run in a single, unified direction.
Outline your design first with a fine backstitch to create clean boundaries for each shape.
Within each section, fill with satin stitches laid perfectly parallel to one another. Alternate the direction of your stitches from one section to the next (e.g., horizontal, vertical, diagonal).
This technique creates subtle shifts in how light reflects off the thread, giving the design a sharp, faceted quality like cut paper or tilework.
11. Create Vibrating Energy with French Knots and Straight Stitches

Combine two simple stitches to generate a powerful sense of radiating energy.
First, fill a central circle with densely packed French knots in a single, bold color like cobalt blue. The knots create a highly textured, active core.
Next, radiate long, straight stitches from the edge of the circle outward, like rays of light. Keep them taut and evenly spaced for a clean, graphic look.
The contrast between the bumpy, chaotic texture of the knots and the smooth, orderly lines of the rays makes the entire design vibrate with energy.
12. Construct 3D Forms with Thread on a Grid
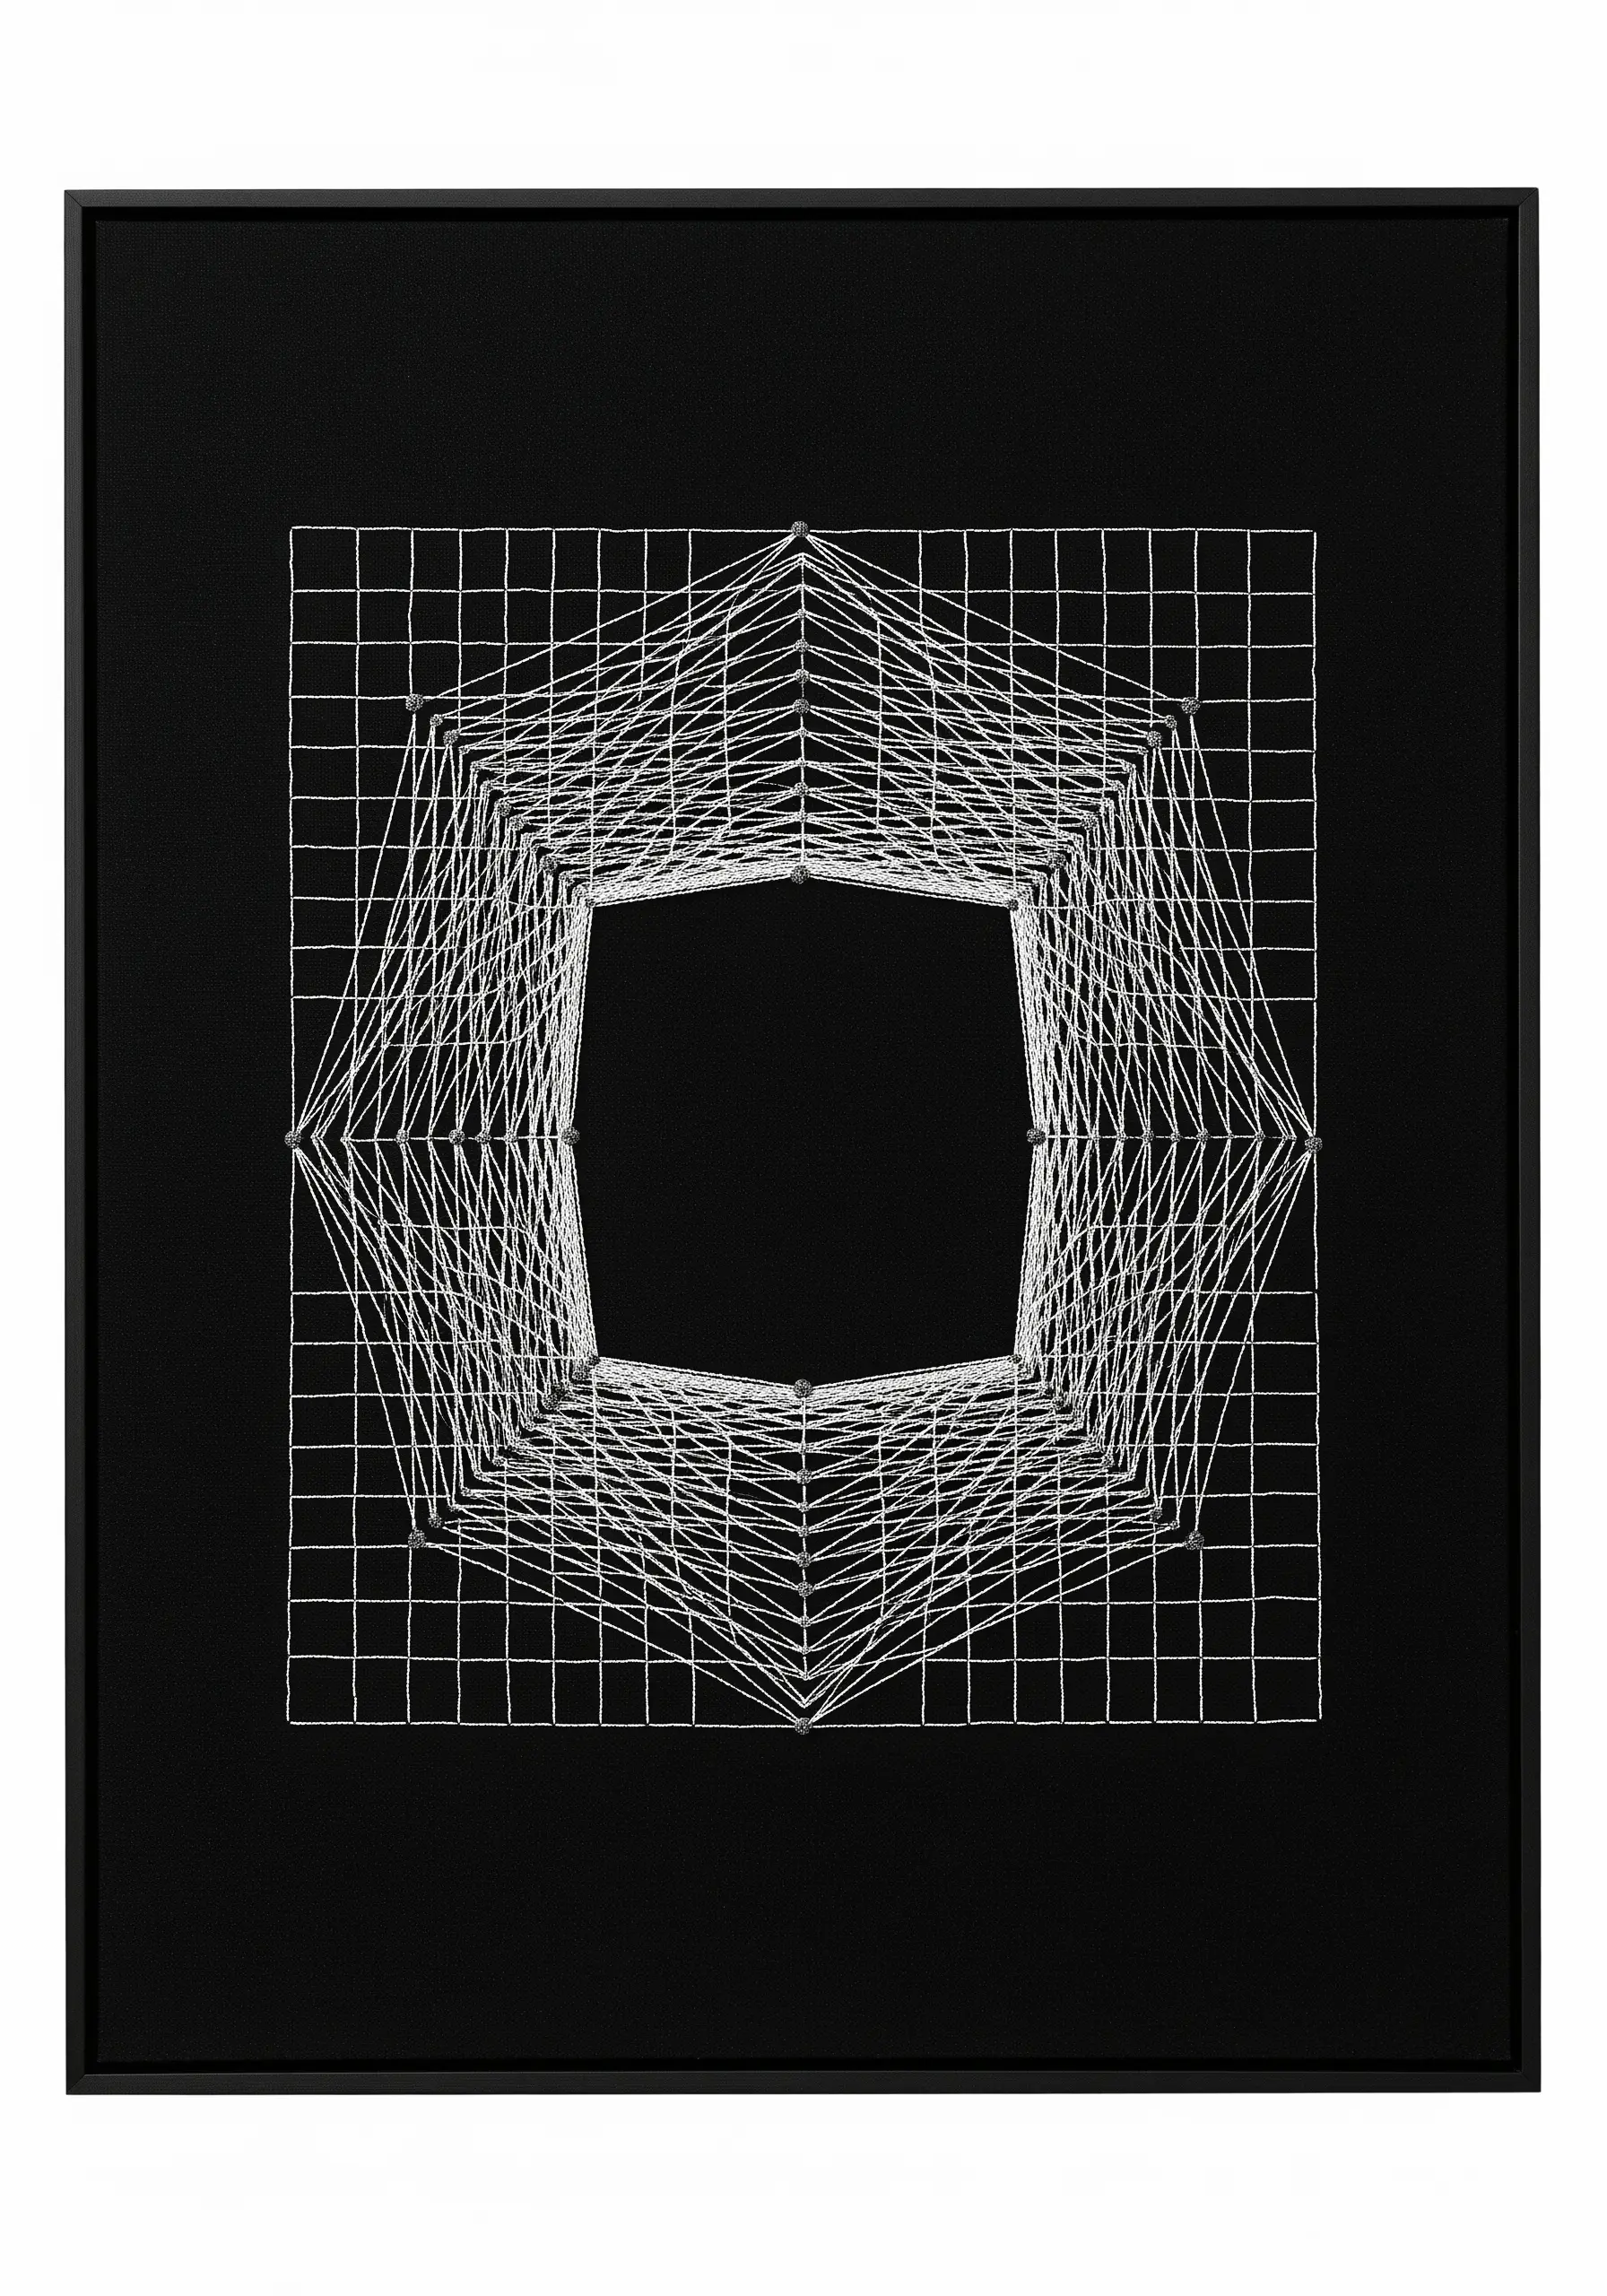
This technique, inspired by string art, uses stretched thread to build geometric forms that appear to float in space.
Create a subtle grid on your fabric with a pencil or single-thread running stitches.
Instead of filling shapes, stitch only from one point on the grid to another, pulling the thread taut. Layering these straight lines creates curved illusions and faceted shapes.
Using a fine, strong thread like a silk or metallic filament against a black background enhances the illusion of a wireframe model suspended in darkness.
13. Weave an Illusion with Laced Stitches

Create a complex, woven look using a foundation of simple straight stitches and a secondary lacing thread.
First, lay down a series of bold, parallel horizontal stripes using a thick red thread.
Then, add diagonal lines with a contrasting grey thread, weaving it over and under the red stripes at each intersection without piercing the fabric.
Finally, use a third thread to create small, securing cross-stitches or ties where the diagonal lines intersect. This adds another layer of detail and secures the floating threads.
14. Build Dimension with Raised Fabric Strips

Move beyond thread to create an illusion of depth with appliquéd fabric strips.
Cut uniform strips of black and white fabric or thick ribbon.
Arrange them in a staggered, brick-like pattern, securing only the ends of each strip with small, invisible stitches.
This allows the center of each strip to lift slightly from the background fabric, creating real shadows and a tangible sense of dimension that changes as the light shifts.
15. Twist Your Threads for a Rope-Like Spiral

Add a tactile dimension to a simple spiral by twisting your threads before you stitch.
Take two or three contrasting colors of floss (like black, white, and grey) and twist them together tightly to form a single, thicker, candy-striped cord.
Use a heavy backstitch or a couching stitch to lay this twisted cord down in a spiral pattern. The pre-twisted colors create a dynamic, rope-like effect with minimal effort.
Alternating these twisted cords with solid-colored rings adds rhythm and enhances the hypnotic, receding illusion.
16. Map Out Isometric Cubes with a Monochromatic Palette

Explore the endless possibilities of the isometric cube by using a single color family to build a complex, city-like structure.
Select four to five shades of blue, from sky blue to deep navy.
Assign the lightest shade to the top-facing planes, medium shades to one side, and the darkest shades to the other. Maintain this rule consistently across the entire design.
This disciplined use of a monochromatic palette creates a cohesive and sophisticated illusion of light and shadow, giving the structure a sense of architectural solidity.
17. Create a 3D Anaglyph Effect with Offset Lines

Mimic the look of vintage 3D glasses by stitching the same design twice in cyan and red, slightly offset from each other.
First, stitch your entire geometric pattern in cyan using a simple backstitch.
Then, stitch the exact same pattern again in red, shifting the placement just a millimeter or two to the side.
Against a black background, this slight misalignment tricks the eye into perceiving depth, creating a vibrating, retro-tech feel that seems to leap off the fabric.
This is one of the most striking modern thread art techniques for digital-age illusions.
18. Weave a Three-Dimensional Basket Illusion

This advanced technique creates an incredible illusion of interwoven, three-dimensional blocks.
The effect is achieved by layering long satin stitches in a specific sequence, using different shades of grey, black, and white to represent light and shadow.
Carefully plan your stitch direction for each small segment to create the appearance of blocks going over and under each other.
Adding a single strand of metallic silver thread to the lighter grey sections adds a subtle highlight that enhances the sense of realism and depth.
19. Render Fractal Geometry with a Single Color

Explore the infinite complexity of fractals, like the Sierpinski triangle, using a single, high-contrast thread color.
Use a fine-tipped transfer pen and a ruler to draw the intricate pattern onto your fabric with precision.
Stitch the design with a simple backstitch or stem stitch using a single strand of neon green floss. The goal is clean, sharp lines, not heavy fill.
The stark contrast of the bright thread against dark fabric allows the mesmerizing, self-repeating pattern of the fractal to take center stage.
20. Stitch a Light Burst with a Neon Palette

Create a dazzling explosion of light and color with strategically placed straight stitches.
Start from a central point and stitch long, straight lines radiating outwards. For a perfect look, ensure all stitches originate from the very same hole in the fabric.
Use a vibrant, neon color palette and arrange the threads randomly to create a chaotic, energetic burst.
Stitching on black fabric is non-negotiable for this design; it provides the deep space from which your colors can explode, making them appear exceptionally bright and dynamic.
21. Use Negative Space to Define Form

This design cleverly uses negative space to create a shape that isn’t actually there.
Instead of stitching the central hexagon, you define its edges by stitching lines that radiate *away* from it.
Draw your central hexagon lightly on the fabric as a guide.
Then, using a bold black thread, stitch straight lines from the corners and edges of the hexagon out to the border of your hoop. The empty space becomes the focal point, appearing brighter and more solid than the stitched area.
22. Deconstruct a Shape to Trick Perception

This is a play on the Jastrow illusion, where two identical shapes appear different due to their placement.
Here, four identical quarter-circle shapes are stitched, but the negative space between them creates a secondary shape—a cross—that competes for your attention.
Fill each segment with dense, curved satin stitch that follows the arc of the shape, which adds a sense of volume.
By separating the components of a circle, you challenge the brain’s ability to complete the form, creating a subtle but engaging visual puzzle.
23. Illustrate an Impossible Waterfall

Recreate M.C. Escher’s famous illusions by combining architectural line work with flowing, textural water stitches.
For the structure, use a simple backstitch in a neutral grey to create a clean, blueprint-like quality.
For the water, use a blend of blue and white threads with long-and-short stitches to create a smooth, gradient flow. Add French knots at the base to simulate splashing water.
The contrast between the rigid, impossible geometry of the aqueduct and the soft, realistic texture of the water is what makes this piece so captivating.
24. Build a Universe with Chaotic Micro-Stitches

Create an image that looks like a nebula or a microscopic world with thousands of tiny, seemingly random stitches.
Use a palette of blues, purples, and teals, and fill your hoop with a dense collage of French knots, bullion knots, seed stitches, and tiny loops.
Vary the size, shape, and color of your stitches constantly to avoid any discernible pattern. The goal is controlled chaos.
This is a masterful exercise in texture, creating a surface so rich and detailed that the eye can wander through it endlessly, discovering new forms each time.
25. Create a Receding Honeycomb Spiral

This illusion uses both size and color to create a powerful sense of a spiraling, receding tunnel.
Begin by stitching the largest hexagons at the outer edge and gradually decrease their size as you move toward the center.
Simultaneously, use a warm color gradient. Start with a deep red or orange for the outermost shapes and transition to a pale yellow for the smallest ones in the middle.
This combination of shrinking scale and a shift from dark/warm to light/cool colors is a classic artistic technique for creating perspective and depth on a flat surface.
26. Master the Illusion of Interlocking Rings

The key to these Borromean rings is a convincing raised stitch and careful planning of the overlaps.
First, outline the rings with a simple backstitch. Then, fill them with a plaited braid stitch or a heavy, raised chain stitch to give them a rope-like, dimensional quality.
Where one ring must pass ‘under’ another, stop your braided stitch just before the intersection and restart it on the other side. This clean break is crucial.
Using a metallic gold thread against black fabric elevates the design, giving it the weight and shine of real, interlinked metal.
27. Paint a Gradient with Long-and-Short Stitch

Achieve a soft, atmospheric gradient that feels more like a painting than embroidery.
This effect is created with the long-and-short stitch, using at least five or six shades of a single color family (here, teal).
Work in vertical bands, starting with your darkest color at the bottom. As you move up, introduce the next lightest shade, ensuring the new stitches interlock seamlessly with the row below them.
The staggered, uneven lengths of the stitches are what allow the colors to blend so smoothly, creating a soft, ethereal transition from dark to light.
28. Embed a Form Within a Patterned Field

Create a subtle illusion where a 3D object appears to emerge from a flat, patterned background.
First, fill your entire fabric with a dense, repeating pattern of tiny symbols using a single color of thread.
Next, superimpose the outline of your main subject—in this case, a cube—over the background pattern.
Finally, fill the cube using the exact same symbols, but manipulate their shading and perspective slightly to create the illusion of three-dimensional planes. The continuity of the pattern tricks the eye into seeing the cube as part of the same surface, yet distinct.
29. Sculpt a 3D Form with Color Patchwork

This dynamic, fluid shape is built with small, irregular patches of satin stitch, similar to a mosaic.
Instead of smooth gradients, you’ll use distinct blocks of color to represent light and shadow on a curved surface.
Draw the warped grid onto your fabric first. Use cool colors like blues and whites for the areas that recede or are in shadow, and warm colors like orange and red for the parts that bulge forward.
By arranging these color ’tiles’ according to the logic of the shape’s curves, you create a vibrant, dimensional form that appears to be bulging out of the frame.


